background image

可信賴平台模組

可信賴平台模組

 (TPM) 

是一種專用的微處理器,其設計

在裝置中內建密碼編譯金鑰,以確保硬體安全。而軟體可使用可信賴平台

模組來驗證硬體裝置。這是因

每個

 TPM 

晶片在生

時,都會燒錄唯一的

 RSA 

祕密金鑰,所以能

執行平台驗證。

警示

:


請勿嘗試將可信賴平台模組

 (TPM) 

從主機板卸下。安裝

 TPM 

後,此模組便會透過密碼編譯繫結至該特定主機板。任何嘗

試卸下已安裝

 TPM 

的動作都會導致密碼編譯繫結中斷,而無法重新安裝或安裝在其他主機板上。

:


現場可更換單元

 (FRU)

。必須由

 Dell 

認證維修技術人員執行卸除和安裝程序。

安裝可信賴平台模組

事前準備作業

警示

:


許多維修僅可由獲得認可的維修技術人員來完成。

只能依照

品說明文件中的授權說明或在線上或電話服務和支援團隊

的指導下,執行故障排除和簡單的維修。由未經

 Dell 

授權的維修造成的損壞不在保固範圍之內。請閱讀並遵循隨

品寄送的安

全指示。

警示

:


請勿嘗試從主機板卸下可信賴平台模組

 (TPM)

。一旦安裝

 TPM

,此模組便會透過密碼編譯繫結至該特定主機板。任何嘗

試卸下已安裝

 TPM 

的動作都會破壞密碼編譯繫結,且此模組無法重新安裝或安裝在其他主機板上。

1.

請遵循「安全指示」一節所列的安全指南。

2.

請遵循「拆裝電腦內部元件之前」一節列出的程序。

步驟

1.

找到主機板上的

 TPM 

連接器。

:


若要找到主機板的

 TPM 

連接器,請參閱「主機板連接器」一節。

2.

 TPM 

上邊緣連接器對齊

 TPM 

連接器上的

槽。

3.

 TPM 

 TPM 

連接器,使塑膠

釘對準主機板上的

槽。

4.

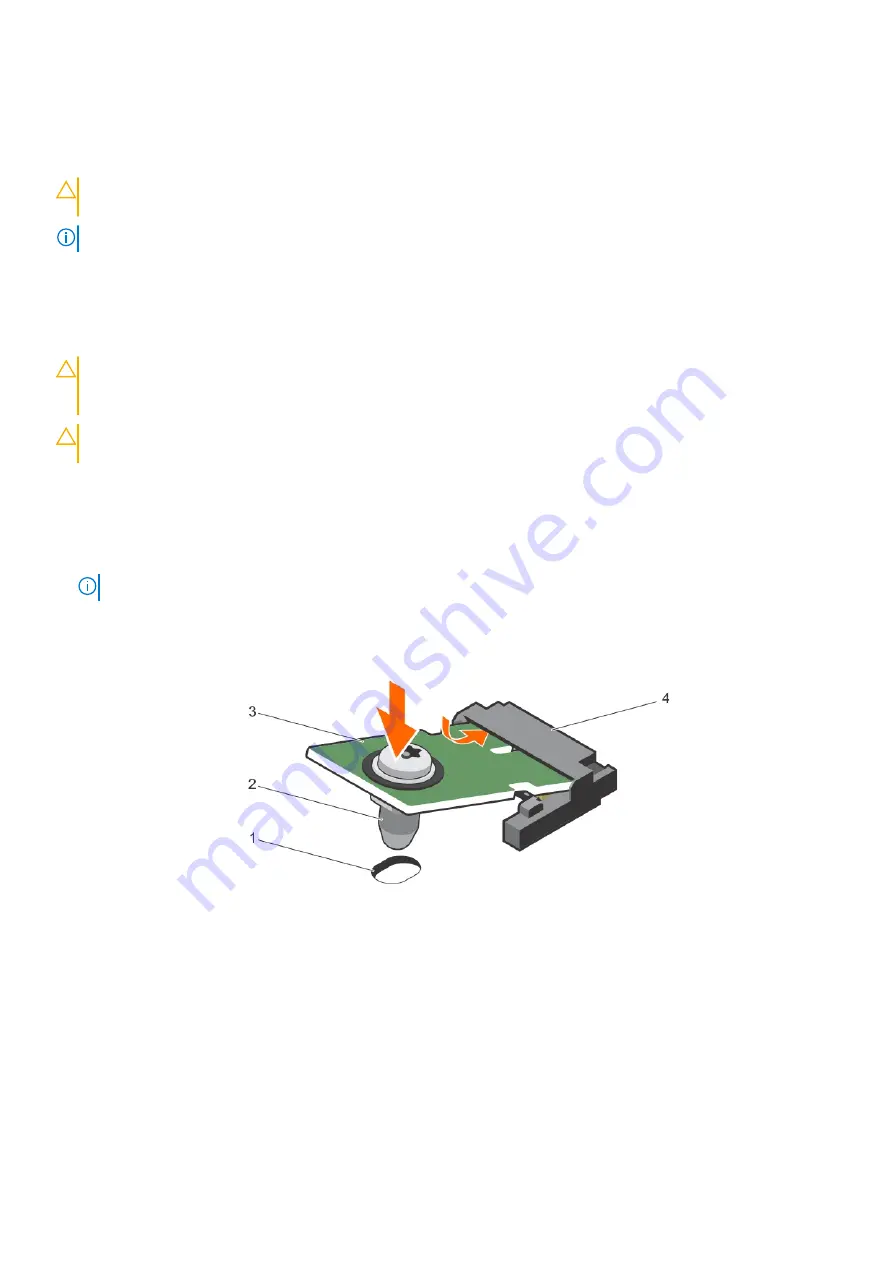
壓下塑膠

釘,直到

釘卡入定位。

60. 

安裝

 TPM

1.

主機板上的

釘槽

2.

塑膠

3. TPM

4. TPM 

連接器

後續步驟

1.

安裝主機板。

2.

請遵循「拆裝系統內部元件之後」一節列出的程序。

相關工作

Before working inside your system
After working inside your system

116

Installing and removing system components

Содержание Storage NX3230

Страница 1: ...Dell Storage NX3230 Systems Owner s Manual ...

Страница 2: ...註 警示與警告 註 註 表示可以幫助您更有效地使用產品的重要資訊 警示 警示 表示有可能會損壞硬體或導致資料遺失 並告訴您如何避免發生此類問題 警告 警告 表示可能的財產損失 人身傷害或死亡 版權所有 2017 Dell Inc 或其子公司 版權所有 翻印必究 Dell EMC 與其他商標均為 Dell Inc 或其子公司的商標 其他商標為 其各自所有者的商標 2017 04 修正版 A01 ...

Страница 3: ...AC IP address 22 Log in to iDRAC 22 遠端管理您的系統 23 Methods to download firmware and drivers 23 5 預裝作業系統管理應用程式 24 管理預裝作業系統應用程式的選項 24 系統設定 24 檢視系統設定 24 系統設定詳細資訊 24 系統 BIOS 25 iDRAC 設定公用程式 41 裝置設定 41 Dell Lifecycle Controller 41 嵌入式系統管理 41 Boot Manager 42 檢視 Boot Manager 42 Boot Manager 主選單 42 PXE 啟動 42 6 Installing and removing system components 43 安全說明 43 Before working inside your system 44 After wor...

Страница 4: ...embly 63 Installing the cooling fan assembly 64 Expansion cards and expansion card riser 65 Expansion card installation guidelines 66 Removing an expansion card from expansion card riser 2 or 3 67 Installing an expansion card into the expansion card riser 2 or 3 69 Removing an expansion card from the expansion card riser 1 70 Installing an expansion card into the expansion card riser 1 71 Removing...

Страница 5: ...1 Hard disk drive backplane 102 Removing HDD backplane 102 Installing HDD backplane 105 Removing the optional HDD backplane back 106 Installing the optional HDD backplane back 107 Control panel 108 Removing the control panel 108 Installing the control panel 109 Removing the I O panel 110 Installing the I O panel 111 System board 112 Removing system board 112 Installing system board 114 可信賴平台模組 116...

Страница 6: ...障排除電源供應器 129 故障排除電源問題 130 電源供應器問題 130 Troubleshooting cooling problems 130 故障排除散熱風扇 131 故障排除 系統 記憶體 131 故障排除內部 USB 鑰匙 132 Troubleshooting an SD card 133 故障排除硬碟 或 SSD 133 Troubleshooting a storage controller 134 故障排除擴充卡 134 故障排除處理器 135 系統訊息 135 Warning messages 136 Diagnostic messages 136 Alert messages 136 10 取得說明 137 與 Dell 公司聯絡 137 Documentation feedback 137 Quick Resource Locator 137 6 目錄 ...

Страница 7: ...t iDRAC if not disabled in F2 iDRAC setup press and hold the button for more than 15 seconds 2 System identification connector Connects the optional system status indicator assembly through the optional cable management arm 3 iDRAC8 Enterprise port Dedicated management port 4 Half height PCIe expansion card slot 3 Allows you to connect up to three half height PCI Express expansion cards 5 Serial c...

Страница 8: ... identification buttons on the front and back panels can be used to locate a particular system within a rack When one of these buttons is pressed the system status indicator on the back flashes until one of the buttons is pressed again Press to toggle the system ID on and off If the system stops responding during POST press and hold the system ID button for more than five seconds to enter BIOS pro...

Страница 9: ...nnector Allows you to connect a VGA display to the system 10 Quick Sync optional 註 By default the Quick Sync option is not available for the Dell Storage NX3230 system Indicates a Quick Sync enabled system The Quick Sync feature is optional and requires a Quick Sync bezel This feature allows management of the system using mobile devices This feature aggregates hardware firmware inventory and vario...

Страница 10: ...ndicator and a status indicator The indicators provide information about the current status of the hard drive The activity LED indicates whether hard drive is currently in use or not The status LED indicates the power condition of the hard drive 圖 3 Hard drive indicators 1 hard drive activity indicator 2 hard drive status indicator 3 hard drive 註 If the hard drive is in the Advanced Host Controlle...

Страница 11: ...hree seconds amber for three seconds and then turns off after six seconds Rebuild stopped iDRAC Direct LED 指示燈代碼 iDRAC Direct LED 指示燈亮起時 表示連接埠已連接 且由 iDRAC 子系統使用中 註 在 USB 模式下使用 USB 連接埠時 iDRAC Direct LED 指示燈不會亮起 1 iDRAC Direct 狀態指示燈 iDRAC Direct LED 指示燈表格說明了使用管理連接埠 USB XML 匯入 設定 iDRAC Direct 時 iDRAC Direct 的活動情形 表 5 iDRAC Direct LED 指示燈 慣例 iDRAC Direct LED 指示 燈顯示方式 狀況 A 綠色 轉為綠色至少兩秒 表示檔案傳輸的開始與結束 B 閃爍...

Страница 12: ...綠色 NIC 以最大連接埠速度連接至有效的網路 1 Gbps 或 10 Gbps C 連結指示燈為琥珀色 NIC 以低於最大連接埠速度連接至有效的網路 D 活動指示燈呈綠色閃爍 正在傳送或接收網路資料 Power supply unit indicator codes AC power supply units PSUs have an illuminated translucent handle that serves as an indicator and DC PSUs have an LED that serves as an indicator The indicator shows whether power is present or a power fault has occurred 12 About your system ...

Страница 13: ...rations of Dell PowerEdge servers can result in a PSU mismatch condition or failure to turn the system on D Flashing amber Indicates a problem with the PSU 警示 When correcting a PSU mismatch replace only the PSU with the flashing indicator Swapping the PSU to make a matched pair can result in an error condition and unexpected system shutdown To change from a high output configuration to a low outpu...

Страница 14: ...ndicator Swapping the PSU to make a matched pair can result in an error condition and unexpected system shutdown To change from a High Output configuration to a Low Output configuration or vice versa you must turn off the system 警示 AC PSU support both 220 V and 110 V input voltages with the exception of Titanium PSU which support only 220 V When two identical PSU receive different input voltages t...

Страница 15: ... Windows Storage Server 2016 故障排除指南 www dell com storagemanuals 管理您的系統 如需有關 Dell OpenManage 系統管理功能的資 訊 請參閱 Dell OpenManage 系統管理概觀指 南 www dell com openmanagemanuals OpenManage Essentials 如需有關設定 使用及故障排除 OpenManage 的 資訊 請參閱 Dell OpenManage Server Administrator 使用者指南 www dell com openmanagemanuals OpenManage Server Administrator 如需有關安裝 使用及故障排除 Dell OpenManage Essentials 的資訊 請參閱 Dell OpenManage Essenti...

Страница 16: ...閱儲存控 制器的說明文件 www dell com storagecontrollermanuals 瞭解事件與錯誤訊息 如需瞭解如何查看由監視系統元件的系統韌體和 代理程式所產生之事件與錯誤訊息 請參閱 Event and Error Message Reference Guide for 14th Generation Dell EMC PowerEdge Servers 第 14 代 Dell EMC PowerEdge 伺服器的事件與錯誤 訊息參考指南 www dell com openmanagemanuals OpenManage Software OpenManage 軟體 16 說明文件資源 ...

Страница 17: ...0 Hz for 750 W Titanium power supply 表 12 Expansion bus specification Expansion Bus Bus type PCI Express Generation 3 Expansion cards For a list of supported expansion cards see the Expansion cards and expansion card risers section in this document Expansion slots using riser card Riser 1 Slot 1 One half height low profile x8 link Slot 2 One half height low profile x8 link Slot 3 One half height l...

Страница 18: ...slots 0 11 and 12 13 表 15 Connector specification Connectors Back NIC Four 1 Gbps two 1 Gbps plus two 10 Gbps or four 10 Gbps Serial 9 pin DTE 16550 compatible USB Two 4 pin USB 3 0 compliant Video 15 pin VGA External vFlash card One flash memory card slot with iDRAC8 Enterprise card 註 The card slot is available for use only if the iDRAC8 Enterprise license is installed on your system Front USB On...

Страница 19: ...h 29 C 84 2 F maximum dew point 註 Outside the standard operating temperature 10 C 35 C the system can operate down to 5 C or up to 45 C for a maximum of 1 of its annual operating hours For temperatures between 40 C 45 C derate maximum allowable dry bulb temperature by 1 C per 125 m above 950 m 1 F per 228 ft Expanded Operating Temperature Restrictions Do not perform a cold startup below 5 C The op...

Страница 20: ... ft above 950 m 3 117 ft 35 C 40 C 95 F 104 F Maximum temperature is reduced by 1 C 175 m 1 F 319 ft above 950 m 3 117 ft 40 C 45 C 104 F 113 F Maximum temperature is reduced by 1 C 125 m 1 F 228 ft above 950 m 3 117 ft Particulate contamination 註 This section defines the limits to help avoid IT equipment damage and or failure from particulates and gaseous contamination If it is determined that le...

Страница 21: ...liquescent point less than 60 relative humidity Gaseous contamination 註 Maximum corrosive contaminant levels measured at 50 relative humidity Copper coupon corrosion rate 300 Å month per Class G1 as defined by ANSI ISA71 04 1985 Silver coupon corrosion rate 200 Å month as defined by AHSRAE TC9 9 相關參考 Expansion cards and expansion card riser Technical specifications 21 ...

Страница 22: ...om openmanagemanuals Dell Lifecycle Controller See Dell Lifecycle Controller User s Guide at Dell com idracmanuals Chassis or Server LCD panel See the LCD panel section You must use the default iDRAC IP address 192 168 0 120 to configure the initial network settings including setting up DHCP or a static IP for iDRAC 註 To access iDRAC ensure that you install the iDRAC port card or connect the netwo...

Страница 23: ...ll OpenManage Server Administrator OMSA 軟體和 OpenManage Essentials OME 系統管理控制台 自遠端監 控及管理伺服器 如需更多資訊 請參閱 Dell com openmanagemanuals OpenManage Server Administrator 或 Dell com openmanagemanuals OpenManage Essentials Methods to download firmware and drivers You can download the firmware and drivers from the Dell Support site available at Dell com DHMSmanuals 初始系統設定與組態 23 ...

Страница 24: ...若要檢視 系統設定 畫面 請執行下列步驟 步驟 1 開啟或重新啟動您的系統 2 在看到以下訊息時 立即按下 F2 F2 System Setup 註 如果在您按下 F2 之前 作業系統便已開始載入 請等候系統完成開機 然後再重新啟動系統並重試 系統設定詳細資訊 System Setup Main Menu 系統設定主選單 畫面的詳細資料 說明如下 選項 說明 系統 BIOS 可讓您進行 BIOS 設定 iDRAC Settings 可讓您進行 iDRAC 設定 iDRAC 設定公用程式是使用 UEFI 整合可延伸韌體介面 來設定及配置 iDRAC 參數的介面 您可以使用 iDRAC 設定公用程式來啟用或停用各種 iDRAC 參數 如需此公用程式的詳細資訊 請參閱 Integrated Dell Remote Access Controller User s Guide Integrated...

Страница 25: ...y Settings 指定與已安裝記憶體相關的資訊及選項 Processor Settings 指定與處理器相關的資訊和選項 例如速度 快取記憶體大小等 SATA Settings 指定啟用或停用內建 SATA 控制器和連接埠的選項 Boot Settings 可指定用來指定開機模式 BIOS 或 UEFI 的選項 可讓您修改 UEFI 和 BIOS 開機設定 網路設定 指定變更網路設定的選項 Integrated Devices 網路設定管理整合裝置控制器與連接埠的選項 並指定相關的功能及選項 Serial Communication 網路設定管理序列埠的選項 並指定相關功能及選項 System Profile Settings 指定變更處理器電源管理設定 記憶體頻率等的選項 System Security 可指定設定系統安全性設定的選項 例如系統密碼 設定密碼 可信賴平台模組 TPM ...

Страница 26: ...註 開機模式是 UEFI 時 這個選項才會啟用 Choosing the system boot mode System Setup enables you to specify one of the following boot modes for installing your operating system BIOS boot mode the default is the standard BIOS level boot interface Unified Extensible Firmware Interface UEFI the default boot mode is an enhanced 64 bit boot interface If you have configured your system to boot to UEFI mode it replaces th...

Страница 27: ...一下 System BIOS 系統 BIOS 4 在 系統 BIOS 畫面上 按一下 網路設定 網路設定畫面的詳細資料 以下說明 Network Settings 網路設定 畫面的詳細資訊 關於此工作 選項 說明 PXE Device n n 1 至 4 啟用或停用裝置 啟用時 系統會為裝置建立 UEFI 開機選項 PXE Device n Settings n 1 至 4 可讓您控制 PXE 裝置的組態 UEFI iSCSI Settings 您可以使用 iSCSI Settings iSCSI 設定 畫面來修改 iSCSI 裝置設定 iSCSI Settings ISCSI 設定 選項僅適用於 UEFI 開機模式 BIOS 無法在 BIOS 開機模式中控制網路設定 如果是 BIOS 開機模式 則由網路控制器的選項 ROM 管理網路設定 檢視 UEFI iSCSI 設定 若要檢視 UEF...

Страница 28: ... 來執行加密和解密 以提高應用程式的速度 此選項預設為 已啟用 系統密碼 設定系統密碼 此選項預設為 已啟用 如果系統未安裝密碼跳線 此選項將為唯讀 Setup Password 設定設定密碼 如果系統未安裝密碼跳線 此選項將為唯讀 Password Status 鎖定系統密碼 此選項預設為 已解除鎖定 TPM Security 註 只有當 TPM 模組已安裝時 才能使用 TPM 功能表 可讓您控制 TPM 的報告模式 TPM 安全性 選項預設為 關閉 如果 TPM Status 欄位設為 On with Pre boot Measurements 或 On without Pre boot Measurements 您便只能修改 TPM Status TPM Activation 和 Intel TXT 欄位 TPM Information 變更 TPM 的作業狀態 此選項預設為 無變更...

Страница 29: ...ot Policy 安全啟動原則 設為 Custom 自訂 時 顯示 Secure Boot Custom Policy Settings 啟動安全自訂原則設 定 檢視安全開機自訂原則設定 若要檢視 Secure Boot Custom Policy Settings 畫面 請執行下列步驟 步驟 1 開啟或重新啟動您的系統 2 在看到以下訊息時 立即按下 F2 F2 System Setup 註 如果在您按下 F2 之前 作業系統便已開始載入 請等候系統完成開機 然後再重新啟動系統並重試 3 在 系統設定主選單 畫面上 按一下 系統 BIOS 4 在 系統 BIOS 畫面上 按一下 系統安全性 5 在 System Security 畫面上 按一下 Secure Boot Custom Policy Settings 安全啟動自訂原則設定詳細資訊 以下說明 Secure Boot Cust...

Страница 30: ...system password and press Enter 後續步驟 When Password Status is set to Locked type the system password and press Enter when prompted at reboot 註 If an incorrect system password is typed the system displays a message and prompts you to reenter your password You have three attempts to type the correct password After the third unsuccessful attempt the system displays an error message that the system has...

Страница 31: ...項鎖定時 您 可以指派系統密碼 如需更多資訊 請參閱 系統安全性設定 一節 您無法停用或變更現有的系統密碼 註 您可以使用密碼狀態選項來保護系統密碼 以防止未經授權的變更 相關工作 系統安全性設定詳細資訊 系統資訊 您可使用系統資訊畫面來檢視系統屬性 例如服務標籤 系統型號和 BIOS 版本 檢視系統資訊 若要檢視 系統資訊 畫面 請執行下列步驟 步驟 1 開啟或重新啟動您的系統 2 在看到以下訊息時 立即按下 F2 F2 System Setup 註 如果在您按下 F2 之前 作業系統便已開始載入 請等候系統完成開機 然後再重新啟動系統並重試 3 在 System Setup Main Menu 系統設定主選單 畫面上 按一下 System BIOS 系統 BIOS 4 在 系統 BIOS 畫面上 按一下 系統資訊 系統資訊詳細資料 關於此工作 以下說明 System Informati...

Страница 32: ...BIOS 系統 BIOS 4 在 System BIOS 系統 BIOS 畫面上 按一下 Memory Settings 記憶體設定 記憶體設定詳細資訊 關於此工作 以下說明 Memory Settings 記憶體設定 畫面的詳細資訊 選項 說明 System Memory Size 可指定系統中的記憶體大小 System Memory Type 可指定系統中安裝的記憶體類型 System Memory Speed 可指定系統記憶體速度 System Memory Voltage 可指定系統記憶體電壓 影像記憶體 指定視訊記憶體量 System Memory Testing 可指定在系統開機期間是否執行系統記憶體測試 選項包括 Enabled 啟用 和 Disabled 停用 此選項預設 為 已停用 Memory Operating Mode 可指定記憶體作業模式 可用選項包括 Optim...

Страница 33: ...按一下 System BIOS 系統 BIOS 4 在 系統 BIOS 畫面上 按一下 處理器設定 處理器設定詳細資訊 關於此工作 以下說明 Processor Settings 處理器設定 畫面的詳細資訊 選項 說明 Logical Processor 啟用或停用邏輯處理器 並顯示邏輯處理器數量 如果此選項設為 Enabled 啟用 則 BIOS 會顯示所有邏輯 處理器 如果此選項設為 Disabled 停用 則 BIOS 會針對每個核心僅顯示一個邏輯處理器 此選項預設為 已啟用 QPI Speed 讓您控制 QuickPath Interconnect 資料速率設定 Alternate RTID Requestor Transaction ID Setting 修改 Requestor Transaction ID Requestor Transaction ID 屬於 QPI 資源 ...

Страница 34: ...有四個處理器清單 Number of Cores per Processor 控制每個處理器中啟用的核心數目 此選項預設為 All 全部 Processor 64 bit Support 指定處理器是否支援 64 位元延伸 Processor Core Speed 指定處理器最大核心頻率 處理器 1 註 根據 CPU 的數量 最多可能列出四顆處理器 系統會針對其中安裝的每顆處理器顯示下列設定 選項 說明 Family Model Stepping 按照 Intel 的定義 指定處理器的系列 型號和步進 Brand 指定品牌名稱 Level 2 Cache 指定 L2 快取記憶體總大小 Level 3 Cache 指定 L3 快取記憶體總大小 Number of Cores 指定每個處理器的核心數目 SATA Settings 您可以使用 SATA Settings SATA 設定 畫面來檢...

Страница 35: ... BIOS 支援 將其設定為 關閉 即可關閉 BIOS 支援 在 AHCI 或 RAID 模式中 BIOS 支援永遠都會啟用 選項 說明 Model 指定選取裝置的磁碟機機型 Drive Type 指定連接 SATA 連接埠的磁碟機類型 容量 指定硬碟機總容量 對於卸除式媒體裝置 例如光碟機 並不會定義此欄位 Port C 可設定所選裝置的磁碟機類型 如果是 ATA 模式的 Embedded SATA settings 嵌入式 SATA 設定 則將此 欄位設為 Auto 自動 以啟用 BIOS 支援 將其設定為 關閉 即可關閉 BIOS 支援 在 AHCI 或 RAID 模式中 BIOS 支援永遠都會啟用 選項 說明 Model 指定選取裝置的磁碟機機型 Drive Type 指定連接 SATA 連接埠的磁碟機類型 容量 指定硬碟機總容量 對於卸除式媒體裝置 例如光碟機 並不會定義此欄位 ...

Страница 36: ...式媒體裝置 例如光碟機 並不會定義此欄位 Port H 可設定所選裝置的磁碟機類型 如果是 ATA 模式的 Embedded SATA settings 嵌入式 SATA 設定 則將此 欄位設為 Auto 自動 以啟用 BIOS 支援 將其設定為 關閉 即可關閉 BIOS 支援 在 AHCI 或 RAID 模式中 BIOS 支援永遠都會啟用 選項 說明 Model 指定選取裝置的磁碟機機型 Drive Type 指定連接 SATA 連接埠的磁碟機類型 容量 指定硬碟機總容量 對於卸除式媒體裝置 例如光碟機 並不會定義此欄位 Port I 可設定所選裝置的磁碟機類型 如果是 ATA 模式的 Embedded SATA settings 嵌入式 SATA 設定 則將此 欄位設為 Auto 自動 以啟用 BIOS 支援 將其設定為 關閉 即可關閉 BIOS 支援 在 AHCI 或 RAID 模式...

Страница 37: ...SB Port 啟用或停用內部 USB 連接埠 此選項預設為 已啟用 整合式 RAID 控制 器 啟用或停用內建 RAID 控制器 此選項預設為 已啟用 Integrated Network Card 1 啟用或停用內建的網路卡 嵌入式 NIC1 和 NIC2 註 嵌入式 NIC1 和 NIC2 選項僅在沒有 Integrated Network Card 1 內建網路卡 1 的系統可用 啟用或停用內嵌 NIC1 和 NIC2 選項 若設為 Disabled 停用 則可能仍可透過內嵌管理控制器 取得共用網 路存取的 NIC 僅沒有網路子卡 NDC 的系統可使用內嵌 NIC1 和 NIC2 選項 內嵌 NIC1 和 NIC2 選項與內建 網路卡 1 選項會互斥 請使用系統的 NIC 管理公用程式來設定內嵌 NIC1 和 NIC2 選項 I OAT DMA Engine 啟用或停用 I OAT...

Страница 38: ...項預設為 Auto 自動 Serial Port Address 可讓您設定序列裝置的連接埠位址 此選項預設為 Serial Device 1 COM2 Serial Device 2 COM1 註 只有 Serial Device 2 序列裝置 2 才能用於 Serial Over LAN SOL 功能 若要使用 SOL 主控台重 新導向 請對主控台重新導向和序列裝置設定相同的連接埠位址 註 每次系統開機時 BIOS 會與儲存在 iDRAC 的序列 MUX 設定同步 您可在 iDRAC 中單獨變更序列 MUX 設定 從 BIOS 設定公用程式載入 BIOS 預設設定 不一定都能將序列 MUX 設定還原成序列裝置 1 的預設設定 External Serial Connector 使用此選項可讓您將外接式序列連接器與 Serial Device 1 序列裝置 1 Serial Device...

Страница 39: ... 註 System Profile 系統設定檔 選項設為 Custom 自訂 時 才能獲得系統設定檔設定畫面的所有參 數 CPU Power Management 設定 CPU 電源管理 此選項預設為 System DBPM DAPC DBPM 是 Demand Based Power Management 按照要求而運作的電源管理 Memory Frequency 記憶 體頻率 設定系統記憶體的速度 您可以選擇 Maximum Performance 最大效能 Maximum Reliability 最大可 靠性 或特定速度 Turbo Boost 啟用或停用處理器 以渦輪加速模式運作 這個選項預設為 Enabled 已啟用 Energy Efficient Turbo 啟用或停用 Energy Efficient Turbo 能源效率渦輪 選項 Energy Efficient Tur...

Страница 40: ...會影響系統電源或效能 Miscellaneous Settings 您可以使用 Miscellaneous Settings 其他設定 畫面來執行特定功能 例如更新資產標籤 以及變更系統日期和時間 檢視其他設定 若要檢視 其他設定 畫面 請執行下列步驟 步驟 1 開啟或重新啟動您的系統 2 在看到以下訊息時 立即按下 F2 F2 System Setup 註 如果在您按下 F2 之前 作業系統便已開始載入 請等候系統完成開機 然後再重新啟動系統並重試 3 在 System Setup Main Menu 系統設定主選單 畫面上 按一下 System BIOS 系統 BIOS 4 在 系統 BIOS 畫面中 按一下 其他設定 其他設定詳細資訊 關於此工作 以下說明 Miscellaneous Settings 其他設定 畫面的詳細資訊 選項 說明 系統時間 可讓您設定系統的時間 系統日期 可...

Страница 41: ...多資訊 請參閱 Dell Integrated Dell Remote Access Controller 使用者指南 網址是 Dell com idracmanuals 輸入 iDRAC 設定公用程式 步驟 1 開啟或重新啟動管理系統 2 在開機自我測試 POST 期間按 F2 鍵 3 在 System Setup Main Menu 系統設定主選單 頁面上 按一下 iDRAC 設定 會顯示 iDRAC Settings iDRAC 設定 畫面 變更溫度設定 iDRAC 設定公用程式可讓您選取及自訂您系統的溫度控制設定 1 請按一下 iDRAC 設定 散熱 2 在系統溫度設定檔 散熱設定檔 選擇下列其中一個選項 預設溫度設定檔設定 最大效能 效能最佳化 最小功率 每瓦效能最佳化 3 在 USER COOLING OPTIONS 使用者冷卻選項 設定 Fan Speed Offset 風扇...

Страница 42: ... Boot Manager 主選單 功能表項目 說明 繼續正常開機 系統會從開機順序的第一個項目開始嘗試啟動到裝置 如果開機嘗試失敗 系統會繼續嘗試開機順序的下個 項目 直到開機成功或找不到任何開機選項為止 單次啟動選單 讓您存取開機功能表 您可以在其中選取用於開機的單次開機裝置 啟動系統設定 可讓您使用系統設定 啟動 Lifecycle Controller 退出開機管理員 並叫出 Dell Lifecycle Controller 程式 系統公用程式 可讓您啟動系統公用程式選單 例如 System Diagnostics 和 UEFI shell 單次 BIOS 開機選單 One shot BIOS boot menu 可讓您選取開機用的開機裝置 系統公用程式 System Utilities 系統公用程式 包含下列可啟動的公用程式 啟動診斷程式 BIOS Update File Ex...

Страница 43: ...pansion card riser SD vFlash card optional Integrated storage controller card Network daughter card 處理器和散熱器 PCIe card holder Cable retention bracket Power supply units 系統電池 Hard disk drive backplane Control panel System board 可信賴平台模組 安全說明 註 需要抬起系統時 請尋求他人的協助 為避免受傷 請勿嘗試靠自己一人抬起系統 警告 在系統開機時打開或卸下系統機箱蓋 可能會使您暴露在觸電風險之中 警示 在沒有機箱蓋的情況下 請勿操作系統超過五分鐘 警示 許多維修僅可由獲得認可的維修技術人員來完成 您只能依照產品說明文件中的授權說明或在線上或電話服務和支援團隊 的指導下...

Страница 44: ...sted in the Safety instructions section 步驟 1 Install the system cover 2 If applicable install the system into the rack For more information see the Rack Installation placemat at Dell com poweredgemanuals 3 If removed install the front bezel 4 Reconnect the peripherals and connect the system to the electrical outlet 5 Turn on the system including any attached peripherals 相關參考 安全說明 建議的工具 您需要下列工具來進行卸...

Страница 45: ...ront bezel a bezel lock b front bezel 相關參考 安全說明 Installing the optional front bezel 事前準備作業 Follow the safety guidelines listed in the Safety instructions section 步驟 1 Locate and remove the bezel key 註 The bezel key is attached to the back of the bezel 2 Hook the right end of the bezel onto the chassis 3 Fit the free end of the bezel onto the system 4 Lock the bezel by using the key 相關參考 安全說明 Insta...

Страница 46: ...y vary depending on the configuration of your system 3 Hold the cover on both sides and lift the cover away from the system 後續步驟 1 Install the system cover 相關參考 安全說明 安裝系統機箱蓋 事前準備作業 1 請遵循 安全指示 一節列出的安全指南 2 請遵循 拆裝電腦內部元件之前 一節列出的程序 3 確定所有內部纜線已連接 並移置以清出空間 且未將任何工具或多餘的零件遺留在系統內部 步驟 1 將系統機箱蓋上的插槽與機箱上的彈片對齊 2 將系統機箱蓋閂鎖向下推 系統機箱蓋往前滑動且系統機箱蓋上的插槽與機箱上的彈片接合 當系統機箱蓋完全與機箱上的彈片接合時 系統機箱蓋閂鎖卡 入到位 3 以順時針方向將鎖定釋放閂鎖轉動至鎖定位置 後續步驟 1...

Страница 47: ... 6 vFlash media slot 7 HDD 2 back 8 power supply unit 2 9 expansion card riser 3 10 network daughter card 11 expansion card riser 2 12 expansion card riser 1 13 HDD backplane Cooling shroud The cooling shroud aerodynamically directs the airflow across the entire system The airflow passes through all the critical parts of the system where the vacuum pulls air across the entire surface area of the h...

Страница 48: ...團隊 的指導下 執行故障排除和簡單的維修 由未經 Dell 授權的維修造成的損壞不在保固範圍之內 請閱讀並遵循隨產品寄送的安 全指示 1 Follow the safety guidelines listed in the Safety instructions section 2 Follow the procedure listed in the Before working inside your system section 3 If applicable route the cables inside the system along the chassis wall and secure the cables by using the cable securing bracket 步驟 1 Align the tabs on the cooling shroud with th...

Страница 49: ...1 Slots A4 A8 and A12 Processor 2 Slots B1 B5 and B9 Slots B2 B6 and B10 Slots B3 B7 and B11 Slots B4 B8 and B12 The following table shows the memory populations and operating frequencies for the supported configurations 表 21 Memory population DIMM Type DIMMs Populated Channel Voltage Operating Frequency in MT s Maximum DIMM Rank Channel RDIMM 1 1 2 V 2400 2133 1866 Dual rank or single rank 2 2400...

Страница 50: ... configurations that follow the appropriate memory guidelines 註 1R 2R and 4R in the following tables indicate single dual and quad rank DIMMs respectively 表 22 Memory configurations single processor System capacity in GB DIMM size in GB Number of DIMMs DIMM rank organization and frequency DIMM slot population 4 4 1 1R x8 2400 MT s 1R x8 2133 MT s A1 8 4 2 1R x8 2400 MT s 1R x8 2133 MT s A1 A2 16 4...

Страница 51: ... A3 A4 B1 B2 B3 B4 96 4 24 1R x8 1866 MT s A1 A2 A3 A4 A5 A6 A7 A8 A9 A10 A11 A12 B1 B2 B3 B4 B5 B6 B7 B8 B9 B10 B11 B12 8 12 1R x8 2400 MT s 1R x8 2133 MT s A1 A2 A3 A4 A5 A6 B1 B2 B3 B4 B5 B6 128 8 16 1R x8 2400 MT s 1R x8 2133 MT s A1 A2 A3 A4 A5 A6 A7 A8 B1 B2 B3 B4 B5 B6 B7 B8 16 8 2R x8 2400 MT s 2R x8 2133 MT s A1 A2 A3 A4 B1 B2 B3 B4 160 8 20 1R x8 1866 MT s A1 A2 A3 A4 A5 A6 A7 A8 A9 A11 ...

Страница 52: ... B3 B4 B5 B6 B7 B8 16 GB DIMMs must be installed in slots numbered A1 A2 A3 A4 B1 B2 B3 and B4 and 8 GB DIMMs must be installed in slots A5 A6 B5 and B6 卸下記憶體模組 事前準備作業 警示 許多維修僅可由獲得認可的維修技術人員來完成 您只能依照產品說明文件中的授權說明或在線上或電話服務和支援團隊 的指導下 執行故障排除和簡單的維修 由未經 Dell 授權的維修造成的損壞不在保固範圍之內 請閱讀並遵循隨產品寄送的安 全指示 1 請遵循 安全指示 一節所列的安全指南 2 請遵循 拆裝電腦內部元件之前 一節列出的程序 3 卸下散熱護罩 註 即使系統已關機經過一段時間 但記憶體模組有時溫度仍可能很高 因此不該觸碰 請待記憶體模組冷卻後 再進行後續處...

Страница 53: ...orking inside your system 相關參考 安全說明 安裝記憶體模組 事前準備作業 註 即使系統已關機經過一段時間 但記憶體模組有時溫度仍可能很高 因此不該觸碰 請待記憶體模組冷卻後 再進行後續處 理 請從邊緣拿起記憶體模組 避免碰到記憶體模組上的元件或金屬接點 警示 許多維修僅可由獲得認可的維修技術人員來完成 您只能依照產品說明文件中的授權說明或在線上或電話服務和支援團隊 的指導下 執行故障排除和簡單的維修 由未經 Dell 授權的維修造成的損壞不在保固範圍之內 請閱讀並遵循隨產品寄送的安 全指示 1 請遵循 安全指示 一節所列的安全指南 2 請遵循 拆裝電腦內部元件之前 一節列出的程序 步驟 1 找到適當的記憶體模組插槽 Installing and removing system components 53 ...

Страница 54: ...值不正確 則一或多個記憶體模組可能並未正確安裝 請確定記憶體模組均已穩固裝入記憶體模組插槽 4 在系統診斷程式中執行系統記憶體測試 相關工作 Before working inside your system After working inside your system 相關參考 安全說明 Hard drives Your system supports entry hard drives and enterprise class hard drives Entry hard drives are designed for 5x8 operating environment with less workload rating to drives and enterprise class drives are designed for 24x7 operating environment...

Страница 55: ...e failure Use only hard drives that have been tested and approved for use with the hard drive backplane When you format a hard drive allow enough time for the formatting to be complete Be aware that high capacity hard drives can take a long time to format Removing a 3 5 inch hard drive blank 事前準備作業 警示 Many repairs may only be done by a certified service technician You should only perform troublesh...

Страница 56: ...ly be done by a certified service technician You should only perform troubleshooting and simple repairs as authorized in your product documentation or as directed by the online or telephone service and support team Damage due to servicing that is not authorized by Dell is not covered by your warranty Read and follow the safety instructions that came with the product 警示 To maintain proper system co...

Страница 57: ...fety guidelines listed in the Safety instructions section 步驟 Insert the hard drive blank into the hard drive slot until it clicks into place 圖 14 Installing a 2 5 inch hard drive blank rear 後續步驟 Follow the procedure listed in the After working inside your system section 相關工作 After working inside your system 相關參考 安全說明 Installing and removing system components 57 ...

Страница 58: ...l If the hard drive is online the green activity or fault indicator flashes while the drive is turning off When the hard drive indicators are off the hard drive is ready for removal For more information see the documentation for the storage controller 警示 為避免資料遺失 請確定您的作業系統支援熱插拔磁碟機安裝 請參閱作業系統隨附的說明文件 步驟 1 Press the release button to open the hard drive or SSD carrier release handle 2 Slide the hard dr...

Страница 59: ...用的的熱插拔硬碟並開啟系統電源後 硬碟將自動開始重建 務必確認更換的硬碟為完全空白 或其中的資料 為可覆寫 因為在硬碟安裝後 其中的任何資料會立即遺失 1 Follow the safety guidelines listed in Safety instructions section 步驟 1 If a hard drive blank is installed in the hard drive slot remove it 2 Install a hard drive in the hard drive carrier For more information see the Installing a hot swappable hard drive into a hot swappable hard drive carrier section 3 Press the releas...

Страница 60: ...保固範圍之內 請閱讀並遵循隨產品寄送的安 全指示 1 Ensure that you read the Safety instructions section in this document 2 Follow the procedure listed in Before working inside your system section in this document 警示 To maintain proper system cooling all empty hard drive slots must have hard drive blanks installed 步驟 1 Push out at the edges of the carrier to disengage the tabs on the hard drive carrier from the slots on t...

Страница 61: ...ion in this document 2 Follow the procedure listed in Before working inside your system section in this document 警示 許多維修僅可由獲得認可的維修技術人員來完成 您只能依照產品說明文件中的授權說明或在線上或電話服務和支援團隊 的指導下 執行故障排除和簡單的維修 由未經 Dell 授權的維修造成的損壞不在保固範圍之內 請閱讀並遵循隨產品寄送的安 全指示 步驟 1 Align the tabs on the hard drive carrier with the slots on the hard drive 2 Pull the edges of the carrier to fit over the hard drive 3 Lower the hard drive carri...

Страница 62: ...ted in Before working inside your system section in this document 警示 許多維修僅可由獲得認可的維修技術人員來完成 您只能依照產品說明文件中的授權說明或在線上或電話服務和支援團隊 的指導下 執行故障排除和簡單的維修 由未經 Dell 授權的維修造成的損壞不在保固範圍之內 請閱讀並遵循隨產品寄送的安 全指示 警示 The cooling fans are hot swappable To maintain proper cooling while the system is on replace only one fan at a time 註 The procedure for removing each fan is identical 步驟 Press the fan release tab and lift the c...

Страница 63: ... Slide the cooling fan into the securing slots until the tabs lock into place 後續步驟 Complete the tasks listed in the After working inside your system section in this document 相關工作 Before working inside your system After working inside your system 相關參考 安全說明 Cooling fan assembly The cooling fan assembly ensures that the key components of the server such as the processors hard drives and memory get ad...

Страница 64: ...e cooling fan assembly 2 Follow the procedure listed in the After working inside your system section 相關工作 Before working inside your system After working inside your system 相關參考 安全說明 Installing the cooling fan assembly 事前準備作業 警示 許多維修僅可由獲得認可的維修技術人員來完成 您只能依照產品說明文件中的授權說明或在線上或電話服務和支援團隊 的指導下 執行故障排除和簡單的維修 由未經 Dell 授權的維修造成的損壞不在保固範圍之內 請閱讀並遵循隨產品寄送的安 全指示 1 Follow the safety guidelines listed in Safety instr...

Страница 65: ... pin on the system board 2 5 cooling fan connector 6 6 guide pin on the chassis 6 後續步驟 Follow the procedure listed in the After working inside your system section 相關工作 Before working inside your system After working inside your system 相關參考 安全說明 Expansion cards and expansion card riser An expansion card in the server is an add on card that can be inserted into an expansion slot on the system board ...

Страница 66: ...le provides guidelines for installing expansion cards to ensure proper cooling and mechanical fit The expansion cards with the highest priority should be installed first using the slot priority indicated All other expansion cards should be installed in card priority and slot priority order 表 25 Expansion card installation order Card priority Card type Slot priority Max allowed NX3230 NX3230 1 PCIe...

Страница 67: ... is closed 註 The procedure for installing and removing a full length PCIe card is similar to the procedure for removing and installing a GPU card 步驟 1 Disconnect any cables connected to the expansion card 2 Lift the expansion card latch out of the guide slot 3 Hold the expansion card by its edges and remove it from the expansion card connector 4 If you are removing the card permanently install a m...

Страница 68: ... cards 5 expansion card connector 後續步驟 1 Install an expansion card into the expansion card riser 2 Follow the procedure listed in the After working inside your system section Related video http www Dell com XCSeries XC730xd PCI 相關工作 Before working inside your system After working inside your system 相關參考 安全說明 68 Installing and removing system components ...

Страница 69: ...ing the card by its edges position the card so that the connector on the expansion card aligns with the expansion card connector on the riser 4 Insert the card edge connector firmly into the expansion card connector until the card is fully seated 5 Press the touch points to open the expansion card locking tabs 6 Close the expansion card latch 7 If applicable connect the cables to the expansion car...

Страница 70: ...structions section 2 Follow the procedure listed in the Before working inside your system section 3 Disconnect any cables connected to the expansion card 4 Remove the expansion card riser 註 The expansion card riser 1 can be used only when both the processors are installed 步驟 1 Press tab A and rotate the latch clockwise 2 Press tab B and rotate the latch downward 3 Remove the expansion card from th...

Страница 71: ...ion card into the expansion card riser 1 事前準備作業 1 Follow the safety guidelines listed in the Safety instructions section 2 Follow the procedure listed in the Before working inside your system section 3 Remove the expansion card riser 警示 許多維修僅可由獲得認可的維修技術人員來完成 您只能依照產品說明文件中的授權說明或在線上或電話服務和支援團隊 的指導下 執行故障排除和簡單的維修 由未經 Dell 授權的維修造成的損壞不在保固範圍之內 請閱讀並遵循隨產品寄送的安 全指示 註 The expansion card riser 1 can be used only...

Страница 72: ...he expansion card riser 2 If applicable connect any cables to the expansion card 3 Follow the procedure listed in the After working inside your system section 4 Install any device drivers required for the card as described in the documentation for the card 相關工作 Before working inside your system After working inside your system 相關參考 安全說明 Removing the riser 1 blank 事前準備作業 警示 許多維修僅可由獲得認可的維修技術人員來完成 您只...

Страница 73: ...e chassis until it clicks into place Removing expansion card risers 事前準備作業 警示 許多維修僅可由獲得認可的維修技術人員來完成 您只能依照產品說明文件中的授權說明或在線上或電話服務和支援團隊 的指導下 執行故障排除和簡單的維修 由未經 Dell 授權的維修造成的損壞不在保固範圍之內 請閱讀並遵循隨產品寄送的安 全指示 1 Ensure that you read the Safety instructions section in this document 2 Complete the tasks listed in Before working inside your system section in this document 3 If installed remove any expansion card i...

Страница 74: ...installed in the riser 1 slot Remove the riser 1 blank only if you are installing riser 1 圖 27 Removing and installing the expansion card riser 1 1 expansion card riser 1 cage 2 expansion card riser 1 3 riser guide back right 4 riser guide back left 5 expansion card riser 1 connector 6 riser guide front 圖 28 Identifying connectors on the expansion card riser 1 a expansion card slot 1 b expansion c...

Страница 75: ...r for GPU cards 2 expansion card riser 2 3 riser guide back 4 expansion card riser 2 connector 5 riser guide front 圖 30 Identifying connectors on the expansion card riser 2 a expansion card slot 4 b expansion card slot 5 c power connector for GPU cards Installing and removing system components 75 ...

Страница 76: ...ector for GPU cards 3 expansion card riser 3 4 riser guide back 5 expansion card riser 3 connector 圖 32 Identifying connectors on the expansion card riser 3 default a expansion card slot 6 b expansion card slot 7 c power connector for GPU cards 76 Installing and removing system components ...

Страница 77: ...e working inside your system section in this document 3 If applicable reinstall the expansion card s into the expansion card riser 1 警示 許多維修僅可由獲得認可的維修技術人員來完成 您只能依照產品說明文件中的授權說明或在線上或電話服務和支援團隊 的指導下 執行故障排除和簡單的維修 由未經 Dell 授權的維修造成的損壞不在保固範圍之內 請閱讀並遵循隨產品寄送的安 全指示 步驟 1 Align the expansion card riser with the connectors and the riser guides on the system board 2 Lower the expansion card riser into place until...

Страница 78: ...ard 事前準備作業 1 Follow the safety guidelines listed in the Safety instructions section 2 Locate the SD vFlash card slot at the back of the chassis 步驟 To remove the SD vFlash card push the SD vFlash card inward to release it and pull the SD vFlash card from the SD vFlash card slot 圖 34 Removing the optional SD vFlash card a SD vFlash card b SD vFlash card slot 相關參考 安全說明 Removing the vFlash media unit ...

Страница 79: ...續步驟 Complete the tasks listed in After working inside your system section in this document 相關工作 Before working inside your system After working inside your system 相關參考 安全說明 Installing the vFlash media unit 事前準備作業 1 Ensure that you read the Safety instructions section in this document 2 Complete the tasks listed in Before working inside your system section in this document 警示 許多維修僅可由獲得認可的維修技術人員來完成 ...

Страница 80: ... in RAID configurations The RAID configurations depend on the version of the storage controller included with your system Removing integrated storage controller card 事前準備作業 1 Follow the safety guidelines listed in the Safety instructions section 2 Follow the procedure listed in the Before working inside your system section 3 Remove the cooling shroud 4 Remove the expansion card riser 1 5 Keep the ...

Страница 81: ...roud 3 Follow the procedure listed in the After working inside your system section 相關工作 Before working inside your system After working inside your system 相關參考 安全說明 Installing integrated storage controller card 事前準備作業 1 Follow the safety guidelines listed in the Safety instructions section 2 Follow the procedure listed in the Before working inside your system section 3 Remove the cooling shroud 4 ...

Страница 82: ...nside your system After working inside your system 相關參考 安全說明 Network daughter card The Network daughter card NDC is a small removable mezzanine card The NDC provides you with the flexibility of choosing different network connectivity options for example 4 x 1GbE 2 x 10GbE and 2 x Converged Network Adapter Removing the network daughter card 事前準備作業 1 Follow the safety guidelines listed in the Safety...

Страница 83: ...edure listed in the After working inside your system section 相關工作 Before working inside your system After working inside your system 相關參考 安全說明 Installing the network daughter card 事前準備作業 1 Follow the safety guidelines listed in the Safety instructions section 2 Follow the procedure listed in the Before working inside your system section 3 If applicable remove the expansion card riser 1 4 Keep the ...

Страница 84: ...r is firmly seated on the system board connector 4 Tighten the captive screws to secure the NDC to the system board 圖 38 Installing the NDC 1 captive screw socket 2 2 connector on the system board 3 captive screw 2 4 touch point 2 5 network daughter card NDC 6 back panel slot for Ethernet connectors 後續步驟 1 If applicable install the expansion card s in the expansion card riser 2 2 Follow the proced...

Страница 85: ...cessor is held in its socket under strong pressure Be aware that the release lever can spring up suddenly if not firmly grasped 步驟 1 Release the open first socket lever near the unlock icon by pushing the lever down and out from under the tab 2 Release the close first socket release lever near the lock icon by pushing the lever down and out from under the tab Lift the lever 90 degrees upward 3 Low...

Страница 86: ...圖 39 Processor shield 1 close first socket release lever 2 lock icon 3 processor 4 open first socket release lever 5 unlock icon 86 Installing and removing system components ...

Страница 87: ...l the heat sink 3 Reinstall the cooling shroud 4 Follow the procedure listed in the After working inside your system section 相關工作 Before working inside your system After working inside your system 相關參考 安全說明 安裝處理器 事前準備作業 警示 許多維修僅可由獲得認可的維修技術人員來完成 您只能依照產品說明文件中的授權說明或在線上或電話服務和支援團隊 的指導下 執行故障排除和簡單的維修 由未經 Dell 授權的維修造成的損壞不在保固範圍之內 請閱讀並遵循隨產品寄送的安 全指示 1 請遵循 安全指示 一節列出的安全指南 2 請遵循 拆裝電腦內部元件之前 一節列出的程序 Installing an...

Страница 88: ...U1 步驟 1 拆開新處理器的包裝 註 如果處理器之前用於其他系統中 請使用無塵擦拭布拭除處理器上殘留的任何散熱膏 2 找到處理器插槽 3 卸下插槽保護蓋 如適用 4 釋放解除鎖定圖示旁的先開啟插槽釋放拉桿 先將拉桿向下推 然後將它從彈片推出 5 同樣地 釋放鎖定圖示旁的先關閉插槽釋放拉桿 先將拉桿向下推 然後將它從彈片推出 將拉桿向上抬起 90 度 6 握住處理器護蓋上鎖定符號旁的彈片 將它向上提起拉出 警示 處理器安裝位置不正確 可能使主機板或處理器永久損壞 請小心不要折彎插槽上的針腳 警示 卸下或重新安裝處理器時 請先擦去手上的任何污垢 處理器插腳上如沾到污染物 例如散熱膏或油污 可能會使處 理器受損 7 將處理器對齊插槽齒排 警示 請勿用力固定處理器 只要處理器安裝位置正確 處理器很容易就能卡入插槽內 8 將處理器的插腳 1 指標對齊主機板上的三角形 9 將處理器置於插槽上 使處理...

Страница 89: ...移除 重新安裝 PCIe 擴充卡提升板 3 如果已中斷連線 請重新連接纜線至擴充卡 4 請遵循 拆裝系統內部元件之後 中列出的程序 5 在開機期間 按下 F2 以進入 System Setup 系統設定 然後確認處理器資訊與新的系統組態是否相符 6 執行系統診斷程式 以確認新的處理器能夠正常運作 相關工作 Before working inside your system 相關參考 安全說明 PCIe card holder This section provides information about installing and removing PCIe card holder Installing and removing system components 89 ...

Страница 90: ... release the PCIe card holder from the chassis 2 Lift the PCIe card holder out of the chassis 註 To ensure proper system cooling you must replace the PCIe card holder 圖 42 Removing and installing the PCIe card holder a PCIe card holder b release tab 後續步驟 1 Replace the PCIe card holder See Installing the PCIe card holder section in this document 2 Complete the tasks listed in the After working insid...

Страница 91: ... closing the PCIe card holder latch 事前準備作業 1 Ensure that you read the Safety instructions section in this document 2 Complete the tasks listed in Before working inside your system section in this document 警示 許多維修僅可由獲得認可的維修技術人員來完成 您只能依照產品說明文件中的授權說明或在線上或電話服務和支援團隊 的指導下 執行故障排除和簡單的維修 由未經 Dell 授權的維修造成的損壞不在保固範圍之內 請閱讀並遵循隨產品寄送的安 全指示 步驟 1 To open the PCIe card holder latch press the release tab 2 To close t...

Страница 92: ...ons section in this document 2 Complete the tasks listed in Before working inside your system section in this document 3 Remove the cooling shroud 4 Remove the PCIe card holder 5 Remove all cables routed through the cable retention bracket 警示 許多維修僅可由獲得認可的維修技術人員來完成 您只能依照產品說明文件中的授權說明或在線上或電話服務和支援團隊 的指導下 執行故障排除和簡單的維修 由未經 Dell 授權的維修造成的損壞不在保固範圍之內 請閱讀並遵循隨產品寄送的安 全指示 步驟 1 Pull the tab to release it from th...

Страница 93: ...cket with the alignment pins on the chassis 2 Slide the cable retention bracket along the chassis wall until the tab clicks and locks the slots 3 Place all cables to be routed in the cable retention bracket 後續步驟 1 Install the PCIe card holder 2 Install the cooling shroud 3 Complete the tasks listed in After working inside your system section in this document 相關工作 Before working inside your system ...

Страница 94: ... having one PSU in the sleep state the active PSU can also activate the sleeping PSU The default PSU settings are as follows If the load on the active PSU is more than 50 percent then the redundant PSU is switched to the active state If the load on the active PSU falls below 20 percent then the redundant PSU is switched to the sleep state You can configure the hot spare feature by using the iDRAC ...

Страница 95: ...PSU bay 事前準備作業 警示 許多維修僅可由獲得認可的維修技術人員來完成 您只能依照產品說明文件中的授權說明或在線上或電話服務和支援團隊 的指導下 執行故障排除和簡單的維修 由未經 Dell 授權的維修造成的損壞不在保固範圍之內 請閱讀並遵循隨產品寄送的安 全指示 1 Follow the safety guidelines listed in the Safety instructions section 步驟 Align the power supply unit blank with the power supply unit slot and push it into the power supply unit slot until it clicks into place Installing and removing system components 95 ...

Страница 96: ...system that is powered on If applicable unlatch and lift the optional cable management arm if it interferes with the power supply unit PSU removal For information about the cable management arm see the system s rack documentation Follow the safety guidelines listed in the Safety instructions section 步驟 1 Disconnect the power cable from the power source and from the PSU you intend to remove and the...

Страница 97: ...move the PSU blank 步驟 1 Slide the PSU into the chassis until the PSU is fully seated and the release latch snaps into place 2 If applicable relatch the cable management arm For information about the cable management arm see the rack documentation of your system 3 Connect the power cable to the PSU and plug the cable into a power outlet 警示 When connecting the power cable secure the cable with the s...

Страница 98: ...A for DC with a high interrupt current rating 警示 Connect the equipment to a 48 60 V DC supply source that is electrically isolated from the AC source reliably grounded 48 60 V DC SELV source Ensure that the 48 60 V DC source is efficiently secured to earth ground 註 A readily accessible disconnect device that is suitably approved and rated shall be incorporated in the field wiring Input requirement...

Страница 99: ...t interferes with power supply removal For information about the cable management arm see the rack documentation of your system 步驟 1 Disconnect the power wires from the power source and the connector from the PSU you intend to remove 2 Disconnect the safety ground wire 3 Press the release latch and slide the PSU out of the chassis by using the PSU handle 圖 49 Removing a DC PSU 1 release latch 2 po...

Страница 100: ...the power wires ensure that you secure the wires with the strap to the PSU handle 4 Connect the wires to a DC power source 註 When installing hot swapping or hot adding a new PSU wait for 15 seconds for the system to recognize the PSU and determine its status The PSU status indicator turns green to signify that the PSU is functioning properly 圖 50 Installing a DC PSU 1 release latch 2 power supply ...

Страница 101: ...壞電池連接器 安裝或卸下電池時 必須穩固地固定連接器 2 Place your finger between the securing tabs at the negative side of the battery connector and lift the battery out of the socket 圖 51 Removing system battery a Positive side of the battery connector b System battery c Negative side of the battery connector 3 To install a new system battery hold the battery with the facing up and slide it under the securing tabs 4 Press...

Страница 102: ...g fan assembly 5 Remove all HDDs 警示 許多維修僅可由獲得認可的維修技術人員來完成 您只能依照產品說明文件中的授權說明或在線上或電話服務和支援團隊 的指導下 執行故障排除和簡單的維修 由未經 Dell 授權的維修造成的損壞不在保固範圍之內 請閱讀並遵循隨產品寄送的安 全指示 警示 To prevent damage to the HDDs and HDD backplane you must remove the HDDs from the system before removing the HDD backplane 警示 You must note the number of each HDD and temporarily label them before removal so that you can replace them in the sa...

Страница 103: ...le A2 3 SAS cable A1 4 left ear control panel cable 5 backplane signal cable 6 backplane power cable 2 7 SAS cable A0 B0 8 USB cable 9 control panel cable 10 right ear control panel flex cable 11 hard drive backplane 12 hard drive backplane connector 12 Installing and removing system components 103 ...

Страница 104: ...inch x12 SAS SATA backplane NX3230 option 1 1 hard drive backplane 2 system board 3 backplane signal connector 0 4 backplane signal connector 1 5 integrated storage controller card 104 Installing and removing system components ...

Страница 105: ... drive mid plane 6 integrated storage controller card 7 backplane signal connector 2 相關工作 Before working inside your system 相關參考 安全說明 Installing HDD backplane 事前準備作業 1 Ensure that you read the Safety instructions section in this document 2 Complete the tasks listed in the Before working inside your system section in this document Installing and removing system components 105 ...

Страница 106: ...ng inside your system After working inside your system 相關參考 安全說明 Removing the optional HDD backplane back 事前準備作業 1 Ensure that you read the Safety instructions section in this document 2 Complete the tasks listed in Before working inside your system section in this document 3 Remove both HDDs 警示 許多維修僅可由獲得認可的維修技術人員來完成 您只能依照產品說明文件中的授權說明或在線上或電話服務和支援團隊 的指導下 執行故障排除和簡單的維修 由未經 Dell 授權的維修造成的損壞不在保固範圍之內 請閱讀...

Страница 107: ... the Safety instructions section in this document 2 Complete the tasks listed in the Before working inside your system section in this document 警示 許多維修僅可由獲得認可的維修技術人員來完成 您只能依照產品說明文件中的授權說明或在線上或電話服務和支援團隊 的指導下 執行故障排除和簡單的維修 由未經 Dell 授權的維修造成的損壞不在保固範圍之內 請閱讀並遵循隨產品寄送的安 全指示 步驟 1 Align the notches on the backplane with the notches on the chassis 2 Lift the release pin and slide the backplane toward the back ...

Страница 108: ...ocument 2 Complete the tasks listed in Before working inside your system section in this document 3 Keep the T15 Torx screwdriver handy 警示 許多維修僅可由獲得認可的維修技術人員來完成 您只能依照產品說明文件中的授權說明或在線上或電話服務和支援團隊 的指導下 執行故障排除和簡單的維修 由未經 Dell 授權的維修造成的損壞不在保固範圍之內 請閱讀並遵循隨產品寄送的安 全指示 警示 Do not use excessive force when removing the control panel cable as it can damage the connectors 步驟 1 Disconnect the control panel cable fro...

Страница 109: ...de your system After working inside your system Installing the control panel 相關參考 安全說明 Installing the control panel 事前準備作業 1 Ensure that you read the Safety instructions section in this document 2 Keep the T15 Torx screw driver handy 警示 許多維修僅可由獲得認可的維修技術人員來完成 您只能依照產品說明文件中的授權說明或在線上或電話服務和支援團隊 的指導下 執行故障排除和簡單的維修 由未經 Dell 授權的維修造成的損壞不在保固範圍之內 請閱讀並遵循隨產品寄送的安 全指示 步驟 1 Fold the PPID label around the cable 2 F...

Страница 110: ...re working inside your system section in this document 3 Keep the T15 Torx screwdriver handy 警示 許多維修僅可由獲得認可的維修技術人員來完成 您只能依照產品說明文件中的授權說明或在線上或電話服務和支援團隊 的指導下 執行故障排除和簡單的維修 由未經 Dell 授權的維修造成的損壞不在保固範圍之內 請閱讀並遵循隨產品寄送的安 全指示 警示 To prevent damage to the I O cable you must release the locking tab before removing or installing the I O cable from the connector on the hard drive backplane 步驟 1 Rotate the locking ...

Страница 111: ...m Removing HDD backplane Installing the I O panel After working inside your system 相關參考 安全說明 Installing the I O panel 事前準備作業 1 Ensure that you read through the Safety instructions section in this document 2 Complete the tasks listed in Before working inside your system section in this document 3 Keep the T15 Torx screw driver handy 警示 許多維修僅可由獲得認可的維修技術人員來完成 您只能依照產品說明文件中的授權說明或在線上或電話服務和支援團隊 的指導下 執行故障...

Страница 112: ... contains a significant number of subsystems such as the processor expansion cards and other components Removing system board 事前準備作業 警示 許多維修僅可由獲得認可的維修技術人員來完成 您只能依照產品說明文件中的授權說明或在線上或電話服務和支援團隊 的指導下 執行故障排除和簡單的維修 由未經 Dell 授權的維修造成的損壞不在保固範圍之內 請閱讀並遵循隨產品寄送的安 全指示 警示 If you are using the Trusted Platform Module TPM with an encryption key you may be prompted to create a recovery key during program or System S...

Страница 113: ... 警示 Take care not to damage the system identification button while removing the system board from the chassis 警示 Do not lift the system board assembly by grasping a memory module processor or other components 3 Hold the system board holder lift the blue release pin lift the system board and slide it toward the front of the chassis Sliding the system board toward the front of the chassis disengages...

Страница 114: ...e system board into the chassis 3 Push the system board toward the back of the chassis until the board is seated correctly 後續步驟 1 Install the Trusted Platform Module TPM For information on how to install TPM see the Installing the Trusted Platform Module section in this document For more information about TPM see the Trusted Platform Module section in this document 2 Replace the following a Cable ...

Страница 115: ...TXT users section in this document 相關工作 Before working inside your system 安裝可信賴平台模組 可信賴平台模組 After working inside your system 為 BitLocker 使用者初始化 TPM 為 TXT 使用者初始化 TPM 相關參考 安全說明 使用簡易還原功能來還原服務標籤 在更換主機板後 您可以使用 簡易還原 功能還原系統的產品服務編號 授權 UEFI 組態及系統組態資料 所有資料皆會自動備份 在備份快閃記憶體裝置 如果 BIOS 在備份快閃記憶體裝置中偵測到新的主機板和產品服務編號 BIOS 會提示使用者還原備份資 訊 步驟 1 開啟系統電源 如果 BIOS 偵測到新的主機板 而且備份快閃裝置中有服務標籤 BIOS 就會顯示服務標籤 授權狀態 以及 UEFI Diagnostics...

Страница 116: ...指導下 執行故障排除和簡單的維修 由未經 Dell 授權的維修造成的損壞不在保固範圍之內 請閱讀並遵循隨產品寄送的安 全指示 警示 請勿嘗試從主機板卸下可信賴平台模組 TPM 一旦安裝 TPM 此模組便會透過密碼編譯繫結至該特定主機板 任何嘗 試卸下已安裝 TPM 的動作都會破壞密碼編譯繫結 且此模組無法重新安裝或安裝在其他主機板上 1 請遵循 安全指示 一節所列的安全指南 2 請遵循 拆裝電腦內部元件之前 一節列出的程序 步驟 1 找到主機板上的 TPM 連接器 註 若要找到主機板的 TPM 連接器 請參閱 主機板連接器 一節 2 將 TPM 上邊緣連接器對齊 TPM 連接器上的插槽 3 將 TPM 插入 TPM 連接器 使塑膠鉚釘對準主機板上的插槽 4 壓下塑膠鉚釘 直到鉚釘卡入定位 圖 60 安裝 TPM 1 主機板上的鉚釘槽 2 塑膠鉚釘 3 TPM 4 TPM 連接器 後續步驟 ...

Страница 117: ... 2 在 System Setup Main Menu 系統設定主選單 畫面上 按一下 System BIOS 系統 BIOS System Security Settings 系 統安全性設定 3 從 TPM Security TPM 安全性 選項 選取 On with Pre boot Measurements 使用開機前測量開啟 4 從 TPM Command TPM 命令 選項 選取 Activate 啟動 5 儲存設定 6 重新啟動您的系統 7 再次進入 System Setup 系統設定 8 在 System Setup Main Menu 系統設定主選單 畫面上 按一下 System BIOS 系統 BIOS System Security Settings 系 統安全性設定 9 從 Intel TXT 選項 選取 On 開啟 Installing and removing ...

Страница 118: ...群組或多部裝置提供一組選項 可讓您 自動執行測試或在互動模式 重複測試 顯示或儲存測試結果 完整地執行測試 並顯示其他測試選項 以提供有關故障裝置的額外資訊 檢視狀態訊息 通知您測試是否成功完成 檢視錯誤訊息 通知您在測試期間遇到的問題 When to use the Embedded System Diagnostics If a major component or device in the system does not operate properly running the embedded system diagnostics may indicate component failure 從 Boot Manager 執行嵌入式系統診斷 事前準備作業 如果您的系統無法開機 執行嵌入式系統診斷 ePSA 步驟 1 當系統開機時 請按 F11 2 使用向上鍵和向下鍵選擇 Syst...

Страница 119: ...etected devices Results Displays the results of all tests that are run System health Provides the current overview of the system performance Event log Displays a time stamped log of the results of all tests run on the system This is displayed if at least one event description is recorded Using system diagnostics 119 ...

Страница 120: ...able a password see the Disabling a Forgotten Password section 表 26 System board jumper settings Jumper Setting Description PWRD_EN The password reset feature is enabled pins 2 4 BIOS local access is unlocked at the next AC power cycle The password reset feature is disabled pins 4 6 NVRAM_CLR The configuration settings are retained at the next system boot pins 3 5 The configuration settings are cl...

Страница 121: ...power connector 0 5 J_SATA_CD Optical drive SATA connector 6 J_SATA_TBU Tape backup unit SATA connector 7 J_TBU Tape backup unit power connector 8 J_PS_1 PSU 1 connector 9 J_IDSDM Internal dual SD module connector 10 J_NDC Network daughter card connector 11 J_USB USB connector 12 J_VIDEO_REAR Video connector 13 J_COM1 Serial connector 14 J_IDRAC_RJ45 iDRAC8 connector 15 J_CYC System identification...

Страница 122: ...nnector 35 J_FAN2U_5 Cooling fan connector 36 J_BP2 Backplane power connector 2 37 B3 B7 B11 B4 B8 B12 Memory module sockets 38 J_FAN2U_4 Cooling fan connector 39 A10 A6 A2 A9 A5 A1 Memory module sockets 40 J_FAN2U_3 Cooling fan connector 41 J_BP1 Backplane power connector 42 J_FAN2U_2 Cooling fan connector 43 A3 A7 A11 A4 A8 A12 Memory module sockets 44 J_FAN2U_1 Cooling fan connector 45 J_CTRL_P...

Страница 123: ...註 If you assign a new system and or setup password with the jumper on pins 2 and 4 the system disables the new password s the next time it boots 5 Reconnect the system to its electrical outlet and turn on the system including any attached peripherals 6 Turn off the system including any attached peripherals and disconnect the system from the electrical outlet 7 Remove the system cover 8 Move the ju...

Страница 124: ...SB 裝置 故障排除 iDRAC Direct USB XML 組態 故障排除 iDRAC Direct 筆電連線 故障排除序列 I O 裝置 故障排除 NIC 故障排除受潮的系統 故障排除受損的系統 故障排除系統電池 故障排除電源供應器 Troubleshooting cooling problems 故障排除散熱風扇 故障排除 系統 記憶體 故障排除內部 USB 鑰匙 Troubleshooting an SD card 故障排除硬碟 或 SSD Troubleshooting a storage controller 故障排除擴充卡 故障排除處理器 系統訊息 故障排除 系統 啟動故障 從 UEFI Boot Manager 安裝作業系統之後 如果您啟動系統 使系統進入 BIOS 啟動模式時 系統卻停止回應 若要避免此問題 您 必須以和安裝作業系統時相同的啟動模式啟動系統 針對所有其他...

Страница 125: ...在 IDRAC Settings Utility IDRAC 設定公用程式 中 確定 USB Management Port Mode USB 管理連接埠模式 已設定為 Automatic 自動 或 Standard OS Use 標準作業系統使用 6 如果問題還是沒有解決 以已知可正常運作的鍵盤或滑鼠替換鍵盤和 或滑鼠 如果問題未解決 請繼續執行步驟 7 替系統連接的其他 USB 裝置進行故障排除 如果問題未解決 請繼續執行連接到系統的其他 USB 裝置的故障排除 7 關閉所有連接的 USB 裝置 然後從系統將其拔下 8 重新啟動系統 9 如果您的鍵盤功能正常 進入系統設定 確認所有 USB 連接埠在 整合裝置 畫面上啟用 如果您的鍵盤無法正常運作 請使用遠 端存取 以啟用或停用 USB 選項 10 在 System Setup 系統設定 中檢查 USB 3 0 是否已啟用 如果已啟用 ...

Страница 126: ...SB XML Configuration iDRAC 管理 USB XML 組態 選項為 Enabled 已啟用 或 Enabled only when the server has default credential settings 僅在伺服器有預設憑證設定時啟用 6 取出並重新插入 USB 儲存裝置 7 如果匯入作業無法正常運作 請嘗試不同的 USB 儲存裝置 後續步驟 如果故障排除失敗 請參閱 取得說明 一節 相關參考 取得說明 故障排除 iDRAC Direct 筆電連線 如需有關 USB 筆電連線和伺服器組態的資訊 請參閱 Integrated Dell Remote Access Controller 使用者指南 網址是 Dell com idracmanuals 步驟 1 確認您的筆電已連線到正面的 USB 管理連接埠 其標示為 圖示 帶有 USB Type A A 纜線...

Страница 127: ...程式 如需更多資訊 請參閱 NIC 說明文件 嘗試使用另一已知良好的網路纜線 如果問題仍然存在 請使用交換器或集線器上的其他連接器 4 確定已安裝適當的驅動程式 且已綁定通訊協定 如需更多資訊 請參閱 NIC 的說明文件 5 進入 System Setup 系統設定 並在 Integrated Devices 整合裝置 畫面上確認已啟用 NIC 連接埠 6 請確定所有 NIC 集線器和交換器在網路上已設定為相同的資料傳輸速度和雙工 如需更多資訊 請參閱各個網路裝置的說明文 件 7 請確定網路上所有 NIC 和交換器皆已設為相同的資料傳輸速度和雙工 如需更多資訊 請參閱各個網路裝置的說明文件 8 確定所有網路纜線都是正確的類型 且未超過最大長度 後續步驟 如果無法解決問題 請參閱 取得說明 一節 相關參考 Using system diagnostics 取得說明 故障排除受潮的系統 事前準...

Страница 128: ... 如果無法解決問題 請參閱 取得說明 一節 8 如果系統正確啟動 請將系統關閉 並且重新安裝您已移除的所有擴充卡 9 執行適當的診斷測試 如需更多資訊 請參閱 使用系統診斷 一節 後續步驟 如果測試失敗 請參閱 取得說明 一節 相關參考 取得說明 Using system diagnostics 故障排除受損的系統 事前準備作業 警示 許多維修僅可由獲得認可的維修技術人員來完成 您只能依照產品說明文件中的授權說明或在線上或電話服務和支援團隊 的指導下 執行故障排除和簡單的維修 由未經 Dell 授權的維修造成的損壞不在保固範圍之內 請閱讀並遵循隨產品寄送的安 全指示 步驟 1 關閉系統和連接的周邊裝置 然後從電源插座上拔下系統 2 卸下系統護蓋 3 確定已正確安裝下列元件 散熱護罩 擴充卡提升板 如果已安裝 擴充卡 電源供應器 散熱風扇組件 如果已安裝 散熱風扇 處理器和散熱器 128 T...

Страница 129: ...關閉 長達幾週或幾個月 NVRAM 可能會遺失其系統組態資訊 這種情況是由電池故障所造成 註 某些軟體可能會導致系統時間加快或變慢 如果系統在除 System Setup 系統設定 中記錄的時間以外均運作正常 則造成 問題的原因可能是軟體 而非電池故障 步驟 1 在 System Setup 系統設定 中重新輸入時間和日期 2 關閉系統 然後從電源插座上拔下電源線至少一個小時 3 將系統重新接上電源插座 然後啟動系統 4 進入系統設定 如果在系統設定程式中顯示的日期和時間不正確 請檢查系統電池訊息的系統錯誤日誌 SEL 後續步驟 如果無法解決問題 請參閱 取得說明 一節 相關參考 取得說明 故障排除電源供應器 事前準備作業 警示 許多維修僅可由獲得認可的維修技術人員來完成 您只能依照產品說明文件中的授權說明或在線上或電話服務和支援團隊 的指導下 執行故障排除和簡單的維修 由未經 Dell ...

Страница 130: ...的指導下 執行故障排除和簡單的維修 由未經 Dell 授權的維修造成的損壞不在保固範圍之內 請閱讀並遵循隨產品寄送的安 全指示 Ensure that the following conditions exist System cover cooling shroud EMI filler panel memory module blank or back filler bracket is not removed Ambient temperature is not higher than the 系統 specific ambient temperature External airflow is not obstructed A cooling fan is not removed or has not failed The expansion card installation g...

Страница 131: ...的電源線 2 重新啟動系統 後續步驟 1 請遵循 拆裝系統內部元件之後 一節列出的程序 2 如果無法解決問題 請參閱 取得說明 一節 相關工作 Before working inside your system 相關參考 安全說明 取得說明 故障排除 系統 記憶體 事前準備作業 警示 許多維修僅可由獲得認可的維修技術人員來完成 您只能依照產品說明文件中的授權說明或在線上或電話服務和支援團隊 的指導下 執行故障排除和簡單的維修 由未經 Dell 授權的維修造成的損壞不在保固範圍之內 請閱讀並遵循隨產品寄送的安 全指示 步驟 1 如果系統可正常作業 請執行適當的系統診斷測試 請參閱 使用系統診斷 一節 瞭解有哪些診斷測試可用 如果診斷測試表示故障 請遵循診斷測試所的修正動作操作 2 如果系統無法正常作業 請關閉系統 和連接的周邊裝置 然後拔掉系統電源 請等待至少 10 秒鐘 然後再重新連接系統...

Страница 132: ...示燈 16 如果記憶體問題仍然存在 請對每個已安裝的記憶體模組重複步驟 12 到步驟 15 後續步驟 如果無法解決問題 請參閱 取得說明 一節 相關參考 取得說明 Using system diagnostics 故障排除內部 USB 鑰匙 事前準備作業 警示 許多維修僅可由獲得認可的維修技術人員來完成 您只能依照產品說明文件中的授權說明或在線上或電話服務和支援團隊 的指導下 執行故障排除和簡單的維修 由未經 Dell 授權的維修造成的損壞不在保固範圍之內 請閱讀並遵循隨產品寄送的安 全指示 步驟 1 進入 System Setup 系統設定 並在 Integrated Devices 整合裝置 畫面上確認已啟用 USB key port USB 鑰匙連接 埠 2 關閉系統和連接的周邊裝置 然後從電源插座上拔下電源線 3 卸下系統機箱蓋 4 找到 USB 金鑰並重新接插 5 安裝系統機箱蓋...

Страница 133: ... and turn on the system including any attached peripherals 7 Enter System Setup and ensure that the Internal SD Card Port and Internal SD Card Redundancy modes are set to the needed modes Verify that the correct SD slot is set as Primary SD Card 8 Check if the SD card is functioning properly 9 If the Internal SD Card Redundancy option is set to Enabled at the time of the SD card failure the system...

Страница 134: ...統 and attached peripherals and disconnect the 系統 from the electrical outlet 9 Remove the 系統 cover 10 Remove all expansion cards installed in the 系統 11 Install the 系統 cover 12 Reconnect the 系統 to the electrical outlet and turn on the 系統 and attached peripherals 13 Run the appropriate diagnostic test See the Using system diagnostics section If the tests fail see the Getting help section 14 For each ...

Страница 135: ...問題 請參閱 取得說明 一節 相關參考 Using system diagnostics 取得說明 故障排除處理器 事前準備作業 警示 許多維修僅可由獲得認可的維修技術人員來完成 您只能依照產品說明文件中的授權說明或在線上或電話服務和支援團隊 的指導下 執行故障排除和簡單的維修 由未經 Dell 授權的維修造成的損壞不在保固範圍之內 請閱讀並遵循隨產品寄送的安 全指示 步驟 1 執行適當的診斷測試 請參閱 使用系統診斷 一節 2 關閉系統和連接的周邊裝置 然後從電源插座上拔下系統 3 卸下系統護蓋 4 確定已正確安裝處理器和散熱器 5 安裝系統護蓋 6 執行適當的診斷測試 請參閱 使用系統診斷 一節 7 如果無法解決問題 請參閱 取得說明 一節 相關參考 取得說明 Using system diagnostics 系統訊息 如需監視系統元件之系統韌體和代理程式產生的事件和錯誤訊息清單 請參...

Страница 136: ...iagnostic utility generates messages if there are errors detected when you run diagnostic tests on your system For more information about system diagnostics see the Using system diagnostics section 相關參考 Using system diagnostics Alert messages The systems management software generates alert messages for your system Alert messages include information status warning and failure messages for drive tem...

Страница 137: ...術支援的聯絡詳細資訊 a 按一下 Global Technical Support 全球技術支援 b Contact Technical Support 聯絡技術支援 頁面隨即顯示致電 文字交談或以電子郵件聯絡 Dell 全球技術支援團隊的詳細資 訊 Documentation feedback Click the Feedback link in any of the Dell documentation pages fill out the form and click Submit to send your feedback Quick Resource Locator Use the Quick Resource Locator QRL to get immediate access to system information and how to videos This can ...

Страница 138: ...圖 62 Quick resource locator 138 取得說明 ...

Отзывы: