


8. After the download is complete, navigate to the folder where you saved the BIOS update file.
9. Double-click the BIOS update file icon and follow the instructions on the screen.
Enabling Intel Optane memory
1. On the taskbar, click the search box, and then type
Intel Rapid Storage Technology
.
2. Click
Intel Rapid Storage Technology
.
The
Intel Rapid Storage Technology
window is displayed.
3. On the
Status
tab, click
Enable
to enable the Intel Optane memory.
4. On the warning screen, select a compatible fast drive, and then click
Yes
to continue enabling Intel Optane memory.
5. Click
Intel Optane memory
>
Reboot
to complete enabling your Intel Optane memory.
NOTE:
Applications may take up to three subsequent launches after enablement to see the full performance
benefits.
Disabling Intel Optane memory
CAUTION:
After disabling Intel Optane memory, do not uninstall the driver for Intel Rapid Storage Technology as it will
result in a blue screen error. The Intel Rapid Storage Technology user interface can be removed without uninstalling the
driver.
NOTE:
Disabling Intel Optane memory is required before removing the SATA storage device accelerated by the Intel
Optane memory module from the computer.
1. On the taskbar, click the search box, and then type
Intel Rapid Storage Technology
.
2. Click
Intel Rapid Storage Technology
.
The
Intel Rapid Storage Technology
window is displayed.
3. On the
Intel Optane memory
tab, click
Disable
to disable the Intel Optane memory.
NOTE:
For computers in which Intel Optane memory acts as a primary storage, do not disable the Intel Optane
memory. The Disable option will be grayed out.
4. Click
Yes
if you accept the warning.
The disabling progress is displayed.
5. Click
Reboot
to complete disabling your Intel Optane memory and restart your computer.
WiFi power cycle
If your computer is unable to access the internet due to WiFi connectivity issues a WiFi power cycle procedure may be performed. The
following procedure provides the instructions on how to conduct a WiFi power cycle:
NOTE:
Some ISPs (Internet Service Providers) provide a modem/router combo device.
1. Turn off your computer.
2. Turn off the modem.
3. Turn off the wireless router.
4. Wait for 30 seconds.
5. Turn on the wireless router.
6. Turn on the modem.
7. Turn on your computer.
Flea power release
Flea power is the residual static electricity that remains on the computer even after it has been powered off and the battery has been
removed. The following procedure provides the instructions on how to conduct flea power release:
1. Turn off your computer.
2. Disconnect the power adapter from your computer.
102
Troubleshooting
Содержание G7 7590
Страница 1: ...Dell G7 7590 Service Manual Regulatory Model P82F Regulatory Type P82F001 ...
Страница 21: ...Replacing the base cover 21 ...
Страница 24: ...24 Removing the battery ...
Страница 26: ...Post requisites Replace the base cover 26 Replacing the battery ...
Страница 28: ...28 Removing the memory modules ...
Страница 30: ...Post requisites Replace the base cover 30 Replacing the memory modules ...
Страница 33: ...Removing the hard drive 33 ...
Страница 37: ...Removing the coin cell battery 37 ...
Страница 42: ...42 Removing the touchpad ...
Страница 44: ...Post requisites 1 Replace the battery 2 Replace the base cover 44 Replacing the touchpad ...
Страница 46: ...46 Removing the solid state drive Intel Optane ...
Страница 51: ...Post requisites Replace the base cover Replacing the solid state drive Intel Optane 51 ...
Страница 53: ...Removing the wireless card 53 ...
Страница 55: ...Post requisites Replace the base cover Replacing the wireless card 55 ...
Страница 61: ...Removing the heat sink 61 ...
Страница 77: ...Removing the system board 77 ...
Страница 82: ...82 Removing the power button with fingerprint reader ...
Страница 86: ...4 Lift the keyboard along with its cable off the palm rest assembly 86 Removing the keyboard ...
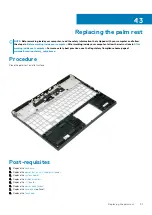
Страница 90: ...90 Removing the palm rest ...


