background image

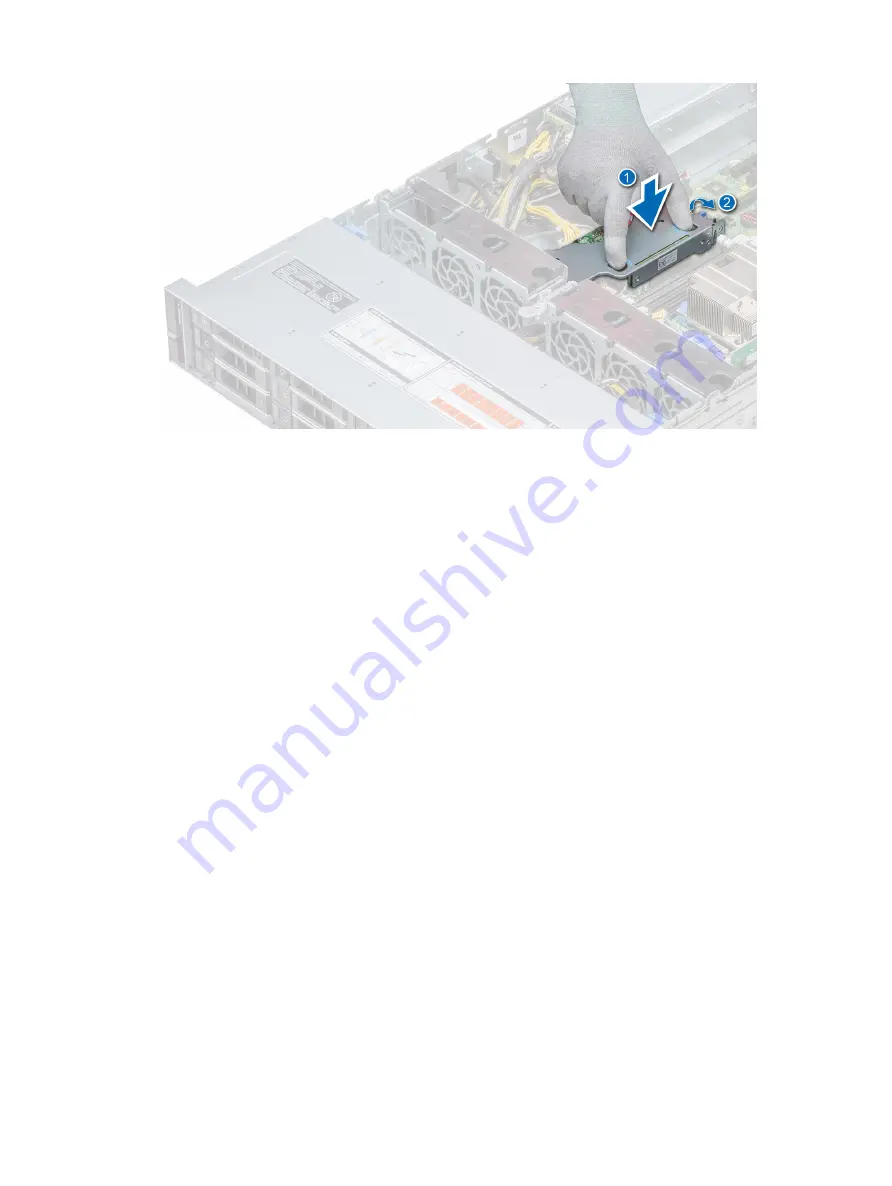
Figure 40. Installing internal PERC riser

Connect the cables to the backplane and then route the cables to the cable guiding latch to close the latch.

Next steps

1

Installing the air shroud

2

Follow the procedure listed in 

After working inside your system

.

Removing the PERC card from the internal PERC riser

Prerequisites

1

Follow the safety guidelines listed in 

Safety instructions

.

2

Follow the procedure listed in 

Before working inside your system

.

3

Removing the air shroud

4

Removing the internal PERC riser

Steps

Using a Phillips #2 screwdriver, remove the screw that secures the PERC card to the internal PERC riser.

Pull the PERC card out of the connector on the internal PERC riser.

Installing and removing system components 

87

Содержание E46S001

Страница 1: ...Dell EMC PowerEdge R540 Installation and Service Manual Regulatory Model E46S Series Regulatory Type E46S001 ...

Страница 2: ...amage to hardware or loss of data and tells you how to avoid the problem WARNING A WARNING indicates a potential for property damage personal injury or death 2018 Dell Inc or its subsidiaries All rights reserved Dell EMC and other trademarks are trademarks of Dell Inc or its subsidiaries Other trademarks may be trademarks of their respective owners 2018 10 Rev A02 ...

Страница 3: ...abel 28 2 Documentation resources 31 3 Technical specifications 33 System dimensions 33 Chassis weight 34 Processor specifications 34 Supported operating systems 34 Cooling fans specifications 34 PSU specifications 34 System battery 35 Expansion bus specifications 35 Memory specifications 35 Storage controller specifications 35 Drive specifications 35 Drives 35 Optical drives 36 Tape Drives 36 Por...

Страница 4: ...ils 46 System BIOS 46 iDRAC Settings utility 66 Device Settings 66 Dell Lifecycle Controller 66 Embedded system management 66 Boot Manager 66 Viewing Boot Manager 66 Boot Manager main menu 67 One shot UEFI boot menu 67 System Utilities 67 PXE boot 67 6 Installing and removing system components 68 Safety instructions 68 Before working inside your system 68 After working inside your system 68 Recomm...

Страница 5: ...ive carrier 98 Installing a drive into the drive carrier 99 System memory 100 System memory guidelines 100 General memory module installation guidelines 101 Mode specific guidelines 102 Removing a memory module 105 Installing a memory module 105 Processors and heat sinks 106 Removing a processor and heat sink module 106 Removing the non fabric processor from the processor and heat sink module 107 ...

Страница 6: ...2 Replacing the optional internal USB memory key 152 Optical drive optional 153 Removing the optical drive 153 Installing the optical drive 154 Power supply units 155 Hot spare feature 155 Removing a power supply unit blank 156 Installing a power supply unit blank 156 Removing a power supply unit 157 Installing a power supply unit 158 Removing a non redundant cabled AC power supply unit 159 Instal...

Страница 7: ...ded System Diagnostics 177 Running the Embedded System Diagnostics from Boot Manager 177 Running the Embedded System Diagnostics from the Dell Lifecycle Controller 177 System diagnostic controls 178 8 Jumpers and connectors 179 System board jumpers and connectors 180 System board jumper settings 181 Disabling forgotten password 182 9 Getting help 183 Contacting Dell EMC 183 Documentation feedback ...

Страница 8: ... NOTE All instances of SAS SATA hard drives and SSDs are referred to as drives in this document unless specified otherwise Topics Supported configurations for the PowerEdge R540 system Front view of the system Back panel features LCD panel Locating the Service Tag of your system System information label Supported configurations for the PowerEdge R540 system The Dell EMC PowerEdge R540 system suppo...

Страница 9: ...Figure 1 Supported configurations for a PowerEdge R540 system with rear drive Dell EMC PowerEdge R540 overview 9 ...

Страница 10: ... The Quick Sync feature is optional This feature allows management of the system by using mobile devices This feature aggregates hardware or firmware inventory and various system level diagnostic and error information that can be used in troubleshooting the system For more information see the Integrated Dell Remote Access Controller User s Guide at Dell com poweredgemanuals 2 Drive slots N A Enabl...

Страница 11: ... mobile devices This feature aggregates hardware or firmware inventory and various system level diagnostic and error information that can be used in troubleshooting the system For more information see the Integrated Dell Remote Access Controller User s Guide at Dell com idracmanuals 2 Drive slots N A Enable you to install drives that are supported on your system For more information about drives s...

Страница 12: ...The Quick Sync 2 feature allows management of the system using mobile devices This feature aggregates hardware firmware inventory and various system level diagnostic error information that can be used in troubleshooting the system You can access system inventory Dell Lifecycle Controller logs or system logs system health status and also configure iDRAC BIOS and networking parameters You can also l...

Страница 13: ... if the system experiences an electrical error for example voltage out of range or a failed power supply unit PSU or voltage regulator Check the System Event Log or system messages for the specific issue If it is due to a problem with the PSU check the LED on the PSU Reseat the PSU If the problem persists see Getting help Memory indicator The indicator turns solid amber if a memory error occurs Ch...

Страница 14: ...2 feature is turned off Press the iDRAC Quick Sync 2 button to turn on the iDRAC Quick Sync 2 feature If the LED fails to turn on reseat the cable and check If the problem persists see the Getting help section Solid white Indicates that iDRAC Quick Sync 2 is ready to communicate Press the iDRAC Quick Sync 2 button to turn off If the LED fails to turn off restart the system If the problem persists ...

Страница 15: ...wer button to gracefully shut down an ACPI compliant operating system 2 USB port The USB ports are 4 pin 2 0 compliant These ports enable you to connect USB devices to the system 3 iDRAC Direct Micro AB USB The iDRAC Direct Micro AB USB port enables you to access the iDRAC Direct Micro AB features For more information see Integrated Dell Remote Access Controller User s Guide at Dell com poweredgem...

Страница 16: ... Solid green for two seconds Indicates that the laptop or tablet is connected Flashing green on for two seconds and off for two seconds Indicates that the laptop or tablet connected is recognized Turns off Indicates that the laptop or tablet is unplugged Drive indicator codes Each drive carrier has an activity LED indicator and a status LED indicator The indicators provide information about the cu...

Страница 17: ...ive rebuilding Solid green Drive online Flashes green for three seconds amber for three seconds and then turns off after six seconds Rebuild stopped Back panel features The back view displays the features available on the back of the system Figure 9 Back panel features of 12 x 3 5 inch 2 x 3 5 inch rear drive system Table 10 Back panel features of R540 Item Features Icon Description 1 Serial port ...

Страница 18: ...about the supported Ethernet ports see the Technical specifications section 8 USB 3 0 port 2 Use the USB 3 0 port to connect USB devices to the system These ports are 4 pin USB 3 0 compliant 9 iDRAC9 dedicated network port Use the iDRAC9 dedicated network port to securely access the embedded iDRAC on a separate management network see the Integrated Dell Remote Access Controller User s Guide at Del...

Страница 19: ...inch rear drive system Table 11 Back panel features of R540 Item Features Icon Description 1 Serial port Use the serial port to connect a serial device to the system For more information about the supported serial port see the Technical specifications section 2 Drive 2 N A Two optional rear drives supported for 12 x 3 5 inch system 3 Full height riser slot N A Use the card slots to connect full he...

Страница 20: ...icated network port Use the iDRAC9 dedicated network port to securely access the embedded iDRAC on a separate management network see the Integrated Dell Remote Access Controller User s Guide at Dell com poweredgemanuals 9 VGA port Use the VGA port to connect a display to the system For more information about the supported VGA port see the Technical specifications section 10 System status indicator...

Страница 21: ...ications section 2 Butterfly riser slot N A Use the card slots to connect full height PCIe expansion cards on butterfly riser 3 PCIe slot 3 N A Use the card slots to connect up to three half height PCIe expansion cards on the system board 4 Power supply unit PSU N A For information about supported PSUs see the Technical specifications section 5 LOM riser ports Use the Ethernet or SFP ports to conn...

Страница 22: ...D on or off To reset iDRAC press and hold the button for more than 15 seconds NOTE To reset iDRAC using system ID ensure that the system ID button is enabled in the iDRAC setup If the system stops responding during POST press and hold the system ID button for more than five seconds to enter the BIOS progress mode NIC indicator codes Each NIC on the back of the system has indicators that provide in...

Страница 23: ...tatus indicator 1 AC PSU status indicator handle Table 14 AC PSU status indicator codes Power indicator codes Condition Green A valid power source is connected to the PSU and the PSU is operational Blinking amber Indicates a problem with the PSU Not illuminated Power is not connected to the PSU Blinking green When the firmware of the PSU is being updated the PSU handle blinks green CAUTION Do not ...

Страница 24: ...ndicator codes Condition Green A valid power source is connected to the PSU and the PSU is operational Blinking amber Indicates a problem with the PSU Not illuminated Power is not connected to the PSU Blinking green When hot plugging a PSU the PSU indicator blinks green This indicates that there is a PSU mismatch with respect to efficiency feature set health status or supported voltage CAUTION If ...

Страница 25: ...tive text NOTE If the system is connected to a power source and an error is detected the LCD turns amber regardless of whether the system is turned on or off When the system turns off and there are no errors LCD enters the standby mode after five minutes of inactivity Press any button on the LCD to turn it on If the LCD panel stops responding remove the bezel and reinstall it If the problem persis...

Страница 26: ...ries are available Set error Select SEL to view LCD error messages in a format that matches the IPMI description in the SEL This enables you to match an LCD message with an SEL entry Select Simple to view LCD error messages in a simplified user friendly description For information about the event and error messages generated by the system firmware and agents that monitor system components see the ...

Страница 27: ...t of the system to view the Express Service Code and Service Tag Alternatively the information may be on a sticker on the chassis of the system The mini Enterprise Service Tag EST is found on the back of the system This information is used by Dell to route support calls to the appropriate personnel Figure 16 Locating Service Tag of your system 1 information tag front view 2 information tag back vi...

Страница 28: ...System information label Figure 17 PowerEdge R540 Service information 28 Dell EMC PowerEdge R540 overview ...

Страница 29: ...Figure 18 Memory information Figure 19 OCP and internal PERC riser installation Figure 20 Riser installation Dell EMC PowerEdge R540 overview 29 ...

Страница 30: ...Figure 21 Rear drive installation 30 Dell EMC PowerEdge R540 overview ...

Страница 31: ...the Getting Started Guide document that is shipped with your system Dell com poweredgemanuals Configuring your system For information about the iDRAC features configuring and logging in to iDRAC and managing your system remotely see the Integrated Dell Remote Access Controller User s Guide For information about understanding Remote Access Controller Admin RACADM subcommands and supported RACADM in...

Страница 32: ...ng Dell SupportAssist see the Dell EMC SupportAssist Enterprise User s Guide Dell com serviceabilitytools For information about partner programs enterprise systems management see the OpenManage Connections Enterprise Systems Management documents Dell com openmanagemanuals Working with the Dell PowerEdge RAID controllers For information about understanding the features of the Dell PowerEdge RAID co...

Страница 33: ...ge R540 system Table 18 Dimensions of the Dell EMC R540 system Xa Xb Y Za with bezel Za without bezel Zb Zc 482 0 mm 18 97 inches 434 0 mm 17 08 inches 86 8 mm 3 41 inches 35 84 mm 1 41 inches 22 mm 0 87 inches 647 07 mm 25 47 inches 681 755 mm 26 84 inches 3 Technical specifications 33 ...

Страница 34: ...tions Your system supports up to six standard or high performance cabled cooling fans Table 20 Fan support matrix for Dell EMC PowerEdge R540 System Front Storage PSU type CPU count Fan1 Fan2 Fan3 Fan4 Fan5 Fan6 8 x 3 5 inch Cable PSU or Redundant PSU 1 Not required Required Required Required Required Not required Redundant PSU 2 Not required Required Required Required Required Required 12 x 3 5 i...

Страница 35: ...ports PCI express PCIe generation three expansion cards which must be installed on the system board using expansion card risers The R540 system supports three types of expansion card risers Memory specifications Table 22 Memory specifications DIMM type DIMM rank DIMM capacity Single processor Dual processors Minimum RAM Maximum RAM Minimum RAM Maximum RAM RDIMM Single rank 8 GB 8 GB 80 GB 16 GB 12...

Страница 36: ...ves TL1000 with LTO 5 LTO 6 and LTO 7 6 Gb SAS tape drives TL2000 with LTO 5 LTO 6 and LTO 7 6 Gb SAS tape drives TL2000 with LTO 5 LTO 6 and LTO 7 8Gb FC tape drives TL4000 with LTO 5 LTO 6 and LTO 7 6 Gb SAS tape drives TL4000 with LTO 5 LTO 6 and LTO 7 8Gb FC tape drives ML6000 with LTO 5 LTO 6 6 Gb SAS tape drives ML6000 with LTO 5 LTO 6 LTO 7 8Gb FC tape drives Ports and connectors specificat...

Страница 37: ...m supports Matrox G200eR2 graphics card with 16 MB capacity Table 24 Supported video resolution options Resolution Refresh rate Hz Color depth bits 640x480 60 70 8 16 32 800x600 60 75 85 8 16 32 1024x768 60 75 85 8 16 32 1152x864 60 75 85 8 16 32 1280x1024 60 75 8 16 32 1440x900 60 8 16 32 Environmental specifications NOTE For additional information about environmental certifications please refer ...

Страница 38: ...ating Six consecutively executed shock pulses in the positive and negative x y and z axes of 6 G for up to 11 ms Storage Six consecutively executed shock pulses in the positive and negative x y and z axes one pulse on each side of the system of 71 G for up to 2 ms Table 29 Maximum altitude specifications Maximum altitude Specifications Operating 3048 m 10 000 ft Storage 12 000 m 39 370 ft Table 30...

Страница 39: ...0 C to 40 C the system can operate down to 5 C or up to 45 C for a maximum of 1 of its annual operating hours For temperatures between 40 C and 45 C de rate maximum allowable temperature by 1 C per 125 m above 950 m 1 F per 228 ft NOTE When operating in the expanded temperature range system performance may be impacted NOTE When operating in the expanded temperature range ambient temperature warnin...

Страница 40: ...on Gold 5115 85 10 Yes Yes Yes Yes Intel Xenon Silver 4116 85 12 Yes Yes Yes Yes Intel Xenon Silver 4114 85 10 Yes Yes Yes Yes Intel Xenon Silver 4110 85 8 Yes Yes Yes Yes Intel Xenon Bronze 3106 85 8 Yes Yes Yes Yes Intel Xenon Bronze 3104 85 6 Yes Yes Yes Yes Intel Xenon Silver 4112 85 4 Yes Yes Yes Yes Particulate and gaseous contamination specifications The following table defines the limitati...

Страница 41: ...must be free of conductive dust zinc whiskers or other conductive particles NOTE This condition applies to data center and non data center environments Corrosive dust Air must be free of corrosive dust Residual dust present in the air must have a deliquescent point less than 60 relative humidity NOTE This condition applies to data center and non data center environments Table 35 Gaseous contaminat...

Страница 42: ...to set up iDRAC IP address To enable communication between your system and iDRAC you must first configure the network settings based on your network infrastructure NOTE For static IP configuration you must request for it at the time of purchase This option is set to DHCP by Default You can set up the IP address by using one of the following interfaces Interfaces Document Section iDRAC Settings uti...

Страница 43: ... intel quickassist technology For more information about logging in to the iDRAC and iDRAC licenses see the latest Integrated Dell Remote Access Controller User s Guide at Dell com poweredgemanuals You can also access iDRAC by using RACADM For more information see the RACADM Command Line Interface Reference Guide at Dell com poweredgemanuals Options to install the operating system If the system is...

Страница 44: ...cmanuals Downloading drivers and firmware Dell EMC recommends that you download and install the latest BIOS drivers and systems management firmware on your system Prerequisite Ensure that you clear the web browser cache before downloading the drivers and firmware Steps 1 Go to Dell com support home 2 In the Drivers Downloads section type the Service Tag of your system in the Enter a Service Tag or...

Страница 45: ...onfigure the BIOS settings iDRAC settings and device settings of your system NOTE Help text for the selected field is displayed in the graphical browser by default To view the help text in the text browser press F1 You can access system setup by one of the following Standard graphical browser The browser is enabled by default Text browser The browser is enabled by using Console Redirection Viewing...

Страница 46: ... BIOS screen perform the following steps 1 Power on or restart your system 2 Press F2 immediately after you see the following message F2 System Setup NOTE If the operating system begins to load before you press F2 wait for the system to finish booting and then restart the system and try again 3 On the System Setup Main Menu screen click System BIOS System BIOS Settings details The System BIOS Sett...

Страница 47: ...ity and UEFI secure boot It also manages the power button on the system Redundant OS Control Sets the redundant OS information for redundant OS control Miscellaneous Settings Provides options to change the system date and time System Information You can use the System Information screen to view system properties such as Service Tag system model name and BIOS version Viewing System Information To v...

Страница 48: ... interleaving Viewing Memory Settings To view the Memory Settings screen perform the following steps 1 Power on or restart your system 2 Press F2 immediately after you see the following message F2 System Setup NOTE If the operating system begins to load before you press F2 wait for the system to finish booting and then restart the system and try again 3 On the System Setup Main Menu screen click S...

Страница 49: ... controls Persistent Memory on the system Processor Settings You can use the Processor Settings screen to view the processor settings and perform specific functions such as enabling virtualization technology hardware prefetcher and logical processor idling Viewing Processor Settings To view the Processor Settings screen perform the following steps 1 Power on or restart your system 2 Press F2 immed...

Страница 50: ...ult DCU IP Prefetcher Enables or disables the Data Cache Unit DCU IP prefetcher This option is set to Enabled by default Sub NUMA Cluster Enables or disables the Sub NUMA Cluster This option is set to Disabled by default Sub NUMA Cluster Enables or disables the Sub NUMA Cluster This option is set to Disabled by default UPI Prefetch Enables you to get the memory read started early on DDR bus The Ul...

Страница 51: ...ATA Settings screen details are explained as follows Option Description Embedded SATA Enables you to set the embedded SATA option to Off AHCI or RAID modes This option is set to AHCI Mode by default Security Freeze Lock Enables you to send Security Freeze Lock command to the embedded SATA drives during POST This option is applicable only for AHCI mode This option is set to Enabled by default Write...

Страница 52: ...ails The Boot Settings screen details are explained as follows Option Description Boot Mode Enables you to set the boot mode of the system CAUTION Switching the boot mode may prevent the system from booting if the operating system is not installed in the same boot mode If the operating system supports UEFI you can set this option to UEFI Setting this field to BIOS allows compatibility with non UEF...

Страница 53: ... compatible to be installed from the UEFI boot mode DOS and 32 bit operating systems do not support UEFI and can only be installed from the BIOS boot mode NOTE For the latest information about supported operating systems go to Dell com ossupport Changing boot order About this task You may have to change the boot order if you want to boot from a USB key or an optical drive The following instruction...

Страница 54: ...he iSCSI device Table 38 UEFI iSCSI Settings screen details Option Description iSCSI Initiator Name Specifies the name of the iSCSI initiator in IQN format iSCSI Device1 Enables or disables the iSCSI device When disabled a UEFI boot option is created for the iSCSI device automatically This is set to Disabled by default iSCSI Device1 Settings Enables you to control the configuration of the iSCSI de...

Страница 55: ...e and software support the feature Embedded Video Controller Enables or disables the use of Embedded Video Controller as the primary display When set to Enabled the Embedded Video Controller is used as the primary display even if add in graphic cards are installed When set to Disabled an add in graphics card is used as the primary display BIOS will output displays to both the primary add in video ...

Страница 56: ...trols the configuration of the PCIe cards installed in the specified slot Slots must be disabled only when the installed peripheral card prevents booting into the operating system or causes delays in system startup If the slot is disabled both the Option ROM and UEFI drivers are disabled Only slots that are present on the system are available for control Table 39 Slot Disablement Option Descriptio...

Страница 57: ...owing message F2 System Setup NOTE If your operating system begins to load before you press F2 wait for the system to finish booting and then restart your system and try again 3 On the System Setup Main Menu screen click System BIOS 4 On the System BIOS screen click Serial Communication Serial Communication details The Serial Communication screen details are explained as follows Option Description...

Страница 58: ...f the attempt fails and the value must not be changed This option is set to 115200 by default Remote Terminal Type Enables you to set the remote console terminal type This option is set to VT100 VT220 by default Redirection After Boot Enables or disables the BIOS console redirection when the operating system is loaded This option is set to Enabled by default System Profile Settings You can use the...

Страница 59: ...imize power resources across cores and uncores during runtime The optimization of the uncore frequency to either save power or optimize performance is influenced by the setting of the Energy Efficiency Policy option Energy Efficient Policy Enables you to select the Energy Efficient Policy option The CPU uses the setting to manipulate the internal behavior of the processor and determines whether to...

Страница 60: ... only if the password jumper is not installed in the system Setup Password Enables you to set the system setup password This option is read only if the password jumper is not installed in the system Password Status Enables you to lock the system password This option is set to Unlocked by default TPM Security NOTE The TPM menu is available only when the TPM module is installed Enables you to contro...

Страница 61: ...fault AC Power Recovery Sets how the system behaves after AC power is restored to the system This option is set to Last by default AC Power Recovery Delay Enables you to set the time that the system should take to power up after AC power is restored to the system This option is set to Immediate by default User Defined Delay 60 s to 240 s Enables you to set the User Defined Delay option when the Us...

Страница 62: ...on Information Table but approves the images whether they pass or fail verification Deployed Mode Deployed Mode is the most secure mode In Deployed Mode PK must be installed and the BIOS performs signature verification on programmatic attempts to update policy objects Deployed Mode restricts the programmatic mode transitions Secure Boot Policy Summary Specifies the list of certificates and hashes ...

Страница 63: ... functioning and must be turned off Even after you turn off and restart the system the error message is displayed until the correct password is entered Deleting or changing system and setup password Prerequisite NOTE You cannot delete or change an existing system or setup password if the Password Status is set to Locked Steps 1 To enter System Setup press F2 immediately after turning on or restart...

Страница 64: ...n the Redundant OS Control screen you can set the redundant OS information This enables you to set up a physical recovery disk on the system Viewing Redundant OS Control To view the Redundant OS Control screen perform the following steps 1 Power on or restart your system 2 Press F2 immediately after you see the following message F2 System Setup NOTE If your operating system begins to load before y...

Страница 65: ... before you press F2 wait for the system to finish booting and then restart your system and try again 3 On the System Setup Main Menu screen click System BIOS 4 On the System BIOS screen click Miscellaneous Settings Miscellaneous Settings details The Miscellaneous Settings screen details are explained as follows Option Description System Time Enables you to set the time on the system System Date E...

Страница 66: ...cycle Controller Dell Lifecycle Controller LC provides advanced embedded systems management capabilities including system deployment configuration update maintenance and diagnosis LC is delivered as part of the iDRAC out of band solution and Dell system embedded Unified Extensible Firmware Interface UEFI applications Embedded system management The Dell Lifecycle Controller provides advanced embedd...

Страница 67: ...om Launch System Setup Enables you to access System Setup Launch Lifecycle Controller Exits the Boot Manager and invokes the Dell Lifecycle Controller program System Utilities Enables you to launch System Utilities menu such as System Diagnostics One shot UEFI boot menu One shot UEFI boot menu enables you to select a boot device to boot from System Utilities System Utilities contains the following...

Страница 68: ... your product NOTE It is recommended that you always use an antistatic mat and antistatic strap while working on components inside the system CAUTION To ensure proper operation and cooling all bays in the system and system fans must be always populated with a component or a blank Before working inside your system Prerequisite Follow the safety guidelines listed in Safety instructions Steps 1 Turn ...

Страница 69: ...alpha wire part number 3080 or equivalent 65 30 stranding Optional front bezel NOTE The procedure to remove the front bezel with and without the LCD panel is the same Removing the front bezel Prerequisite Follow the safety guidelines listed in Safety instructions Steps 1 Unlock the bezel by using the bezel key 2 Press the release button and pull the left end of the bezel 3 Unhook the right end and...

Страница 70: ...he bezel by using the key Figure 24 Installing the front bezel with the LCD panel System cover NOTE The system cover of 12 x 3 5 inch 2 x 3 5 inch rear system is different from other systems The cover has one additional mylar and foam layer on the front side of the system cover Removing the system cover Prerequisites 1 Follow the safety guidelines listed in Safety instructions 2 Turn off the syste...

Страница 71: ...tes 1 Follow the safety guidelines listed in Safety instructions 2 Ensure that all internal cables are routed correctly and connected and no tools or extra parts are left inside the system Steps 1 Align the tabs on the system cover with the guide slots on the system 2 Push the system cover latch down The system cover slides forward the tabs on the system cover engage with the guide slots on the sy...

Страница 72: ...ver Removing the backplane cover Prerequisites 1 Follow the safety guidelines listed in Safety instructions 2 Follow the procedure listed in Before working inside your system 3 Removing the system cover Steps 1 Slide the backplane cover in the direction of the arrows marked on the backplane cover 2 Lift the backplane cover away from the system 72 Installing and removing system components ...

Страница 73: ... instructions 2 Follow the procedure listed in Before working inside your system 3 Installing the system cover Steps 1 Align the tabs on the backplane cover with the guide slots on the system 2 Slide the backplane cover toward the front of the system until the cover locks into place Installing and removing system components 73 ...

Страница 74: ...t step Follow the procedure listed in After working inside your system Inside the system NOTE Components that are hot swappable are marked orange and touch points on the components are marked blue 74 Installing and removing system components ...

Страница 75: ...Figure 29 Inside the system without rear drive cage Installing and removing system components 75 ...

Страница 76: ... Low profile riser right 14 Low profile riser left 15 Drive cage rear Air shroud Removing the air shroud Prerequisites CAUTION Never operate your system with the air shroud removed The system may get overheated quickly resulting in shutdown of the system and loss of data 1 Follow the safety guidelines listed in Safety instructions 2 Follow the procedure listed in Before working inside your system ...

Страница 77: ...and lift it away from the system Figure 31 Removing air shroud NOTE The system with 2 x 3 5 inch rear drive has a different air shroud However the procedure to remove the air shroud is identical Installing and removing system components 77 ...

Страница 78: ...d in Before working inside your system 3 If applicable route the cables inside the system along the system wall and secure the cables by using the cable latch Steps 1 Align the tabs on the air shroud with the slots on the system 2 Lower the air shroud into the system until it is firmly seated When firmly seated the memory socket numbers marked on the air shroud align with the respective memory soc...

Страница 79: ...Figure 32 Installing air shroud NOTE The procedure to install the air shroud for 2 x 3 5 inch rear drive system is identical Installing and removing system components 79 ...

Страница 80: ...s 2 Follow the procedure listed in Before working inside your system 3 Removing the air shroud 4 Removing the internal PERC riser 5 Move the cables out of the way to access the cooling fan cable connector on the system board Steps 1 Lift the fan out holding the blue touch point 2 Disconnect the cooling fan cable connected to the system board connector NOTE In the 12 x 3 5 inch drive system disconn...

Страница 81: ...Figure 33 Disconnecting fan cable from PIB connector 3 Press the release tab and lift the cooling fan out of the cooling fan cage Installing and removing system components 81 ...

Страница 82: ...the safety guidelines listed in Safety instructions 2 Follow the procedure listed in Before working inside your system 3 Removing the air shroud 4 Removing the internal PERC riser 5 Remove the power cable 6 Move the cables out of the way to access the cooling fan cable connector on the system board Steps 1 Holding the release tab blue touch point place the cooling fan into the cooling fan cage 2 R...

Страница 83: ...Figure 35 Installing cooling fan NOTE In the 12 x 3 5 inch drive system connect the fan 1 cable to the power interposer board connector Installing and removing system components 83 ...

Страница 84: ...the internal PERC riser Prerequisites 1 Follow the safety guidelines listed in Safety instructions 2 Follow the procedure listed in Before working inside your system 3 Removing the air shroud Steps 1 Open the cable guiding latch for easy access 2 Lower the plunger 3 Press the cable connector and disconnect the PERC cable from the backplane 4 Hold the blue touch points and lift the internal PERC ri...

Страница 85: ...up 6 Press the cable connector and disconnect the cable connected to the internal PERC card Figure 38 Disconnecting the cable from internal PERC card Next steps 1 Installing the air shroud 2 Follow the procedure listed in After working inside your system Installing and removing system components 85 ...

Страница 86: ...al PERC card Figure 39 Connecting the cable to internal PERC riser 2 Holding the blue touch points align the slot on the internal PERC riser to the guide on the system board 3 Insert the internal riser card s edge connector firmly into the system board connector until the riser is fully seated 4 Lift the plunger to lock the riser in place 86 Installing and removing system components ...

Страница 87: ...he PERC card from the internal PERC riser Prerequisites 1 Follow the safety guidelines listed in Safety instructions 2 Follow the procedure listed in Before working inside your system 3 Removing the air shroud 4 Removing the internal PERC riser Steps 1 Using a Phillips 2 screwdriver remove the screw that secures the PERC card to the internal PERC riser 2 Pull the PERC card out of the connector on ...

Страница 88: ... working inside your system Installing PERC card into the internal PERC riser Prerequisite 1 Follow the safety guidelines listed in Safety instructions Steps 1 Insert the PERC card into the internal PERC riser and push the card in 2 Using a Phillips 2 screwdriver replace the screw to secure the PERC card on the internal PERC riser 88 Installing and removing system components ...

Страница 89: ...Follow the safety guidelines listed in Safety instructions 2 Follow the procedure listed in Before working inside your system 3 Removing the air shroud 4 Removing the internal PERC riser Steps 1 Disconnect the intrusion switch cable connected to the system board NOTE Ensure that you note the routing of the cables as you remove them from the system board 2 Slide the intrusion switch out of the intr...

Страница 90: ...nstalling the intrusion switch Prerequisites 1 Follow the safety guidelines listed in Safety instructions 2 Follow the procedure listed in Before working inside your system Steps 1 Align the intrusion switch with the intrusion switch slot 90 Installing and removing system components ...

Страница 91: ...oving a drive blank The procedure for removing 2 5 inch and 3 5 inch drive blanks is identical Prerequisites 1 Follow the safety guidelines listed in Safety instructions 2 If installed Removing the front bezel CAUTION To maintain proper system cooling drive blanks must be installed in all empty drive slots CAUTION Mixing drive blanks from previous generations of PowerEdge servers is not supported ...

Страница 92: ...uidelines listed in Safety instructions 2 If installed Removing the front bezel CAUTION Mixing drive blanks from previous generations of PowerEdge servers is not supported Step Insert the drive blank into the drive slot and push the blank until the release button clicks into place Figure 46 Installing a drive blank Next step If removed Installing the front bezel 92 Installing and removing system c...

Страница 93: ...ve the 2 5 inch drive from the 3 5 inch drive adapter Figure 47 Removing a 2 5 inch drive from a 3 5 inch drive adapter Next step Installing a 2 5 inch drive into a 3 5 inch drive adapter Installing a 2 5 inch drive into a 3 5 inch drive adapter Prerequisites 1 Follow the safety guidelines listed in Safety instructions 2 Removing a 3 5 inch drive adapter from a 3 5 inch drive carrier Steps 1 Align...

Страница 94: ...low the safety guidelines listed in Safety instructions 2 If installed Removing the front bezel 3 Remove the 3 5 inch drive carrier from the system Steps 1 Using a Phillips 1 screwdriver remove the screws from the rails on the drive carrier 2 Lift the 3 5 inch drive adapter out of the 3 5 inch drive carrier 94 Installing and removing system components ...

Страница 95: ...in Safety instructions 2 Install the 2 5 inch drive into the 3 5 inch drive adapter Steps 1 Insert the 3 5 inch drive adapter into the 3 5 inch drive carrier with the connector end of the drive toward the back of the 3 5 inch drive carrier 2 Align the screw holes on the 3 5 inch drive adapter with the holes on the 3 5 inch drive carrier 3 Using a Phillips 1 screwdriver secure the 3 5 inch drive ad...

Страница 96: ...for removal For more information see the documentation for the storage controller CAUTION Before attempting to remove or install a drive while the system is running see the documentation for the storage controller card to ensure that the host adapter is configured correctly to support drive removal and insertion CAUTION Mixing drives from previous generations of PowerEdge servers is not supported ...

Страница 97: ...nd attempting to lock its handle next to a partially installed carrier can damage the partially installed carrier s shield spring and make it unusable CAUTION To prevent data loss ensure that your operating system supports hot swap drive installation See the documentation supplied with your operating system CAUTION When a replacement hot swappable drive is installed and the system is powered on th...

Страница 98: ...rom the drive carrier Prerequisite CAUTION Mixing drives from previous generations of PowerEdge servers is not supported Steps 1 Using a Phillips 1 screwdriver remove the screws from the slide rails on the drive carrier 2 Lift the drive out of the drive carrier 98 Installing and removing system components ...

Страница 99: ... drive into the drive carrier ensure that the screws are torqued to 4 in lbs Steps 1 Insert the drive into the drive carrier with the connector end of the drive towards the back of the carrier 2 Align the screw holes on the drive with the screws holes on the drive carrier When aligned correctly the back of the drive is flush with the back of the drive carrier 3 Using a Phillips 1 screwdriver secur...

Страница 100: ...s the instructions that are executed by the processor Your system contains 16 memory sockets Processor 1 supports up to 10 memory sockets and Processor 2 supports up to 6 memory sockets Six memory channels are allocated to each processor Processor 1 has four 2 DIMM slots per channel and two 1 DIMM slot per channel Processor 2 has six 1 DIMM per channel 100 Installing and removing system components...

Страница 101: ... your system observe the following general guidelines when configuring your system memory If your system s memory configurations fail to observe these guidelines your system might not boot stop responding during memory configuration or operate with reduced memory The memory bus may operate at frequency can be 2666 MT s 2400 MT s or 2133 MT s depending on the following factors System profile select...

Страница 102: ...ities can be mixed provided other memory population rules are followed For example 8 GB and 16 GB memory modules can be mixed In a dual processor configuration the memory configuration for each processor must be identical For example if you populate socket A1 for processor 1 then populate socket B1 for processor 2 and so on Mixing of more than two memory module capacities in a system is not suppor...

Страница 103: ...dules the available system memory 16 GB x 16 memory modules 8GB 1 rank sparing channel x 12 channel 256 GB 96 GB 160 GB For multi rank sparing in a dual processor configuration with sixteen 64 GB quad rank memory modules the available system memory 64 GB x 16 memory modules 32 GB 2 rank sparing channel x 12 channel 1024 GB 384 GB 640 GB NOTE To use memory sparing this feature must be enabled in th...

Страница 104: ...Multi rank sparing population order 1 2 3 4 5 6 7 8 9 10 Populate in this order odd amount allowed Requires three ranks or more per channel Dual processor Populate round robin starting with processor1 Optimized Independent channel population order A 1 B 1 A 2 B 2 A 3 B 3 Odd amount of DIMM slots per processor allowed Odd number of DIMM population is allowed NOTE Odd number of DIMMs will result in ...

Страница 105: ... off the system Handle the memory modules by the card edges and avoid touching the components or metallic contacts on the memory module Steps 1 Locate the appropriate memory module socket CAUTION Handle each memory module only by the card edges ensuring not to touch the middle of the memory module or metallic contacts 2 Push the ejectors outward on both ends of the memory module socket to release ...

Страница 106: ...Figure 57 Installing a memory module Next steps 1 Installing the air shroud 2 Follow the procedure listed in After working inside your system 3 To verify if the memory module has been installed properly press F2 and navigate to System Setup Main Menu System BIOS Memory Settings In the Memory Settings screen the System Memory Size must reflect the updated capacity of the installed memory 4 If the v...

Страница 107: ... up Figure 58 Removing processor and heat sink module Next step Installing a processor and heat sink module Removing the non fabric processor from the processor and heat sink module Prerequisites NOTE Only remove the processor from the processor and heat sink module if you are replacing the processor or heat sink This procedure is not required when replacing a system board 1 Follow the safety guid...

Страница 108: ...ck the bracket from the heat sink Figure 59 Loosening the processor bracket 4 Lift the bracket and the processor away from the heat sink and place the processor connector side down on the processor tray 5 Flex the outer edges of the bracket to release the bracket from the processor NOTE Ensure that the processor and the bracket are placed in the tray after you remove the heat sink Figure 60 Removi...

Страница 109: ...e pin 1 indicator on the processor before placing the bracket on the processor NOTE Ensure that the processor and the bracket are placed in the tray before you install the heat sink Figure 61 Installing the processor bracket 3 If you are using an existing heat sink remove the thermal grease from the heat sink by using a clean lint free cloth 4 Use the thermal grease syringe included with your proc...

Страница 110: ...locks onto the heat sink NOTE Ensure that the two guide pin holes on the bracket match the guide holes on the heat sink Do not press on the heat sink fins Ensure that the pin 1 indicator on the heat sink is aligned with the pin 1 indicator on the bracket before placing the heat sink onto the processor and bracket 110 Installing and removing system components ...

Страница 111: ...processor unless you intend to replace the processor The heat sink is necessary to maintain proper thermal conditions 1 Follow the safety guidelines listed in Safety instructions 2 If installed remove the CPU dust cover Steps 1 Align the pin 1 indicator of the heat sink to the system board and then place the processor and heat sink module PHM on the processor socket CAUTION To avoid damaging the f...

Страница 112: ...nd tighten it completely If the PHM slips off the blue retention clips when the screws are partially tightened follow these steps to secure the PHM a Loosen both the heat sink screws completely b Lower the PHM on to the blue retention clips following the procedure described in step 2 c Secure the PHM to the system board following the replacement instructions listed in this step above 4 Figure 64 I...

Страница 113: ...sion cards to ensure proper cooling and mechanical fit The expansion cards with the highest priority should be installed first using the slot priority indicated All the other expansion cards should be installed in the card priority and slot priority order Table 47 Riser configurations No RSR 1 CPU Card Type Slot Priority Maximum number of cards LOM riser 2x1G BCM5720L FXN 1 1 LOM riser 2x10G BCM57...

Страница 114: ...D PERC10 External Dell 2 1 PCIe SSD PCIe Card Samsung 2 1 NIC Broadcom INTEL EMULEX Mellanox Solarflare 2 1 Card Network Broadcom INTEL Mellanox INTEL 2 1 Card Controller EMULEX QLOGIC 2 1 BOSS M 2 SATA Dell 2 1 PERC9 14G PERC10 FXN Integrated Slot 1 RAID PERC9 14G PERC10 Internal Integrated Slot 1 Table 50 Riser configurations LP LP 2 CPU Card type Slot priority Maximum number of cards LOM riser ...

Страница 115: ...2 5 3 Card Controller QLOGIC EMULEX 3 2 5 3 Card Network Broadcom INTEL Mellanox QLOGIC Solarflare 3 5 2 Card Controller QLOGIC 3 5 2 Intel OPA NIC Intel OPA 3 5 2 BOSS M 2 SATA Dell 3 5 2 Card Network Broadcom 6 5 3 3 Card Network INTEL 6 5 3 3 PERC9 14G PERC10 FXN Integrated Slot 1 RAID PERC9 14G PERC10 Internal Dell Integrated Slot 1 Table 52 Riser configurations BTF 3 XLP 2 CPU Card type Slot ...

Страница 116: ...ternal Integrated Slot 1 Removing expansion card from the expansion card riser Prerequisites 1 Follow the safety guidelines listed in Safety instructions 2 Follow the procedure listed in Before working inside your system 3 If applicable Removing the air shroud 4 If applicable disconnect the cables from the expansion card 5 When removing a card from low profile full height X1 or butterfly riser ens...

Страница 117: ...Figure 65 Removing expansion card from low profile riser Figure 66 Removing expansion card from full height X1 riser Installing and removing system components 117 ...

Страница 118: ...g expansion card from butterfly riser 3 If the expansion card is not going to be replaced install a filler bracket Figure 68 Installing filler bracket for low profile riser 118 Installing and removing system components ...

Страница 119: ...talling filler bracket for full height X1 riser Figure 70 Installing filler bracket for butterfly riser Next steps 1 Install expansion card into the expansion card riser Installing and removing system components 119 ...

Страница 120: ...a new expansion card unpack it and prepare the card for installation NOTE For instructions see the documentation accompanying the card 3 When installing a card into low profile full height X1 or butterfly riser open the PCIe card holder latch Steps 1 Pull and lift up the expansion card retention latch lock to open 2 If installed remove the filler bracket NOTE Store the filler bracket for future us...

Страница 121: ...riser 3 Hold the card by its edges and align the card edge connector with the expansion card connector on the riser 4 Insert the card edge connector firmly into the expansion card connector until the card is fully seated 5 Close the expansion card retention latch Installing and removing system components 121 ...

Страница 122: ...Figure 74 Installing expansion card into low profile riser Figure 75 Installing expansion card into full height X1 riser 122 Installing and removing system components ...

Страница 123: ...the documentation for the card Removing expansion card from the system board Prerequisites 1 Follow the safety guidelines listed in Safety instructions 2 Follow the procedure listed in Before working inside your system 3 Disconnect any cables connected to the expansion card Steps 1 Pull and lift up the expansion card retention latch lock to open 2 Hold the expansion card by the edge and pull the c...

Страница 124: ...ll a filler bracket by performing the following steps a Align the filler bracket with the slot on the system b Push the filler bracket downward until firmly seated c Close the expansion card retention latch by pushing the latch down until the latch snaps into place 124 Installing and removing system components ...

Страница 125: ...on card on the system board Installing expansion card on the system board Prerequisite 1 Follow the safety guidelines listed in Safety instructions Steps 1 Unpack the expansion card and prepare it for installation For instructions see the documentation accompanying the card 2 If you are installing a new card remove the filler bracket a Pull and lift up the expansion card retention latch lock to op...

Страница 126: ... the system and aid in proper cooling and airflow inside the system 3 Holding the card on the edges align the card with the expansion card connector on the system board 4 Press the expansion card firmly into the expansion card connector on the system board until the card is fully seated 5 Close the expansion card retention latch by pushing the latch down until the latch snaps into place 126 Instal...

Страница 127: ...Removing an expansion card riser Prerequisites 1 Follow the safety guidelines listed in Safety instructions 2 Follow the procedure listed in Before working inside your system 3 Disconnect any cables connected to the expansion card Step Hold the touch points and lift the expansion card riser from the riser connector on the system board Installing and removing system components 127 ...

Страница 128: ...Figure 81 Removing low profile riser right Figure 82 Removing low profile riser left 128 Installing and removing system components ...

Страница 129: ...Figure 83 Removing full height X1 riser NOTE For butterfly riser loosen the captive screw and holding the touch points lift the riser away from the system Installing and removing system components 129 ...

Страница 130: ... instructions Steps 1 If removed install the expansion cards into the expansion card riser 2 Holding the touch points align the expansion card riser with the connector and the riser guide pin on the system board 3 Lower the expansion card riser into place until the expansion card riser connector is fully seated in the connector 130 Installing and removing system components ...

Страница 131: ...Figure 85 Installing low profile riser right Figure 86 Installing low profile riser left Installing and removing system components 131 ...

Страница 132: ... Installing full height X1 riser NOTE For butterfly riser tighten the captive screw to firmly hold the riser to the system board Figure 88 Installing butterfly riser 132 Installing and removing system components ...

Страница 133: ...sted in Before working inside your system 3 Remove the air shroud 4 If installed remove the rear drive cage 5 Remove the BOSS card NOTE The procedure to remove the BOSS card is similar to the removing an expansion card Steps 1 Loosen the screw and lift the retention strap that secures the M 2 SSD module on the BOSS card 2 Lift the M 2 SSD module and slide it out of the connector on the BOSS card F...

Страница 134: ...on card Steps 1 Connect the M 2 SSD module to the connector on the BOSS card 2 Place the retention strap on the M 2 SSD module and tighten the screw to secure the module Figure 90 Installing the M 2 SSD module Next steps 1 Install the BOSS card NOTE The procedure to install the BOSS card is similar to the Installing expansion card on the system board 2 Install the applicable air shroud 3 Follow th...

Страница 135: ...led in System Setup NOTE If reinstalling ensure that you install the MicroSD cards into the same slots based on the labels you had marked on the cards during removal Steps 1 Locate the MicroSD card connector on the IDSDM vFlash module Orient the MicroSD card appropriately and insert the contact pin end of the card into the slot To locate IDSDM vFlash see the System board jumpers and connectors sec...

Страница 136: ... vFlash card Prerequisite Follow the safety guidelines listed in Safety instructions Steps 1 Locate the IDSDM vFlash connector on the system board To locate IDSDM vFlash connector see the Jumpers and connectors section 2 Align the IDSDM vFlash card with the connector on the system board 3 Push the IDSDM vFlash card until it is firmly seated on the system board 136 Installing and removing system co...

Страница 137: ...Before working inside your system 3 If installed remove the risers 4 If installed remove the rear drive cage Steps 1 Using a Phillips 2 screwdriver loosen the screws that secure the LOM riser card to the system board 2 Release the two blue side plastic snaps holding the LOM riser card 3 Hold the LOM riser card by the edges on either side and lift to remove it from the connector on the system board...

Страница 138: ...Steps 1 Align the connectors on the LOM riser card with the slot on the system 2 Press the LOM riser card until the card is firmly seated on the system board connector and the two blue plastic snap hold the LOM riser card in place 3 Using a Phillips 2 screwdriver replace the screws to secure the LOM riser card to the system board 138 Installing and removing system components ...

Страница 139: ... Drive backplane guidelines Depending on your system configuration the drive backplanes supported in PowerEdge R540 are listed here Table 53 Supported backplane options for PowerEdge R540 systems System Supported hard drives options PowerEdge R540 3 5 inch x8 SAS SATA backplane 3 5 inch x12 SAS or SATA backplane and 3 5 inch x2 SAS or SATA backplane rear Installing and removing system components 1...

Страница 140: ...nal connector 3 SAS SATA A cable connector 4 Power connector Figure 96 12 X 3 5 inch drive backplane 1 Power cable connector 2 SAS SATA cable connector 3 SAS SATA cable connector 4 Backplane signal connector 5 SAS cable connector 140 Installing and removing system components ...

Страница 141: ...e location NOTE The procedure to remove the backplane is similar for all backplane configurations 1 Follow the safety guidelines listed in Safety instructions 2 Follow the procedure listed in Before working inside your system 3 Remove the air shroud 4 Remove the backplane cover 5 Remove all the drives from the hard drive slots from the front of the system 6 Disconnect all the cables from the backp...

Страница 142: ... Safety instructions NOTE The procedure to install the backplane is similar for all backplane configurations Steps 1 Use the hooks on the system as guides to align the slots on the backplane with the guides on the system 2 Lower the drive backplane until the blue release tabs snap into place 142 Installing and removing system components ...

Страница 143: ...s and backplane you must remove the drives from the system before removing the backplane CAUTION You must note the number of each hard drive and temporarily label them before removal so that you can replace them in the same locations 1 Follow the safety guidelines listed in Safety instructions 2 Follow the procedure listed in Before working inside your system 3 Remove all the drives from the rear ...

Страница 144: ...ne Next step Install the 3 5 inch rear drive backplane Installing the 3 5 inch rear drive backplane Prerequisite Follow the safety guidelines listed in Safety instructions Steps 1 Use the hooks on the rear drive cage as guides to align the drive backplane 2 Lower the backplane into the system until it is firmly seated 3 Using Phillips 2 screwdriver replace the screws to secure the backplane to the...

Страница 145: ... drive backplane Next steps 1 Install the rear drive cage 2 Install all the drives 3 Connect all the cables to the backplane 4 Follow the procedure listed in After working inside your system Installing and removing system components 145 ...

Страница 146: ...3 5 inch rear drive backplane with internal PERC riser 1 Drive backplane 2 SAS cable BP SAS A2 to rear drive backplane 3 Internal PERC riser 4 Drive backplane rear 5 Cable guiding latch 6 SAS cable BP SAS A0 B0 to internal PERC riser 146 Installing and removing system components ...

Страница 147: ... backplane with internal PERC riser 1 Drive backplane 2 SATA cable BP BP_A to internal PERC riser SATA_A 3 Internal PERC riser 4 Cable guiding latch 5 SATA cable BP BP_B to internal PERC riser SATA_B Installing and removing system components 147 ...

Страница 148: ...5 inch drive backplane 1 Drive backplane 2 SATA A cable BP BP_A0 to MB SATA_A 3 SATA B cable BP BP_B0 to MB SATA_B 4 System board 5 Cable guiding latch 6 SATA C cable BP BP_C0 to MB SATA_C 148 Installing and removing system components ...

Страница 149: ...equisites 1 Follow the safety guidelines listed in Safety instructions 2 Follow the procedure listed in Before working inside your system 3 Remove all the drives 4 Disconnect all the cables from the rear drive backplane Steps 1 Using Phillips 2 screwdriver loosen the screws that secure the drive cage to the system 2 Pull and hold the screws to lift the drive cage away from the system Installing an...

Страница 150: ...the safety guidelines listed in Safety instructions Steps 1 Align the screws on the drive cage with the screw holes on the system chassis 2 Lower the drive cage into the system until it is firmly seated and the screws locks into place 3 Using Phillips 2 screwdriver tighten the screws 150 Installing and removing system components ...

Страница 151: ...y only with the same or equivalent type recommended by the manufacturer For more information see the safety information that shipped with your system 1 Follow the safety guidelines listed in Safety instructions 2 Follow the procedure listed in Before working inside your system 3 If applicable disconnect the power or data cables from expansion card s 4 If installed remove the low profile or full he...

Страница 152: ...edure listed in After working inside your system 4 While booting press F2 to enter the System Setup and ensure that the battery is operating properly 5 Enter the correct time and date in the System Setup Time and Date fields 6 Exit the System Setup Optional internal USB memory key Replacing the optional internal USB memory key Prerequisites CAUTION To avoid interference with other components in th...

Страница 153: ... 2 Follow the procedure listed in Before working inside your system 3 If applicable remove the front bezel 4 Disconnect the power and data cables from the connectors on the optical drive NOTE Ensure that you note the routing of the power and data cable on the side of the system and drive Route these cables properly when you replace them to prevent them from being pinched or crimped Steps 1 Press t...

Страница 154: ...optical drive Prerequisite Follow the safety guidelines listed in Safety instructions Steps 1 Align the optical drive with the optical drive slot on the front of the system 2 Slide in the optical drive until the release tab snaps into place 154 Installing and removing system components ...

Страница 155: ... are installed power supply redundancy 1 1 with redundancy or 2 0 without redundancy is configured in system BIOS In redundant mode power is supplied to the system equally from both PSUs when Hot Spare is disabled When Hot Spare is enabled one of the PSUs is put into the sleep mode when system utilization is low in order to maximize efficiency NOTE If two PSUs are used they must be of the same max...

Страница 156: ...e Follow the safety guidelines listed in Safety instructions Step If you are installing a second power supply unit remove the power supply unit blank in the bay by pulling the blank outward CAUTION To ensure proper system cooling the power supply unit blank must be installed in the second power supply unit bay in a non redundant configuration Remove the power supply unit blank only if you are inst...

Страница 157: ...stem that is powered on 1 Follow the safety guidelines listed in Safety instructions 2 Disconnect the power cable from the power source and from the PSU you intend to remove and then remove the cable from the strap on the PSU handle 3 Unlatch and lift the optional cable management arm if it interferes with the PSU removal For information about the cable management arm see the system s rack documen...

Страница 158: ...ow the safety guidelines listed in Safety instructions 2 For systems that support redundant PSU ensure that both the PSUs are of the same type and have the same maximum output power NOTE The maximum output power shown in watts is listed on the PSU label Step Slide the PSU into the system until the PSU is fully seated and the release latch snaps into place 158 Installing and removing system compone...

Страница 159: ... occur until discovery is complete Wait until the new PSU is discovered and enabled before you remove the other PSU The PSU status indicator turns green to signify that the PSU is functioning properly Removing a non redundant cabled AC power supply unit Prerequisites 1 Follow the safety guidelines listed in Safety instructions 2 Follow the procedure listed in Before working inside your system 3 Re...

Страница 160: ...cabled AC power supply unit Prerequisite 1 Follow the safety guidelines listed in Safety instructions Steps 1 Unpack the new power supply unit PSU 2 Slide the new PSU into the PSU cage until the PSU is fully seated 3 Using a Phillips 2 screwdriver replace the screw to secure the PSU to the system 160 Installing and removing system components ...

Страница 161: ...cal or national codes and practices Damage due to servicing that is not authorized by Dell is not covered by your warranty Read and follow all safety instructions that came with the product CAUTION The system needs one PSU for normal operation On power redundant systems remove and replace only one PSU at a time in a system that is powered on 1 Follow the safety guidelines listed in Safety instruct...

Страница 162: ... with the strap to the PSU handle 4 Connect the wires to a DC power source NOTE When installing hot swapping or hot adding a new PSU wait for 15 seconds for the system to recognize the PSU and determine its status The PSU status indicator turns green to signify that the PSU is functioning properly Wiring instructions for a DC power supply unit Your system supports up to two 48 60 V DC power supply...

Страница 163: ... covered by your warranty Read and follow all safety instructions that came with the product Steps 1 Strip the insulation from the end of the green or yellow wire exposing approximately 4 5 mm 0 175 inch of copper wire 2 Using a hand crimping tool Tyco Electronics 58433 3 or equivalent crimp the ring tongue terminal Jeeson Terminals Inc R5 4SA or equivalent to the green and yellow wire safety grou...

Страница 164: ...y Power interposer board Removing power interposer board Prerequisites 1 Follow the safety guidelines listed in Safety instructions 2 Follow the procedure listed in Before working inside your system 3 Removing the air shroud 4 Disconnect all the cables connected from the PIB to the system board NOTE Ensure that you note the routing of the cables as you remove them from the system board 5 Removing ...

Страница 165: ...er board Prerequisite Follow the safety guidelines listed in Safety instructions Steps 1 Align the slots on the PIB with the hook on the PSU cage and slide it into place 2 Using a Phillips 2 screwdriver tighten the screw to secure the PIB to the system 3 Route the cables and connect it to the system board Installing and removing system components 165 ...

Страница 166: ...in Before working inside your system 3 Removing the air shroud 4 Removing the PERC card from the internal PERC riser Steps 1 Disconnect the control panel cable from the system board connector NOTE Ensure that you note the routing of the cables as you remove them from the system board You must route the cables properly when you replace them to prevent the cables from being pinched or crimped 2 Usin...

Страница 167: ...ted in Safety instructions Steps 1 Route the control panel cable through the side wall of the system 2 Align the left control panel assembly with the control panel slot on the system and place the assembly in the slot on the system 3 Connect the control panel cable to the system board connector 4 Using Phillips 1 screwdriver tighten the screws to secure the left control panel assembly to the syste...

Страница 168: ...e working inside your system 3 Removing the PERC card from the internal PERC riser Steps 1 Lift the cable latch and disconnect the control panel cable from the connector on the system board NOTE Ensure that you note the routing of the cables as you remove them from the system board You must route the cables properly when you replace them to prevent the cables from being pinched or crimped 2 Using ...

Страница 169: ...1 Route the control panel cable through the side wall of the system 2 Align the right control panel assembly with the control panel slot on the system and attach the control panel assembly to the system 3 Connect the control panel cable to the connector on the system board and lower the cable latch to secure the cable in place 4 Using a Phillips 1 screwdriver tighten the screws to secure the right...

Страница 170: ...program before you can access the encrypted data on your drives CAUTION Do not attempt to remove the TPM plug in module from the system board Once the TPM plug in module is installed it is cryptographically bound to that specific system board Any attempt to remove an installed TPM plug in module breaks the cryptographic binding and it cannot be re installed or installed on another system board 1 F...

Страница 171: ...j LOM riser card k Drive cage rear if installed Steps 1 Disconnect all cables from the system board CAUTION Take care not to damage the system identification button while removing the system board from the chassis 2 Using a Torx T30 screwdriver remove nine screws securing the system board to the chassis Figure 125 System board screws 3 Hold the system board holder slightly lift the system board an...

Страница 172: ...t lift the system board by holding a memory module processor or other components CAUTION Take care not to damage the system identification button while placing the system board into the chassis 2 Holding the system board holder push the system board toward the back of the system till it is seated 3 Using Phillips 2 screwdriver tighten the screws to secure the system board to the chassis 172 Instal...

Страница 173: ...Drive cage rear if applicable 2 Reconnect all cables to the system board NOTE Ensure that the cables inside the system are routed along the chassis wall and secured using the cable securing bracket 3 Follow the procedure listed in After working inside your system 4 Ensure that you a Use the Easy Restore feature to restore the Service Tag For more information see the Restoring the service tag using...

Страница 174: ...figuration data To restore the system configuration data press Y To use the default configuration settings press N NOTE After the restore process is complete system reboots Manually update the Service Tag After replacing a system board if Easy Restore fails follow this process to manually enter the Service Tag using System Setup About this task If you know the system service tag use the System Set...

Страница 175: ...led TPM plug in module breaks the cryptographic binding the removed TPM cannot be reinstalled or installed on another system board Removing the TPM 1 Locate the TPM connector on the system board NOTE To locate the TPM connector on the system board see the Jumpers and connectors section 2 Press to hold the module down and remove the screw using the security Torx 8 bit shipped with the TPM module 3 ...

Страница 176: ...lizing the TPM 1 2 for TXT users 1 While booting your system press F2 to enter System Setup 2 On the System Setup Main Menu screen click System BIOS System Security Settings 3 From the TPM Security option select On with Pre boot Measurements 4 From the TPM Command option select Activate 5 Save the settings 6 Restart your system 7 Enter System Setup again 8 On the System Setup Main Menu screen clic...

Страница 177: ...he failed device s View status messages that inform you if tests are completed successfully View error messages that inform you of problems encountered during testing Running the Embedded System Diagnostics from Boot Manager Run the Embedded System Diagnostics ePSA if your system does not boot 1 When the system is booting press F11 2 Use the up arrow and down arrow keys to select System Utilities ...

Страница 178: ...etected devices Results Displays the results of all tests that are run System health Provides the current overview of the system performance Event log Displays a time stamped log of the results of all tests run on the system This is displayed if at least one event description is recorded 178 Using system diagnostics ...

Страница 179: ...escribes the connectors on the various boards in the system Jumpers on the system board help to disable the system and setup passwords You must know the connectors on the system board to install components and cables correctly Topics System board jumpers and connectors System board jumper settings Disabling forgotten password 8 Jumpers and connectors 179 ...

Страница 180: ...onnectors Item Connector Description 1 FAN6 Cooling fan 6 connector 2 CPU1 Processor socket 1 3 CPU1_PWR_CONN P2 CPU1 power connector 4 J_INTRU Intrusion switch connector 5 J_BP_SIG1 Backplane signal connector 1 6 LFT_CP_CONN Left control panel connector 7 J_SATA_B1 Internal SATA B connector 180 Jumpers and connectors ...

Страница 181: ...USB_3 0 USB connector 20 NVRAM_CLR Clear NVRAM 21 PWRD_EN Reset BIOS password 22 SLOT6 PCIe slot 6 23 SLOT5 PCIe slot 5 24 SLOT4 PCIe slot 4 25 J_TPM_MODULE TPM module connector 26 J_BP_SIG0 Backplane signal connector 27 J_MEZZ_A1 LOM riser card connector 28 BATTERY Battery connector 29 PCIE_G3_X16 CPU1 Riser 1 connector 30 A6 A5 A10 A4 A9 A7 A1 A8 A2 A3 Memory module sockets 31 B3 B2 B1 B4 B5 B6 ...

Страница 182: ...nstructions that are shipped with your product Steps 1 Power off the system including any attached peripherals and disconnect the system from the electrical outlet 2 Remove the system cover 3 Move the jumper on the system board jumper from pins 2 and 4 to pins 4 and 6 4 Install the system cover The existing passwords are not disabled erased until the system boots with the jumper on pins 4 and 6 Ho...

Страница 183: ...Tag in the Enter your Service Tag field b Click Submit The support page that lists the various support categories is displayed 4 For general support a Select your product category b Select your product segment c Select your product The support page that lists the various support categories is displayed 5 For contact details of Dell EMC Global Technical Support a Click Global Technical Support b Th...

Страница 184: ... environment you can receive the following benefits Automated issue detection SupportAssist monitors your Dell EMC devices and automatically detects hardware issues both proactively and predictively Automated case creation When an issue is detected SupportAssist automatically opens a support case with Dell EMC Technical Support Automated diagnostic collection SupportAssist automatically collects s...

Отзывы: