


When the device is powered with both the power sources—AC adapter and USB Type-C cable, the AC adapter is the primary
power source and USB Type-C is the secondary power source. Disconnecting the AC adapter will shut down the system. If the
secondary power source is disconnected, the system continues to operate normally.
NOTE:
Hotswap between the AC adapter and USB Type-C power source is not supported.
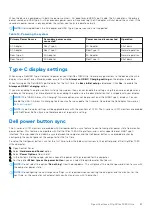
Table 14. Powering the system
Primary Power Source
Secondary power source
connected
Power source disconnected
Operation
AC Adapter
Rear Type-C
AC Adapter
Shut down
AC Adapter
Rear Type-C
Rear Type-C
Normal operation
Rear Type-C
AC Adapter
AC Adapter
Normal operation
Rear Type-C
AC Adapter
Rear Type-C
Shut down
Type-C display settings
When using a Dell USB Type-C display to power on your OptiPlex 7090 Ultra, to avoid any power loss to the device when the
display is turned off or on Standby mode, ensure that the
Always on USB-C Charging setting
on the display is enabled.
When turning on the Dell USB Type-C display for the first time, the
Easy initial setup
is displayed. Click
Yes
, to enable the
Always on USB-C charging
option.
If you miss enabling the option on Easy Initial setup window, then you can enable the setting using the on-screen display menu
available on the display. For more information on enabling the option, see the documentation that is shipped with your display.
NOTE:
The "USB-C Always On Charging" firmware option may not be present on all Dell USB Type-C displays. You can
enable the USB-C Always On charging feature only after you update the firmware. Download the Dell display firmware, at
.
NOTE:
Type-C display settings will be applicable only with the monitors of CY20. The C-series or CY21 monitors are enabled
with Dell Power Button Sync and therefore do not require this setting.
Dell power button sync
The C-series or CY21 monitors are enabled with Dell power button sync feature to control computer power state from monitor
power button. This feature is compatible with Dell OptiPlex 7090 Ultra platform, and is only supported over USB Type-C
interface. The user needs to establish a sync between the computer and the Dell power button sync enabled monitor by
configuring the control panel of the computer for the first time.
To setup the Dell power button sync for the first time, follow the below instructions in the control panel of Dell OptiPlex 7090
Ultra computer.
1. Open Control Panel.
2. Select
Hardware and Sound
option.
3. Select
Power Options
from the list.
4. In the Systems Settings page, you can choose the power settings required for the computer.
5. For the option
When I press the power button:
, you can select Sleep/Hibernate/Shut down.
NOTE:
Do not select the option "
Do nothing
" from the drop down. This will prevent the monitor power button to sync with
the computer power state.
NOTE:
Re-configuring the control panel settings is not required when connecting the computer and the monitor for the
next time, as the computer will automatically contract and sync with the monitor.
Specifications of OptiPlex 7090 Ultra
87
Содержание D13U
Страница 4: ...Chapter 5 Getting help 90 Contacting Dell 90 4 Contents ...
Страница 11: ...17 Lock the device and the stand cover Set up your OptiPlex 7090 Ultra 11 ...
Страница 12: ...18 Press the power button to turn on the device 12 Set up your OptiPlex 7090 Ultra ...
Страница 13: ...Set up your OptiPlex 7090 Ultra 13 ...
Страница 20: ...13 Lock the device and the stand cover 20 Set up your OptiPlex 7090 Ultra ...
Страница 21: ...14 Press the power button to turn on the device Set up your OptiPlex 7090 Ultra 21 ...
Страница 22: ...22 Set up your OptiPlex 7090 Ultra ...
Страница 28: ...28 Set up your OptiPlex 7090 Ultra ...
Страница 29: ...Set up your OptiPlex 7090 Ultra 29 ...
Страница 33: ...Set up your OptiPlex 7090 Ultra 33 ...
Страница 35: ...Set up your OptiPlex 7090 Ultra 35 ...
Страница 37: ...9 Slide and release the inner bar on the lower edge of the stand cover Set up your OptiPlex 7090 Ultra 37 ...
Страница 42: ...Large Height Adjustable Stand 42 Set up your OptiPlex 7090 Ultra ...
Страница 44: ...15 Lock the device and the stand cover 44 Set up your OptiPlex 7090 Ultra ...
Страница 45: ...16 Press the power button to turn on the device Set up your OptiPlex 7090 Ultra 45 ...
Страница 47: ...For 30 inch to 32 inch monitor Large height adjustable stand Set up your OptiPlex 7090 Ultra 47 ...
Страница 48: ...For monitors 32 inch Large height adjustable stand 48 Set up your OptiPlex 7090 Ultra ...
Страница 56: ...k Close the stand cover 56 Set up your OptiPlex 7090 Ultra ...
Страница 57: ...l Lock the device and the stand cover Set up your OptiPlex 7090 Ultra 57 ...
Страница 63: ...h Press the power button to turn on the device Set up your OptiPlex 7090 Ultra 63 ...
Страница 64: ...64 Set up your OptiPlex 7090 Ultra ...
Страница 70: ...Back 70 View of OptiPlex 7090 Ultra ...
Страница 71: ...1 Hard drive cover M 2 Solid state drive cover Stands view Fixed stand View of OptiPlex 7090 Ultra 71 ...
Страница 72: ...Pro 1 0 Height adjustable stand Pro 2 0 Height Adjustable Stand Standard 72 View of OptiPlex 7090 Ultra ...
Страница 73: ...Pro 2 0 Height Adjustable Stand Large View of OptiPlex 7090 Ultra 73 ...
Страница 74: ...Offset VESA Mount 74 View of OptiPlex 7090 Ultra ...
Страница 75: ...VESA Adapter for Pro2 0 Height Adjustable Stand View of OptiPlex 7090 Ultra 75 ...
Страница 76: ...VESA Adapter for Pro1 0 Height Adjustable Stand 76 View of OptiPlex 7090 Ultra ...
Страница 77: ...Wall Mount View of OptiPlex 7090 Ultra 77 ...
Страница 78: ...78 View of OptiPlex 7090 Ultra ...