2K
PLEASE READ FIRST!
Connect your NVR to your modem/router using the Ethernet cable (included). This is required for viewing your footage from
the SmartSignal App. If only viewing your footage from the mobile app, skip to page 2. If you’d like to view your footage from
a monitor/TV, proceed to Step 1.
VEUILLEZ LIRE CE QUI SUIT EN PREMIER LIEU ! / ¡POR FAVOR, LEA PRIMERO!
Connectez votre NVR à votre modem/routeur en utilisant le câble Ethernet (inclus). Cette étape est nécessaire pour visualiser vos images depuis l’application SmartSignal. Si vous ne
regardez vos images que depuis l’application mobile, passez à la page 2. Si vous souhaitez visionner vos images depuis un moniteur/télévision, commencez avec l’étape 1
Conecte su NVR a su módem / enrutador utilizando el cable Ethernet (incluido). Esto es necesario para ver su metraje desde la aplicación SmartSignal. Si solo mira material de archivo
desde la aplicación móvil, salte a la página 2. Si desea ver sus imágenes desde un monitor / una TV, proceda al Paso 1.
NVR SETUP
CONFIGURATION DE VOTRE NVR / CONFIGURACIÓN DE NVR
W2K1TB4B2 / W2K1TB4B3 / W2K1TB4B4
For the full product manual and support videos visit
www.DEFENDER-USA.COM/SUPPORT
Pour consulter le manuel complet du produit et les vidéos d’assistance, visitez le|Para ver el manual completo del producto y los videos de soporte, visite
www.DEFENDER-USA.COM/SUPPORT
•
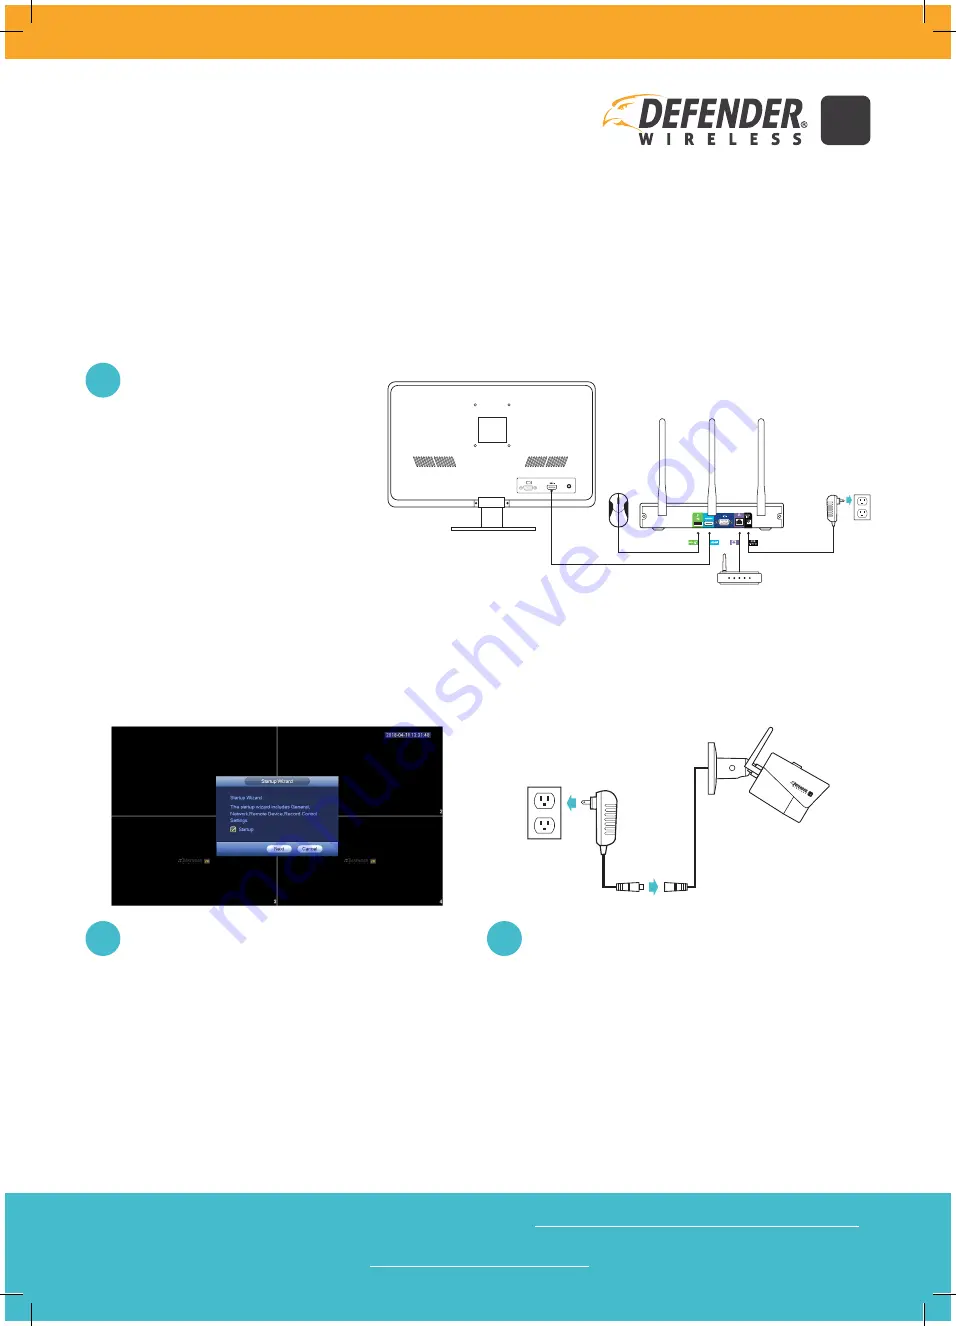
Connect all cables to the NVR based
on color coding and image labels.
•
NVR will power on automatically when
connected to a power outlet.
•
Turn on the monitor/TV.
•
If the NVR does not display, confirm the
input on your TV is set to the correct
source (Ex: HDMI1, HDMI2, etc.).
•
Test all Cameras before installing.
•
Connect Cameras to a power supply using the power
adapter connection – NOTE: The Ethernet port on the
camera is explained in the Product Manual and not
required for wireless setup.
•
Testez toutes les caméras avant l’installation.
•
Connectez les caméras à une source d’alimentation en utilisant la connexion de l’adapta-
teur d’alimentation — REMARQUE : l’utilisation du port Ethernet sur la caméra est expli-
quée dans le manuel du produit et celui-ci n’est pas requis pour la configuration sans fil.
•
Pruebe todas las cámaras antes de instalar.
•
Conecte las cámaras a una fuente de alimentación utilizando la conexión del adaptador
de alimentación - NOTA: El puerto Ethernet de la cámara se explica en el Manual del
producto y no es necesario para la configuración inalámbrica.
•
Follow the Setup Wizard instructions.
•
Camera Registration screen: click Device Search to pair
cameras – NOTE: It can take a few minutes for cameras
to show and pair.
•
Suivez les instructions de l’assistant de configuration.
•
Écran Enregistrement de caméra : cliquez sur Recherche de périphérique pour
associer des caméras. – REMARQUE : l’affichage et le couplage des caméras peuvent
prendre quelques minutes.
•
Siga las instrucciones del asistente de instalación.
•
Pantalla de registro de cámara: haga clic en Búsqueda de dispositivo para empare-
jar cámaras - NOTA: Las cámaras pueden demorar unos minutos en mostrarse y
sincronizarse.
1
2
3
•
Conecte todos los cables al NVR según la codificación de color y las etiquetas
de imagen.
•
El NVR se encenderá automáticamente cuando esté conectado a una toma de
corriente. Encienda el monitor / la TV.
•
Si el NVR no muestra nada, confirme que la entrada en su televisor esté configurada
en la fuente correcta (Ej: HDMI1, HDMI2, etc.).
•
Connectez tous les câbles au NVR en fonction du code de couleur et des
étiquettes d’image.
•
Le NVR s’allume automatiquement lorsqu’il est connecté à une prise de
courant. Allumez le moniteur/télévision.
•
Si le NVR ne s’affiche pas, vérifiez que l’entrée de votre télévision est réglée
sur la bonne source (ex. : HDMI1, HDMI2, etc.).
1.


