Operations Manual USB Photo Relay Card
DECISION Computer International
- 7 -
7
3.
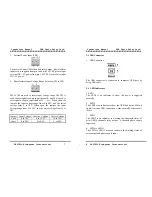
External Power Input (TB1)
SGND
+5V
. .
2 1
The power of mini USB 4 channels relay output / photo isolator
input card is supplied from pin 1 and pin 2 of TB1, please input
external DC +5V power from pin 1 of TB1. Be careful to input
DC +5V power.
4.
Photo Isolator Input Voltage Range Selection (JP5 to JP8)
1 2
. .
JP5 to JP8 are used to select input voltage range. The JP5 is
used to select photo couple input channel 0, and JP6 is used to
select photo couple input channel 1 … etc. When short the
jumper, the input voltage range from 0 to 20V, and the active
voltage form 6 to 20V. When open the jumper, the input
voltage range from 0 to 30V, and the active voltage from 18 to
30V.
Jumper Input Voltage
Inactive Voltage
Active Voltage
open
0 to 30V
0 to 16.5V
18 to 30V
short
0 to 20V
0 to 4.5V
6
to 20V
Operations Manual USB Photo Relay Card
DECISION Computer International
8
2.3 USB Connector
1.
USB Connector
The USB connector is connected to computer USB port by
using USB cable.
2.4 LED Indicators
1. LED1
The LED1 is an indicator to show the power is supplied
normally.
2.
LED2
The LED2 is an indicator to show the USB link status. When it
lights, it means USB connection works normally, otherwise it
is fail.
3.
LED3
The LED3 is an indicator to warning the abnormal status of
mini USB 4 channels relay output / 4 channels photo couple
input card.
4.
LED4 to LED11
The LED4 to LED11 are used to shown the working status of
relay output and photo couple input.

