background image

SECTION 1   

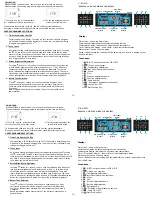
TECHNICAL FEATURES of OVEN

MODEL

ASTRO  

A OW15-

K5M

ASTRO 

B

(OW15-

D7)

ASTRO  

C (OW15-

DM8-T ) 

ALBA A  

OW13-

M5

ALBA B  

OW13-

D7

 ALBA C  

OW13-

DM8-T


Thermostat (C)

50 - 285 

50 - 285 

50 - 285 

50 – 285  50 – 285 

50 – 285 

Timer

����������

��

����������

��

����������

��

������

��

������

��

������

��

Oven Volume {It)

66 

66 

66 

66 

66 

66 

Max Oven 

Power (W)

2500 

2500 

2500 

2500 

2500 

2500 

Grili Power (W)

2000 

2000 

2000 

2000 

2000 

2000 

Voltage (Volt)

)

220

 – 16 

220

 – 16 

220

 – 16 

220

 – 

16

220

 – 

16

220

 – 

16

Frequency (Hz.)

50 - 60 

50 - 60 

50 - 60 

50 – 60 

50 – 60 

50 – 60 

Fan

Energy 

Efficiency Class

Energy 

Consumption 

(Conventional) 

(Kilowatt-hour)

0,76 

0,76 

0,76 

0,76 

0,76 

0,76 

Energy 

Consumption

(forced

air

conv.)(Kilowatt-

hour}

0,75 

0,75 

0,75 

0,75 

0,75 

0,75 

Weight (Kg)

40 

40 

40 

40 

40 

40 

Wit",

imrni

594 

594 

594 

594 

594 

594 

Length 

(mm)

560 

560 

560 

560 

560 

560 

DIMEN

SIONS

Height 

(mm)

594 

594 

594 

594 

594 

594 

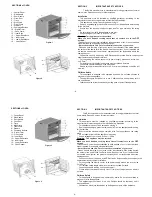
SECTIONS of OVEN 

13250 / -i

1 – Control Panel 

2 – Side Handle 

3 – Door Handle 

4 – Oven Door 

5 – Trays 

6 – Wire Grate 

7 – Trivet Grate 

8 – Drawers 

9 – Command Buttons 

10 – Digital Timer  

11 – Oven Lamp 

12 – Inner Body 

13 –  Upper Resistance 

14 –  Inner Lamp 

15 –  Lower Resistance 

16 –  Oven Gasket 

Figure.1

Figure.2

SECTION 2   

IMPORTANT SAFETY NOTICES 

This Built-in electrical oven is manufactured for using preparation of normal 

home meals. Please do not use for other purposes. 

Installation

-  This  appliance  must  be  installed  by  qualified  personnel,  according  to  the 

manufacturer’s instructions and to the relevant Safety Standards. 

-  This appliance is heavy. Take care when moving it. 

-  Remove all packaging, protective films and oils From the appliance before using 

for the first time. 

-  Ensure  that  the  electrical  supply  complies  with  The  type  stated  on  the  rating 

plate.

-  Do not attempt to modify the appliance in any way. 

-  Usage voltage of your oven is  230 Volt - 50 Hz. 

Warning:

  This appliance must be earthed. 

When  you  have  finished  cooking  check  that  all  controls  are  in  the 

OFF

position.

- Please check  your electrical installation to have earthed or not. 

f it is not earthed, 

make it earthed by a capable electrical technician . 

- It must be used min 16 A Fuse for electrical connection of your oven.    

- Please be sure that plug of your oven cooker is accidentally if the pulled beyond 

the extent of the power cord, the Earth wire will pull out last. 

f your residence did 

not  contain  earth  system  the  producer  company  does  not  responsible  about  the 

damaged event. 

-

  Connection can only be done by M

JR Electronics

 Authorised Service company or an 

expert authorised by customer relations. 

-

  For connecting the electric cooker to its power supply, please use a cord size     

3 x 2.5 mm

2

-

  For isolation safety length of power cord must not exceed 2 meters. 

-

  Connection sheme is being on oven’s back wall.  

-

  Please adjust timer when electricity cut off. If timer is not adjusted, oven side will 

not work. 

Children Safety 

-   This appliance is designed to be operated by adults. Do not allow children to 

play near or with the appliance. 

 -  The appliance gets hot when it is in use. Children should be kept away until it 

has cooled down. 

 -  Children can also injure themselves by pulling pans or pots off the appliance. 

-

4

-

Содержание BO 6341 R

Страница 1: ... attempting to install or use this product It is advisable to keep these instructions in a safe place for future reference BUILT IN OVEN USER S MANUAL BO 6341 R BO 6352 WH BL BO 6361 Please read these instructions carefully before attempting to install or use this product It is advisable to keep these instructions in a safe place for future reference ...

Страница 2: ......

Страница 3: ...ner Body 13 Upper Resista 14 Inner Lamp 15 Lower Resista 16 Oven Gasket ASTRO A OW15 K5M ASTRO B OW15 D7 ASTRO C OW15 DM8 T ALBA A OW13 M5 ALBA B OW13 D7 ALBA C OW13 DM8 T Thermostat C 50 285 50 285 50 285 50 285 50 285 50 285 Timer Oven Volume It 66 66 66 66 66 66 Max Oven Power W 2500 2500 2500 2500 2500 2500 Grili Power W 2000 2000 2000 2000 2000 2000 Voltage Volt 220 16 220 16 220 16 220 16 22...

Страница 4: ... 14 14 14 FULL TOUCH CONTROL 0 84 Kwh 0 84 Kwh 0 84 Kwh 0 84 Kwh 0 79 Kwh 0 79 Kwh 0 79 Kwh 0 79 Kwh SECTION 1 TECHNICAL FEATURES of OVEN MODEL 3 MODEL BO6352 WH BO6352 BL BO 6341 BO 6361 COLOUR WHITE BLACK INOX GLASS INOX GLASS FUEL TYPE ELECTRICAL ELECTRICAL ELECTRICAL ELECTRICAL TIMER TOUCH CONTROL DIGITAL TOUCH CONTROL DIGITAL 3 COLOUR DIGITAL FULL TOUCH CONTROL COOKING FUNCTION 7 FUNCTION 7 F...

Страница 5: ...l it has cooled down Children can also injure themselves by pulling pans or pots off the appliance 4 ALBA C OW13 DM8 T 50 285 66 2500 2000 220 16 50 60 0 76 0 75 40 594 560 594 SECTIONS of OVEN 13250 i 1 Control Panel 2 Side Handle 3 Door Handle 4 Oven Door 5 Trays 6 Wire Grate 7 Trivet Grate 8 Drawers 9 Command Buttons 10 Digital Timer 11 Oven Lamp 12 Inner Body 13 Upper Resistance 14 Inner Lamp ...

Страница 6: ...kin It is Othe spre If a be s Insta Do n the c Figure 3 Oven Measures Figure 4 Board Measures Figu 5 of g to ore us he ratin the t earth n d beyon dence about any or a cord si n side wil hildren ay until i ance Before using your product please take out packing materials on oven Do not forget to take out cartoons on sides of trays and wire grate and strafor that stick on front panel Packing materia...

Страница 7: ...ns in Figure 5 With these control buttons power of each heating element can be adjustable Buttons can turn clockwise or opposite to clockwise directions Please bring the control button to required cooking position and do not forget big numbers on button print means high heat outlet For first cooking it recommended to use highest cooking position 1 Thermostat 2 Timer 3 Selections turn the bu SECTIO...

Страница 8: ... Heating Element for keeping cooked food warm or gently reheating Oven Lamp Top Bottom Heating Elements Turbo Fan Hot air comes from up and down heats the tray from both side Top and bottom sides of meals cooked equally with Turbo Fan OVEN FUNCTIONS buttons an turn control n button to use Push the button to get it out Then turn it to related level At the end of cooking turn the buttons to 0 positi...

Страница 9: ...ons For 2 Trays 4 6 For 1 Tray 4 to 2503 C he desired ducing the to 250 C r case the arger 50 C and particular ater start v the fan sired heat the s P P h P CREAT P w c P t Y t SECTION 7 AD A Adjustm Mechanical be adjusted to start 90 minutes with me if cooking time will e B Adjustm OT 3000 BUZZER TONE A Press the 8 PLATE OPEN DOOR CAUTION The oven door has to be open with using plate open door as...

Страница 10: ...ogrammable Options QT 3000 is at the desire ready time I amount of ti TIME OF DA You can adj progress th button a sm or buttons adjustments ADJUSTIN With this fea warned by a Note Once 9 When desired colour is obtained press the button for 5 seconds to record it NOTE To exit without recording press the button AUTO BACKLIGHT COLOUR CHANGE in AUTO MODE ON OFF Press the button for 5 seconds till disp...

Страница 11: ...programmed the remaining time can be seen by pressing the button once CANCELLING THE BUZZER SOUND AUTOMATIC COOKING PROGRAM If you want to start cooking immediately you just have to give in the cooking time Example We placed our food into the oven and want it to be cooked for 2 hours and 15 minutes 4 After a few seconds the screen will indicate that cooking has started and show the current time No...

Страница 12: ... hours and 15 minutes Please do not forget to bring the function and or temperature knobs of your oven to appropriate positions Note You may cancel the automatic cooking mode any time by pressing the button In the above example cooking immediately started after giving in the cooking period By pressing the button you can see the ready time ie The time when the food will be ready to serve and if you...

Страница 13: ...me in that case the cooking time will be calculated automatically and should be edited thereafter BUZZER ALARM With this feature you can program after how much elapsed time you should be warned by a buzzer sound 1 Touching twice 2 Using or give in the 3 After a few seconds enter buzzer alarm mode duration in minutes screen will return to clock mode CANCELLING THE BUZZER SOUND After the programmed ...

Страница 14: ...easing the button the brightness level is stored Factory setting is maximum brightness 4 Buzzer Tone Selection Touch button for 1 second until you hear a double beep tone Upon every touch of this button within 5 seconds you will hear a different tone There are 3 different tones available The tone last heard will be stored in 5 seconds Note Programmed options are nonvolatile They will not be erased...

Страница 15: ... the display disappear The temperature display will indicate the residual heat if any see Residual Heat Indication Page 2 7 1 General Overview Resistance and fan combinations in the menu can be selected using touch keys in the user interface Cooking time end time if meat probe is used end temperature cooking temperature are adjustable Additionally keep warm heat up real time display stopwatch and ...

Страница 16: ...Cooking The 5 bars on the temperature display give an indication about the actual oven temperature Each bar is assigned to 1 5 th of the adjusted value The up arrow near the bars flashes when the heating elements are currently active AUTOMATIC END OF COOKING After cooking ends automatically the temperature display will indicate the residual heat if any see Residual Heat Indication will be flashing...

Страница 17: ...the cooking starts The display to be shown when the cooking finishes When the cooking programme is completed audible warning is on and will remain on for 7 minutes if not switched off before You have finished the semi automatic cooking Your food is ready for servicing AUTOMATIC PROGRAMMING With this programme cooking duration and the time to finish cooking are programmed beforehand Current time of...

Страница 18: ...aning agents Clean the glass surfaces with glass cleaning agents Do not use hard brushes steel wood or sharp instruments such as a knife when cleaning the interior part of the oven Remove the glass front lid by unscrewing the fixing parts by use of a screwdriver and remove the inside glass clean and rinse it After drying it place the seal properly and re install the glass SECTION 8 MAINTENANCE CLE...

Страница 19: ...got an original box Take precautions about damage possiblity of oven outer walls glass painted enamelled or stainless steel surfaces SECTION 10 Things To Do Before Calling Authorised Service SECTION 9 INFORMATION ABOUT TRANSPORTATION In case of transport hold your oven vertically and do not put anythin on it At transportation Please Keep your ovens original box Carry your oven with original box Ob...

Страница 20: ......

Отзывы: