manualshive.com logo in svg
background image

For any assistance or after sales service contact your 
Davey Dealer. For help in locating your closest Dealer 
contact your appropriate Davey Support Centre listed  
on the back of this booklet.
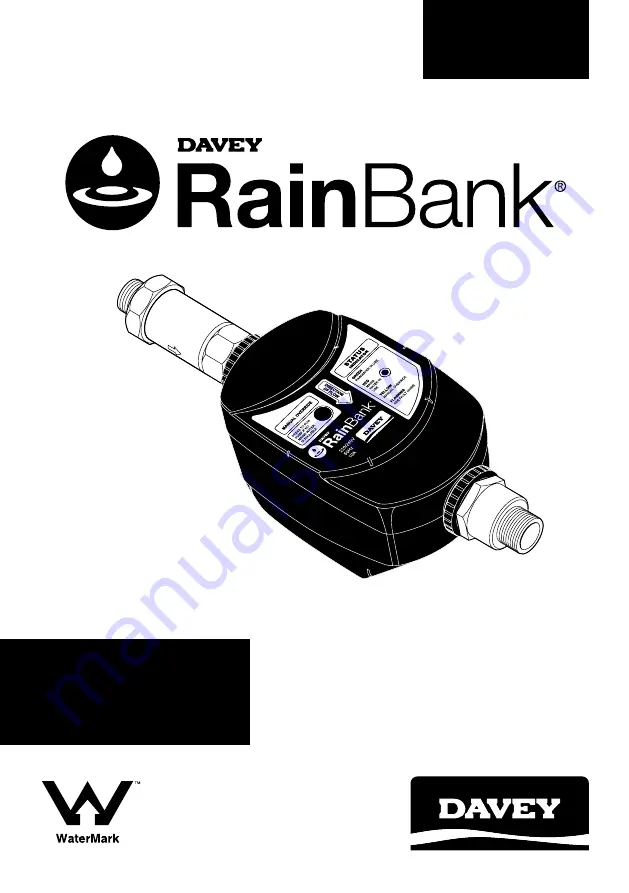
• INSTALLATION
• OPERATION
• TROUBLE SHOOTING

INSTALLATION 

INSTRUCTIONS

WMTS-477:2016 Lic WM-022042

Содержание RainBank KRBS1

Страница 1: ...contact your Davey Dealer For help in locating your closest Dealer contact your appropriate Davey Support Centre listed on the back of this booklet INSTALLATION OPERATION TROUBLE SHOOTING INSTALLATION...

Страница 2: ...ing specific and emerging market opportunities Many of these products have received multiple awards for innovation and excellence which have led to our induction into the Manufacturing Hall of Fame in...

Страница 3: ...o install RainBank 7 Before you start 9 Installation instruction 11 Pump outside tank option 12 Pump inside tank option 14 Float switch installation 18 Installation of Submersible Pumps 25 Priming Pum...

Страница 4: ...f water a year Your actual savings depend on your roof catchment area rainfall and the size of your tank RainBank may allow you to claim tank rebates when installed on existing homes Check with your l...

Страница 5: ...Pump Power lead 4 RainBank Power lead 5 Stop valve Warning Do not reconnect with mains water supply Important All pipework and outlet fittings from RainBank must be labelled to AS NZS 3500 1 6 Float...

Страница 6: ...ainBank senses a water demand and detects insufficient waterin the rainwater tank it will automatically allow the mains water to flow 5 If there is a power failure during a demand for water RainBank w...

Страница 7: ...ipe Different types of RainBank Installations There are different ways a RainBank can be installed depending on your rainwater tank and pump configuration INSTALLATION TYPE 1 PAGE 16 Tank above ground...

Страница 8: ...KRB1 2 3 4 Different ways of installing the RainBank unit itself Exposed installation against wall under eaves Encased installation with unit and pump inside cover Integrated installation incorporate...

Страница 9: ...nit are protected from access by children and pets Other things we recommend to maximise the performance and serviceability of your RainBank Fit a first flush system to the guttering if possible to di...

Страница 10: ...water and having to turn off the mains supply if the unit ever has to beremoved While RainBank does have an in built DUAL CHECK back flow prevention valve some water authorities require an additional...

Страница 11: ...iner between the pump and the RainBank controller is recommended to stop foreign matter entering the unit and damaging it All pipe work and fittings should be labelled in accordance with local standar...

Страница 12: ...Ground Option Model No KRB1 2 3 4 9 4 Mains water supply 900kPa Maximum 1 3 4 BSP Male thread 2 3 4 BSP Male thread 3 Pump Power lead 4 RainBank Power lead 5 Stop valve Warning Do not reconnect with...

Страница 13: ...t not supplied WHERE MAINS PRESSURE EXCEEDS 600kPa A PLV MUST BE FITTED TO INLET RainBank MUST BE INSTALLED HORIZONTALLY AS ILLUSTRATED Stop valve 20mm hole NOTE Australian Building Standards stipulat...

Страница 14: ...8 Rainwater supply 9 8 PUMP INSIDE TANK OPTION OVERALL MODEL NO KRBS1 2 6 6 1 2 5 1 2 3 In tank Option Model No KRBS1 2 3 5 6 9 4 7 Above Ground Option Model No KRB1 2 3 4 9 4 Mains water supply 900kP...

Страница 15: ...via 3 pin plug 3 4 BSP M 1 BSP M Stop valve 200 Micron Y Strainer Pressure Limiting Valve NOTE Australian Building Standards stipulate incoming mains pressure should not exceed 500kPa WHERE MAINS PRE...

Страница 16: ...600mm x 600mm is ideal STEP 2 RAINBANK POSITION Work out where the RainBank will be positioned Check that there is a power point within reach of the 3 metre power lead IMPORTANT Do not use long mains...

Страница 17: ...off retainer clip C from top of weight D 5 Position retainer clip 100mm from float ball E 6 Slide weight E over retaining clip and firmly snap into position 7 Lower weight into tank and feed top of ca...

Страница 18: ...tank so that the incoming flow does not interfere with the operation of the switch Before cutting the hole check again that the 5m lead from the float switch will reach the RainBank and plug comforta...

Страница 19: ...p and RainBank should be assembled so that the mains water supply to the unit and rainwater outlet to toilets and laundry connect easily to the plumbing on the same level STEP 5 CONNECT PUMP TO RAINBA...

Страница 20: ...at require bracing If your access to the bottom of the RainBank unit is difficult you may have to connect the 5 volt connection from the float switch before the plumbing is connected Connect all leads...

Страница 21: ...tructions on how to do this for all types of Davey pump in the Priming section on page 26 4 Turn on a tap or flush a toilet in the rainwater system The pump should run and deliver rainwater Allow to r...

Страница 22: ...Installation Type 1 on page 19 Step 7 Connect all leads as per Installation Type 1 on page 20 There is no float switch lead as this is fitted to the submersible pump Step 8 Test the unit page 21 INSTA...

Страница 23: ...water in a partially buried tank is considered a medium level hazard Even though RainBank has a built in dual check back flow valve you may be required to fit additional backflow protection valves to...

Страница 24: ...ad It is recommended that the float switch extension lead s are in a protective cinduit The float end should be set up so it can fall no lower than 100mm above the level of the lowest point in the inl...

Страница 25: ...with cable ties 3 Place pump into tank 4 Davey recommends the fitting of floating inlets to submersible pumps to minimise any possibility of sludge intake Part number to suit pump D42A B is FI 42 Cabl...

Страница 26: ...t a slight but consistent slope so that any air is expelled at the pump end as the pump is primed 2 Hold down manual override button on the RainBank to operate pump to clear trapped air Make sure an o...

Страница 27: ...low the lowest water level for reliable operation Priming is as for Type 1 installations If there is a significant amount of water required to do this it can be a good idea to fit the highest area of...

Страница 28: ...y re starts the motor when the temperature within the pump has dropped to a safe level Constant tripping of this switch indicates a problem e g Low voltage at pump etc This automatic thermal overload...

Страница 29: ...heck all taps toilets and appliances connected to RainBank system to ensure they are turned off 3 Water is leaking on discharge side of RainBank system Check for leaks and repair 4 Rock or debris caug...

Страница 30: ...pressurised water supply connected to inlet Press manual override button to simulate mains water flowing 7 Mains supply to RainBank turned off Turn on mains water supply Press manual override button...

Страница 31: ...ates direction of flow Mains water not passing through RainBank Possible cause debris is blocking inlet to RainBank Remove RainBank and clean inlet Check all filters are clean Mains water pressure and...

Страница 32: ...n your rainwater tank is connected to mains water Do not enter a empty rainwater tank they may contain hazardous gases Secure all openings to the rainwater tank to ensure it will not permit access to...

Страница 33: ...mp and RainBank 4 Fit a stop valve on mains water line before RainBank makes servicing easier 5 Fit a stop valve between pump and tank outlet makes servicing easier 6 Check with local council plumbing...

Страница 34: ...34 Notes...

Страница 35: ...eplate Your Davey Guarantee does not cover freight or any other costs incurred in making a claim Please retain your receipt as proof of purchase you MUST provide evidence of the date of original purch...

Страница 36: ...ber of the GUD Group ABN 18 066 327 517 NEW ZEALAND Customer Service Centre 7 Rockridge Avenue Penrose Auckland 1061 Ph 0800 654 333 Fax 0800 654 334 Email sales dwp co nz Davey is a registered tradem...

Отзывы: