background image

VLASE

TM

 IR 

72 


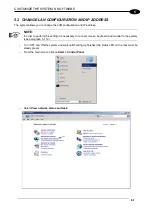
5.3  CHANGE VIDEO SETTING 

The system allows you to change the Video setting. 

NOTE: 

In order to perform this setting it is necessary to connect mouse, keyboard and monitor to the system 
(see paragraph 3.1.12)

o


Turn OFF and ON the system and wait until booting-up finishes (the status LED on the rack must be 

steady green) 

o


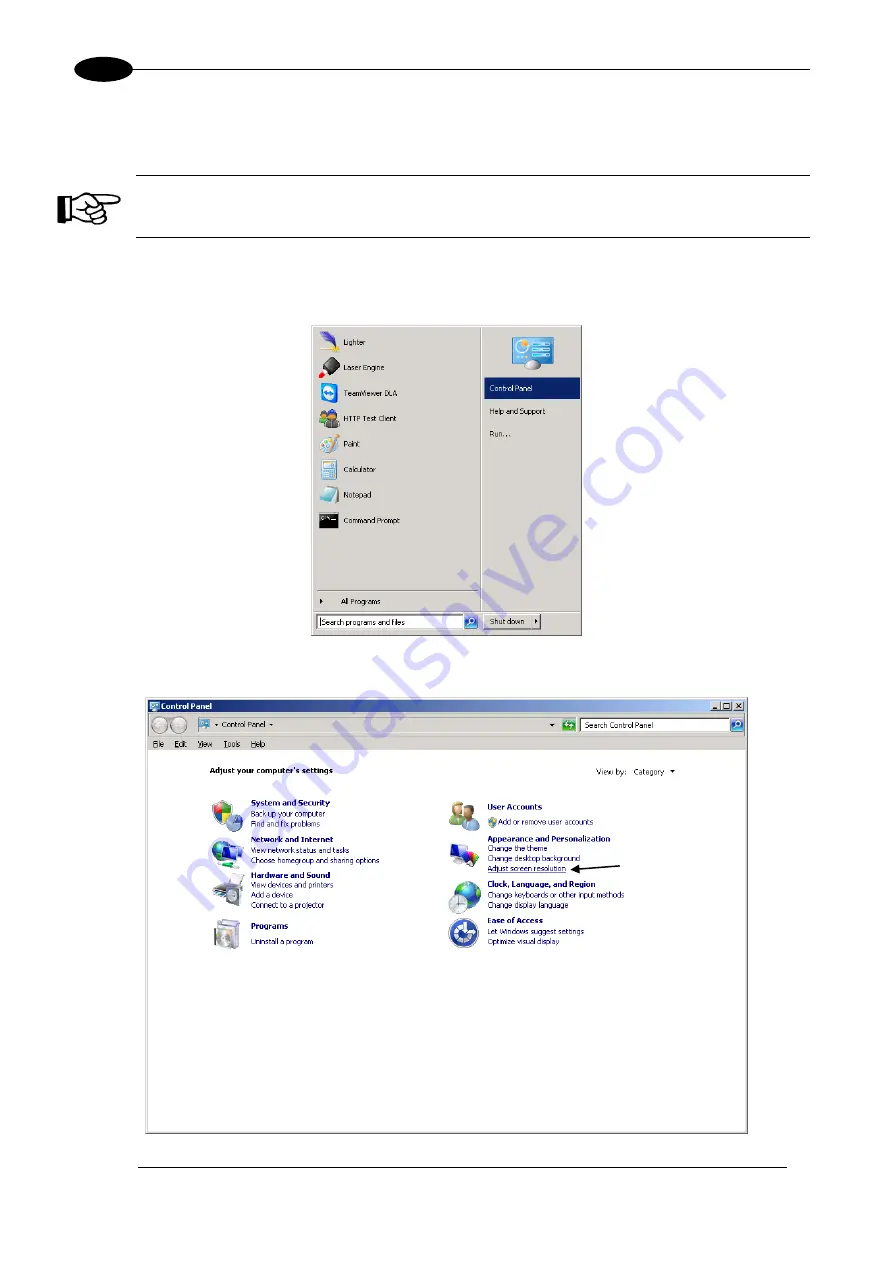
From the main screen click on 

Start > Control Panel


o


Select 

Adjust screen resolution


Содержание VLASE IR 1PWX-TLS2

Страница 1: ...USER S MANUAL VLASETM IR ...

Страница 2: ...urpose without the express written permission of Datalogic S p A and or its affiliates Datalogic and the Datalogic logo are registered trademarks of Datalogic S p A in many countries including the U S A and the E U Vlase Arex Eox Violino Lighter Suite are trademarks of Datalogic S p A and or affiliates All other trademarks and brands are property of their respective owners Datalogic reserves the r...

Страница 3: ...nough to constitute an electrical risk This symbol may also appear on the marking system at the risk area Laser Warning This symbol indicates the danger of exposure to visible or invisible laser radiation This symbol may also appear on the marking system at the risk area Fire Warning This symbol indicates the danger of a fire when processing flammable materials Because there is a danger of fire it...

Страница 4: ...view 821002853 rev C 15 01 2016 Marking Area Specification 821002854 rev D 29 04 2016 25 Appendix C 821002855 rev E 22 05 2017 ii Appendix F 1217 01 12 2017 100L added 0318 22 03 2018 82 821002856 rev F 23 05 2018 20 NOTE We sometimes update the documentation after original publication Therefore you should also review the documentation at www datalogic com for updates ...

Страница 5: ...e and visible laser radiation The operator is required to carefully read the section of the manual concerning safety instructions as well as the sections related to matters falling under her his responsibility The workers assigned to the marking system can be identified as OPERATOR responsible for loading elements to be processed visually checking the work cycle removing the finished product and c...

Страница 6: ...t easy to integrate into a system that comprises safety devices required by applicable regulations the management of marking signals and the customer s complementary modules if any All laser marking system connections are found on the rear of the rack power supply safety electrical signals communication ports patch cord to the scanner head while the front features key and enable command devices st...

Страница 7: ...e repeatability thanks to new Beam Expander design which guarantees higher beam collimation control Available cable lengths 3m standard other lengths available on request Simplified access to Laser Diode Module for fiber installation and Laser Diode Module maintenance Dedicated software tool for laser parameter setting and diagnostics IMPORTANT WARNINGS Access to the internal parts of the marking ...

Страница 8: ...TERLOCK OUT CONNECTOR 24 2 4 3 COMMAND BOX CONNECTOR LASER CONTROL 25 2 4 4 AXES CONNECTOR I O CONTROL 30 2 4 5 RS232 CONNECTOR COM2 31 2 4 6 ENCODER CONNECTOR 32 2 4 7 PHOTOCELL CONNECTOR 32 2 5 INPUT OUTPUT SIGNAL SPECIFICATIONS 33 2 6 CONNECTION EXAMPLES 34 3 INSTALLATION AND SET UP 35 3 1 CONNECTIONS 35 3 1 1 CONNECTING COMMAND BOX CABLE 35 3 1 2 CONNECTING INTERLOCK CABLE 36 3 1 3 CONNECTING ...

Страница 9: ...DUCT SUPPORT AND CUSTOMER SERVICE 82 APPENDIX A LABELS IDENTIFICATION 83 EXTERNAL LABEL PLACING 85 APPENDIX B STANDARDS 87 LASER STANDARDS 87 CE COMPLIANCE 87 FCC COMPLIANCE 87 APPENDIX C SAFETY CONSIDERATION ACCORDING TO EN ISO 13489 1 2008 88 PERFORMANCE LEVEL PL 88 APPLICATION EXAMPLE 88 EXAMPLE AUTOMATIC PRODUCTION LINE 89 SAFETY FUNCTIONS OF VLASE 92 APPENDIX D LASER SAFETY 93 LASER RADIATION...

Страница 10: ...ds Figure 2 Unpacking Before installing or operating the marking system you should Inspect the shipping container for damage Inspect the marking system for signs of damage Confirm that the shipping carton contains all items on the shipping inventory list including any accessories Retain all packaging materials until the marking system has been inspected for completeness and damage and you have che...

Страница 11: ... Optical fiber cable Power supply cables Scan Head cable Command Box cable Command Box Gold connector Interlock connector gold Interlock OUT connector Interlock cable Safety Key USB Stick Cable gland Rack adapters Sample Test Quick Reference Guide Test Report If this connector is used the marking system works in DANGEROUS condition MUTING DEVICE ...

Страница 12: ...SATION If the marking system is brought directly from a cold to a warm location moisture may condense inside or outside the marking system This moisture condensation may cause a malfunction of the marking system If moisture condensation occurs Turn off the marking system and wait about 1 hour for the moisture to evaporate Note on moisture condensation Moisture may condense when you bring the marki...

Страница 13: ...he marking system must be positioned in a safe manner and the precautions listed below must be followed Figure 4 Positioning rack Figure 5 Vertical positioning requires additional fixing WARNING DO NOT fix the marking system in manner not shown in the figure ...

Страница 14: ...special surface parallel to the ground and absolutely vibration free The resonator can be secured both horizontally and vertically NOTE In order to prevent marking distortions install a vibrometer on the base of the piece to be marked and check for the absence of vibrations during the marking process NOTE It is recommended to install the resonator on a micrometer positioning Z axis system Figure 7...

Страница 15: ...r filter is dirty insufficient air flow might not ensure correct cooling and might stop the marking operation Clean or replace the air filter periodically Figure 8 Rack installation environment WARNING DO NOT place heavy objects on top of the rack In order to have the marking system operating in safety mode see Appendices for more details we recommend installing the marking system as shown in the ...

Страница 16: ...rine gas which can be harmful to the laser operator and to the marking system itself Always use adequate fume extractor during PVC and plastic marking 1 9 FAN INSTALLATION The fan supplied with the device must be accurately positioned and fixed on the resonator so that it can work properly The fan must be assembled so that the air flow is aimed at the unit containing the crystal gold coloured sect...

Страница 17: ...e m 2000 Shock and Vibration MIL 810E CAT 1 Basic Transportation Package Drop Test cm 60 Pollution Degree 2 Overvoltage Category II PHYSICAL FEATURES Control Rack Resonator Dimensions H W D H W D mm 122 430 480 166 128 6864 in 4 8 16 9 18 9 6 5 5 0 27 04 Weight kg 15 75 lbs 33 1 15 4 OTHER FEATURES Optical Fiber Minimum Bending Radius mm 200 fixed installation Cables Length m 3 standard other avai...

Страница 18: ... RESONATOR A description of the main parts of the resonator unit is provided here below Figure 11 Resonator view 1 Scan Head signals connector 5 Fan connector 2 RF connector 6 Rack Resonator connector 3 Optic fiber inlet 7 F Theta scan lens 4 Cooling fan ...

Страница 19: ... Control rack front view 1 Status LED 11 MDR connector 2 Enable selector 12 Resonator signals connector 3 Key selector 13 Optic fiber outlet 4 USB port 14 RF connector 5 VGA port 15 Command Box connector 6 LAN port 16 I O connector axis control 7 RS232 port 17 Photocell connector 8 3x USB ports 18 Encoder connector 9 Interlock connector 19 Earth ground 10 Interlock OUT connector 20 Mains power sup...

Страница 20: ...m 98 2 170 3 329 6 427 7 533 9 Marking Area MA mm2 50 x 50 110 x 110 180 x 180 220 x 220 285 x 285 NOTE Definition of Marking Area square marking field measured on black anodized aluminium plate WARNING This product was designed to use only certain configurations of F Theta lens and marking field If your needs are not satisfied by the currently available F Theta lens configurations please contact ...

Страница 21: ...d as the distance between the center of the marking area defined in the focal plane and the closest mechanical edge of the F Theta Scan Lens Refer to the following figure WD Working Distance MA Marking Area AB Aiming beam FD Fixing Distance Figure 13 Marking area ...

Страница 22: ...TIONAL DIAGRAM 1 VCC_INT_IN_A OUTPUT 24V DC reference for INTERLOCK_A signal 2 INTERLOCK_A INPUT INTERLOCK IN signal A 3 GND_INT_IN_B GND Ground reference for INTERLOCK_B signal 4 INTERLOCK_B INPUT INTERLOCK IN signal B PIN 1 PIN 2 PIN 3 PIN 4 MARKING FUNCTIONALITY CONDITION CONTACT OPEN CONTACT OPEN NOT POSSIBLE SAFE CONTACT CLOSED CONTACT OPEN NOT POSSIBLE DANGEROUS CONTACT OPEN CONTACT CLOSED N...

Страница 23: ...rs 4 pins Figure 15 Female cable mount connector cod TY4F solder view WARNING If the interlock gold connector is used the marking system is in DANGEROUS condition MUTING DEVICE NOTE To restore the marking system it is necessary to repeat the Turning on sequence without shutting down the system See paragraph 4 1 for more details ...

Страница 24: ...INT_OUT_A 2 INT_OUT_A_EMITTER EMITTER 3 INT_OUT_B_COLLECTOR COLLECTOR Interlock OUT signal B INT_OUT_B 4 INT_OUT_B_EMITTER EMITTER INT_OUT_A INT_OUT_B CONDITION Closed Closed SAFE Closed Open DANGEROUS Open Closed DANGEROUS Open Open DANGEROUS Type NPN BJT transistor Vmax 300 V Imax 60 mA Vsaturation 1 5 V Leakage current 400 nA NOTE The response time is 10 ms from the output s switching PLUG CONN...

Страница 25: ...upply available for EXT_ENABLE_A max 250mA 8 EXT_ENABLE_A Digital Input Primary external ENABLE signal see par 2 4 3 1 HIGH level contact closed LOW level or disconnected contact opened 9 BUSY Digital Output This signal is used to know if the current spooler is executing marking in progress see par 2 4 3 4 ON during marking process 10 CONNECTOR PRESENCE Digital Input This signal is used to check t...

Страница 26: ... GND Ground Ground reference 22 ENABLE_OUT Digital Output This signal is used to know if the system is ready to emit laser radiation see paragraph 2 4 3 3 ON when the system is in READY state 23 SW_READY Digital Output This signal is used to know if a document sequence or script is loaded and ready to be executed ON when a document or a sequence is running in AUTO MODE or WORK MODE SW_READY COMPAT...

Страница 27: ...TECHNICAL SPECIFICATIONS 27 2 2 4 3 1 ENABLE SIGNAL SCHEME COMMAND BOX CONNECTOR Figure 19 ENABLE signal scheme ...

Страница 28: ...VLASETM IR 28 2 2 4 3 2 KEY SIGNAL SCHEME COMMAND BOX CONNECTOR Figure 20 KEY signal scheme 2 4 3 3 LASER CONTROL SIGNAL TIMINGS Figure 21 Timing control signals ...

Страница 29: ...etting the minimum acceptable time for the START_MARKING signal T2 Start Delay For delaying the start of marking process T3 Busy Advance BUSY signal corresponding to marking progress T4 Stop Time The minimum time for STOP_MARKING signal to stop the marking process T5 Busy Delay For delaying the Laser END signal with respect to laser emission T6 End Time For setting the Laser END activation time Re...

Страница 30: ...put Generic input or X Axis home sensor input The home search is stopped when this signal goes HIGH 8 INPUT_1 or ZERO Y Digital Input Generic input or Y Axis home sensor input The home search is stopped when this signal goes HIGH 9 INPUT_2 or ZERO Z Digital Input Generic input or Z Axis home sensor input The home search is stopped when this signal goes HIGH 10 INPUT_3 or DISABLE X Digital Input Ge...

Страница 31: ...AKE R Digital Output Generic output or R Axis electromechanical brake release signal ON during drive motion 24 OUTPUT_11 or DIR R Digital Output Generic output or R Axis drive direction signal 25 GND Ground Ground reference enabling an axis causes the corresponding control signals to no longer be available as generic inputs outputs Refer to Lighter user s manual Setting the X Y Z and Rotor Axes pa...

Страница 32: ...5 ENC_B DIGITAL INPUT Encoder HTL B channel signal 6 GND GND Return signal for ENC_B 7 NC NC NC 8 NC NC NC BODY SHIELD SHIELD SHIELD 2 4 7 PHOTOCELL CONNECTOR Panel socket BINDER M12 4 pins female 763 series Recommended photocell Datalogic S51 PA 5 B01 PK Datalogic S15 PA 5 B01 PK or equivalent Figure 26 Female panel socket cod 09 3482 87 04 front view PIN SIGNAL TYPE DESCRIPTION 1 VCC POWER OUTPU...

Страница 33: ...DC Imax 5mA 24V DC Pulse Width 1ms debounce MIN TYP MAX INPUT Logic LOW 0 0 V DC 0 0 V DC 2 0 V DC INPUT Logic HIGH 5 0 V DC 12 0 V DC 24 0 V DC DIGITAL OUTPUT Type Low side driver Vmax 24V DC Imax 250mA Vsaturation 0 5V DC Leakage current 5µA OUTPUT State ON V 0 5 V DC I 250mA OUTPUT State OFF V 24 V DC I 5µA ...

Страница 34: ...VLASETM IR 34 2 2 6 CONNECTION EXAMPLES Figure 27 Connection examples ...

Страница 35: ...operations as described below WARNING Connect the components of the marking system together WITHOUT voltage in order to avoid risks to the operator and to the marking system 3 1 1 CONNECTING COMMAND BOX CABLE Figure 28 Connecting Command Box cable NOTE The Command Box cable must always be inserted in order to use Enable and Key on the front panel of the rack ...

Страница 36: ...igure 29 Connecting interlock cable NOTE The interlock cable must always be inserted in order to use the marking system The absence of such connector locks the system 3 1 3 CONNECTING INTERLOCK OUT CONNECTOR Figure 30 Connecting interlock OUT connector ...

Страница 37: ...ate on the rack Figure 31 Removing the cover plate from the rack 2 insert the optical fiber into the cable gland without removing its protection cap WARNING The insertion of the optical fiber is a delicate operation You must make sure that the optical fiber is protected by its cap during insertion through the cable gland to avoid damaging or dirtying it Figure 32 Passing the optical fiber through ...

Страница 38: ...ed on the rear panel of the rack Figure 33 Passing the optical fiber through the PG cable gland 4 remove the optical fiber protection cap and tighten it to the fiber diode module paying attention not to soil or scratch the fiber end Figure 34 Connection of the optical fiber ...

Страница 39: ...INSTALLATION AND SET UP 39 3 5 fix the cable gland to the PG on the rack Figure 35 Fixing the cable gland 6 close the rack cover plate Figure 36 Closing cover ...

Страница 40: ...nator Figure 37 Disassembling the optical fiber cable gland from the resonator 2 insert the optical fiber through the cable gland without removing the protection cap WARNING The insertion of the optical fiber is a delicate operation You must make sure that the optical fiber is protected by its cap during insertion through the cable gland to avoid damaging or dirtying it Figure 38 Passing the optic...

Страница 41: ...r being careful not to soil or scratch the fiber end Figure 39 Connecting the optical fiber to resonator 4 screw the metallic cover and cable gland onto the resonator Figure 40 Final closing WARNING To avoid damaging or breaking the optical fiber never subject it to a bending radius smaller than 20 cm ...

Страница 42: ...VLASETM IR 42 3 3 1 6 CONNECTING RADIOFREQUENCY CABLE Screw in the SMA cable connectors starting at the resonator side 90 end then at the rack side Figure 41 RF cable connection ...

Страница 43: ...ION AND SET UP 43 3 3 1 7 CONNECTING MDR CABLE Connect the MDR cable to the rack Figure 42 MDR connection rack side Connect the other end of the cable to the scanner head Figure 43 MDR connection resonator side ...

Страница 44: ... 8 CONNECTING RESONATOR CABLE Connect the resonator cable to the rack Figure 44 Resonator cable connection rack side Connect the other end of the cable to the resonator Figure 45 Resonator cable connection resonator side ...

Страница 45: ...INSTALLATION AND SET UP 45 3 3 1 9 CONNECTING FAN CABLE Connect the fan cable to the resonator Figure 46 Resonator fan cable connection ...

Страница 46: ...ble Figure 47 Power supply cable connection NOTE Lock the plug with the retaining clamp to avoid accidental disconnection 3 1 11 GROUND CONNECTION To ensure high electrical noise immunity it is strongly recommended to connect the chassis to earth ground Figure 48 Ground connection ...

Страница 47: ...MODE CONNECTION To use the marking system in Local Mode it is necessary to install a mouse keyboard and monitor to the system Connect the monitor and input devices as shown below Figure 49 USB mouse connection Figure 50 USB keyboard connection ...

Страница 48: ...stem in Remote Mode it is necessary to connect a network cable Figure 52 RJ45 Ethernet connection NOTE The system LAN is configured by default with a fixed IP Address and Subnet Mask Default IP address 192 168 0 10 Default Subnet Mask 255 255 255 0 See paragraph 5 2 in order to change LAN configuration NOTE Ethernet TCP IP 10 100 Mbit ...

Страница 49: ...4 F THETA LENS PROTECTION CAP REMOVAL Remove the F Theta Lens protection cap before marking operation Figure 53 F Theta Lens protection cap removal WARNING Marking with the lens protection cap in place could result in damage to the lens ...

Страница 50: ... Box connector Check that KEY and ENABLE commands on the rack front panel are disabled see Figure 19 and Figure 20 1ST turn on the main switch at the back of the control rack Figure 54 Power on SIGNAL STATUS EXT_KEY OFF EXT_ENABLE_A OFF EXT_ENABLE_B OFF During booting up the status LED on the rack front panel will be blinking green Wait until booting up finishes The status LED on the rack will be ...

Страница 51: ...EY SIGNAL STATUS EXT_KEY ON EXT_ENABLE_A OFF EXT_ENABLE_B OFF When the KEY command is enabled the status LED on the rack will be blinking orange for about 20 seconds laser source warm up Wait until laser source warm up finishes The status LED on the rack will be steady orange Figure 57 Status LED display ...

Страница 52: ... ENABLE command by rotating it clockwise Figure 58 Enable command ENABLE SIGNAL STATUS EXT_KEY ON EXT_ENABLE_A ON EXT_ENABLE_B ON The laser system is ready to mark The status LED on the rack will turn red Figure 59 Status LED display ...

Страница 53: ... SEQUENCE BLINKING ORANGE 2Hz SYSTEM_ALARM OFF POWER_ON OFF ENABLE_OUT OFF SYSTEM ERROR BLINKING RED 2Hz SYSTEM_ALARM ON POWER_ON OFF ENABLE_OUT OFF See paragraph 2 42 4 3 for more information 4 1 1 ADVICE ON USING THE SYSTEM If the marking system is used in manual mode you need to connect Command Box connector as described before In this way you are able to control the marking system directly fro...

Страница 54: ...nefit from the ALL IN ONE Rack architecture characteristics SW Editor SW Engine Correction Matrix Laser Control Galvo Control 4 3 REMOTE MODE OPERATIONS Keyboard mouse and monitor are not necessary in this configuration LAN SW Editor Remote SW Engine Remote Active X SW Engine Correction Matrix Laser Control Galvo Control ...

Страница 55: ...zed Applications and User Interfaces via Ethernet Local or remote ActiveX control interface is available with the same commands to allow the use of the same application developed for both local and remote configurations LAN Remote ActiveX SW Engine Correction Matrix Laser Control Galvo Control ...

Страница 56: ...With Laser Editor you can o edit graphic layouts o set laser parameters o set system configuration o control the integrated I O module for axis management o create automated procedures o create programs using Lighter s programming language Laser Engine is an application automatically loaded at start up that allows operating the marking system Laser Engine is present in the icon tray With Laser Eng...

Страница 57: ... EDIT YOUR FIRST GRAPHIC DOCUMENT SIGNAL STATUS EXT_KEY OFF EXT_ENABLE_A OFF EXT_ENABLE_B OFF In WAIT FOR START status double click on the Laser Editor icon to start the layout editor application Click on the document type selector and choose Layer ...

Страница 58: ...VLASETM IR 58 4 Click on the Text String icon in the Object toolbar to add a string object to the layer Edit String properties such as value font style etc using the Properties browser ...

Страница 59: ...USE AND OPERATION 59 4 Edit Filling properties such as filling type interline etc using the Properties browser ...

Страница 60: ...OW TO TEST AND ENGRAVE YOUR DOCUMENT SIGNAL STATUS EXT_KEY ON EXT_ENABLE_A OFF EXT_ENABLE_B OFF In STANDBY SHUTTER CLOSED status press Limits All button in the Laser Toolbar to adjust the object position in the marking field ...

Страница 61: ...ON 61 4 In READY status adjust the Laser parameters using the Properties browser SIGNAL STATUS EXT_KEY ON EXT_ENABLE_A ON EXT_ENABLE_B ON Press the Send Marking button in the Laser Toolbar to start the marking process ...

Страница 62: ...rnal devices Click on the Save to Device button to save the layout in the marking system memory Click on the Show Laser Engine button to display Laser Engine window AUTO MANUAL Mode button allows switching between the two available working modes o Auto mode the engraving operations are executed automatically using external signals o Manual mode used for displaying the margins of the graphic object...

Страница 63: ...USE AND OPERATION 63 4 Select the document from the list and click on the To Auto Mode button The laser system is ready to mark the document using external START_MARKING and STOP_MARKING signals ...

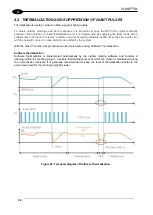
Страница 64: ... excites the crystal but with the Q switch closed no laser radiation is emitted by the system With the VlaseTM source this procedure can be implemented using Software Thermalization Software thermalization Software thermalization is implemented automatically by the Lighter marking software and consists in defining within the marking project a certain thermalization level at which the crystal is ma...

Страница 65: ...MOD signal stays fixed at 0 V At the end of the thermalization phase before starting another marking phase the FPK First Pulse Killing procedure needs to be implemented in order to discharge the crystal thus avoiding the generation of giant pulses which may cause marking defects as well as damages to the internal optics of the resonator To discharge the crystal the Q Switch is kept closed Q SW MOD...

Страница 66: ...us and dialogs languages you can use to enter text and keyboard layout NOTE In order to perform this setting it is necessary to connect mouse keyboard and monitor to the system see paragraph 3 1 12 o Turn OFF and ON the system and wait until booting up finishes the status LED on the rack must be steady green o From the main screen click on Start Control Panel o Select Change display language ...

Страница 67: ...CUSTOMIZE THE SYSTEM S SOFTWARE 67 5 o In Keyboards and Languages select and choose the desired language o Select Change keyboards to change your keyboard or input language ...

Страница 68: ...e Desktop screen o A message advises you to restart or shutdown the system in order to permanently save data Press OK o Shut down the system in order to save the new settings WARNING DO NOT turn OFF or UNPLUG the system while Windows is shutting down o WAIT until system shuts down automatically black screen o Power off the system to complete installation ...

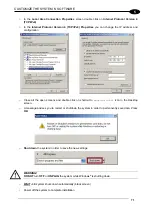
Страница 69: ... IP address NOTE In order to perform this setting it is necessary to connect mouse keyboard and monitor to the system see paragraph 3 1 12 o Turn OFF and ON the system and wait until booting up finishes the status LED on the rack must be steady green o From the main screen click on Start Control Panel o Select View network status and task ...

Страница 70: ...VLASETM IR 70 5 o In the Network and Sharing Center screen select Change adapter settings o In the Network Connections screen double click on Local Area Connection ...

Страница 71: ...n o Close all the open screens and double click on shortcut to save data bat icon in the Desktop screen o A message advises you to restart or shutdown the system in order to permanently save data Press OK o Shut down the system in order to save the new settings WARNING DO NOT turn OFF or UNPLUG the system while Windows is shutting down o WAIT until system shuts down automatically black screen o Po...

Страница 72: ... perform this setting it is necessary to connect mouse keyboard and monitor to the system see paragraph 3 1 12 o Turn OFF and ON the system and wait until booting up finishes the status LED on the rack must be steady green o From the main screen click on Start Control Panel o Select Adjust screen resolution ...

Страница 73: ...t to save data bat icon in the Desktop screen o A message advises you to restart or shutdown the system in order to permanently save data Press OK o Shut down the system in order to save the new settings WARNING DO NOT turn OFF or UNPLUG the system while Windows is shutting down o WAIT until system shuts down automatically black screen o Power off the system to complete installation ...

Страница 74: ... remote computer are connected to the LAN o Click Start All Programs Accessories and then click Remote Desktop Connection o Click Options o In the Computer list type the host name or the IP address of the computer to which you want to connect o Type the user name password and domain if applicable of an account to which you have allowed remote access into the corresponding boxes and then click Conn...

Страница 75: ...me DLA Password dla o In the Log on to list if applicable select the domain or remote computer that you want and then click OK The remote desktop is displayed in a window on the desktop The remote computer is locked during this session o To disconnect the session click the Close button in the session window and then click OK when you are prompted to disconnect the Windows session ...

Страница 76: ... Selector switch for EXT_KEY control signal 2 Enable selector ENABLE indicator Selector switch for both EXT_ENABLE_A and EXT_ENABLE_B control signals with LED indicator for ENABLE_OUT control signal 3 Alarm indicator LED indicator for SYSTEM_ALARM control signal 4 Start button BUSY indicator Pushbutton for START_MARKING control signal with LED indicator for BUSY control signal 5 Stop button END in...

Страница 77: ...on fly kit is available on request Kit includes encoder photocell cables and plastic reflectors Figure 62 Kit MOF Ordering no 985330027 6 3 EXTENDED LENGTH CABLE KIT Extended length cable kits are available on request Figure 63 Extended length cable kit ...

Страница 78: ...VLASETM IR 78 6 6 4 RACK HANDLES Handles for rack fastening are available on request Figure 64 Rack handles ...

Страница 79: ...shall not be held liable for any non conforming use of the marking system of its manufacture It is forbidden to operate the marking system before the machine it is intended for has been declared in conformance with statutory Directives WARNING Access to the internal parts of the control rack is only permitted by authorized personnel who have been trained and instructed on the electrical risks Data...

Страница 80: ...d MAINTENANCE PROGRAM COMPONENT OR FUNCTION TYPE OF OPERATION INTERVALS F Theta Scan Lens Check Clean Weekly wipe gently with a dry cloth or soaked in high purity isopropyl alcohol or clean it with air blowing Rack Air filters Clean Replace Every 3 months according to the environment and frequency of use 7 2 1 F THETA SCAN LENS CLEANING PROCEDURE Figure 65 Cleaning F Theta lens WARNING Before clea...

Страница 81: ...s operation 1 Turn off key switch on controller unit 2 Disconnect AC power cable 3 Loosen screws of front panel and remove them 4 Remove filter 5 Clean filter with compressed air or with neutral detergent and air dry it 6 Reinstall the filter and protective cover WARNING DO NOT install wet filter 7 If filter cannot be cleaned replace the filter 8 Suitable filters are available as spare parts ...

Страница 82: ... the SUPPORT link which gives you access to Downloads by selecting your product model from the dropdown list in the Search by Product field for specific Data Sheets Manuals Software Utilities and Drawings Repair Program for On Line Return Material Authorizations RMAs plus Repair Center contact information Customer Service containing details about Maintenance Agreements Technical Support through em...

Страница 83: ...ser Laser Label resonator 8 Laser Label control rack 8 Aperture Label Label for non interlock protective housing Caution possibility of electric shock General Warning USB plug MAC Address 8 Maximum output of laser radiation as per definition 3 55 of IEC60825 1 considering single fault conditions ...

Страница 84: ...Control Axes connector INTERLOCK Interlock Connector INTERLOCK OUT Interlock OUT Connector LAN LAN connector RS232 RS232 connector VGA VGA connector PHOT Photocell connector ENC Encoder connector RES Resonator connector MDR Scan Head connector RF Radio frequency connector FAN Fan connector ...

Страница 85: ...85 EXTERNAL LABEL PLACING Figure 67 Positioning of external labels rack ...

Страница 86: ...86 Figure 68 Positioning of external labels resonator ...

Страница 87: ...alysis and assessment of the risk s This evaluation was carried out in relation to the applicable points of the standards listed in the Declaration of Conformity Datalogic products are mainly designed for integration purposes into more complex systems For this reason it is under the responsibility of the system integrator to do a new risk assessment regarding the final installation WARNING This is...

Страница 88: ... the risk reduction from the laser radiation Any other risks mechanical electrical etc must always be evaluated and appropriate risk reduction measures must be taken where necessary The Machinery Directive and EN 13849 1 are NOT applicable to the product Vlase The target safety integrity or performance level e g PLd according to ISO13849 1 shall be determined by the machine integrator taking into ...

Страница 89: ...nal Guard opening should only be possible with the aid of a tool Guard safety switch is connected as input of a safety logic and Vlase interlock system as output input of that safety logic Warning label for access panel according EN60825 1 must be applied Since the frequency is LOW F1 and the removal of the guard is intentional the MINIMUM REQUIREMENT as per IEC13849 1 is PLc Target PLr c ...

Страница 90: ...90 BLOCK DIAGRAM VLASETM SAFETY LOGIC DETAILS FOR AUTOMATIC PRODUCTION LINE ...

Страница 91: ...s COMPONENT CHARACTERISTICS DOOR SWITCH SAFETY SWITCH designed in compliance with the standard currently in effect IEC60947 EN292 EN60204 EN1088 Two redundant contacts IP67 B10d 2000000 SAFETY LOGIC main component SAFETY PLC min PLd according EN13849 1 Output type relays min 10mA To be installed in an IP54 enclosure CONCLUSIONS Because MTTFd is greater than 100 years Category is 3 max achievable D...

Страница 92: ... INTERLOCK e g no IR laser output if INTERLOCK_A or INTERLOCK_B are disabled where disabled means contacts open These functions have been evaluated according to UNI EN ISO 13849 1 The results are SF 1 Category B MTTFd 10 years DC none SF 2 Category 3 MTTFd 4496 years DC feedback is provided The determination of the diagnostic coverage DC is assigned to the system integrator depending on the superv...

Страница 93: ...g system NOTE BEFORE INSTALLING AND USING THE LASER CAREFULLY READ THE APPENDIX CONCERNING LASER SAFETY WARNING It is crucial that you protect yourself against beams of reflected or direct light as they cause permanent damage to your skin WARNING Staring directly at a laser beam may cause irreversible damage to your eyes WARNING Wear safety goggles while using the system ...

Страница 94: ...with the result that it can be very harmful to the eye and present vision problems WARNING Directly viewing a laser beam can cause irreversible damage to vision To prevent permanent damage to vision a few precautions must be taken All individuals who may be exposed to dangerous levels of laser radiation must know that the laser is active and wear protective goggles if necessary Due to its high pow...

Страница 95: ...e crystalline lens melanic coloring or reddening of the skin Greater wavelengths infrared IR A 780 1400 nm IR B 1400 3000 nm IR C 3000 10E6 nm generally cause thermal effects detachment or photocoagulation of the retina burning of the skin The degree of injury obviously depends on the amount of absorbed radiation and the instantaneous power of the radiation source CLASSIFICATION AND DANGER LEVEL R...

Страница 96: ...OF THE BEAM AFTER MIRROR REFLECTION This may occur by directing the beam on a reflecting surface Viewing of a mirror reflected beam from a flat surface is very dangerous and equal to direct viewing DIRECT VIEWING OF THE BEAM OUTPUT BY AN OPTICAL FIBER This happens if an Optical Fiber disconnects from the resonator Viewing of the beam is dangerous up to a significant distance Filters and Goggles do...

Страница 97: ...ing the CEI EN 60825 1 2014 Normative regarding nominal distance and optical risk in the worst condition and in case of accidental exposure of 10 seconds for direct radiation and 100 seconds for diffused radiation Wavelength 1064 nm Application type Marking Emission type Q Switched Observation type Direct radiation Pulse energy VlaseTM IR 1109 TFS2 480 J 10 kHz VlaseTM IR 1209 TFS2 550 J 20 kHz Pu...

Страница 98: ...aseTM IR 10 W Marker with F Theta 160 mm 25 2 m 3 70 VlaseTM IR 20 W Marker with F Theta 160 mm 28 8 m 3 82 FILTER SCALE INDEX OF THE PROTECTION GOGGLES The scale index L of the filters indicates the stability against radiation which means the ability of the filter to maintain its characteristics unchanged This stability is certified by the producer according to the EN 207 with tests conducted for...

Страница 99: ...nd Skin Understanding of the necessity for Individual Protection Devices I P D COLLATERAL RISKS If the intended use of the marking system changed for example for material processing applications collateral risks may arise represented by the production of fumes and vapors which may be irritating or toxic if not removed and adequately filtered before being released into the air again WARNING It is a...

Страница 100: ...ocument describes how to update the software version 1 Close the Lighter and Laser Engine Click on QUIT from the icon tray menu 2 UNISTALL Lighter from the Start menu you cannot run the new installer before having removed the old SW version ...

Страница 101: ...nforms the user that data is automatically saved in the system o system will be shut down automatically within the next 10 seconds WARNING DO NOT restart the system or turn off the system o wait until the system shuts down automatically black screen o power off the system to complete installation Procedure without control board update o a window informs the user that data is automatically saved in...

Страница 102: ...covery procedure requires the USB recovery disk which is included in the standard equipment Procedure o Turn OFF the system o Insert the USB recovery disk provided with the system in the USB port o Turn ON the system and press the ESC key to enter the BIOS menu o Go to BOOT menu select Hard Drive BBS Priorities and press the ENTER key o Select Boot Option 1 and press the ENTER key o Select the USB...

Страница 103: ... Datalogic Recovery Disk procedure o Press the ENTER key to continue o Choose RESTORE_DISK_C_PCM3365 to restore disk C and press the ENTER key o In the next screen choose sdb as target disk and press the ENTER key ...

Страница 104: ...104 o Wait for the end of the procedure about 10 minutes o Select Enter command line prompt and press the ENTER key o Select Start over and press the ENTER key ...

Страница 105: ...reen choose sda as target disk and press the ENTER key o Wait for the end of the procedure about 2 minutes o Select Poweroff and press the ENTER key o Wait some seconds until the shutdown process is done o Turn OFF the system using the main switch o Remove the USB recovery disk from the USB port ...

Страница 106: ...d click the Restart Later button in the restart window Insert the USB recovery disk provided with the system in the USB port Navigate to the Fileinz and report folder on the USB recovery disk Copy the customized Laser inz file to the D DATA CONFIG folder on the system Select the Test Layouts folder on the USB recovery disk Select the correct test layout files based on the laser system model Copy t...

Страница 107: ...er to permanently save data Press OK o Shut down the system in order to save the new settings WARNING DO NOT turn OFF or UNPLUG the system while Windows is shutting down o WAIT until the system shuts down automatically black screen o Remove the USB recovery disk from the USB port o Power off the system to complete installation ...

Страница 108: ...108 APPENDIX G MECHANICAL DRAWINGS ...

Страница 109: ...109 NOTE Please refer to Datalogic website for detailed drawings ...

Страница 110: ...ub D 25 front view 25 Figure 19 ENABLE signal scheme 27 Figure 20 KEY signal scheme 28 Figure 21 Timing control signals 28 Figure 22 Timing signals 29 Figure 23 Male panel socket Sub D 25 front view 30 Figure 24 Male panel socket Sub D 9 front view 31 Figure 25 Female panel socket cod 09 3482 87 08 front view 32 Figure 26 Female panel socket cod 09 3482 87 04 front view 32 Figure 27 Connection exa...

Страница 111: ...52 RJ45 Ethernet connection 48 Figure 53 F Theta Lens protection cap removal 49 Figure 54 Power on 50 Figure 55 Status LED display 50 Figure 56 Enable command KEY 51 Figure 57 Status LED display 51 Figure 58 Enable command ENABLE 52 Figure 59 Status LED display 52 Figure 60 Temporal diagram of Software Thermalization 64 Figure 61 Control Box Ordering no 985330031 76 Figure 62 Kit MOF Ordering no 9...

Страница 112: ......

Отзывы: