Accessories
A-10
Pegaso™ Industrial PDA with Windows
®
CE
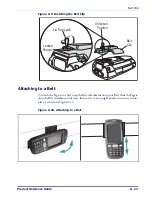
Belt Clip
The Belt Clip comes with two separate pieces:
one that attaches to the Pegaso, and one that
attaches to your belt.
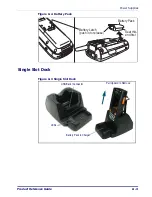
To install the Belt Clip on the unit, complete
the following steps:
1. Turn the Pegaso face-down and ensure
that power is off.
2. Orient the Belt Clip on the underside of
the Pegaso.
3. Align the “ears” on the inside of the Belt Clip with the corresponding holes on the
underside of the Pegaso and slide them into place.
4. Push the top of the Belt Clip against the Pegaso and turn the quarter-turn fastener
to secure it.
The Handstrap can be left on when installing the Belt Clip.
Ears
Содержание Pegaso
Страница 1: ...Industrial PDA with Windows CE Product Reference Guide ...
Страница 10: ...Preface About this Guide viii Pegaso Industrial PDA with Windows CE NOTES ...
Страница 14: ...Batteries and Power 1 4 Pegaso Industrial PDA with Windows CE NOTES ...
Страница 46: ...Configuring the Pegaso 2 32 Pegaso Industrial PDA with Windows CE NOTES ...
Страница 72: ...Networks Communications and Connections 4 10 Pegaso Industrial PDA with Windows CE NOTES ...
Страница 98: ...Falcon Desktop Utility for Windows CE B 14 Pegaso Industrial PDA with Windows CE NOTES ...
Страница 104: ...Configuring the Web Server C 6 Pegaso Industrial PDA with Windows CE NOTES ...
Страница 132: ...Programming Bar Codes G 8 Pegaso Industrial PDA with Windows CE 2 4 0 4 2 2 0 2 F F 3 E 0 4 2 2 0 4 F F 3 E ...
Страница 156: ...Programming Bar Codes G 32 Pegaso Industrial PDA with Windows CE NOTES ...
Страница 170: ...I 8 Pegaso Industrial PDA with Windows CE Index NOTES ...
Страница 171: ......

