background image

TECHNICAL SPECIFICATIONS 


19 


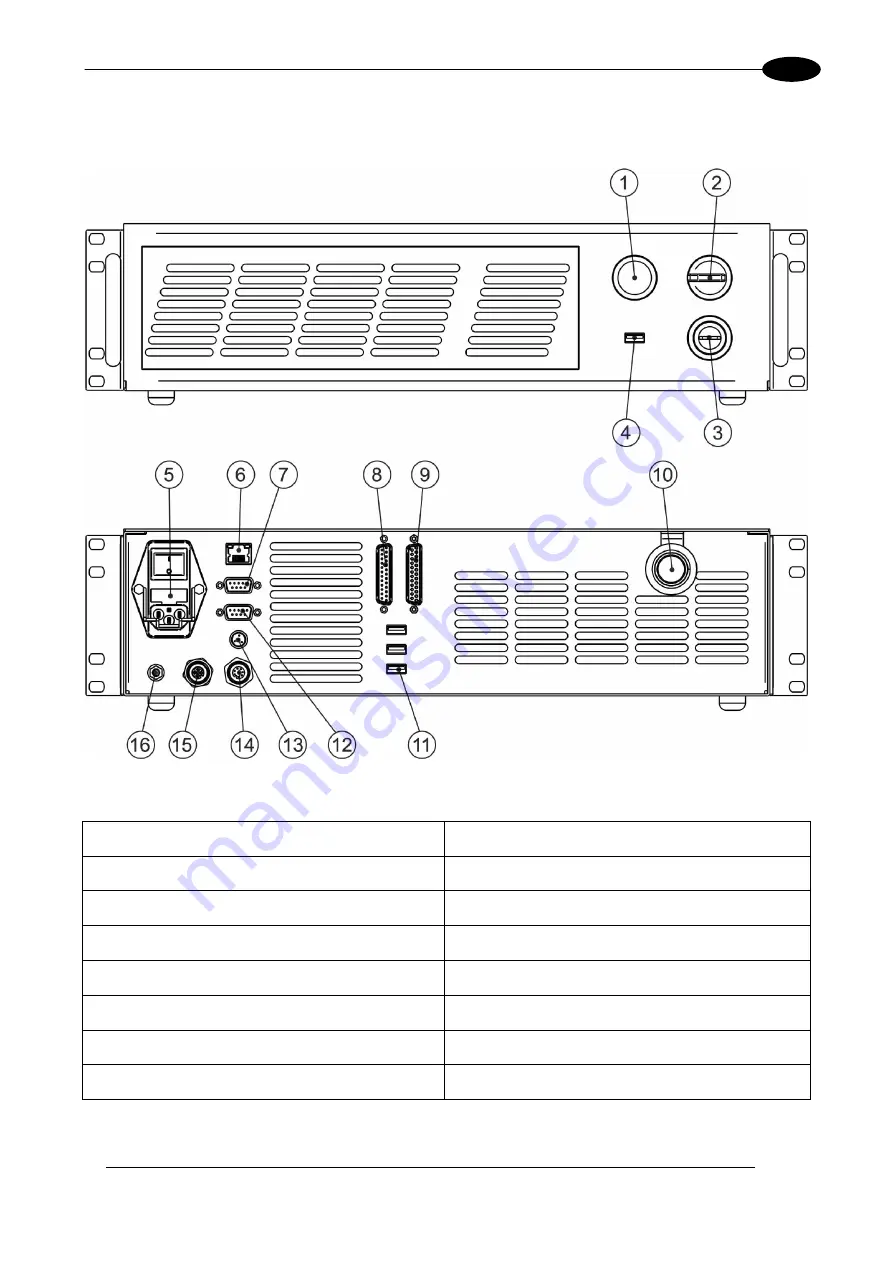
2.2.2  CONTROL RACK 

The control rack is described here below in order to provide the right information for proper installation: 


Figure 10: Control rack overview. 

1) Status LED 

9) I/O connector (Axes Control) 

2) Enable selector 

10) Main connection to Scan Head 

3) Key selector 

11) 3x USB connectors 

4) USB connector 

12) RS232 connector 

5) Mains power supply connection 

13) Interlock connector 

6) LAN connector 

14) Photocell connector 

7) VGA connector 

15) Encoder connector 

8) Command Box connector (Laser Control) 

16) Earth ground 

Содержание Arex 30W

Страница 1: ...USER S MANUAL ArexTM 30W 50W ...

Страница 2: ...urpose without the express written permission of Datalogic S p A and or its affiliates Datalogic and the Datalogic logo are registered trademarks of Datalogic S p A in many countries including the U S A and the E U Arex Lighter Suite are trademarks of Datalogic S p A and or affiliates All other trademarks and brands are property of their respective owners Datalogic reserves the right to make modif...

Страница 3: ...nough to constitute an electrical risk This symbol may also appear on the marking system at the risk area Laser Warning This symbol indicates the danger of exposure to visible or invisible laser radiation This symbol may also appear on the marking system at the risk area Fire Warning This symbol indicates the danger of a fire when processing flammable materials Because there is a danger of fire it...

Страница 4: ...015 Release 821004081 03 02 2016 General Review 821004082 rev D 05 05 2016 16 Appendix C 821004083 rev E 22 05 2017 ii Appendix F NOTE We sometimes update the documentation after original publication Therefore you should also review the documentation at www datalogic com for updates ...

Страница 5: ...herent to invisible and visible laser radiation The operator is required to carefully read the section of the manual concerning safety instructions as well as the sections related to matters falling under her his responsibility The workers assigned to the marking system can be identified as OPERATOR responsible for loading elements to be processed visually checking the work cycle removing the fini...

Страница 6: ...e two motors with the turning on off of the laser beam The deflected laser beam is focused by an F Theta scan lens before it hits the surface of the product Generally speaking the marking is carried out within the focus of the beam LASER SOURCE On Arex TM marking system it is used a sealed fiber laser source This source is based on the new fiber solid state technology It guaranties high stability ...

Страница 7: ...oller Figure 1 Control Rack and Scan Head WARNING Laser marking may strongly interact with materials through a thermal carbonization process with the emission of fumes and vapours Adequate fume extractor and fume treatment must be provided for especially when working on plastic materials such PVC IMPORTANT WARNINGS Access to the internal parts of the marking system is allowed only to authorized pe...

Страница 8: ...CIFICATION 20 2 4 CONNECTORS SPECIFICATIONS 22 2 4 1 INTERLOCK CONNECTOR 22 2 4 2 COMMAND BOX CONNECTOR LASER CONTROL 24 2 4 3 AXES CONNECTOR I O CONTROL 29 2 4 4 RS232 CONNECTOR COM2 30 2 4 5 ENCODER CONNECTOR 31 2 4 6 PHOTOCELL CONNECTOR 31 2 5 INPUT OUTPUT SIGNAL SPECIFICATIONS 32 2 6 CONNECTION EXAMPLE 33 3 INSTALLATION AND SET UP 34 3 1 CONNECTIONS 34 3 1 1 COMMAND BOX CONNECTOR CONNECTION 34...

Страница 9: ...X B STANDARDS 72 LASER STANDARDS 72 CE COMPLIANCE 72 FCC COMPLIANCE 72 APPENDIX C AREX TM SAFETY CONSIDERATION ACCORDING EN ISO 13849 1 2008 73 SAFETY FUNCTIONS OF AREX TM 75 APPENDIX D NOTE ABOUT LASER 76 LASER SAFETY 76 LASER RADIATION 77 ABSORPTION OF LASER RADIATION 78 CLASSIFICATION AND DANGER LEVEL 78 RADIATION VIEWING CONDITIONS 79 DIRECT VIEWING OF THE LASER BEAM 79 DIRECT VIEWING OF THE B...

Страница 10: ...nection cable between Scan Head and Rack Figure 2 Unpacking Before installing or operating the marking system you should Inspect the shipping container for damage Inspect the marking system for signs of damage Confirm that the shipping carton contains all items on the shipping inventory list including any accessories Retain all packaging materials until the marking system has been inspected for co...

Страница 11: ...able WARNING To avoid damaging or breaking the optical fiber never subject it to a bending radius below the limits specified in the technical specification table 1 3 CABLE AND ACCESSORIES Power Supply cable Command Box Connector Interlock connector System Keys USB flash drive Rack adapters Manuals Test Report Sample Test If this connector is used the marking system works in DANGEROUS condition MUT...

Страница 12: ...d and Rack 1 5 ON MOISTURE CONDENSATION If the marking system is brought directly from a cold to a warm location moisture may condense inside or outside the marking system This moisture condensation may cause a malfunction of the marking system If moisture condensation occurs Turn off the marking system and wait about 1 hour for the moisture to evaporate Note on moisture condensation Moisture may ...

Страница 13: ...NG The marking system must be positioned in a safely manner and the precautions listed below must be followed Figure 4 Positioning rack Figure 5 Vertical positioning need additional fixing WARNING DO NOT fix the marking system in manner not shown in figure ...

Страница 14: ...icrometer positioning Z axis system The Scan Head must be fixed to a suitable base not supplied by Datalogic using the four M5 threaded holes and the two slotted seats Figure 7 Fixing points on Scan Head vertical mount The Scan Head unit just like the control rack must be safely positioned and fixed to a stable surface vibration free The Scan Head can be fixed either vertically or horizontally In ...

Страница 15: ...dirty If the air filter is dirty the air flow might become not sufficient to ensure correct cooling and might stop marking operation Clean or exchange air filter periodically Figure 8 Rack installation environment WARNING DO NOT place heavy objects on top of rack 1 8 FUME DUST EXTRACTOR During marking process dust and or gas may be produced It is important to use adequate fume extractor and or air...

Страница 16: ... OEM system integrator to provide the safety completeness to be ready to use 2 1 TECHNICAL CHARACTERISTICS CONTROL RACK MECHANICAL CHARACTERISTICS Weight 16 Kg Height 111 mm Width 430 mm Depth 370 mm IP Rating IP21 SCAN HEAD MECHANICAL CHARACTERISTICS Weight 3 Kg Height 90 mm Width 112 mm Depth 300 mm IP Rating IP54 without F Theta scan lens NOTE Refer to Datalogic s website for detailed drawings ...

Страница 17: ...lo 30W 50W LASER SOURCE specification 25 C Laser Type Class 4 Pulsed Fiber Laser Average Power W 30 50 Pulse energy max mJ 1 Peak power max kW 11 10 Central emission wavelength nm 1060 1080 Repetition Rate kHz 30 200 50 200 Laser aiming beam Class 2M 1mW 660nm Cooling Forced Air Noise dB A 70 at 1 meter OTHER HEAD CABLE minimum bending radius 150 mm fixed installation 300 mm mobile installation Ma...

Страница 18: ...N OF THE LASER MODULES 2 2 1 SCAN HEAD A description of the main parts of the Scan Head unit is provided here below Figure 9 Scan Head overview 1 Main connection Rack Scan Head 3 Status LED bar 2 F Theta Scan Lens 4 Focusing Beam output ...

Страница 19: ...ontrol rack overview 1 Status LED 9 I O connector Axes Control 2 Enable selector 10 Main connection to Scan Head 3 Key selector 11 3x USB connectors 4 USB connector 12 RS232 connector 5 Mains power supply connection 13 Interlock connector 6 LAN connector 14 Photocell connector 7 VGA connector 15 Encoder connector 8 Command Box connector Laser Control 16 Earth ground ...

Страница 20: ...388 6 Fixing Distance mm 212 3 367 6 471 7 Marking Area mm 2 100 x 100 170 x 170 210 x 210 NOTE Definition of Marking Area square marking field within which power is 95 respect to power in center WARNING This product was designed to use only certain configurations of F Theta lens and marking field If your needs are not satisfied by current available F Theta lens configurations please contact Datal...

Страница 21: ... and the last mechanical edge of the F Theta Scan Lens Refer to the following figure WD Working Distance FD Fixing Distance MA Marking Area AB Aiming beam FB Focusing beam Figure 11 Marking area NOTE For systems equipped with standard Small F Theta Scan Lens M39 the focus condition is obtained by matching the Aiming Beam with the Focusing beam ...

Страница 22: ... 2008 PIN SIGNAL TYPE DESCRIPTION FUNCTIONAL DIAGRAM 1 VCC_INT_A OUTPUT 24V DC reference for INTERLOCK IN signal A 2 INTERLOCK_A INPUT INTERLOCK IN signal A 3 GND GND Ground reference for INTERLOCK IN signal B 4 INTERLOCK_B INPUT INTERLOCK IN signal B PIN 1 PIN 2 PIN 3 PIN 4 MARKING FUNCTIONALITY CONDITION CONTACT OPEN CONTACT OPEN NOT POSSIBLE SAFE CONTACT CLOSED CONTACT OPEN NOT POSSIBLE DANGERO...

Страница 23: ... 4 positions Figure 13 Female cable mount connector cod TA4FX solder view WARNING If the interlock gold connector is used the marking system is in DANGEROUS condition MUTING DEVICE NOTE To restore the marking system it is necessary to repeat the Turning on sequence without shutting down the system See chapter 4 1 for more details ...

Страница 24: ...ailable for EXT_ENABLE_A max 250mA 8 EXT_ENABLE_A Digital Input Primary external ENABLE signal see paragraph 2 4 2 1 HIGH level contact closed LOW level or disconnected contact opened 9 BUSY Digital Output This signal is used to know if the current spooler is executing marking in progress see paragraph 2 4 2 4 ON during marking process 10 CONNECTOR PRESENCE Digital Input This signal is used to che...

Страница 25: ...rror 21 GND Ground Ground reference 22 ENABLE_OUT Digital Output This signal is used to know if the system is ready to emit laser radiation see paragraph 2 4 2 3 ON when the system is in READY state 23 SW_READY Digital Output This signal is used to know if a document sequence or script is loaded and ready to be executed ON when a document or a sequence is running in AUTO MODE or WORK MODE SW_READY...

Страница 26: ...AREXTM 30W 50W 26 2 2 4 2 1 ENABLE SIGNAL S SCHEME COMMAND BOX CONNECTOR Figure 15 ENABLE signal s scheme ...

Страница 27: ...TECHNICAL SPECIFICATIONS 27 2 2 4 2 2 KEY SIGNAL S SCHEME COMMAND BOX CONNECTOR Figure 16 KEY signal s scheme 2 4 2 3 LASER CONTROL SIGNALS TIMING Figure 17 Timing control signals ...

Страница 28: ...tting the minimum acceptable time for the START_MARKING signal T2 Start Delay For delaying the start of marking process T3 Busy Advance BUSY signal corresponding to marking progress T4 Stop Time The minimum time for stop signal to stop the marking process T5 Busy Delay For delaying the Laser END signal with respect to laser emission T6 End Time For setting the Laser END activation time Refer to Li...

Страница 29: ...igital Input Generic input or X Axis home sensor input The home search is stopped when this signal goes HIGH 8 INPUT_1 or ZERO Y Digital Input Generic input or Y Axis home sensor input The home search is stopped when this signal goes HIGH 9 INPUT_2 or ZERO Z Digital Input Generic input or Z Axis home sensor input The home search is stopped when this signal goes HIGH 10 INPUT_3 or DISABLE X Digital...

Страница 30: ... Digital Output Generic output or R Axis electromechanical brake release signal ON during drive motion 24 OUTPUT_11 or DIR R Digital Output Generic output or R Axis drive direction signal 25 GND Ground Ground reference enable an axis cause that the corresponding signals will no longer be available as generic inputs output Refer to Lighter user s manual Setting the X Y Z and Rotor Axes parameters t...

Страница 31: ... for ENC_A 5 ENC_B DIGITAL INPUT Encoder HTL B channel signal 6 GND GND Return signal for ENC_B 7 NC NC NC 8 NC NC NC BODY SHIELD SHIELD SHIELD 2 4 6 PHOTOCELL CONNECTOR Panel socket BINDER M12 4 positions female 763 series Recommended photocell Datalogic S51 PA 5 B01 PK Datalogic S15 PA 5 B01 PK or equivalent Figure 22 Female panel socket cod 09 3482 87 04 front view PIN SIGNAL TYPE DESCRIPTION 1...

Страница 32: ...ax 5mA 24V DC Pulse Width 1ms debounce MIN TYP MAX INPUT Logic LOW 0 0 V DC 0 0 V DC 2 0 V DC INPUT Logic HIGH 5 0 V DC 12 0 V DC 24 0 V DC DIGITAL OUTPUT Type Low side driver Vmax 24V DC Imax 250mA Vsaturation 0 5V DC Leakage current 5µA OUTPUT State ON V 0 5 V DC I 250mA OUTPUT State OFF V 24 V DC I 5µA ...

Страница 33: ...TECHNICAL SPECIFICATIONS 33 2 2 6 CONNECTION EXAMPLE Figure 23 Connection example NOTE See APPENDIX C AREX SAFETY CONSIDERATION ACCORDING EN ISO 13849 1 2008 about the compliance to EN ISO 13849 1 2008 ...

Страница 34: ...y a connection cable 3 meters long Rack and Scan Head are NOT separable WARNING Connect the marking system to other parts WITHOUT voltage in order to avoid risks for the operator and for the laser source 3 1 1 COMMAND BOX CONNECTOR CONNECTION Figure 24 Connecting Command Box connector NOTE The Command Box connector must always be inserted in order to use Enable and Key on the front panel of the ra...

Страница 35: ...connector is used the marking system is in DANGEROUS condition MUTING DEVICE NOTE The interlock connector must always be inserted in order to use the marking system The absence of such connector locks the marking system NOTE See APPENDIX C AREX SAFETY CONSIDERATION ACCORDING EN ISO 13849 1 2008 about the compliance to EN ISO 13849 1 2008 ...

Страница 36: ...cable Figure 26 Connecting power supply cable NOTE Lock the plug with the retaining clamp to avoid accidental disconnection 3 1 4 GROUND CONNECTION To ensure high electrical noise immunity it is strongly recommended to connect the chassis to earth plant Figure 27 Ground connection ...

Страница 37: ...DE CONNECTION To use the marking system in Local Mode it is necessary to install a mouse keyboard and monitor Connect the monitor and input devices to marking system as shown below Figure 28 USB mouse connection Figure 29 USB keyboard connection ...

Страница 38: ...em in Remote Control mode it is necessary to connect a network cable Figure 31 RJ45 Ethernet connection NOTE The system LAN is configured by default with a fixed IP Address and Subnet Mask Default IP address 192 168 0 10 Default Subnet Mask 255 255 255 0 See chapter 5 2 in order to change LAN configuration NOTE Ethernet TCP IP 10 100 Mbit ...

Страница 39: ...3 1 7 F THETA LENS PROTECTION CAP REMOVAL Remove the F Theta Lens protection cap before marking operation Figure 32 F Theta Lens protection cap removal WARNING Marking with the lens protection cap could result in damage to the lens ...

Страница 40: ...and Box connection Check that KEY and ENABLE commands on the rack front panel are disabled see Figure 15 and Figure 16 1 ST turn on the main switch in the back of the control rack Figure 33 Power on During booting up status LED on the rack front panel and the LED bar on Scan Head will be blinking green Wait the end of the booting up The status LED on the rack and the LED bar on the Scan Head will ...

Страница 41: ... the KEY command is enabled the status LED on the rack and the status LED bar on the Scan Head will be blinking orange for about 20 seconds laser source warm up Wait the end of the laser source warm up The status LED on the rack and the LED bar on the Scan Head will be steady orange Figure 36 Status LED display ...

Страница 42: ...activate the ENABLE command by rotating it clockwise Figure 37 Enable command ENABLE The marking system is ready to mark The status LED on the rack and LED status bar on the Scan Head will turn red Figure 38 Status LED display ...

Страница 43: ...LID START SEQUENCE BLINKING ORANGE 2Hz SYSTEM ALARM OFF POWER_ON OFF ENABLE_OUT OFF SYSTEM ERROR BLINKING RED 2Hz SYSTEM ALARM ON POWER_ON OFF ENABLE_OUT OFF See paragraph 2 4 2 for more information 4 1 1 ADVICE ON USING THE SYSTEM If the marking system is used in manual mode you need to connect Command Box connector as described before In this way you are able to control the marking system direct...

Страница 44: ... benefit of the ALL IN ONE Rack architecture characteristics SW Editor SW Engine Correction Matrix Laser Control Galvo Control 4 3 REMOTE MODE OPERATIONS Keyboard mouse and monitor are not necessary in this configuration LAN SW Editor Remote SW Engine Remote Active X SW Engine Correction Matrix Laser Control Galvo Control ...

Страница 45: ...zed Applications and User Interfaces via Ethernet Local or remote ActiveX control interface is available with the same commands to allow the use of the same application developed for both local and remote configurations LAN Remote ActiveX SW Engine Correction Matrix Laser Control Galvo Control ...

Страница 46: ...tor you can o edit graphic layouts o set laser parameters o set marking system configuration o control the integrated I O module for axis management o create automated procedures o create programs using Lighter programming language Laser Engine is an application automatically loaded at start up that allows to operate on the marking system Laser Engine is present in the tray icon With Laser Engine ...

Страница 47: ...ND EDIT YOUR FIRST GRAPHIC DOCUMENT SIGNAL STATUS EXT_KEY OFF EXT_ENABLE_A OFF EXT_ENABLE_B OFF In WAIT FOR START status double click on Laser Editor icon to start the layout editor application Click on the document type selector and choose Layer ...

Страница 48: ...AREXTM 30W 50W 48 4 Click on the Text String icon in the Object toolbar to add a string object to the layer Edit String properties such as value font style etc using the Properties browser ...

Страница 49: ...USE AND OPERATION 49 4 Edit Filling properties such as filling type interline etc using the Properties browser ...

Страница 50: ... HOW TO TEST AND ENGRAVE YOUR DOCUMENT SIGNAL STATUS EXT_KEY ON EXT_ENABLE_A OFF EXT_ENABLE_B OFF In STANDBY SHUTTER CLOSED status press Limits All button in the Laser Toolbar to adjust the object position in the marking field ...

Страница 51: ...TION 51 4 In READY status adjust the Laser parameters using the Properties browser SIGNAL STATUS EXT_KEY ON EXT_ENABLE_A ON EXT_ENABLE_B ON Press Send Marking button in the Laser Toolbar to start the marking process ...

Страница 52: ...other external devices Click on Save to Device button to save the layout in the device memory Click on Show Laser Engine button to display Laser Engine window AUTO MANUAL Mode button allows switching between the two available working modes o Auto mode the engraving operations are executed automatically using external signals o Manual mode used for displaying the margins of the graphic objects to b...

Страница 53: ...USE AND OPERATION 53 4 Select the document from the list and click on To Auto Mode button The marking system is ready to mark document using external START_MARKING and STOP_MARKING signals ...

Страница 54: ...anguages you can use to enter text and keyboard layout NOTE In order to perform this setting it is necessary to connect mouse keyboard and monitor to the marking system see paragraph 3 1 5 o Turn OFF and ON the marking system and wait the end of the booting up the status LED on the rack and on the scan head must be steady green o From the main screen click on Start Control Panel o Select Change di...

Страница 55: ...CUSTOMIZE THE SYSTEM S SOFTWARE 55 5 o In Keyboards and Languages select and choose the desired language o Select Change keyboards to change your keyboard or input language ...

Страница 56: ... Desktop screen o A message advise you to restart or shutdown the system in order to permanently save data Press OK o Shut down the system in order to save the new settings WARNING DO NOT turn OFF or UNPLUG the system while Windows is shutting down o WAIT until system shuts down automatically black screen o Power off the system to complete installation ...

Страница 57: ... In order to perform this setting it is necessary to connect mouse keyboard and monitor to the marking system see paragraph 3 1 5 o Turn OFF and ON the marking system and wait the end of the booting up the status LED on the rack and on the scan head must be steady green o From the main screen click on Start Control Panel o Select View network status and task ...

Страница 58: ...AREXTM 30W 50W 58 5 o In the Network and Sharing Center screen select Change adapter settings o In the Network Connections screen double click on Local Area Connection icon ...

Страница 59: ... o Close all the open screens and double click on the shortcut to save data bat icon in the Desktop screen o A message advise you to restart or shutdown the system in order to permanently save data Press OK o Shut down the system in order to save the new settings WARNING DO NOT turn OFF or UNPLUG the system while Windows is shutting down o WAIT until system shuts down automatically black screen o ...

Страница 60: ...setting it is necessary to connect mouse keyboard and monitor to the marking system see paragraph 3 1 5 o Turn OFF and ON the marking system and wait the end of the booting up the status LED on the rack and on the scan head must be steady green o From the main screen click on Start Control Panel o Select Adjust screen resolution ...

Страница 61: ...t to save data bat icon in the Desktop screen o A message advise you to restart or shutdown the system in order to permanently save data Press OK o Shut down the system in order to save the new settings WARNING DO NOT turn OFF or UNPLUG the system while Windows is shutting down o WAIT until system shuts down automatically black screen o Power off the system to complete installation ...

Страница 62: ...remote computer are connected to the LAN o Click Start All Programs Accessories and then click Remote Desktop Connection o Click Options o In the Computer list type the host name or the IP address of the computer to which you want to connect o Type the user name password and domain if applicable of an account to which you have allowed remote access into the corresponding boxes and then click Conne...

Страница 63: ...me DLA Password dla o In the Log on to list if applicable select the domain or remote computer that you want and then click OK The remote desktop is displayed in a window on the desktop The remote computer is locked during this session o To disconnect the session click the Close button in the session window and then click OK when you are prompted to disconnect the Windows session ...

Страница 64: ...tor switch for EXT_KEY control signal 2 Enable selector ENABLE indicator Selector switch for both EXT_ENABLE_A and EXT_ENABLE_B control signals with LED indicator for ENABLE_OUT control signal 3 ALARM indicator LED indicator for SYSTEM_ALARM control signal 4 START button BUSY indicator Pushbutton for START_MARKING control signal with LED indicator for BUSY control signal 5 STOP button END indicato...

Страница 65: ... The marking on fly kit is available on request Kit includes encoder photocell cables and plastic reflectors Figure 40 Kit MOF Ordering no 985330027 6 3 RACK HANDLES Handles for rack fastening are available on request Figure 41 Handles rack ...

Страница 66: ...hall not be held liable for any non conforming use of marking system of its manufacture It is forbidden to operate the marking system before the machine it is intended for has been declared in conformance with statutory Directives WARNING Access to the internal parts of the control rack is only permitted for authorized personnel who have been trained and instructed on the electrical risks Datalogi...

Страница 67: ...TENANCE PROGRAM COMPONENT OR FUNCTION TYPE OF OPERATION INTERVALS F Theta Scan Lens Check Clean Weekly wipe gently with a dry cloth or soaked in high purity isopropyl alcohol or clean it with air blowing Rack Air filters Clean Replace Every 3 months according to the environment and frequency of use 7 2 1 F THETA SCAN LENS CLEANING PROCEDURE Figure 42 Cleaning F Theta lens WARNING Before cleaning t...

Страница 68: ...is operation 1 Turn off key switch on controller unit 2 Disconnect AC power cable 3 Loosen screws of front panel and remove them 4 Remove filter 5 Clean filter with air blow or with neutral detergent and air dry it 6 Reinstall the filter and protective cover WARNING DO NOT install wet filter 7 If filter cannot be cleaned replace the filter 8 Suitable filters are available as spare parts ...

Страница 69: ... original packing and include all original accessories and documentation as detailed in the original inventory It is advised that the correct and original packaging is used to prevent transit damage to the marking system If part or all of the original packaging is unavailable please contact Datalogic for replacement items Please take time to complete all return documentation This can be obtained f...

Страница 70: ...bility of electric shock Generic Warning USB plug MAC Address 0 I KEY ENABLE Positions COMMAND BOX Command Box connector AXES I O Control Axes connector INTERLOCK Interlock connector LAN LAN connector RS232 RS232 connector VGA VGA connector PHOT Photocell connector ENC Encoder connector 2xT5A Fuses 3 Maximum output of laser radiation as per definition 3 55 of IEC60825 1 considering single fault co...

Страница 71: ...71 POSITIONING OF EXTERNAL LABELS Positioning of labels on the control rack Figure 44 External labels rack location Positioning of labels on the Scan Head Figure 45 External labels Scan Head location ...

Страница 72: ...ate analysis and assessment of the risk s This evaluation was carried out in relation to the applicable points of the standards listed in the Declaration of Conformity Datalogic products are mainly designed for integration purposes into more complex systems For this reason it is under the responsibility of the system integrator to do a new risk assessment regarding the final installation WARNING T...

Страница 73: ...emove the power to the laser source According to Category 3 Arex TM interlock is made by two separate channels referred as INTERLOCK A and INTERLOCK B For a normal operation INTERLOCK A signal must be short circuited to its reference VCC_INT_A and INTERLOCK B signal must be short circuited to its reference GND The opening of at least one channel causes the power removal from the internal laser sou...

Страница 74: ...oise produced by the fans is lower 4 do the same for INTERLOCK_B channel 5 final check is OK if both interlock channels are OK If Final Check is not OK and the root cause is due to Arex TM the unit should be returned to the manufacturer or authorized repair center To manage this issue please contact your supplier of the system General information Safety MUST be a part of our conscience The safety ...

Страница 75: ...ed means contacts open These functions has been evaluated according to UNI EN ISO 13849 1 The results are SF 1 Category B MTTFd 10 years DC none according category SF 2 Category 3 MTTFd 113 years dop 365days hop 24h Tcycle 1800s DC because Arex TM doesn t provide feedbacks a measure of fault detection must be included in the process The estimate for DC is 0 to 99 depending on the application This ...

Страница 76: ...rking system WARNING It is crucial that you protect yourself against beams of reflected or direct light as they cause permanent damage to your skin WARNING Staring directly at a laser beam may cause irreversible damage to your eyes WARNING Wear safety goggles while using the marking system NOTE BEFORE INSTALLING AND USING THE LASER READ CAREFULLY THE APPENDIX CONCERNING LASER SAFETY ...

Страница 77: ... that it can be very harmful to the eye and present vision problems WARNING Directly viewing a laser beam can cause irreversible damage to vision To prevent permanent damage to vision a few precautions must be taken All individuals who may be exposed to dangerous levels of laser radiation must know that the laser is active and wear protective goggles if necessary Due to its high power the laser in...

Страница 78: ...crystalline lens melanic coloring or reddening of the skin Greater wavelengths infrared IR A 780 1400 nm IR B 1400 3000 nm IR C 3000 10 E6 nm generally cause thermal effects detachment or photocoagulation of the retina burning of the skin The degree of injury obviously depends on the amount of absorbed radiation and the instantaneous power of the radiation source CLASSIFICATION AND DANGER LEVEL Re...

Страница 79: ...F THE BEAM AFTER MIRROR REFLECTION This may occur by directing the beam on a reflecting surface Viewing of a mirror reflected beam from a flat surface is very dangerous and equal to direct viewing DIRECT VIEWING OF THE BEAM OUTPUT BY AN OPTICAL FIBER This happens if an Optical Fiber disconnects from the Scan Head Viewing of the beam is dangerous up to a significant distance Filters and Goggles do ...

Страница 80: ...he protection filters of the laser radiation Calculations have been done following the CEI EN 60825 1 2014 Normative regarding nominal distance and optical risk in the worst condition and in case of accident exposure of 10 seconds for direct radiation and 100 seconds for diffused radiation Wavelength RIF 1070 nm 10 nm 1120 nm Raman emission Laser Type Q Switched fiber laser Observation type Direct...

Страница 81: ...nal Ocular Hazard Distance O D Optical Density Arex TM Marker 30W 31 6 m 4 19 Arex TM Marker 50W 40 8 m 4 41 SCALE INDEX OF THE PROTECTION GOGGLES FILTER The scale index L of the filters indicates the stability to the radiation that means the ability of the filter to maintain its characteristics unchanged This stability is certified by the producer according to the UNI EN 207 It is then necessary ...

Страница 82: ...serve as a reference for the Operator and shall be written in his her language Training is essential and must include Familiarization with system operating procedures Knowledge of the biological effects of radiation on the Eyes and Skin Understanding of the necessity for Individual Protection Devices I P D COLLATERAL RISK If the intended use of the marking system is changed for example for materia...

Страница 83: ...d use of the marking system if a material being processed undergoes alterations and produces irritating and or toxic fumes it may be necessary to remove the fumes from processing before releasing them into the air An additional risk may be represented by fire caused by processing materials other than those the system was designed for WARNING Do not subject materials other than those the marking sy...

Страница 84: ...ocument describes how to update software version 1 Close the Lighter and Laser Engine Click on QUIT 2 Do Lighter UNISTALL you cannot run the new installer before having removed the old software version 3 Wait the end of uninstall procedure ...

Страница 85: ...ser that data is automatically saved in the system o system will be shut down automatically within the next 10 seconds WARNING DO NOT restart or turn off the system o wait until system shuts down automatically black screen o power off the system to complete installation Procedure without control board update o a window informs user that data is automatically saved in the system o system will be re...

Страница 86: ...lost The recovery procedure requires the USB recovery disk which is included in the standard equipment Procedure o Turn OFF the system o Insert the USB recovery disk provided with the system in the USB port o Turn ON the system and press ESC key to enter BIOS menu o Go to BOOT menu select Hard Drive BBS Priorities and press ENTER key o Select Boot Option 1 and press ENTER key o Select the USB disk...

Страница 87: ...gic Recovery Disk procedure screen will appear o Press ENTER key to continue o Choose RESTORE_DISK_C_PCM3365 to restore disk C and press ENTER key o In the next screen choose sdb as target disk and press ENTER key ...

Страница 88: ...88 o Wait for the end of the procedure about 10 minutes o Select Enter command line prompt and press ENTER key o Select Start over and press ENTER key ...

Страница 89: ...creen choose sda as target disk and press ENTER key o Wait for the end of the procedure about 2 minutes o Select Poweroff and press ENTER key o Wait some seconds until the shutdown process is done o Turn OFF the system using the main switch o Remove the USB recovery disk from the USB port ...

Страница 90: ... installed click Restart Later button in restart window Insert the USB recovery disk provided with the system in the USB port Navigate to Fileinz and report folder on the USB recovery disk Copy customized Laser inz file in D DATA CONFIG folder on the system Select Test Layouts folder on the USB recovery disk Select the right test layouts files based on the laser system model Copy the selected test...

Страница 91: ... order to permanently save data Press OK o Shut down the system in order to save the new settings WARNING DO NOT turn OFF or UNPLUG the system while Windows is shutting down o WAIT until system shuts down automatically black screen o Remove the USB recovery disk from the USB port o Power off the system to complete installation ...

Страница 92: ...92 APPENDIX G MECHANICAL DRAWINGS ...

Страница 93: ...93 NOTE Please refer to Datalogic website for detailed drawings ...

Страница 94: ...al s scheme 27 Figure 17 Timing control signals 27 Figure 18 Timing signals 28 Figure 19 Male panel socket Sub D 25 front view 29 Figure 20 Male panel socket Sub D 9 front view 30 Figure 21 Female panel socket cod 09 3482 87 08 front view 31 Figure 22 Female panel socket cod 09 3482 87 04 front view 31 Figure 23 Connection example 33 Figure 24 Connecting Command Box connector 34 Figure 25 Connecti...

Страница 95: ...985330031 64 Figure 40 Kit MOF Ordering no 985330027 65 Figure 41 Handles rack 65 Figure 42 Cleaning F Theta lens 67 Figure 43 Removal of air filter 68 Figure 44 External labels rack location 71 Figure 45 External labels Scan Head location 71 Figure 46 Eyeball section 78 ...

Страница 96: ......

Отзывы: