background image

Settings

86

JOYA™ TOUCH A6

Recovery Mode

Recovery is an independent, runtime environment that’s included on
a separate bootable partition from the main Android OS. It contains
tools  to  help  repair  your  installations as well as install official OS
updates by using a combination of key presses. Its main purpose is
to reset the device, wipe data or perform system updates when the
system crashes and the screen is unresponsive.

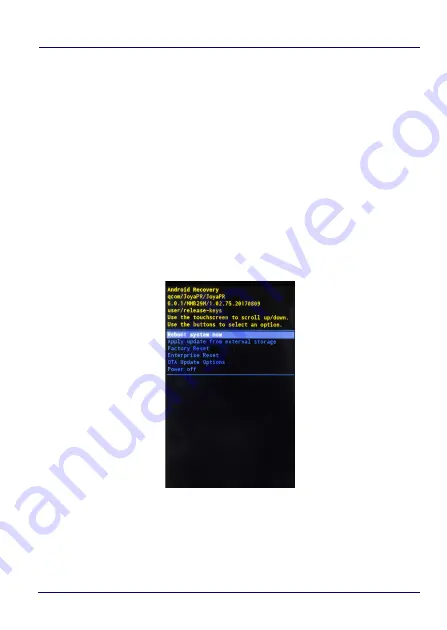
To enter 

Recovery Menu

:

1. Turn off the Joya Touch A6 (see 

Getting Started on page 29

).

2. Press the Power key with a metallic clip and, immediately after,

press the Scan Key.

3. The 

Recovery Menu 

displays on the screen:

4. Use the touch screen to navigate the menu. You can apply/force

updates and perform a configuration reset. Press the Scan Key or
the Scan Trigger to select.

5. Select 

Reboot system now

. The device reboot is complete.

Содержание 311350037

Страница 1: ...Multi Purpose Device for Retail User s Manual ...

Страница 2: ... docu mentation Should future revisions of this manual be published you can acquire printed versions by contacting your Datalogic representative Elec tronic versions may either be downloadable from the Datalogic website www datalogic com or provided on appropriate media If you visit our web site and would like to make comments or suggestions about this or other Dat alogic publications please let u...

Страница 3: ...Side View 10 Accessories 12 Battery 15 Install the Battery 15 Charge the Battery 17 Charge with the Single Slot Dock Locking 17 Charge with the Single Slot Dock Charge Only 19 Charge with the 3 Slot Cradle 20 Charge with USB 22 Battery Information 23 Battery Safety Guidelines 25 Getting Started 29 Turn on the Device 29 Home Screen 29 Home Screen Items 30 Status Bar Icons 31 ...

Страница 4: ...stures 45 Using the Stylus Pen 45 Resetting the Device 46 Configuration Reset 46 Device Reset 49 LED Indicators 51 Magnetic Sensor Calibration 52 Settings 53 Overview 53 Wi Fi Settings 54 Connect to Wi Fi Network 54 Add a Wi Fi Network 56 Bluetooth Settings 58 Enable Bluetooth 58 Connect to Other Bluetooth Devices 59 Configure Rename or Unpair Bluetooth Devices 60 Sound Notification 62 Led Notific...

Страница 5: ...Advanced Settings 88 Suspend Timeout 88 Charging Mode 90 Wake Up Configuration 91 Input Configuration 92 Accessibility 100 Device Info 106 Datalogic Applications 109 DL Battery Manager 109 Battery Info 111 Charging Profile 115 Data Logging 117 Application 121 DL Cradle Manager 122 DL Ringtone Editor 124 DL Stager 127 Desktop Configuration Utility DXU 128 How DXU Works 129 Installation 131 Controls...

Страница 6: ...0 Install Android Studio 204 Install Android SDK 205 Install ADB Driver 206 Create a New Application with Android Studio 208 Avalanche 211 CSIPSimple 211 SureLock 211 SureFox 212 MobiControl 213 Data Capture 215 Imager Data Capture 215 Connections 219 USB Connection 219 USB Direct Connection 219 Wi Fi Connection 221 Bluetooth Serial Connection 223 Wireless and Radio Frequencies Warnings 225 Techni...

Страница 7: ...ed EU Declaration of Conformity 254 Statement of Compliance 254 Information for the User 256 Radiofrequency Radiation Exposure Information 257 Radio Technologies and Frequency Bands 258 Europe 258 US and Canada 258 FCC IC Labeling 259 FCC Compliance 259 ISED Compliance 260 Radiofrequency Radiation Exposure Information 261 WEEE Compliance 263 Support Through the Website 265 Reference Documentation ...

Страница 8: ...vi JOYA TOUCH NOTES ...

Страница 9: ...ng conventions Device and Joya Touch A6 refer to the Joya Touch A6 Dock refers to the Joya Touch Single Slot Dock Locking 3 Slot Cradle refers to the Joya Touch 3 Slot Cradle The label artworks may be only a draft Refer to the product labels for more precise information ...

Страница 10: ...wireless communication capabilities supporting nearly any application The Datalogic Joya Touch A6 system architecture is based on Qualcomm Snapdragon 210 platform and it was developed to meet the most demanding customer needs A large quantity of on board memory is available and it enables the user to adapt the terminal for any specific need Thanks to its great ergonomics and the state of the art a...

Страница 11: ...ion mode Android6 2GB RAM 16 GB Flash Grey Blue EU colors combination upper case battery cover 911350055 Joya Touch A6 Pistol Grip 802 11 a b g n BT 4 2D Imager w white illum Green Spot 4 3 Full Touch VoIP Presentation mode Android6 2GB RAM 16 GB Flash Dark Grey Orange Orange EU 911350056 Joya Touch A6 Handheld 802 11 a b g n BT 4 2D Imager w white illum Green Spot 4 3 Full Touch VoIP Presentation...

Страница 12: ...l Touch VoIP Presentation mode Android6 2GB RAM 16 GB Flash Dark Grey Orange Orange EU 911350060 Joya Touch A6 Handheld 802 11 a b g n BT 4 2D Imager w red illum Green Spot 4 3 Full Touch VoIP Presentation mode Android6 2GB RAM 16 GB Flash Dark Grey Orange EU North America models 911350061 Joya Touch A6 Pistol Grip 802 11 a b g n BT 4 2D Imager w white illum Green Spot 4 3 Full Touch VoIP Presenta...

Страница 13: ...oIP Presentation mode Android6 2GB RAM 16 GB Flash White Green HC FCC 911350067 Joya Touch A6 Pistol Grip 802 11 a b g n BT 4 2D Imager w red illum Green Spot 4 3 Full Touch VoIP Presentation mode Android6 2GB RAM 16 GB Flash Grey Blue Blue FCC 911350068 Joya Touch A6 Handheld 802 11 a b g n BT 4 2D Imager w red illum Green Spot 4 3 Full Touch VoIP Presentation mode Android6 2GB RAM 16 GB Flash Gr...

Страница 14: ...Introduction 6 JOYA TOUCH A6 For further details about the Datalogic Joya Touch A6 models refer to the web site www datalogic com ...

Страница 15: ... Start Guide Safety Regulatory Addendum Remove all the components from their packaging check their integrity and compare them with all the packing documents CAUTION Keep the original packaging for use when sending products to the technical assistance center Damage caused by improper packaging is not covered under the warranty ...

Страница 16: ...Introduction 8 JOYA TOUCH A6 General View Front View Scan Key Touch Panel Display ...

Страница 17: ...Introduction User s Manual 9 Back View Laser Safety Label Product Label Power Key ...

Страница 18: ...Introduction 10 JOYA TOUCH A6 Top View Side View Data Capture Window Scan Trigger Micro USB Port Handheld Models Pistol Grip Models ...

Страница 19: ...Introduction User s Manual 11 CAUTION Do not apply any sticker to the Joya Touch A6 see the picture below ...

Страница 20: ...ot cradle charge only light gray power supply and line cord included Cradles Accessories 91ACC0045 Joya Touch Cradle Unlock Key 5 PCS 91ACC0048 Joya Touch 3 Slot Cradle and Single Slot Dock Power Supply requires line cord for 3 SC powers up to 2 cradles in standard charge mode and 1 cradle in fast charge mode 91ACC0049 Joya Touch 3 Slot Cradle Power Jumper to connect a second 3 slot cradle to a si...

Страница 21: ...nsparent border 5 pcs 91ACC0079 Joya Touch Handheld Rubber Boot for WEC7 models and A6 models 91ACC0085 Joya Touch Pistol Grip Rubber Boot for WEC7 models and A6 models 91ACC0080 Joya Touch Belt Holster 91ACC0047 Joya Touch Trolley Holder 60 pcs for both handheld and pistol grip 91ACC0086 Joya Touch Trolley Holder 60 pcs pistol grip only display orientation 45 degrees NOTE Use only Datalogic appro...

Страница 22: ...Introduction 14 JOYA TOUCH A6 NOTES ...

Страница 23: ...ry To install the battery pack follow the steps below 1 Unscrew the battery cover and remove it 2 Connect the battery contacts to the battery clip located in the battery slot Handheld Models Pistol Grip Models Handheld Models Pistol Grip Models ...

Страница 24: ...Insert the battery pack into the slot as shown in the figures below 4 Insert the battery cover and fix the screws NOTE Required torque of the screws is 35 Ncm Handheld Models Pistol Grip Models Handheld Models Pistol Grip Models ...

Страница 25: ...3 slot cradle or a USB cable Charge with the Single Slot Dock Locking To prevent the risk of short circuiting first plug the power cord into the power connector on the back of the dock then connect the power cord to the power supply CAUTION Use only the Datalogic power supply 91ACC0048 to power the Joya Touch Single Slot Dock Locking The Single Slot Dock Locking cannot be daisy chained to a Joya T...

Страница 26: ...rt the device into the dock with the screen facing front and the head facing down NOTE For further information on the Joya Touch Single Slot Dock Locking refer to the Single Slot Dock Locking Quick Start Guide included in the dock s box ...

Страница 27: ... the power supply into the power jack on the back of the dock then plug the power supply into a power outlet CAUTION Use only the Datalogic power supply included in the box to power the Joya Touch Single Slot Dock Charge Only NOTE Insert the device into the dock with the screen facing front and the head facing down 1 1 2 ...

Страница 28: ...the power supply into the AC DC plug using a Datalogic power cable Please see below an example of how to insert the power supply cable through the wall mounting metal bracket Standard Charge The standard charge connection allows to power two cradles with one power supply To connect a second cradle use the Joya Touch Cradle Power Jumper available as optional accessory P N 91ACC0049 1 Connect the fi...

Страница 29: ... the screen facing front and the head facing down NOTE Under the same conditions the fast charge connection can charge the battery up to twice as fast as the standard charge connection NOTE For further information on the Joya Touch 3 Slot Cradle refer to the Joya Touch 3 Slot Cradle Quick Start Guide included in the cradle s box and to the Joya Touch 3 Slot Cradle Installation Guide downloadable f...

Страница 30: ...e Datalogic micro USB power supply p n 94ACC1380 to charge the terminal from a power outlet CAUTION Do not put any foreign object such as but not limited to coins paper clips stickers inside the slot of any of the docks see the examples below 1 1 2 ...

Страница 31: ...ng temperature some battery performance degradation may occur The Joya Touch A6 should be charged at an ambient temperature between 0 35º C 32 to 95ºF to achieve the maximum charging rate Never charge the device battery in a closed space where excessive heat can build up As a safety precaution the battery may stop charging to avoid overheating The Joya Touch A6 may get warm during charging this is...

Страница 32: ...sures maximum performance CAUTION Do not incinerate disassemble short terminals or expose to high temperature Risk of fire and explosion Use specified charger only Risk of explosion if the battery is replaced by an incorrect type Dispose of batteries as required by local authorities WARNING Use only Datalogic approved batteries and accessories for battery charging Risk of explosion if battery is r...

Страница 33: ...eas in hot weather do not place the battery pack in microwave ovens in clothes dryers in high pressure containers on induction cook surfaces or similar devices Doing so may cause the battery pack to generate heat explode or ignite Using the battery pack in this manner may also result in a loss of performance and a shortened life expectancy To power the cradle use only a Datalogic approved power su...

Страница 34: ...e look like metal strips on the battery pack Short circuiting the terminals may damage the battery pack or the connecting object Do not apply voltages to the battery pack contacts Do not pierce the battery pack with nails strike it with a hammer step on it or otherwise subject it to strong impacts pressures or shocks Do not disassemble or modify i e bend crush or deform the battery pack The batter...

Страница 35: ...onic devices without a prior check and approval by an Authorised Repair Centre Do not replace the battery pack when the device is turned on Do not remove or damage the battery pack s label Do not use the battery pack if it is damaged in any part Battery pack usage by children should be supervised Collect and recycle waste batteries separately from the device in compliance with European Directive 2...

Страница 36: ...Battery 28 JOYA TOUCH A6 NOTES ...

Страница 37: ...Joya Touch A6 press and hold the Scan Key or the Scan Trigger for Pistol Grip models for at least 4 seconds Home Screen Notification Status Bar All Apps Icon CSIPSimple Icon Browser Icon Favorites Tray SoftSpot Icon Settings Icon Power Home Back Overview Navigation Bar ...

Страница 38: ... customize it CSIPSimple Icon Launch the CSIPSimple App SoftSpot Icon Launch the SoftSpot application All Apps Icon Opens the Apps window Tap it to view the Apps loaded on your device Settings Icon Opens the Settings Browser Icon Opens the Browser application Back Button Returns you to the previous page Home Button Returns you to the home page Overview Button Shows the list of recent applications ...

Страница 39: ... Icons Wi Fi is on Wi Fi not connected Wi Fi connected no internet Connected to a Wi Fi network Bluetooth is on Battery is low External power source is connected Battery is full Battery is partially drained Airplane mode Vibrate mode SD storage ...

Страница 40: ...until the home screen appears 3 Drag and drop the icon into position on the home screen panel or in an open spot in the Favorites tray To add a widget 1 On a home screen long tap on an empty area to go to the screen where you can customise your home screen 2 Tap the Widget icon 3 Tap and hold the item you want to add until the home screen appears 4 Drag and drop the widget into position on the hom...

Страница 41: ...Getting Started User s Manual 33 2 Tap and hold the shortcut widget or folder until it floats on the screen 3 Drag the item to X Remove at the top of the screen ...

Страница 42: ...d 34 JOYA TOUCH A6 Power Menu Tap the Power button on the Navigation Bar to display the Power Menu Alternatively you can access the Power Menu by pressing the power key on the back of the device with a metallic clip ...

Страница 43: ...meout on page 88 To wake the device from suspend press the Scan Key or the Scan Trigger for Pistol Grip models To unlock the home screen tap anywhere on the screen and drag your finger upward Power Off Select Power Off to turn off the terminal When you turn off the terminal the session you are working on expires and it won t be possible to restore it Alternatively you can shut down the device by p...

Страница 44: ...mplete shutdown of the device after which the battery will be detached In the battery pack undesired current consumption is reduced during a shipping period to extend the charge keeping time of the battery pack After this operation the date and time settings will be lost To restart the device connect it to a power supply or insert it into a dock ...

Страница 45: ...Screenshot to capture a screenshot of the current screen Adjust Volume Select Adjust Volume to adjust the volume Pair Device Select Pair device to start a pairing session with a PC via DXU software DXU is the Datalogic system application for device configuration and firmware upgrade from a Windows PC see Desktop Configuration Utility DXU on page 128 for further information ...

Страница 46: ...code containing the configuration data of your PC Open DXU on your PC and tap Scan2Deploy From the Wi Fi Configuration window you can select the barcode type and set the Wi Fi and pairing configuration data Tap Print to create the barcode tap Save to save it on your hard disk ...

Страница 47: ...Getting Started User s Manual 39 If you select Print the barcode displays on the screen From the Joya Touch A6 s Long Press Power Menu select Pair device Tap Scan to read the barcode ...

Страница 48: ...0 JOYA TOUCH A6 Quick Settings Menu You can use this menu to toggle settings such as Wi Fi Bluetooth auto rotation and more To display the Quick Settings Menu drag your finger twice from the top of your screen downward ...

Страница 49: ...nager Avalanche Enables rapid deployment and central management of Joya Touch A6 installations see Avalanche on page 211 Browser Use to access the Internet or intranet Calculator Provides the basic and scientific arithmetic functions Calendar Use to manage events and appointments Clock Use to schedule alarms for appointments or as a wake up Contacts Use to manage contact information CSipSimple Voi...

Страница 50: ...tool see DL Stager on page 127 Downloads Lists all downloaded files DXU Agent Launch to start a pairing with DXU by reading a barcode containing the configuration data of your PC see Desktop Configuration Utility DXU on page 128 Email Use to send and receive email Enterprise Agent Enhances the lockdown functionalities of SureLock and SureFox to ensure advanced device security see SureLock on page ...

Страница 51: ...r Use to set edit or create a usage profile ProximityCalibrate Allows to calibrate the proximity sensor see ProximityCalibrate on page 195 Scan2Deploy Use to pair device see Pair Device on page 37 Scanner Enables data capture see Data Capture on page 215 Settings Use to configure the Joya Touch A6 see Settings on page 53 SoftSpot A configurable application meant to provide easy access to frequentl...

Страница 52: ...OUCH A6 SureFox Use to controls web access for the users see SureFox on page 212 SureLock Use to secure and lock your device see Connections on page 219 Videos Play videos stored on the internal storage memory Icon Description ...

Страница 53: ...ss the screen to scroll or pan Drag in a list to select multiple items Tap and hold Tap and hold your finger or the stylus on an item to see a list of actions available for that item On the pop up menu that appears tap the action you want to perform CAUTION The stylus tip size must be minimum 4 mm To prevent damage to the screen do not use sharp devices or any device other than your finger or a to...

Страница 54: ...Configuration reset sets the configuration of the device all its settings to a known status the factory status or an enterprise user defined status Network Settings Reset Resets all network settings 1 Tap Settings Backup reset 2 Tap Network settings reset 3 Tap RESET SETTINGS ...

Страница 55: ... Manual 47 Factory Data Reset Brings the device to the default configuration clearing your device s internal storage and all the user customized settings 1 Tap Settings Backup reset 2 Tap Factory data reset 3 Tap RESET PHONE ...

Страница 56: ...rise flash partition and in the splash flash partition The Enterprise folder is a file system storage that is used for deployment and device unique data It is persistent and maintains data after an Enterprise reset Applications and custom settings i e custom boot animation and wallpaper can persist data after an Enterprise Reset by saving them to the enterprise folder 1 Tap Settings Backup reset 2...

Страница 57: ...ft Reset Restarts Android Operative System through an Android API function It is generally used when some applications stop responding or it is automatically issued by Android after a Configuration reset 1 Press the Power button 2 Tap Reboot 3 The device shuts down and then reboots ...

Страница 58: ...ponding or after a critical failure that compromises its usability To perform a hard reset do the following steps 1 Perform a full shutdown by pressing and holding the power key with a metallic clip for about 15 seconds After clip release the left and right LEDs will blink once simultaneously to confirm the correct shutdown see LED Indicators on page 51 2 Press the Scan Key or the Scan Trigger to ...

Страница 59: ...pp See Led Notifications on page 63 and Led Effects Editor on page 193 for more details The following table lists the default indicators LED Default Status Left and Right LEDs The two LEDs blink alternately in case of critical charge the device is charging but the battery level is too low to turn on The two LEDs blink once simultaneously after a full shutdown Bottom LED Good Red Illuminates when a...

Страница 60: ... magnetic sensor allows you to use any compass application to determine north and south and display cardinal directions no matter which orientation the phone is in To calibrate the magnetic sensor hold the device in front of you and wave it through the air in a figure 8 pattern as shown in the picture below ...

Страница 61: ... s Manual 53 Settings Overview The Settings app allows you to set system parameters to customize your device Tap the Settings icon on the Favorites Tray or on the All Apps screen to open the Settings screen ...

Страница 62: ...i Fi networks within range and lists them If the device finds a network that you connected to previously it will connect to it automatically Secured networks are indicated with a lock icon 2 Select the network name you want to connect to from the available network list 3 If the network is open tap the profile and then tap Connect or press and hold and then select Connect to network ...

Страница 63: ...User s Manual 55 4 If the network is secured a dialog box appears requesting information relevant to the network security protocol e g password key or certificate Enter the required information then tap Connect ...

Страница 64: ...of the screen and select Add network 3 Enter the Network SSID Wi Fi network name For secure Wi Fi network connections tap None under Security and then select the type of security protocol required from the pop up menu e g WEP WPA WPA2 PSK or 802 1xEAP Enter any additional security information required by the type of security protocol selected ...

Страница 65: ...Settings User s Manual 57 4 Tap Save ...

Страница 66: ...hat has Bluetooth capabilities ensure that the two devices are turned on discoverable and within close range Enable Bluetooth 1 To turn on the Bluetooth tap Settings Bluetooth and switch right to the On position Once the Bluetooth radio is enabled the terminal automatically starts searching for discoverable devices ...

Страница 67: ...for available Bluetooth devices Flick the list and select a device The Bluetooth pairing request dialog box displays on the screen 2 Make sure both devices show the same passkey and tap Pair 3 The selected Bluetooth device is added to the Paired Devices list and a paired connection is established ...

Страница 68: ...ir Bluetooth Devices Tap Settings Bluetooth Select a device from the Paired Devices list and tap the settings icon next to its name The Paired devices window displays on the screen Type in the Name field to rename the paired device Tap FORGET to unpair ...

Страница 69: ...Settings User s Manual 61 To rename your device tap the Menu icon at the right top of the screen and select Rename this device Tap Rename to confirm ...

Страница 70: ...Settings 62 JOYA TOUCH A6 Sound Notification The Sound notification window allows to set the volume and to change the notification touch and other sound settings Tap Settings Sound notification ...

Страница 71: ...tion settings allows to configure the LED indicators see LED Indicators on page 51 Tap Settings Led notifications The first window lists the events states the LED should signal Select the desired event Tap Led ID to select the LED you want to assign to the event ...

Страница 72: ...Settings 64 JOYA TOUCH A6 Tap Led Action to configure the LED behaviour Use the Blink window to configure the blink frequency and duration Tap Apply to confirm the settings ...

Страница 73: ...Settings User s Manual 65 If the Bottom LED is selected the Led Action list will include two more options Set Brightness allows to configure the LED s brightness Tap Apply to confirm the settings ...

Страница 74: ...Settings 66 JOYA TOUCH A6 Dim allows to adjust the LED s brightness through an editor Select Dim and the tap Dimming Sequence to draw the dimming curve Tap CONFIRM ...

Страница 75: ...r Settings Before you start reading barcodes use the Settings app to view and configure all settings for the scanner From the applications menu tap Settings Scanner Settings Select the desired configuration from the following options ...

Страница 76: ...d read tone and display notification Good Read Duration Sets the duration of the notification LED green spot or beep the scanner emits on a good read Good Read Interval Sets the interval between each notification LED green spot or beep the scanner emits on a good read ...

Страница 77: ...fault If cleared the scanner is disabled until you launch a scanner listener application developed using the Datalogic SDK or enable a keyboard intent wedge Good Read Audio Mode Sets the audio tone to None Beep tone Audio file If Audio file is selected the option Good read audio file displays Tap it to select the file you want to use as good read ringtone NOTE The Notification settings do not appl...

Страница 78: ...io Volume Sets the volume of beep tone or audio file if enabled Good Read Use it to enable good read notifications LED Green Spot Tap Enable good read to enable disable notifications main enabler then select the notification you want to use ...

Страница 79: ...e text by enabling and configuring the use of prefix suffix group separator and code identifier Label Prefix Tap Label prefix to enter the characters you will be using as prefix Tap Add special to select a special character to be added in the current cursor position ...

Страница 80: ...lacement The Group Separator replacement is a non printable data separator character ASCII code 1D hex Tap Group Separator replacement to enter a string that will be used as GS data separator substituting the standard GS character Tap Add special to select a special character to be added in the current cursor position Remove Non Printable Characters Select it to remove non printable characters fro...

Страница 81: ...tomatic Identification and Mobility is an international barcode identifier When AIM identifier before is enabled the AIM ID is inserted at the beginning of the decoded barcode DLM identifier is a Datalogic specific character identifier User defined identifier is a user specific character identifier you can set in the related symbology settings menu ...

Страница 82: ...selected it allows you to pick and decode a barcode from multiple barcodes printed close together when the scan illumination intersects more than one barcode Only the targeted barcode will be returned Enable Illumination If selected it causes the scanner to turn on the illumination to aid decoding Enable Aim Enables the laser aim ...

Страница 83: ...t an aiming pattern to assist in centering over the barcode before scanning Tap Target mode to select the desired targeting behavior No Delay Target mode is disabled Spot Timeout Scanning takes place after a programmable time upon pressing the scan button Tap Target timeout to set the duration of the spot ...

Страница 84: ...e scan timeout to set the scanning timeout after releasing the scan button Decode Timeout Drag the Decode timeout slider to set the maximum amount of time the scanner attempt to decode after target timeout in case Spot Timeout is enabled or after the scan button is pressed in case Target mode is disabled ...

Страница 85: ...Settings User s Manual 77 Wedge Use it to enable or disable the keyboard wedge and the intent wedge ...

Страница 86: ...a with active keyboard input If this setting is not enabled keystrokes will be always dispatched to the foreground application Keyboard Wedge Input Mode Allows to select the scanned data input mode Text Injection The scanned barcode is injected into the text area Key Pressure The scanned barcode is translated into keyboard strokes Enable Intent Wedge Enables the broadcast of specific intents to th...

Страница 87: ... input into internet browsing applications in the form of a valid URL Symbology Settings Each barcode symbology can be customized with additional settings that may affect that specific barcode decoding Tap Symbology settings to configure symbology decoding options ...

Страница 88: ...Settings 80 JOYA TOUCH A6 Refer to the sample symbology control panels for examples of the types of fields and options you can modify The example below shows the settings of a Code 128 barcode symbology ...

Страница 89: ...barcode symbologies Reset Configuration Resets back to default scanner configuration settings Commit Saves the configuration settings to a persistent storage Any change you make is temporary and will be lost when the system restarts unless you tap Commit Digimarc Watermak All the red illumination models are pre configured to read Digimarc watermarks The function can ben disabled in the Scanner Set...

Страница 90: ...lows you to upgrade your operative system to the latest version Local Upgrade From the Settings menu tap System upgrade Local upgrade Navigate the file system and select a pre charged update package Select the update package you want to install ...

Страница 91: ...Settings User s Manual 83 The following window displays on screen showing information about the device and the update package components ...

Страница 92: ...lows to reset the device configuration after the update see Resetting the Device on page 46 force the update of all components including those already updated Tap Install Update The device will reboot and a success notification will be displayed Tap the notification to display a report showing the installed update components If the update fails the screen will display a failure message and a repor...

Страница 93: ...tery level is at least 40 in case of critical update xloader bootloader or recovery partition and 20 in case of any other update or the Joya Touch A6 is connected to a power source USB or dock NOTE Update is always done in recovery mode see Recovery Mode on page 86 ...

Страница 94: ...he device wipe data or perform system updates when the system crashes and the screen is unresponsive To enter Recovery Menu 1 Turn off the Joya Touch A6 see Getting Started on page 29 2 Press the Power key with a metallic clip and immediately after press the Scan Key 3 The Recovery Menu displays on the screen 4 Use the touch screen to navigate the menu You can apply force updates and perform a con...

Страница 95: ...Settings User s Manual 87 NOTE In Recovery mode you can only apply updates from external storage see Local Upgrade on page 82 ...

Страница 96: ...rmation on Suspend Mode 1 Tap Settings Advanced settings Suspend on external power sets the number of seconds without user input activity before the system is suspended while running on external power Suspend on internal battery sets the number of seconds without user input activity before the system is suspended while running on battery power ...

Страница 97: ...Settings User s Manual 89 2 Tap Settings Display Sleep to set the number of seconds without user input activity before the system is suspended while running on either battery power or external power ...

Страница 98: ...trol will display the Suspend on external power setting the next time you look in the Display page If you set the Display page s Sleep control to a new value it will override both timeouts for external power and internal battery Charging Mode Sets the battery level at which the device turns on automatically The default value is 5 ...

Страница 99: ...urces to configure other wake up sources Possible wake up buttons are front trigger Scan Key pistol trigger Scan Trigger auto scan trigger and motion see Triggers on page 99 for more details If Motion is selected your device will wake up as soon as it detects motion Tap Motion wake up sensitivity to configure the motion detector s sensitivity ...

Страница 100: ...r input from the keyboard The following pop up window displays on screen asking for confirmation To unlock the keyboard clear the Lock keyboard input check box Key Remapping Tap Key remapping to remap an input key then press the key you want to remap You can remap the Front Trigger and the Pistol Trigger ...

Страница 101: ... Manual 93 The following window displays on screen Scancode represents the physical location of a keyboard key Keycode represents the value that is mapped to a specific key Tap Remap type to select the remapping type ...

Страница 102: ... key to a new function Tap the second menu default DISABLE KEY to select the new function you want to assign to the selected key Tap the last menu default None to add a modifier key such as Ctrl Shift or Alt Tap ADD A NEW MAPPING A window displays showing the new keymap ...

Страница 103: ...er s Manual 95 Unicode Select Unicode to remap a key to display Unicode characters such as symbol Press the Back Button on the navigation bar and then tap ADD A NEW MAPPING A window displays showing the new keymap ...

Страница 104: ...6 Start Activity Select Start activity to remap a key to launch an application loaded on your device Tap SELECT APPLICATION Select the desired application and then tap ADD A NEW MAPPING A window displays showing the new keymap ...

Страница 105: ...Settings User s Manual 97 ...

Страница 106: ...ttings 98 JOYA TOUCH A6 View All Remapped Keys Tap View all remapped keys to display all remapped keys Swipe left to edit an entry Swipe right to remove an entry and reset the key mapping back to default ...

Страница 107: ... physical trigger front and pistol are enabled by default If Auto Scan Trigger is enabled the device will automatically scan barcodes without a trigger being pressed Tap Auto Scan Trigger Range to select the maximum distance at which the device will automatically start scanning barcodes ...

Страница 108: ...Settings 100 JOYA TOUCH A6 Accessibility You can customize your Android device using accessibility settings Tap Settings Accessibility ...

Страница 109: ...ant captions to appear Text size select the size for your caption text Caption style select the style and color for your caption text and background Magnification Gestures Tap Magnification gestures and then tap the ON OFF switch to enable the magnification gestures When this feature is turned on you can zoom in and out by triple tapping the screen While zoomed in you can Pan drag two or more fing...

Страница 110: ... white depending on the original text color making text easier to read Power Button Ends Call Not used Auto Rotate Screen When enabled the screen automatically rotates when you move your phone between portrait mode and landscape mode Speak Passwords This feature reads out passwords to you automatically to help fill them in correctly If the check box is selected password characters are announced au...

Страница 111: ...he lock screen temporarily enables accessibility until the device is unlocked Text to Speech Output Text to speech output converts language text into spoken synthetic speech This means you are able to type in content and have it read back to you aloud and automatically Tap the setting icon next to the name of your preferred engine Pico TTS to change the language and the settings for your engine Ta...

Страница 112: ...efore your touch becomes a touch and hold If you find that you accidentally touch and hold when you intend to tap consider choosing a longer delay Tap Touch hold delay to adjust the amount of time before your touch on the screen becomes a touch and hold Color Inversion When enabled this feature exchanges color values For example black text on a white screen becomes white text on a black screen Col...

Страница 113: ...Settings User s Manual 105 To change the color correction mode select Correction mode then choose one of the following options ...

Страница 114: ...ings 106 JOYA TOUCH A6 Device Info The Device info screen displays information about the terminal including model number Android OS version open source licenses baseband version system versions build number ...

Страница 115: ...splay terminal information including battery network roaming IP address serial number Tap Factory to display information on factory configuration Tap Legal information Open source licenses to display information on open source software licenses ...

Страница 116: ...Settings 108 JOYA TOUCH A6 NOTES ...

Страница 117: ...ication provides information about the battery features and status allows to configure the battery charging profile and to log battery data Tap All Apps DL Battery Manager icon then tap the menu icon on the top left corner of the screen or swipe right to display the menu ...

Страница 118: ...Datalogic Applications 110 JOYA TOUCH A6 ...

Страница 119: ...er level and charging status Battery Info Realtime This window provides real time information about the battery The top section shows the battery level and the time left to full discharge when in discharge mode and to full charge when in charge mode Status Displays the charging status Source Displays the charging source Charge Mode Discharge Mode ...

Страница 120: ...gic Applications 112 JOYA TOUCH A6 Temperature Displays the real time temperature Voltage Displays the real time voltage Current Displays the real time current Charge Left Shows how much battery power is left ...

Страница 121: ...life cycle Health Shows the current battery health and signals potential errors State of Health Shows the current battery s health level Total Discharge Shows how much the battery has been used over its whole life cycle Full Charge Shows the actual maximum capacity available to the user Temperature Shows the maximum and minimum temperature reached by the battery ...

Страница 122: ...oltage reached by the battery Charge Current Shows the maximum charge current Discharge Current Shows the maximum discharge current Battery Info Manufacturer This window displays the model name the type the nominal capacity the serial number and the manufacture date of the battery ...

Страница 123: ...cording to the user s needs and priorities To configure a charging profile select 1 or 2 of the following preferences Battery Lifetime Maximum Capacity Charging Speed If a third preference is selected the system will automatically clear the oldest option Tap Apply Profile to confirm You can configure up to 6 different charging profiles ...

Страница 124: ...Datalogic Applications 116 JOYA TOUCH A6 Once you have set your profile it will be applied by default whenever you charge the device You can change your profile at any time even during charging ...

Страница 125: ...s to collect store display and analyze minute by minute battery data Setup Use the Setup window to select the data you want to log The data logging is disabled by default To enable it tap Enable Data Logging When enabled the log is always running even when the device is in suspend mode ...

Страница 126: ...Datalogic Applications 118 JOYA TOUCH A6 Graphs The Graphs window provides a graphical display of selected data on a specific date Select Date Select Data ...

Страница 127: ...Datalogic Applications User s Manual 119 Logs The Logs window displays data details by date Manage The Manage window allows to remove or export logs ...

Страница 128: ...logs and tap Remove to remove them Tap OK to confirm Select one or more logs and tap Export to export data and store them for extended periods Tap Allow to confirm The selected log files will be saved in the battery folder in the internal storage of your device ...

Страница 129: ...ill be used to create the graphs If you charge the Joya Touch A6 with a wireless charging pad you re not allowed to customize the charging profile If the Show Wireless Pad Notification check box is selected the system displays a warning message saying that the charging profile won t be applied Show Wireless Pad Notification is enabled by default To disable it clear the Show Wireless Pad Notificati...

Страница 130: ... JOYA TOUCH A6 DL Cradle Manager This application provides information about the cradle you re currently using and allows to enable disable some of its properties Below are some screenshots showing the different cradle options C ...

Страница 131: ...nu icon on the right top of the screen and digit your desired insertion timeout In addition you can unlock and lock the device without using the unlock key by tapping the UNLOCK and LOCK buttons The 3 Slot Cradle screen has 3 more fields Slot Index indicates the slot into which the device is inserted Fast Charge is enabled by default Clear the check box to reduce the charging speed of the slot Led...

Страница 132: ...ingtone in the Ringtone Name field and tap to add the first note The app will add the default note You can change the note the duration and the octave by selecting the desired options You can also set the BPM and the style Repeat the procedure for each new note Tap to remove a note Tap to add a new note Tap to play the ringtone Enter the number of loops in the Looping fields ...

Страница 133: ... right top of the screen for more options Effects Allows to add the following effects to the ringtone Note auto increment If enabled you can add a new note without tapping the button Play single note Select to play notes while editing Clear notes Clears all the notes ...

Страница 134: ... the ringtone as good read notification Save When the ringtone is ready tap Save on the menu list to save the ringtone The audio file will be saved in the Ringtones folder in the internal storage of your device Load Loads a file from the device s internal storage ...

Страница 135: ...alogic Applications User s Manual 127 DL Stager DL Stager is a configuration tool that uses special barcode labels Contact our technical support for more details see Support Through the Website on page 265 ...

Страница 136: ...XU reports information about currently connected devices DXU can configure a wide variety of device parameters including the scanner and most decoding parameters the touch screen and the keyboard interfaces such as Wi Fi Bluetooth and USB device settings such as date time time zone and power management and security settings such as password access DXU can also configure communication parameters be...

Страница 137: ...roubleshooting allowing a DXU administrator an opportunity to remotely operate the device to check settings configure the device using its own user interface and to see what a user sees How DXU Works DXU is really two applications working together The DXU desktop application runs on a Windows PC providing convenient UI to configure the Joya Touch A6 An application runs continuously on the device t...

Страница 138: ...t can be easily viewed and analyzed DXU can connect directly to devices that are plugged into your PC via USB including those inserted into a powered dock which is connected to your PC via USB DXU can also connect to devices on your network DXU supports connecting only to devices in the same subnet as the PC running DXU When connected to Wi Fi wireless access points the Joya Touch A6 can connect t...

Страница 139: ...on both 32 bit and 64 bit versions of Windows 7 Windows 8 family DXU is supported on both 32 bit and 64 bit versions of Windows 8 Windows 8 1 family DXU is supported on both 32 bit and 64 bit versions of Windows 8 1 Windows 10 family DXU is supported on both 32 bit and 64 bit versions of Windows 10 Unsupported Windows Versions DXU may run on older unsupported Windows versions but Datalogic technic...

Страница 140: ...have been disabled 4 Follow on screen prompts to finish installing DXU 5 Follow on screen prompts to finish installing Datalogic Device Support drivers Controls DXU Agent Controls The most important thing to remember about changing DXU Agent settings is that the DXU Agent Service must be disabled before changing settings and it must be enabled again after changing settings to put those settings in...

Страница 141: ...Datalogic Applications User s Manual 133 ...

Страница 142: ...rief overview of each of the settings a Enable service This check box is the key to changing any settings in DXU Agent Clearing this check box allows you to edit almost all settings Selecting this check box puts those settings into operation This check box is selected by default ...

Страница 143: ...s check box enables DXU Agent s logging capability When enabled logs are written to the log file location Logging can be helpful when diagnosing problems but at a slight cost of slowing DXU and consuming slightly more power This check box is not selected by default d Change Log file location This field allows you to specify where DXU Agent s log file is kept on your device The default location on ...

Страница 144: ...ult error behavior when they cannot load any particular web page g Home page location This field stores the path to a locally hosted web page that can be displayed on the device when network connectivity fails This functionality is enabled by the Custom home page check box This folder is located in internal flash storage sdcard0 h Is Authentication required This check box enables authentication to...

Страница 145: ...ou can change it j Password This field stores the password used to log into DXU Agent It is put into effect when the Is Authentication required check box is selected The default value is 0000 and you can change it k Is Simplified Deploy enabled This checkbox enables Simplified Deploy This is a security setting that could be used for example to allow use of Simplified Deploy only once as an out of ...

Страница 146: ...fault n VNC Password This field allows VNC communication to be authenticated so prying eyes cannot remotely connect to and control your device This field is blank by default Advanced Settings These settings must match settings on DXU in order for the DXU desktop application to communicate with the your device A mismatch will result in a communication failure which will block all configuration func...

Страница 147: ...default the same as most web servers b Device UDP Server Port This field configures the UDP port for the DXU server running on the device It is set to UDP port 3453 by default Desktop UDP Server Port This field configures the UDP port for communicating to the DXU desktop server It is set to UDP port 3453 by default c VNC Server Port This field configures the HTTP port for VNC running on the device...

Страница 148: ...ey connect By default No Devices Available will display when no devices announce themselves to DXU either when they connect via USB or when they connect over a network Simply connecting the Joya Touch A6 to a network even on the same subnet as the PC running DXU will not automatically display as being available The device must try to connect to DXU which sends an announcement packet to DXU This ca...

Страница 149: ...on under Available Devices to load its configuration into DXU To return to the DXU main window click the Back button generally a leftward pointing arrow in a circle Refresh This button manually refreshes the display of currently connected devices This can overcome problems with the automatic display of devices as they connect and it can remove devices from the list that are not currently connected...

Страница 150: ...ect to devices running DXU Agent that are either inside your PC s subnet or outside it The limitation is that devices on other subnets must be on a subnet that is routable from your PC s subnet Consult with your network expert for more information Once connected devices that respond to DXU s query over the network will display in the Available Devices list Load Configuration Clicking the Load Conf...

Страница 151: ...o any folder where DXU configuration files are located then select any configuration file you wish You can double click it to streamline opening it 3 Click the Open button Note that the default location is your user directory on your PC but DXU remembers the last directory you opened a DXU configuration file and always starts in that directory the next time you wish to open another DXU configurati...

Страница 152: ...arcode must be generated and printed using the Scan2Deploy button on DXU desktop Manifest File Manifest Files are text ini files indicating which firmware versions to update devices to update tag which DXU configuration file to apply config tag and which apk Android and cab WEC7 file applications to install install tag It is recommended that update tags be in separate manifest files You can specif...

Страница 153: ...th on DXU Server PC name of appN to install file with full path on DXU Server PC config name of DXU configuration file file with full path on DXU Server PC Android Example update firmware zip install install apk C Users DLUser Documents Android my_terminal apk config defaultConfigAndroid dxu C Users DLUser Documents Android my_user dxu WEC7 Example update firmware img install install cab C Users D...

Страница 154: ...equire an active connection to a device to create a Scan2Deploy barcode label This button opens the Scan2Deploy dialog box streamlined to create Scan2Deploy labels that can automatically connect a device to a Wi Fi access point on your PC s subnet and to automatically connect it to DXU adding it to DXU s Available Device list Printing a Simplified Deploy Barcode By embedding the IP address of the ...

Страница 155: ...of the PC which has DXU desktop installed and the name of the manifest file to be used You can also create a New manifest file as a template for either DXU configuration file or a firmware update file You could then edit the Manifest File ini file in a text editor like Word Pad to add applications to install 4 Click the Print Preview button enlarging the barcode view as needed And then print by cl...

Страница 156: ... DXU on your PC When the Include Unmodified Changes checkbox is selected all configuration items will be included in the barcode set This option results in several barcodes being generated as true Scan2Deploy labels After scanning the first label in this set DXU Agent s Scan2Deploy window on your device will display how many barcode labels must be scanned and will display your progress in scanning...

Страница 157: ... Wi Fi network Wi Fi Configuration Tab Barcode Type Menu The Barcode Type menu allows you to choose which barcode symbology that Scan2Deploy labels will be printed in Each barcode symbology has advantages and disadvantages which may benefit your organization QR Code Aztec Code and Data Matrix are 2D barcodes that offer high data density and larger capacity but require 2D scanners to ...

Страница 158: ...s graphic files should this prove convenient for including Scan2Deploy barcodes in an e mail to a remote office for example Wi Fi Configuration Controls As with the other version of the Scan2Deploy dialog box this group of controls allows you to configure the automatic configuration of a device s Wi Fi connection Fields allow you to enter the SSID password security method and IP settings If you se...

Страница 159: ...y dialog box this tab allows to set the maximum size of each label by symbology For example if you know that your devices can scan larger 2D labels than DXU s default setting you can increase the size of your label so fewer labels are needed to fully deploy your configuration Settings Window The Settings window is opened by clicking the Settings button on DXU main window This view includes control...

Страница 160: ...DXU uses to communicate several types of information with remote computers that are being configured The Desktop UDP Server Port a and the Device UDP Server Port b fields must be set to the same value as the matching ports on the remote device to ensure communication and remote configuration The Device HTTP Server Port c field must be set to the same value as the matching ports on the remote devic...

Страница 161: ... The types of settings include scanner settings enterprise settings system configuration settings DXU Agent configuration settings SoftSpot settings Tap2Deploy device side settings and SureLock settings Other settings may be added in the future Additional settings may be available depending on hardware options installed on your device and may depend on software installed on your device Device Info...

Страница 162: ... the screen of the device you are currently connected to This window also includes buttons to remotely activate the devices external buttons and to capture a screen shot of what is visible on its screen Firmware Update Utility Button Clicking this button opens the Firmware Utility dialog box which you can use to update the firmware on your device ...

Страница 163: ...e Printing Custom Configuration Barcodes on page 148 Use it to create Scan2Deploy barcode sets that can fully configure a device without network access to DXU on your PC containing all configuration settings in one set of barcodes and applying them by scanning the labels all without the need to use Simplified Deploy ...

Страница 164: ... button in the Available Device list Connect to a Device via Network Manually If DXU Agent on the device has its Enable Discovery Manager feature enabled and DXU has Automatic Discovery of Devices enabled under Advanced Settings then clicking Refresh should display it in the Available Device list if it is in the same subnet However if you want to manually add a device in DXU make sure both device ...

Страница 165: ...dy have your network set up and you already have your printer set up To connect a device to a Wi Fi access point and to DXU using the default settings follow the steps below 1 Launch DXU 2 Click Scan2Deploy on the DXU main window 3 Enter the SSID and Password for the Wi Fi access point that your device will use to connect to your network NOTE You will see the IP Address and port details displayed ...

Страница 166: ...t application 9 Tap Menu and then select the Scan2Deploy command 10 Scan the barcode Your device should appear in the Available Device list of the DXU main window Click Available Device to continue configuring your device Delete a Device from the Available Device List Click the exit button X located at top right of the device NOTE In most cases you should be able to leave other fields with their d...

Страница 167: ...file name in the field or you can click the Browse button to use a standard file dialog box to explore to the folder of your choice and type the file name Unusually clicking the Save button in the Save As dialog box does not actually save the configuration file but returns you to the Save Configuration dialog box 3 Optionally you may select the Use Password check box and type a password into the f...

Страница 168: ... the Load Configuration file This will open a standard file dialog box 3 Explore to your configuration file select it and click Open Open a Configuration File Which is Authenticated DXU displays a login prompt when you open a configuration file that requires authentication and when you connect to a device with a password set in the DXU Agent ...

Страница 169: ...uration device into the User Name field 3 Type the password for this configuration device in the Password field 4 Click OK Edit a Configuration File Off line You can edit configuration files even when the device they were drawn from are not connected to DXU Follow the steps below 1 Open your configuration file 2 Edit any settings you wish 3 Either save the result to a new configuration file or jus...

Страница 170: ...comment 1 Open a configuration file or load the configuration from a connected device 2 Click Configure This Device 3 Right click any tab node or parameter then select Add comment in the context sensitive menu 4 Type your comment 5 Click OK save A small text balloon will appear next to the item you commented on To edit a comment 1 Right click any item with a small comment icon 2 Select Edit commen...

Страница 171: ... there are no comments add them 4 Click Show Comments in the button bar You can select and edit comments in this table by double clicking the Comment field Click the exit button X to close the dialog box Configure a Device On line Once you have added the device to Desktop Configuration Utility you can click ist name under the Available devices list and use the Configure This Device option to start...

Страница 172: ...Datalogic Applications 164 JOYA TOUCH A6 ...

Страница 173: ...nges to a configuration file or apply the configuration changes to your device To configure a device that is connected over the network 1 Launch DXU 2 Connect your device to DXU manually using Scan2Pair labels or automatic discovery See instructions for these methods in this section 3 Click the button for your connected device in the Available Device list 4 Click Configure This Device 5 Configure ...

Страница 174: ...e selects the barcode symbology used to print the Scan2Deploy labels Different symbologies have advantages and disadvantages so DXU gives you a choice 2 Include Unmodified Changes when you configure a device using the console you don t always wish to configure all the settings so by default the generated codes for configuration do not include unmodified settings However once selected the Include U...

Страница 175: ...ile or load the configuration from a connected device 2 Click Configure This Device 3 Configure any settings you wish 4 Optional Save your configuration 5 Click the Back button to return to the Desktop Configuration Utility window 6 Click the Scan2Deploy 7 Click the Device Configuration tab 8 Optional Select the Include Unmodified Changes check box to include all configuration settings in your Sca...

Страница 176: ...e your device and unlock its screen 2 Launch the DXU Agent application 3 Tap Menu and then select the Scan2Pair command 4 Scan any label in your Scan2Deploy label set 5 Continue to scan all the barcodes on the list Once the last label is scanned the configuration will be put into effect and an on screen notification will confirm that your configuration is complete 6 Tap Home to exit NOTE Some conf...

Страница 177: ...ault but you can also select Italian Chinese Simplified or Chinese Traditional To change DXU s language 1 From the DXU main window click Settings 2 Select the language you prefer in the Language menu 3 Click the Back button a leftward pointing arrow in a circle to return to DXU main window Configure DXU Communication Settings You can configure the TCP IP ports used by DXU to communicate with the D...

Страница 178: ...erver running on the console PC It is set to UDP port 3453 by default b The Device UDP Server Port configures the UDP port for the DXU Agent server running on the device It is set to UDP port 3453 by default c The Device HTTP Server Port configures the TCP port for the DXU Agent server running on the device It is set to TCP port 80 by default like common web servers d The Device VNC Server Port co...

Страница 179: ...n the DXU Console PC DXU can log its activities and this can be very helpful for technical support to help you diagnose those unexpected problems that always seem to pop up after software is released to actual users Logging is not enabled by default Once enabled the DXU s default log file location is stored in your user directory at the following path C Users user AppData Roaming Datalogic DXU To ...

Страница 180: ...Advanced Settings tab 3 Click the Reset Advanced Settings button 4 Click Yes to confirm 5 Click the Back button a leftward pointing arrow in a circle to return to the DXU main window Enable Logging on the Joya Touch A6 DXU Agent can log its activities When enabled logs are written to the log file location Logging can be helpful when diagnosing problems but it slows down the DXU Agent and consumes ...

Страница 181: ...lication 3 Tap Menu to display the menu 4 Tap the Settings button 5 Clear the Enable Service check box 6 Select the Enable Log check box 7 Select the Enable Service check box 8 Tap Home to exit To specify where the log files are stored on your device 1 Resume your device and unlock its screen 2 Launch the DXU Agent application 3 Tap Menu to display the menu 4 Tap the Settings button 5 Clear the En...

Страница 182: ... of authentication by automatically applying a default user name and password to every DXU configuration and configuration file You can display an authentication prompt whenever anyone attempts to connect to one of your devices with DXU and change both the user name and the password to increase security of your devices Enable Authentication in DXU Agent You can ensure that users are prompted to en...

Страница 183: ...ect the Enable Service check box 8 Tap Home to exit To authenticate while opening DXU Agent s Settings window 1 Resume your device and unlock its screen 2 Launch the DXU Agent application 3 Tap Menu to display the menu 4 Tap the Settings button 5 Type your password in the Enter Password field and then tap OK NOTE You must clear Enable Service before you can change any setting in DXU Agent ...

Страница 184: ... the user name to add another piece of information that a hacker must enter correctly to access the configuration in DXU To change the User Name 1 Resume your device and unlock its screen 2 Launch the DXU Agent application 3 Tap Menu to display the menu 4 Tap the Settings button 5 Clear the Enable Service check box NOTE You must clear Enable Service before you can change any setting in DXU Agent ...

Страница 185: ... DXU Agent configuration settings The default password is 0000 To change the Password 1 Resume your device and unlock its screen 2 Launch the DXU Agent application 3 Tap Menu to display the menu 4 Tap the Settings button 5 Clear the Enable Service check box 6 Tap the Password button 7 Delete the contents of the field and then type a new password 8 Tap OK 9 Select the Is Authentication Required che...

Страница 186: ...elected all the configuration items will be included in the barcode set This option results in several barcodes being generated as true Scan2Deploy labels After scanning the first label in this set the DXU Agent s Scan2Deploy window on your device will display how many barcode labels must be scanned and your progress in scanning them all Once they are all scanned the DXU Agent will apply the confi...

Страница 187: ...rcodes 10 Optional Select the barcode symbology in the Barcode Type menu 11 Click Save to save your barcode label set as a graphic image file 12 Click Print Preview then click the Print button in the button bar and complete using your printer s Print dialog box To apply the configuration by scanning the Scan2Deploy barcodes 1 Resume your device and unlock its screen 2 Launch the DXU Agent applicat...

Страница 188: ...e firmware version and the version of the Datalogic Enterprise SDK To view information about the device you are connected to 1 Load the configuration from a connected device 2 Click Device Info 3 Click the Back button a leftward pointing arrow in a circle to return to the DXU main window View Device Info Recorded in a Configuration File You can view information about the device from which a config...

Страница 189: ...o the DXU main window Remote Control Remote Control allows to see what is displayed on the screen of a connected device This window also includes buttons to remotely activate the device s external buttons and to capture a screen shot of what is visible on its screen Note that clicking a button on screen does not physically press a button or even trigger it electrically but sends an event message t...

Страница 190: ... Click the lock icon and drag it rightward releasing it over the unlocked lock icon at the right edge of the Remote Control window 1 Home Button At the bottom of the Remote Control window the Home button activates the device s Home button which switches the display to the Home screen 2 Menu Button At the bottom of the Remote Control window the Menu button activates the device s menu Not all the ap...

Страница 191: ...er as if you had pressed the Scan Key or the Scan Trigger on the device There are some limitations the scanner will not scan if there is no application running that can receive its data the Camera application is showing its live preview or taking a photograph or recording a video none of the device s scan buttons are configured to scan However if your device is configured to scan barcodes and an a...

Страница 192: ...o and control your device This field is blank by default To set or edit a VNC password in DXU Agent 1 Resume your device and unlock its screen 2 Launch the DXU Agent application 3 Tap Menu to display the menu 4 Tap the Settings button 5 Clear the Enable Service check box 6 Tap the Password button in the VNC Settings section 7 Type a password in the field It can be numbers letters or some punctuati...

Страница 193: ...d in the field and then click OK Set or Edit the VNC Authentication Password from DXU You can change a device s VNC password from DXU It is a configuration parameter in the Device Configuration window Follow the steps below 1 Open a configuration file or load the configuration from a connected device 2 Click the Configure This Device 3 Click the DXU Configuration tab 4 Click the General Settings n...

Страница 194: ...without performing an update NOTE DXU firmware update is not the only way to update the firmware on the Joya Touch A6 DXU s firmware update capability works only with connected devices If you need a method that can update firmware on many devices remotely especially if they are not connected to a network then other methods may suit your needs better Please consult your device s user reference guid...

Страница 195: ...cumstances a firmware image can become corrupted in the field and this option allows a DXU administrator to perform a full firmware upgrade disregarding the version reported by the device Factory Data Reset After Installing Firmware A factory data reset is a full reset of the device intended to return it to factory defaults This reset deletes all user data settings and installed applications and r...

Страница 196: ... box to browse for and select a suitable firmware image file 6 Navigate to your firmware image file select it and click Open Optional Select the Silent Install check box if you wish to perform a firmware update that does not require user interaction on the device Optional Select the Force Update check box if you wish to force a complete reinstallation of this image on the device Optional Select an...

Страница 197: ... settings when creating a DXU configuration file 1 The EULA on the device must first be accepted You can use DXU Desktop to remotely accept the SureFox and SureLock EULAs for all devices consuming a dxu configuration file Otherwise you first need to launch SureLock or SureFox on each device and then accept the EULA 2 The Enable SureLock Password and or Enable SureFox Password fields must have the ...

Страница 198: ...Datalogic Applications 190 JOYA TOUCH A6 SureFox ...

Страница 199: ...Datalogic Applications User s Manual 191 Change the SureLock and or SureFox Password After completing the above steps you can enter the new password in the Change Password field SureLock SureFox ...

Страница 200: ... been connected to the Wi Fi network Optionally you can perform Simplified Deploy with a manifest file without using Scan2Deploy Usage DXU command line options are DXU put filename dxu Applies configuration file to any USB connected devices DXU put filename dxu ip ipaddress Applies configuration file to device of specific IP address DXU man filename ini Applies Simplified Deploy to any USB connect...

Страница 201: ... Applications User s Manual 193 Led Effects Editor This application allows to create and save customized LED effects Tap All Apps Led Effects Editor Tap Led ID to select the LED you want to assign to the effect ...

Страница 202: ...Datalogic Applications 194 JOYA TOUCH A6 Tap Led Action to configure the LED behaviour Tap Save to name and save the effect ...

Страница 203: ... 195 ProximityCalibrate The proximity sensor measures the distance of a surface from the Joya Touch A6 data capture window see the picture below ProximityCalibrate is a wizard that helps you to calibrate the sensor s distance measurement ...

Страница 204: ...access to the barcode scanner application and other frequently used functionalities on mobile scanning devices Tap the SoftSpot icon on the favorites tray or on the All Apps screen to launch SoftSpot Tap the SoftSpot to scan barcodes Enable Disable SoftSpot Enables disables the SoftSpot Enable SoftSpot on boot Select it to enable SoftSpot on boot ...

Страница 205: ...y If selected the SoftSpot turns transparent automatically when it is not used Maximum visibility Sets the SoftSpot transparency level when it is used or when the auto transparency feature is not enabled Minimum visibility Sets the SoftSpot transparency level when it is not used and the auto transparency feature is enabled Speed of transparency Sets the lapse of time it takes for the SoftSpot to t...

Страница 206: ... and scan barcodes consecutively tap SCAN and select the Enable on double tap check box Then double tap the SoftSpot Tap one more time to stop laser emission You can also configure the SoftSpot from the DXU For more details on DXU Desktop Configuration Utility DXU on page 103 ...

Страница 207: ...cations Android Debug Bridge ADB is a command line utility included with Google s Android SDK and you can use it to control your device over USB from a computer copy files back and forth install and uninstall apps and run shell commands Use the USB CD ROM to install the Windows drivers and then launch ADB to run a shell using the following tool command prompt Start Datalogic Android Support Device...

Страница 208: ...ndroid Add on please insert the following URL in Android Studio or Eclipse ADT https datalogic github io android sdk addon addon xml or follow the detailed steps valid for Android Studio versions released on the stable there is no support for the beta channel 1 From Android Studio launch window click on Configure Android SDK Manager to open Android SDK Manager ...

Страница 209: ...Tools User s Manual 201 2 Select the tab SDK Update Sites and click the icon on the right side toolbar ...

Страница 210: ...ttps datalogic github io android sdk addon addon xml 4 Now select the tab SDK Platforms and check the checkbox on the bottom right Show Package Details Under the section Android 6 0 API 23 Datalogic SDK should appear To install it select the Datalogic SDK checkbox and a small icon on the left should appear ...

Страница 211: ...ted packages Once the installation is complete the Status of the Datalogic SDK changes from Not installed to Installed NOTE Please notice that you must also install the Android API platform matching your Android version i e API 23 is required to compile apps for Android 6 0 ...

Страница 212: ...Tools 204 JOYA TOUCH A6 Install Android Studio To install Android Studio follow the steps described at http developer android com sdk index html No specific version is required ...

Страница 213: ...lop Android Studio 2 Scroll down to the downloads near the bottom to find the SDK tools 3 Select the correct download for your operating system For the Windows installer follow the instructions on the screen For other unzipped archives you need to run the Android executable in the tools directory This will bring up the Android SDK Manager and prompt you to download the tools you need ...

Страница 214: ...o use ADB with your device connected over USB you must enable USB debugging in the device system settings To enable Android Developer options go to Settings Device info and tap on the Build Number section 7 times After the 7th tap the Developer options will be unlocked and available Go back to Settings and tap Developer options Select USB debugging NOTE Before installing the Google USB Driver ensu...

Страница 215: ...Tools User s Manual 207 4 Use a CD Rom Installer to debug the ADB driver and read the Joya Touch A6 as an ADB device ...

Страница 216: ...new project choose the most correct Minimum SDK API level and press Next CAUTION Please notice that you must select the Minimum SDK level in accordance with the installed Android firmware version on your Datalogic device For example a device running Android Jelly Bean can support applications built with Minimum SDK level selected up to 16 Greater values will produce an incompatible Android app ...

Страница 217: ...Tools User s Manual 209 The wizard will guide through the creation of a new application ...

Страница 218: ... JOYA TOUCH A6 With a choice of basic layout and Activity styles Complete the guided wizard and let the IDE settle down A generic Android application runnable on all Android devices is now ready for development ...

Страница 219: ...bsite https www ivanti com support product documentation CSIPSimple CSipSimple is a Voice over Internet Protocol VoIP application for Google Android operating system using the Session Initiation Protocol SIP For more details visit the website http www voipvoip com android csipsimple html SureLock With SureLock you can secure and lock the Joya Touch A6 to ensure its responsible usage improve produc...

Страница 220: ...equired to ensure appropriate use of the devices SureFox creates locked browsing environment in your devices with Android making them apt for deployments as public web kiosks or as field devices for your mobile workforce You can specify the websites that you wish to allow SureFox will then block all other websites and allow the users to browse the allowed websites in locked down kiosk mode You can...

Страница 221: ...he Joya Touch A6 throughout its entire lifecycle from deployment to retirement It controls all aspects of business mobility tracking physical assets managing applications and content as well as keeping the device and the data safe and secure For further details refer to the SOTI website https www soti net products mobicontrol ...

Страница 222: ...Tools 214 JOYA TOUCH A6 NOTES ...

Страница 223: ...red in memory and software decoding algorithms are executed to extract the data from the image The omni directional scanning does not require that the operator orient the barcode to align with the scan pattern To scan a barcode symbol 1 Point the scan window at the barcode from a distance within the reading range 2 Press the Scan Key or the Scan Trigger The imager projects a laser aiming pattern s...

Страница 224: ...formed by the brackets in the aiming pattern then either wait for the timeout or release the Scan Key to capture the image A red beam illuminates the symbol which is captured and decoded 4 If the scan has been successful If enabled the good read LED turns on see LED Indicators on page 51 and Led Notifications on page 63 Linear Bar Code 2D Matrix Symbol ...

Страница 225: ...er closer or farther away from the barcode The aiming pattern is smaller when the imager is closer to the barcode and larger when it is farther from the barcode Scan symbols with smaller bars or elements mil size closer to the unit and those with larger bars or elements mil size farther from the unit Hold the Joya Touch A6 between two and nine inches depending on symbol density from the symbol cen...

Страница 226: ...Data Capture 218 JOYA TOUCH A6 NOTES ...

Страница 227: ...e any standard micro USB cable to directly connect the Datalogic Joya Touch A6 to a host computer to transfer data through the USB interface NOTE Connection through the cable complies to USB 2 0 standard Host Computer Joya Touch A6 Standard Micro USB cable type USB A micro USB B ...

Страница 228: ... you connected your device scroll down the notification bar and tap the USB for charging notification Tap File transfers if you want to transfer all types of media to and from the Joya Touch A6 or tap Photo transfer PTP if you just want to transfer the pictures ...

Страница 229: ...and an Access Point connected to the host computer To launch this utility you can tap the specific icon if it s visible on the taskbar or you can open Connections folder or Control Panel from desktop NOTE Wi Fi module is on by default in order to avoid wasting energy you can switch it off using the Wireless Communications applet Joya Touch A6 Joya Touch A6 Access Point Host ...

Страница 230: ...s depending on the radio power mode and security protocol selected it may take up to 30 seconds for the 802 11 a b g n radio driver to re associate the radio to the network NOTE Area coverage and radio performance may vary due to environmental conditions access point types or interference caused by other devices microwave ovens radio transmitters etc ...

Страница 231: ...le in Joya Touch A6 plus models NOTE In order to extend battery life the Bluetooth module is off by default If you need to have Bluetooth working the module must be powered on NOTE Suspending the terminal powers off the Bluetooth radio and drops the Bluetooth connection When the terminal resumes it takes approximately 10 seconds for the Bluetooth radio driver to re initialize the radio ...

Страница 232: ...Connections 224 JOYA TOUCH A6 NOTE Area coverage and Bluetooth radio performance may vary due to environmental conditions or interference caused by other devices microwave ovens radio transmitters etc ...

Страница 233: ...stry Manufacturers Associations for mobile phones Persons with pacemakers Should ALWAYS keep this device more than twenty five 25 cm from their pacemaker and or any other medical device Should not carry this device in a breast pocket Should keep the device at the opposite side of the pacemaker and or any other medical device Should turn this device OFF or move it immediately AWAY if there is any r...

Страница 234: ...ely shielded electronic systems in motor vehicles Check with the manufacturer or its representative regarding your vehicle You should also consult the manufacturer of any equipment that has been added to your vehicle WARNING An air bag inflates with great force DO NOT place objects including either installed or portable wireless equipment in the area over the air bag or in the air bag deployment a...

Страница 235: ...ipment near fuel storage areas or fuel distribution areas chemical plants or where any operation involves use of explosive materials Do not store or carry flammable liquids explosive gases or materials with the device or its parts or accessories Areas with a potentially explosive atmosphere are often but not always clearly marked or shown Sparks in such areas could cause an explosion or fire resul...

Страница 236: ...Connections 228 JOYA TOUCH A6 NOTES ...

Страница 237: ...4 3 inch full touch TFT LCD color display FWVGA 854 x 480 pixels 16M colors LED backlight Touch Screen Capacitive multi touch Gorilla Glass 3 Physical Keys Handheld Scan fully programmable key Pistol Grip Scan key and scan trigger both fully programmable Lighting Software programmable lights at the bottom of the battery cover Dimensions Handheld 14 5 x 7 7 x 3 4 cm 5 7 x 3 0 x 1 3 in Pistol Grip 1...

Страница 238: ... Sani Cloth applicable for both the device and cradles Drop Resistance Withstands repeated drops from 1 2 m 4 0 ft onto plywood and 1 5 m 5 0 ft onto plywood with the rubber boot accessory Temperature Operating 10 to 50ºC 14 to 122ºF Interfaces Interfaces USB 2 0 device with standard Micro USB connector User Interfaces Accelerometer 3 Axis accelerometer SoftSpot Technology Virtual trigger Scan Key...

Страница 239: ...WVGA 752 x 480 pixels Light Source Illumination White or red LEDs depending on model Aiming 650 nm VLD Typical Depth of Field Minimum distance determined by symbol length and scan angle Printing resolution contrast and ambient light dependent 1D barcode 5 0 mils 6 5 to 21 0 cm 2 6 to 8 2 in 1D barcode 13 0 mils 5 5 to 39 0 cm 2 2 to 15 2 in Data Matrix 15 0 mils 4 0 to 25 0 cm 1 6 to 9 8 in Minimu...

Страница 240: ...tal Watermarks Supports Digimarc Barcode Software Configuration and Maintenance Datalogic X Platform Configuration Utility DXU Development Java and Xamarin SDK available System Memory System RAM 2 GB System Flash 16 GB Flash Disk CPU Qualcomm Snapdragon 210 Operating System Google Android 6 0 Marshmallow field upgradeable to Android 7 1 Nougat Safety Regulatory Agency Approvals The product meets n...

Страница 241: ...User s Manual 233 Test Codes High Density Codes 0 25 mm 10 mils Code 39 17162 Interleaved 2 5 0123456784 Code 128 test P HA13 P ...

Страница 242: ...Test Codes 234 JOYA TOUCH A6 High Density Codes continued 0 25 mm 10 mils 80 EAN 13 80 EAN 8 ...

Страница 243: ...Test Codes User s Manual 235 Medium Density Codes 0 38 mm 15 mils Code 39 17162 Interleaved 2 5 0123456784 Code 128 test ...

Страница 244: ...Test Codes 236 JOYA TOUCH A6 Medium Density Codes continued 0 38 mm 15 mils 100 EAN 13 100 EAN 8 ...

Страница 245: ...Test Codes User s Manual 237 Low Density Codes 0 50 mm 20 mils Code 39 17162 Interleaved 2 5 0123456784 Code 128 test ...

Страница 246: ...Test Codes 238 JOYA TOUCH A6 Low Density Codes continued 0 50 mm 20 mils 120 EAN 13 120 EAN 8 ...

Страница 247: ...Test Codes User s Manual 239 2D Codes Datamatrix ECC200 Example Inverse Datamatrix ECC200 Example ...

Страница 248: ...Test Codes 240 JOYA TOUCH A6 NOTES ...

Страница 249: ...ly with Isopropyl Alcohol 70 Bleach diluted 10 1 or Hydrogen Peroxide stabilized 3 Please note that both Bleach and Hydrogen Peroxide may damage your device if you don t use the correct dilution Do not use any other cleaning agents e g different alcohol abrasive or corrosive products solvents or abrasive pads to clean the device Do not spray or pour liquids directly onto the device The device is n...

Страница 250: ...ights Reduce or eliminate vibration Reduce or eliminate direct pressure Provide adjustable workstations Provide adequate clearance Provide a suitable working environment Improve work procedures CAUTION In order to avoid or minimize the potential risk of ergonomic injury follow the recommendations below Consult with your local Health Safety Manager to ensure that you are adhering to your company s ...

Страница 251: ...ng will invalidate the warranty When replacing the battery pack or at the end of the operative life of the Joya Touch A6 disposal must be performed in compliance with the laws in force in your jurisdiction Do not submerge the Joya Touch A6 in liquid products For further information or support refer to this manual and to the Datalogic web site www datalogic com NOTE Read this manual carefully befor...

Страница 252: ...fied Power Unit LPS SELV rating 12V min 5A power source which supplies power via the power connector of the cable Any changes or modifications to equipment not expressly approved by Datalogic could void the user s authority to operate the equipment Laser Safety The following information applies to Laser Aiming System used on Joya Touch A6 Imager The laser light is visible to the human eye and is e...

Страница 253: ...Safety and Regulatory Information User s Manual 245 Laser Warning Label Scan Window Data Label ...

Страница 254: ... FISSARE IL FASCIO APPARECCHIO LASER DI CLASSE 2 MASSIMA POTENZA MEDIA DI USCITA 1 mW LUNGHEZZA D ONDA EMESSA 630 680 nm CONFORME A EN 60825 1 2007 e EN 60825 1 2014 LASERSTRAHLUN G NICHT IN DER STRAHL BLINKEN PRODUKT DER LASERKLASSE 2 MAXIMALE DURCHSCHNITTLI CHE AUSGANGLEISTU NG 1 mW WELLENLÄNGE 630 680 nm ENTSPR EN 60825 1 2007 und EN 60825 1 2014 RAYON LASER EVITER DE REGARDER LE RAYON APPAREIL...

Страница 255: ...hough staring directly at the laser beam momentarily causes no known biological damage avoid staring at the beam as one would with any very strong light source such as the sun Avoid shining laser light into any person s eye even through reflective surfaces such as mirrors etc WARNING Do not attempt to open or otherwise service any components in the optics cavity Opening or servicing any part of th...

Страница 256: ... o manutenzione WARNING Use of optical systems with the scanner will increase eye hazard Optical instruments include binoculars microscopes eye glasses and magnifying glasses ATTENZIONE Non tentare di accedere allo scomparto contenete i componenti ottici o di farne la manutenzione L apertura dello scomparto o la manutenzione di qualsiasi parte ottica da parte di personale non autorizzato potrebbe ...

Страница 257: ...e gli specchi DEUTSCH Die folgenden Informationen stimmen mit den Sicherheitshinweisen überein die von internationalen Behörden auferlegt wurden und sie beziehen sich auf den korrekten Gebrauch vom Terminal NORM FÜR DIE LASERSICHERHEIT Dies Produkt entspricht am Tag der Herstellung den gültigen EN 60825 1 und CDRH 21 CFR 1040 Normen für die Lasersicherheit Es ist nicht notwendig das Gerät wegen Be...

Страница 258: ...rsucht werden die Komponenten im Optikhohlraum zu öffnen oder auf irgendwelche andere Weise zu warten Das Öffnen bzw Warten der Komponenten im Optikhohlraum durch unbefugtes Personal verstößt gegen die Laser Sicherheitsbestimmungen Das Optiksystem darf nur werkseitig repariert werden ACHTUNG Jegliche Änderungen am Gerät sowie Vorgehensweisen die nicht in dieser Betriebsanleitung beschreiben werden...

Страница 259: ...constaté à la suite d une exposition au rayon laser Eviter de regarder fixement le rayon comme toute autre source lumineuse intense telle que le soleil Eviter aussi de diriger le rayon vers les yeux d un observateur même à travers des surfaces réfléchissantes miroirs par exemple ATTENTION Ne pas essayer d ouvrir ou de réparer les composants de la cavité optique L ouverture de la cavité optique ou ...

Страница 260: ...ON L utilisation d instruments optiques avec le scanneur augmente le danger pour les yeux Les instruments optiques comprennent les jumelles les microscopes les lunettes et les verres grossissants ATENCIÓN No intente abrir o de ninguna manera dar servicio a ninguno de los componentes del receptáculo óptico Abrir o dar servicio a las piezas del receptáculo óptico por parte del personal no autorizado...

Страница 261: ...fied as EXEMPT RISK GROUP according to IEC62471 Marking and European Economic Area EEA In radio systems configured with mobile computers and access points the frequencies to be used must be allowed by the spectrum authorities of the specific country in which the installation takes place Be absolutely sure that the system frequencies are correctly set to be compliant with the spectrum requirements ...

Страница 262: ...rav i direktiv 2014 53 EU 2011 65 EU de Deutsch German Hiermit erklärt Datalogic S r l dass sich das Gerät Joya Touch A6 in Übereinstimmung mit den grundlegenden Anforderungen und den übrigen einschlägigen Bestimmungen der Richtlinie 2014 53 EU 2011 65 EU befindet et Eesti Estonian Käesolevaga kinnitab Datalogic S r l seadme Joya Touch A6 vastavust direktiivi 2014 53 EU 2011 65 EU põhinõuetele ja ...

Страница 263: ...c S r l deklaruoja kad šis Joya Touch A6 atitinka esminius reikalavimus ir kitas 2014 53 EU 2011 65 EU Direktyvos nuostatas nl Nederlands Dutch Hierbij verklaart Datalogic S r l dat het toestel Joya Touch A6 in overeenstemming is met de essentiële eisen en de andere relevante bepalingen van richtlijn 2014 53 EU 2011 65 EU mt Malti Maltese Hawnhekk Datalogic S r l jiddikjara li dan Joya Touch A6 ji...

Страница 264: ...mernice 2014 53 EU 2011 65 EU fi Suomi Finnish Datalogic S r l vakuuttaa täten että Joya Touch A6 tyyppinen laite on direktiivin 2014 53 EU 2011 65 EU oleellisten vaatimusten ja sitä koskevien direktiivin muiden ehtojen mukainen sv Svenska Swedish Härmed intygar Datalogic S r l att denna Joya Touch A6 står I överensstämmelse med de väsentliga egenskapskrav och övriga relevanta bestämmelser som fra...

Страница 265: ... section Europe This device is compliant with SAR limits for general population uncontrolled exposure specified in Council Recommendation 1999 519 EC Annex II US and Canada For body worn operation this device has been tested and meets the FCC ISED RF exposure guidelines for use with an accessory that contains no metal and the positions the handset a minimum of 0 cm from the body Use of other enhan...

Страница 266: ... Radio Frequency Transmitted Power WLAN IEEE 802 11b g n HT 20 2 4GHz Frequency Bands 2 412 2 472 MHZ 18 64 dBm WLAN IEEE 802 11a n HT 20 5GHz Frequency Bands 5 180 5 240 MHz 5 260 5 320 MHz 5 500 5 700 MHz 18 62 dBm Bluetoothe V4 0 EDR LE 2402 2480 Mhz 9 14 dBm Radio Technology Frequency Bands WLAN IEEE 802 11b g n HT 20 2 4GHz Frequency Bands 2 412 2 462 MHZ WLAN IEEE 802 11a n HT 20 5GHz Freque...

Страница 267: ...c S r l may void the FCC authorization to operate this equipment NOTE This equipment has been tested and found to comply with the limits for a Class B digital device pursuant to Part 15 of the FCC Rules These limits are designed to provide reasonable protection against harmful interference in a residential installation This equipment generates uses and can radiate radio frequency energy and if not...

Страница 268: ...ician for help ISED Compliance NOTICE This device complies with Industry Canada licence exempt RSS standard s Operation is subject to the following two conditions 1 this device may not cause harmful interference and 2 this device must accept any interference received including interference that may cause undesired operation Le présent appareil est conforme aux CNR d Industrie Canada applicables au...

Страница 269: ...tèmes de satellites mobiles utilisant les mêmes canaux ii les utilisateurs de radars de haute puissance sont désignés utilisateurs principaux c à d qu ils ont la priorité pour les bandes 5 250 5 350 MHz et 5 650 5 850 MHz et que ces radars pourraient causer du brouillage et ou des dommages aux dispositifs LAN EL Radiofrequency Radiation Exposure Information This device was tested for handheld and ...

Страница 270: ...xposure guidelines for use with an accessory that contains no metal and the positions the handset a minimum of 0 cm from the body Use of other enhancements may not ensure compliance with FCC ISED RF exposure guidelines Cet équipement peut être installé et utilisé à une distance minimale de 0 cm entre le radiateur et votre corps The antenna s used for this transmitter must not be co located or oper...

Страница 271: ...bolo del bidone barrato deve essere smaltita alla fine della sua vita utile separatamente dai rifiuti urbani Per maggiori dettagli sulle modalità di smaltimento contattare il Fornitore dal quale è stata acquistata l apparecchiatura o consultare la sezione dedicata sul sito http www datalogic com Information aux utilisateurs Au terme de sa vie utile le produit qui porte le symbole d un caisson à or...

Страница 272: ... por favor póngase en contacto con el proveedor donde lo compró o consultar la sección dedicada en el Web site http www datalogic com Benutzerinformation bezüglich Am Ende des Gerätelebenszyklus darf das Produkt nicht über den städtischen Hausmüll entsorgt werden Eine entsprechende Mülltrennung ist erforderlich Weitere Informationen zu dieser Richtlinie erhalten sie von ihrem Lieferanten über den ...

Страница 273: ...gs Repair Program for On Line Return Material Authorizations RMAs plus Repair Center contact information Customer Service containing details about Maintenance Agreements Technical Support through email or phone Reference Documentation For further information regarding Joya Touch A6 refer to the SDK Help on line and to the Joya Touch A6 User s Manual downloadable from our website www datalogic com ...

Страница 274: ...Support Through the Website 266 JOYA TOUCH A6 NOTES ...

Страница 275: ...enting 128 letters numerals punctuation marks and control characters It is a standard data transmission code in the U S Barcode A pattern of variable width bars and spaces which represents numeric or alphanumeric data in binary form The general format of a barcode symbol consists of a leading margin start character data or message character check character if any stop character and trailing margin...

Страница 276: ...mbered from the right 0 through 7 with bit 0 the low order bit One byte in memory can be used to store one ASCII character CDRH Center for Devices and Radiological Health A federal agency responsible for regulating laser product safety This agency specifies various laser operation classes based on power output during operation Character A pattern of bars and spaces which either directly represents...

Страница 277: ...with a host computer and provides a storage place for the terminal when not in use Firmware A software program or set of instructions programmed on a hardware device It provides the necessary instructions for how the device communicates with the other computer hardware Firmware is typically stored in the flash ROM of a hardware device While ROM is read only memory flash ROM can be erased and rewri...

Страница 278: ...he layer 2 data link protocol It may also break the packet into fragments to support the maximum transmission unit MTU of the network IP Address Internet Protocol address The address of a computer attached to an IP network Every client and server station must have a unique IP address A 32 bit address used by a computer on a IP network Client workstations have either a permanent address or one that...

Страница 279: ... liquid crystal sealed between two glass plates The crystals are excited by precise electrical charges causing them to reflect light outside according to their bias They use little electricity and react relatively quickly They require external light to reflect their information to the user MIL 1 mil 1 thousandth of an inch Parameter A variable that can have different values assigned to it RAM Rand...

Страница 280: ...ment Kit Symbol A scannable unit that encodes data within the conventions of a certain symbology usually including start stop characters quiet zones data characters and check characters Symbology The structural rules and conventions for representing data within a particular barcode type e g UPC EAN Code 39 PDF417 etc USB Universal Serial Bus Type of serial bus that allows peripheral devices disks ...

Страница 281: ...e fax SMS voice messaging over the public Internet rather than via the public switched telephone network PSTN WLAN A Wireless Local Area Network links devices via a wireless distribution method typically spread spectrum or OFDM radio and usually provides a connection through an access point to the wider internet This gives users the mobility to move around within a local coverage area and still be...

Страница 282: ...ved Datalogic and the Datalogic logo are registered trademarks of Datalogic S p A in many countries including the U S and the E U Datalogic S r l Via S Vitalino 13 Lippo di Calderara di Reno BO 40012 Italy Telephone 39 051 3147011 Fax 39 051 3147205 822002500 Rev A November 2017 ...

Отзывы: