background image

24  

                                                                                              Datacolor 20D User's Guide 008-400666 Rev A 


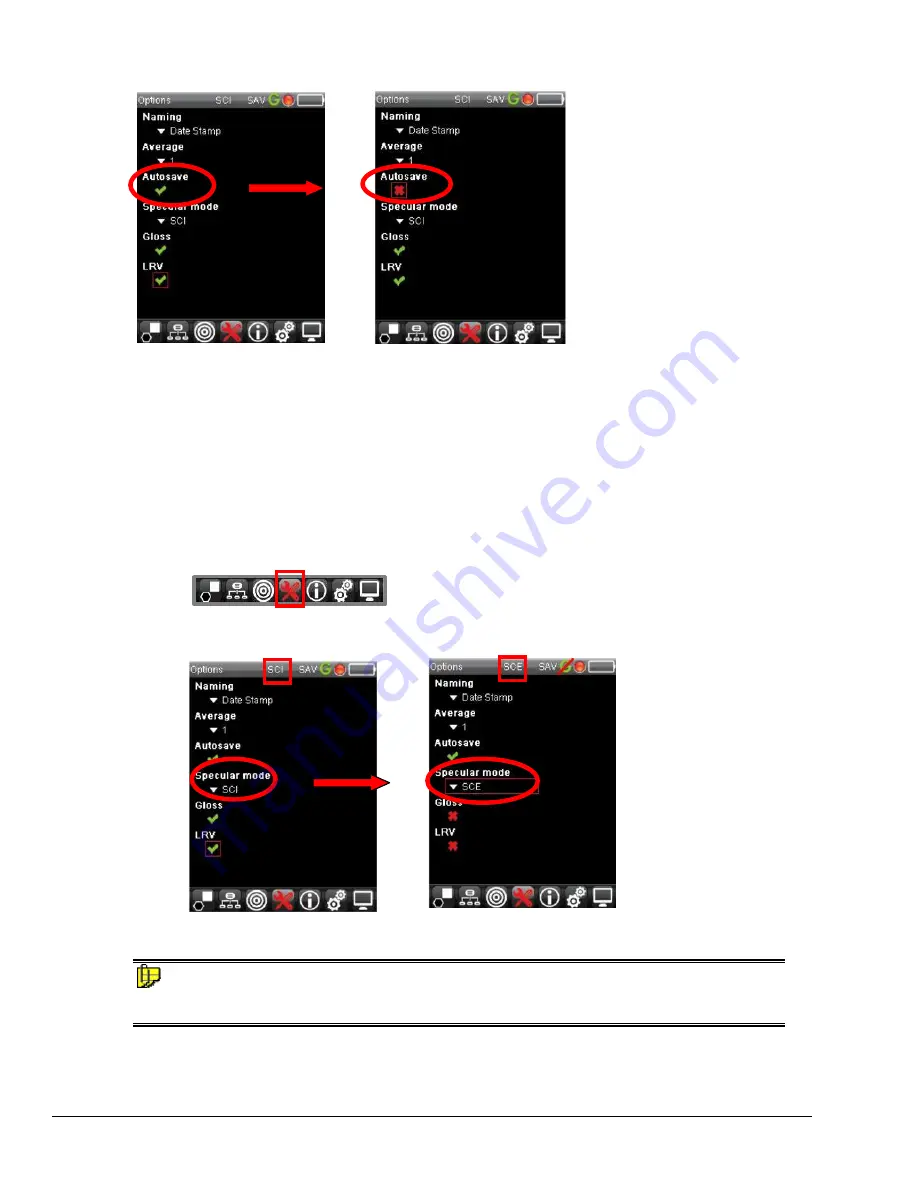
Specular Mode 

This option controls the position of the specular port in the instrument when a measurement is made.   


Specular Component Included (SCI)

. Specular port is closed. One measurement is made of     

the sample, which 

includes

 the specular component.  This is the most common setting. 


Specular Component Excluded (SCE)

.  Specular port is open. One measurement is made of   

the sample, which 

excludes

 the specular component 

To enable/disable this feature: 

1.  Using the black navigation button on the instrument, navigate to the live


bar, and select 

Options


2.  Navigate to 

the 

“Specular Mode 

field and select it.   The field and the specular mode icon on the title bar 

automatically update. 


NOTE 

The gloss determination selection overrides this option.  When gloss determination is enabled, two 
measurements are made for each sample, regardless of the Specular Mode selection. 


Содержание 008-400666

Страница 1: ...Datacolor 20D ...

Страница 2: ...ers Worldwide Datacolor Inc 2016 Datacolor and other Datacolor product trademarks are the property of Datacolor Inc Microsoft and Windows are either registered trademarks of Microsoft Corporation in the United States and or other countries Bluetooth is a registered trademark owned by Bluetooth SIG To obtain information on local agents contact either of the offices listed below or visit our website...

Страница 3: ...COLOR COORDINATES 14 MAINTENANCE FEATURES 15 CUSTOMIZING THE SYSTEM 19 SETTINGS PAGE 19 OPTIONS PAGE 22 DATACOLOR 20D AND DATACOLOR PAINT 27 PC ACCESS 27 USB CABLE CONNECTION 27 BLUETOOTH WIRELESS CONNECTION 28 USING DATACOLOR PAINT 31 INSTRUMENT COMMUNICATIONS 31 LAUNCHING DATACOLOR PAINT 31 INSTRUMENT CONFIGURATION 32 INSTRUMENT CALIBRATION 34 SAMPLE MEASUREMENT 35 RETRIEVING SAMPLES FROM DATACO...

Страница 4: ... Datacolor 20D User s Guide 008 400666 Rev A This page intentionally left blank ...

Страница 5: ...ywhere within the store or at a customer job site o Initial instrument installation is simple with all required set up data loaded at the factory Just connect to your computer start the Paint v 2 x Software and you are ready to go o Large color LCD screen with an intuitive user interface makes the Datacolor 20D easy to learn and easy to handle o Precisely position your sample for measurement using...

Страница 6: ...the reference and sample channels Light Source Pulsed xenon Wavelength Resolution 2nm Effective Bandwidth 10nm Aperture Size Type SAV Illuminated 10 mm Measured 6 5mm Sphere Diameter 51mm 2 inches See also Appendix Instrument Specifications for complete device specifications Caution Disconnect power before servicing There are no user serviceable parts for this equipment Accessories Below are the a...

Страница 7: ...ve Humidity 20 85 non condensing Altitude Up to 2 000 meters Do not store above 140 F 60 C Indoor Use Do not crush short circuit mutilate reverse polarity disassemble or dispose In fire might explode cause burns or release toxic materials Safety Warnings If the equipment is used in a manner not specified by the manufacturer the protection provided by the equipment might be impaired Battery Do not ...

Страница 8: ... USB Port For data export to a USB flash drive or connection to a USB HID keyboard or bar code scanner Mini USB Connection Used to connect the instrument to the pc Power Supply A power supply is provided with the instrument Power is supplied to the back of the unit via an AC adaptor jack WARNING The power cord supplied with the unit must be used No other cords are acceptable Power Adapter You need...

Страница 9: ...el of the instrument NOTE The instrument does NOT charge on the USB cable The AC adapter must be used to charge the instrument Charging the Instrument Datacolor 20D must be fully charged before using It takes 8 hours to fully charge the unit NOTES The instrument does NOT charge through the USB connection You must use the AC adapter to charge the instrument The unit includes a selection of AC adapt...

Страница 10: ...ns regarding the stand alone operation of the instrument NOTE When used with the Datacolor PAINT program you can transfer measurement data from the instrument to the computer and use it to match and correct colors See also Working with Datacolor PAINT for instructions to use Datacolor 20D with Datacolor PAINT Controls and Indicators Buttons on the unit are used to make software selections and meas...

Страница 11: ...lorimetric CIELab output and Illuminant Observer condition Push the black button in the direction of the left right arrows to scroll through the options on the Live bar at the bottom of the screen and to enter sample names using the digital keyboard Press the black button to complete a selection Fields on the Screen In stand alone mode the Datacolor 20D displays the Sample screen and reports the C...

Страница 12: ...age PC Access Displays current status of connection between instrument and computer Measurement Mode Specular Component Included SCI Specular port is closed Measurement includes the specular component Specular Component Excluded SCE Specular port is open Measurement excludes the specular component Current Aperture Selection The aperture selection is always Small Area View Gloss Determination Gloss...

Страница 13: ...selections Sample Name This selection can be changed Colorimetric Output For Datacolor 20D it is always CIEL a b Illuminant Observer condition This selection can be changed NOTE When you change the Illuminant Observer the color coordinates will change The rows in the center of the screen display the colorimetric data L a b for the standard and batch Gloss Determination When the Gloss option is ena...

Страница 14: ...ations to evaluate the overall lightness of the sample When this is enabled the output selection automatically changes to CIELab LRV and the LRV value is included See also LRV Option for instructions to enable disable this evaluation Live Bar Options A live bar at the bottom of each screen provides access to maintenance options in the on board software When an option is selected it turns red Live ...

Страница 15: ...ata as needed See also Delete Samples Sample Data Displays colorimetric data for a sample Select measure a sample to view the colorimetric data Options Page Display edit software configuration options See also Options Page System Information Display edit system information including software version instrument serial number etc Also accesses options for updating and or restarting the system See al...

Страница 16: ... recalibrate it in stand alone mode to update the calibration data stored on the unit To calibrate the instrument 1 Turn on the instrument 2 Using the black button navigate to the calibration icon on the live bar and select it 3 The program will prompt you to measure the black trap Position the trap over the aperture and press the Measure button When the black trap measurement is complete the inst...

Страница 17: ...raging feature Sample Mode The instrument has one mode for measurement Sample mode The icon is found on the live bar Measure Samples You can measure new samples or retrieve samples stored on the instrument See also Recall Sample Data for instructions to retrieve a stored measurement To measure a new standard 1 From the Live bar select the Sample icon to activate the measurement mode 2 Position the...

Страница 18: ...color Service for full applications support for this feature CIEL a b Color Coordinates In stand alone mode you can display the CIEL a b coordinates for the sample When the Gloss option is enabled the estimated gloss of the sample is included with the color coordinates Gloss Determination Enabled Gloss Determination Disabled NOTES Color coordinates are dependent upon the current Illuminant Observe...

Страница 19: ...on to display the choices Push the black navigation button up down to move through the list Press the black button to make the selection The live bar at the bottom of the screen accesses current instrument settings output display configuration and other configuration features Use the left right and up down program navigation buttons on the instrument to select these options and to change the selec...

Страница 20: ...o autoname the samples When enabled the sample is automatically named When this option is not enabled the program will prompt you for a sample name See also Options page for instruction to configure the naming options Sample Search If you have a large number of samples on the unit you can search for a sample by name 1 Use the black navigation button to navigate to the Sample Name field or to selec...

Страница 21: ...ve the navigation button on the instrument right left and or up down to key in the sample name You can enter a partial name 5 When finished navigate to the back button on the keyboard and select it The search results display 6 When the list contains multiple samples use the program navigation button to highlight one of the samples and select it The data for the sample will display Nam e Sear ch ...

Страница 22: ...lete a single sample or you can delete all samples stored on the unit To delete sample data 1 Navigate to the Delete Sample icon on the live bar The editing options display Delete sample Delete the current sample Delete all samples Deletes all of the samples stored on the unit ...

Страница 23: ...ing options on the Settings page the Options page and the Preferences page Settings Page The Settings page provides default selections for system information such as date time language calibration information etc It also includes defaults for autonaming samples To access settings Use the black button on the instrument to navigate to the Settings icon on the live bar and press to select The Setting...

Страница 24: ...e to the Settings icon on the Live bar and press to select 2 Navigate to the Calibration Period field Use the black button to scroll to the appropriate calibration interval expressed as hours 3 When the edit is complete press the black button The selection will update Sound This option controls the sound of the navigation keys on the instrument 1 Use the black navigation button to navigate to the ...

Страница 25: ...e screens with the language selection Flashes for Measurement For the measurement of uniform samples the light source only needs to flash once for a scan to generate a repeatable reproducible measurement and the default setting for this feature is 1 However the unit can be programmed to flash to light source multiple times for a single scan This may improve the measurement accuracy for very dark s...

Страница 26: ... time of measurement 1 Using the black navigation button on the instrument navigate to the Naming field and select it The Naming options display Date Stamp The program will assign the date and time of measurement as the sample name Numeric The program assign a sequential number as the sample name Manual The program will prompt you to assign a name to the sample using a digital keyboard After you m...

Страница 27: ...k button navigate to the Average field and select it 3 Using the black navigation button select the number of scans to average The Average field updates See Routine Functions Measurement Averaging for an example of the operation of this feature Contact Datacolor Service for full applications support for this feature AutoSave The software can be programmed to automatically save every measurement To...

Страница 28: ...xcluded SCE Specular port is open One measurement is made of the sample which excludes the specular component To enable disable this feature 1 Using the black navigation button on the instrument navigate to the live bar and select Options 2 Navigate to the Specular Mode field and select it The field and the specular mode icon on the title bar automatically update NOTE The gloss determination selec...

Страница 29: ...e the measurement time When this feature is activated the gloss icon shows enabled and the colorimetric output includes a gloss value Gloss Determination Enabled Gloss Determination Disabled To enable disable Gloss Determination Use the black navigation button on the instrument to navigate to the Options page on the live bar and select it Navigate to the Gloss field and select it The gloss selecti...

Страница 30: ...on button on the instrument to navigate to the Options page on the live bar and select it Navigate to the LRV field and select it The output display will update to reflect the change LRV Enabled Output Display LRV Disabled Output Display System Information Refer to the Appendix for details on these options ...

Страница 31: ...You can also use the instrument as a measuring device for Datacolor PAINT PC Access IMPORTANT The PC Access feature on the stand alone unit should be selected whenever the instrument is connected to the computer Use the black navigation button on the instrument to put it into PC Access Mode The screen will display the current status of the PC connection USB Cable Connection To connect the unit to ...

Страница 32: ...ss mode This should be done each time you enable the Bluetooth communication between the instrument and Datacolor Paint Activate Bluetooth Connection To activate the Bluetooth connection on the computer 1 Power the instrument and put it into PC Access mode 2 Click on the Windows icon on the bottom left of the computer window The dialog below displays 3 In the Search field enter Bluetooth Select Ad...

Страница 33: ...tall the device driver 9 The message below displays in the system tray 10 If you select Click here for status the dialog below opens When the status of both drivers is Ready to Use click Close NOTE AccessWindows Control Panel Devices and Printers to verify that the instrument Bluetooth connection is enabled PC Access You must put the Datacolor 20D into PC Access Mode to ensure a Bluetooth connecti...

Страница 34: ...atacolor 20D User s Guide 008 400666 Rev A A graphic should display identifying that the instrument is connected NOTE The Datacolor 20D Bluetooth radio is always on when the instrument is in PC Access mode ...

Страница 35: ...dure will launch automatically when the DVD is inserted into the drive Follow the prompts on the screen to complete the Datacolor PAINT installation You must also have a database compatible with the materials from your paint manufacturer Instrument Communications When using the Datacolor 20D with Datacolor PAINT the instrument can communicate with the computer using either a USB cable or a Bluetoo...

Страница 36: ...e default user and password is admin The Datacolor PAINT v 2 x main window will display All program features are accessed from the PAINT main screen Instrument Configuration You must configure the program to recognize both the dispenser and the instrument you are using This is done through the Settings feature in Datacolor PAINT 1 On the main window click on the Settings icon The window below disp...

Страница 37: ...f no dispenser is connected choose Manual 4 To select an instrument Highlight the Spectrophotometer tab Select the Datacolor 20D instrument The driver must be Cometflash 5 Click Accept All 6 When you connect for the first time the software will search and connect to the instrument 7 When the connection is made return to the PAINT main window Select Custom Match The instrument conditions are displa...

Страница 38: ... Calibration You must calibrate the instrument when you connect it to Datacolor PAINT for the first time and whenever the Calibration Status is red expired You will need the black trap white tile and green tile to complete the instrument calibration using Datacolor PAINT 1 On the Measure Color Sample window click Calibrate 2 The system will prompt you for the black trap white tile and green tile m...

Страница 39: ... PAINT v 2 x Sample Measurement 1 From the PAINT main window select Custom Match The Measure Color Sample window displays 2 Position the sample to fully cover the port opening and press the Measure button 3 If you suspect a bad measurement click on Delete last measure or Delete All Measures and remeasure the sample 4 Enter a name for the color you just measured Color Name Select Product Measure Bu...

Страница 40: ...See Datacolor PAINT User s Guide for instructions to enable measurement averaging and for a detailed explanation of all program features Retrieving Samples from Datacolor 20D You can retrieve any of the samples stored on the Datacolor 20D to be matched using Datacolor PAINT To view and retrieve the samples on the unit 1 From the PAINT main window select Custom Match 2 The Measurement window displa...

Страница 41: ... sample to be retrieved and click Select 1 5 The selected sample displays in the Custom Match window 6 Click Select Product and make the appropriate selections for the product and formula See also Datacolor PAINT User Guide for details on the Custom Match feature ...

Страница 42: ... Spectrometer Principle Concave holographic grating Detector Proprietary Dual 256 element diode array Color Repeatability 0 05 CIELAB ΔE max on white ceramic tile Color Inter Instrument Agreement 0 20 CIELAB ΔE avg of 12 BCRA tiles Aperture Size SAV 10mm illuminated 6 5 mm measured Battery Rechargeable Li Ion Battery 2 000 measures charge Operating Environment 5 to 40 C 20 to 85 RH non condensing ...

Страница 43: ...tions may limit performance data capacity and operation of some features Faster processor more memory and faster hard drives will significantly enhance performance 2 Accurate on screen color display requires monitor calibration and true color video mode 3 Datacolor PAINT 2 0 is supplied on a DVD disk Recommend a DVD writer for data backup and file transfer from stand alone systems 4 Datacolor spec...

Страница 44: ...umber Identifies the instrument serial number Debug Port Identifies the port for debugging Battery Identifies the battery life remaining on the unit Geometry Identifies the viewing geometry diffuse 8 Expose SD Card N A System Restart N A IMPORTANT Use the three options below ONLY under the guidance of a Datacolor service representative Improper handling will make the Datacolor 20D inoperable Expos...

Страница 45: ...maintenance and certification services to match your needs Please contact your local Datacolor office for more information The sections that follow provide detailed instructions for maintaining the instrument and calibration tiles These instructions and tips will help to insure that the instrument continues to perform properly over its life Caution There are no user serviceable parts for this equi...

Страница 46: ... objects to remove dirt or foreign substances from the calibration tiles This will damage the surface Never immerse the tiles in water Tiles that have scratches chips abrasions or cracks must be replaced Signs of wear and tear on the tile surface will affect the accuracy of the calibration Cleaning the Black Trap The black trap should be kept dust free Dust accumulating in the black trap should be...

Отзывы: