background image

Attaching and Configuring a Screw Terminal Panel

33

4

4

4

4

4

4

4

4

4

Specific 5B and 7B Series backplanes that are supported include 
the following:

5B01 

 a 16-channel backplane for 5B Series signal 

conditioning modules,

5B08 

 an 8-channel backplane for 5B Series signal 

conditioning modules,

7BP16-1 

 a 16-channel backplane for 7B Series signal 

conditioning modules,

7BP08-1 

 an 8-channel backplane for 7B Series signal 

conditioning modules, and

7BP04-1 

 a 4-channel backplane for 7B Series signal 

conditioning modules.

This section describes how to connect the STP268-EC screw terminal 
panel to the DT3010-268 board, and how connect a 5B or 7B Series 
backplane, and/or a PB16H Opto-22 backplane to the STP268-EC 
screw terminal panel. 

Attaching to the DT3010-268 Board

The EP325 cable, which is available as an accessory to the STP268-EC 
screw terminal panel, attaches connector J1 on the STP268-EC to 
connector J1 on the DT3010-268 board.

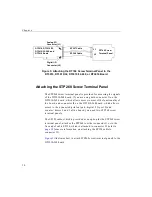
Figure 5

 illustrates how to attach an STP268-EC screw terminal panel 

to the DT3010-268 board. 

Содержание DT3010 Series

Страница 1: ...R DT3010 Series UM 16868 C Getting Started Manual ...

Страница 2: ...tents or other rights of third parties which may result from its use No license is granted by implication or otherwise under any patent rights of Data Translation Inc Use duplication or disclosure by the United States Government is subject to restrictions as set forth in subparagraph c 1 ii of the Rights in Technical Data and Computer software clause at 48 C F R 252 227 7013 or in subparagraph c 2...

Страница 3: ...Chapter 2 Preparing to Use a DT3010 Series Board 5 Unpacking 7 Checking the System Requirements 8 Installing the Software 9 Viewing the DT3010 Series Documentation Online 11 Chapter 3 Installing the Board and Loading the Device Driver 13 Setting up the Computer 15 Setting up Expansion Slots 16 Removing the Board for Handling 17 Attaching the EP324 Cable DT3010 268 Board Only 18 Inserting the DT301...

Страница 4: ... Terminal Panel 37 Configuring the DT740 Screw Terminal Panel 37 Configuring Jumper W1 Common Ground Sense 38 Configuring Resistors R1 to R16 Bias Return 38 Configuring Resistors R17 to R32 Current Shunt 38 Configuring the STP268 Screw Terminal Panel 39 Configuring Jumper W1 Common Ground Sense 40 Configuring Resistors R1 to R16 Bias Return 40 Configuring Resistors R17 to R32 Current Shunt 40 Conf...

Страница 5: ...er Timer Signals 83 Connecting Event Counting Signals 83 Connecting Frequency Measurement Signals 92 Connecting Pulse Output Signals 95 Chapter 6 Verifying the Operation of a DT3010 Series Board 105 Installing the Quick Data Acq Application 108 Running the Quick Data Acq Application 110 Performing a Single Value Analog Input Operation 111 Performing a Single Value Analog Output Operation 111 Perfo...

Страница 6: ... Screw Terminal Panel 117 Analog Inputs 119 Single Ended Inputs 119 Pseudo Differential Inputs 120 Differential Inputs 121 Analog Outputs 122 Digital Inputs and Counter Timer Inputs 123 Digital Outputs 124 Cabling Information 125 Index 127 ...

Страница 7: ...orm data acquisition operations It is assumed that you are familiar with the requirements of your application It is also assumed that you are familiar with Microsoft Windows 98 Windows Me Millennium Edition Windows NT 4 0 or Windows 2000 How this Manual is Organized This manual is organized as follows Chapter 1 Overview describes the key features of the DT3010 Series hardware and the DT3010 Series...

Страница 8: ...on of a DT3010 Series Board describes how to verify the operation of a DT3010 Series board with the Quick Data Acq application Appendix A Using Your Own Screw Terminal Panel describes additional considerations to keep in mind when designing your own screw terminal panel for use with a DT3010 Series board An index completes this manual Conventions Used in this Manual The following conventions are u...

Страница 9: ...TM to access the capabilities of Data Translation data acquisition boards DTx EZ Getting Started Manual UM 15428 Available separately from Data Translation this manual describes how to use the ActiveX controls provided in DTx EZTM to access the capabilities of Data Translation data acquisition boards in Microsoft Visual Basic or Visual C DT VPI User s Manual UM 16150 Available separately from Data...

Страница 10: ...cal Support Department is available to provide technical assistance Refer to the DT3010 Series User s Manual for more information refer to page 11 for more information on viewing this manual If you are outside the U S or Canada call your local distributor whose number is listed in your Data Translation product handbook ...

Страница 11: ...1 1 Overview DT3010 Series Key Hardware Features 2 DT3010 Series Software 3 Getting Started Procedure 4 ...

Страница 12: ... Analog Output FIFO Digital I O Lines Counter Timers DT3010a b a The analog I O resolution is 12 bits b This board contains one 50 pin connector and one 68 pin connector 32 SE 16 DI 1 25 MHz 2 500 kHz for each channel 4K 16 4 DT3010 268c c This board contains two 68 pin connectors but is functionally equivalent to the DT3010 board 32 SE 16 DI 1 25 MHz 2 500 kHz for each channel 4K 16 4 DT3010 32a ...

Страница 13: ...a Acq application you can verify the features of the board display data on the screen and save data to disk Calibration Utility This utility allows you to calibrate the analog I O circuitry of the board Refer to the DT3010 Series User s Manual for information on using this utility DT3010 Series User s Manual in PDF format This manual describes the features of the DT3010 Series boards and how to us...

Страница 14: ...ws you where you are in the getting started procedure Figure 1 Getting Started Flow Diagram Install the Board and Load the Device Driver see Chapter 3 starting on page 13 Wire Signals see Chapter 5 starting on page 43 Verify the Operation of the Board see Chapter 6 starting on page 105 Attach and Configure the Screw Terminal Panel see Chapter 4 starting on page 27 Prepare to Use a Board see Chapte...

Страница 15: ...5 2 Preparing to Use a DT3010 Series Board Unpacking 7 Checking the System Requirements 8 Installing the Software 9 Viewing the DT3010 Series Documentation Online 11 ...

Страница 16: ... Chapter 3 starting on page 13 Wire Signals see Chapter 5 starting on page 43 Verify the Operation of the Board see Chapter 6 starting on page 105 Attach and Configure the Screw Terminal Panel see Chapter 4 starting on page 27 Prepare to Use a Board this chapter ...

Страница 17: ...tates call the Customer Service Department at 508 481 3700 An application engineer will guide you through the appropriate steps for replacing missing or damaged items If you are located outside the United States call your local distributor listed in your Data Translation Product Handbook Once you have unpacked your board check the system requirements as described in the next section CAUTION Keep t...

Страница 18: ...available PCI revision 2 0 compliant or greater 32 bit or 64 bit 5 V expansion slot Microsoft Windows 98 Windows Me Windows NT 4 0 or Windows 2000 At least 32 MB available RAM At least one CD ROM drive and A VGA or compatible display 640 x 480 or higher 256 colors recommended Once you have verified that your system meets the system requirements install the software as described in the next section...

Страница 19: ... appears 6 Click Device Drivers The DT Open Layers Data Acquisition software wizard appears 7 Click Next You are prompted for the destination location 8 Either change the directory path and or name using Browse or accept the default directory then click Next You are prompted to select the software components to install CAUTION This version of the Data Acquisition OMNI CD provides WDM compliant dev...

Страница 20: ...e program folder name 10 Either change the program folder name or accept the default program folder name then click Next The files are copied to the destination directory 11 Click Finish The DT Data Acquisition Software setup program reappears 12 Click Main Menu 13 Click Exit ...

Страница 21: ...of the document click a heading from the table of contents on the left side of the document Within the document click the text shown in blue to jump to the appropriate reference the pointer changes from a hand to an index finger To go back to the page from which the jump was made click the right mouse button and Go Back or from the main menu click Document then Go Back To print the document from t...

Страница 22: ...Chapter 2 12 ...

Страница 23: ...e Device Driver Setting up the Computer 15 Setting up Expansion Slots 16 Removing the Board for Handling 17 Attaching the EP324 Cable DT3010 268 Board Only 18 Inserting the DT3010 Series Board into the Computer 19 Loading the Device Driver 22 ...

Страница 24: ... User s Manual for instructions see page 11 for information on viewing this manual Install the Board and Load the Device Driver this chapter Wire Signals see Chapter 5 starting on page 43 Verify the Operation of the Board see Chapter 6 starting on page 105 Attach and Configure the Screw Terminal Panel and Signal Conditioning Backplane see Chapter 4 starting on page 27 Prepare to Use a Board see Ch...

Страница 25: ...f all peripherals printer modem monitor and so on connected to the computer Unplug the computer and all peripherals Remove the cover from you computer Refer to your computer s user s manual for instructions CAUTION To prevent electrostatic damage that can occur when handling electronic equipment use a ground strap or similar device when performing this installation procedure ...

Страница 26: ...exists in the shared slot you cannot use the slot for a PCI board if a PCI board exists in the shared slot you cannot use the slot for an ISA board Note If you are using a DT3010 268 board with an STP268 screw terminal panel the expansion slot to the left of the slot you just selected must be available for the EP324 cable and faceplate it can be either a PCI or ISA slot Refer to page 19 for more i...

Страница 27: ... by holding the wrapped board in one hand while placing your other hand firmly on a metal portion of the computer chassis 2 Carefully remove the antistatic packing material from the board It is recommended that you save the original packing material in the unlikely event that your board requires servicing in the future 3 Hold the board by its edges and do not touch any of the components on the boa...

Страница 28: ...ou need to use the STP268 screw terminal panel and the EP324 cable that is shipped with the board Attach the end of the EP324 that does not have the face plate to connector J2 on the DT3010 268 board as shown in Figure 2 Figure 2 Attaching the EP324 Cable to the DT3010 268 Board Refer to page 30 for information on attaching the STP268 screw terminal panel Connector J2 EP324 ribbon cable with face ...

Страница 29: ... steps to insert the DT3010 Series board into the computer 1 Position the board so that the cable connectors are facing the rear of the computer Figure 3 shows an example of inserting a DT3010 DT3010 32 DT3010 32 268 or DT3016 board Figure 4 shows an example of inserting a DT3010 268 board Figure 3 Inserting the DT3010 Series Board in the Computer Rear of Computer DT3010 DT3010 32 DT3010 32 268 or...

Страница 30: ... down on the board until it clicks into place 4 Secure the board in place at the rear panel of the system unit using the screw removed from the slot cover CAUTION Do not force the board into place Moving the board from side to side during installation may damage the bus connector If you encounter resistance when inserting the board remove the board and try again Rear of Computer PCI Expansion Slot...

Страница 31: ... 3 5 If you are installing a DT3010 268 board secure the face plate of the EP324 cable into the appropriate slot 6 Reinstall the cover of the computer Refer to your computer s user s manual for instructions 7 Power up the computer and follow the steps in the next section ...

Страница 32: ...rdware Found dialog box appears followed by the Add New Hardware Wizard dialog box Perform the following steps to load the device driver in Windows 98 1 Click Next 2 Click Search for the best driver for your device Recommended then click Next 3 Click Specify a location browse to the Windows System32 Drivers directory on your hard drive then click Next 4 Click Next The files are copied 5 Click Fini...

Страница 33: ...If you are using an Optiplex computer or experience timing problems with your DT3010 Series board uncheck this box 5 When you are finished click Close Once you have finished loading the device driver perform the steps in Chapter 4 to attach and configure the screw terminal panel and or signal conditioning backplane Windows NT 4 0 In Windows NT 4 0 the driver is automatically loaded when you instal...

Страница 34: ... steps to load the device driver in Windows 2000 1 Click Next 2 Click Search for a suitable driver for my device recommended 3 Click Specify a location and click Next 4 Browse to WinNT System32 Drivers DT3010 Inf then click Open 5 Click OK 6 Click Next The files are copied 7 Click Finish 8 Open the Control Panel 9 Double click the Open Layers Control Panel icon 10 Select the DT3010 Series board to...

Страница 35: ...rd and Loading the Device Driver 25 3 3 3 3 3 3 3 3 3 Once you have finished loading the device driver perform the steps in Chapter 4 to attach and configure the screw terminal panel and or signal conditioning backplane ...

Страница 36: ...Chapter 3 26 ...

Страница 37: ...27 4 Attaching and Configuring a Screw Terminal Panel Attaching a Screw Terminal Panel 29 Configuring a Screw Terminal Panel 37 ...

Страница 38: ...e Chapter 3 starting on page 13 Wire Signals see Chapter 5 starting on page 43 Verify the Operation of the Board see Chapter 6 starting on page 105 Attach and Configure the Screw Terminal Panel this chapter Prepare to Use a Board see Chapter 2 starting on page 5 ...

Страница 39: ...ries board Attaching the DT740 Screw Terminal Panel The DT740 screw terminal panel is provided for DT3010 DT3010 32 DT3010 32 268 and DT3016 boards Connector J1 on the screw terminal panel brings out all of the analog signals from connector J1 on the board cable EP307 connects connector J1 on the screw terminal panel to the DT3010 DT3010 32 DT3010 32 268 or DT3016 board Connector J2 on the screw t...

Страница 40: ...dynamic digital outputs digital I O port B and counter timers 2 and 3 of the board you need two STP268 screw terminal panels The EP325 cable which is provided as an option for the STP268 screw terminal panel attaches the STP268 to either connector J1 or to the free end of cable EP324 which is attached to connector J2 refer to page 18 for more information on attaching the EP324 cable to connector J...

Страница 41: ...l I O backplane The STP268 EC provides the following four connectors Connector J1 Attaches to the 68 pin connector of the DT3010 268 Connector J2 Supports the PB16H digital I O backplane The PB16H supports eight digital I O lines Connectors J3 and J4 Supports 5B and 7B Series backplanes or an AC1324 screw terminal panel for analog input connections Figure 7 shows the location of these connectors o...

Страница 42: ...Chapter 4 32 Figure 7 STP268 EC Screw Terminal Panel J1 68 Pin Connector 35 48 1 14 68 55 34 21 15 20 49 54 J2 50 Pin Connector J3 26 Pin Connector J4 26 Pin Connector W1 W4 W3 W2 Jumpers ...

Страница 43: ...ignal conditioning modules and 7BP04 1 a 4 channel backplane for 7B Series signal conditioning modules This section describes how to connect the STP268 EC screw terminal panel to the DT3010 268 board and how connect a 5B or 7B Series backplane and or a PB16H Opto 22 backplane to the STP268 EC screw terminal panel Attaching to the DT3010 268 Board The EP325 cable which is available as an accessory ...

Страница 44: ...d of an AC1315 cable into the J3 or J4 connector of the STP268 EC screw terminal panel as shown in Figure 9 Figure 9 Connecting the AC1315 Cable to the STP268 EC Screw Terminal Panel 2 If you are using a 5B Series backplane plug the other end of the AC1315 cable into the 26 pin connector on the 5B Series backplane as shown in Figure 10 DT3010 268 Board Connector J1 EP325 Cable J1 STP268 EC Screw T...

Страница 45: ...AC1393 adapter cable then attach the 25 pin connector of the AC1393 adapter cable to the 7B Series backplane as shown in Figure 11 Figure 11 Connecting the AC1315 Cable to the AC1393 Adapter Cable and to the 7B Series Backplane 5B Series Backplane STP268 EC J1 Connector AC1315 Cable EP325 Cable J3 or J4 Connector DT3010 Board 7B Series Backplane AC1315 Cable AC1393 Adapter Cable J3 or J4 Connector...

Страница 46: ...able into the J2 connector of the STP268 EC screw terminal panel 2 Plug the other end of the EP035 cable into the 50 pin connector on the PB16H Opto 22 backplane as shown in Figure 12 Figure 12 Connecting the PB16H Opto 22 Backplane to the STP268 EC Screw Terminal Panel PB16H Opto 22 Backplane EP035 50 Pin Ribbon Cable J2 Connector STP268 EC J1 Connector EP325 Cable DT3010 Board ...

Страница 47: ... DT3010 Series board Configuring the DT740 Screw Terminal Panel Figure 13 shows the layout of the DT740 screw terminal panel and shows the location of the jumper and resistors Figure 13 Layout of the DT740 ScrewTerminal Panel J1 J2 1 8 9 16 17 24 32 40 48 56 25 33 41 49 W1 R1 to R16 CTR 57 CTR 65 Trig 73 GND 81 DIO 97 DIO 89 Shield 105 64 72 80 88 96 104 112 Gnd 0 Gate 1 Clk 0 Out 0 Gate 0 Gnd 1 C...

Страница 48: ...g ground These resistor locations are typically used when connecting differential inputs to analog input channels 0 to 15 where R1 corresponds to analog input channel 0 and R16 corresponds to analog input channel 15 The high side of the corresponding analog input channels returns the source input impedance through the bias return resistors to the low side of the channels then to analog ground Typi...

Страница 49: ... range is converted to 1 to 5 V Note that depending on your application you may need to use resistors R1 to R16 with resistors R17 to R32 for proper operation Refer to page 74 for an example of using current shunt resistors Configuring the STP268 Screw Terminal Panel Figure 14 shows the layout of the STP268 screw terminal panel including the location of jumper W1 and the resistors Figure 14 Layout...

Страница 50: ...resistor locations are typically used when connecting differential inputs to analog input channels 0 to 15 where R1 corresponds to analog input channel 0 and R16 corresponds to analog input channel 15 The high side of the corresponding analog input channels returns the source input impedance through the bias return resistors to the low side of the channels then to analog ground Typical resistor va...

Страница 51: ...8 EC screw terminal panel for use with analog output modules on the 5B01 and 7BP16 1 signal conditioning backplanes Note You cannot use analog output modules on the 5B08 7BP04 1 or 7BP08 1 backplane By default the 5B01 and 7BP16 1 backplanes map to single ended analog input channels 0 to 15 However you can use channels 14 and 15 on the 5B01 or 7BP16 1 backplane as analog output channels 0 and 1 Yo...

Страница 52: ...r to Figure 14 on page 39 for the location of jumpers W1 through W4 For example assume that you are using a 5B01 with the DT3010 268 and that you want to use analog output channels 0 and 1 In this case ensure that you wire DAC0 signals to channel 14 and DAC1 signals to channel 15 on the 5B01 backplane Then install jumpers W1 through W4 on the STP268 EC screw terminal panel ...

Страница 53: ...5 Wiring Signals Preparing to Wire to a Screw Terminal Panel 45 Connecting Analog Input Signals 64 Connecting Analog Output Signals 77 Connecting Digital I O Signals 79 Connecting Counter Timer Signals 83 ...

Страница 54: ...e Chapter 3 starting on page 13 Wire Signals this chapter Verify the Operation of the Board see Chapter 6 starting on page 105 Attach and Configure the Screw Terminal Panel see Chapter 4 starting on page 27 Prepare to Use a Board see Chapter 2 starting on page 5 ...

Страница 55: ...oduce high electro magnetic fields such as large electric motors power lines solenoids and electric arcs unless the signals are enclosed in a mumetal shield On the DT740 screw terminal panel it is recommended that you connect the shields as follows Connect the analog shield to screw terminals TB35 and TB36 and to TB51 through TB56 Connect the digital shield to screw terminals TB105 and TB108 Conne...

Страница 56: ...n the Quick Data Acq application described in Chapter 6 starting on page 105 to verify that the board is operating properly Once you have determined that the board is operating properly wire the signals according to your application s requirements Considerations When Using 5B or 7B Series Signal Conditioning Modules When using a DT3010 268 with an STP268 EC screw terminal panel and a 5B or 7B Seri...

Страница 57: ... 5B modules is 5 V The output of many 7B modules is 0 to 10 V Ensure that you select an input range that matches the output of the 5B or 7B modules that you are using For example if you are using 5B modules that have an output of 5 V use a bipolar input range and a gain of 2 on the DT9800 EC Series function module Connect all unused inputs to analog common Reading an open channel can cause settlin...

Страница 58: ...n the DT740 screw terminal panel is also current limited through a 10 Ω resistor and is provided for applications that require a reference less than 1 mA Screw terminal TB112 5 V output on the DT740 screw terminal panel is current limited through a series 10 Ω resistor and supports loads up to 100 mA Note that you must take the drop current I multiplied by resistance R across the series 10 Ω resis...

Страница 59: ...J1 on the DT740 Screw Terminal Panel TB J1 Pin Signal Description TB J1 Pin Signal Description 1 25 Analog Input 00 2 50 Analog Input 08 Analog Input 00 Return 3 24 Analog Input 01 4 49 Analog Input 09 Analog Input 01 Return 5 23 Analog Input 02 6 48 Analog Input 10 Analog Input 02 Return 7 22 Analog Input 03 8 47 Analog Input 11 Analog Input 03 Return 9 21 Analog Input 04 10 46 Analog Input 12 An...

Страница 60: ... 21 Return 29 11 Analog Input 22 30 36 Analog Input 30 Analog Input 22 Return 31 10 Analog Input 23 32 35 Analog Input 31 Analog Input 23 Return 33 9 Amp Low 34 34 Analog Ground 35 8 Analog Shield Ground 36 33 Analog Shield Ground 37 7 15 V Output 38 32 Power Ground 39 6 15 V Output 40 31 Reserved 41 5 Analog Output 0 42 30 Analog Output 0 Return 43 4 Analog Output 1 44 29 Analog Output 1 Return 4...

Страница 61: ...Output 0 60 50 External Gate 0 61 49 Digital Ground 62 15 User Clock Input 1 63 14 User Counter Output 1 64 48 External Gate 1 65 47 Digital Ground 66 13 User Clock Input 2 67 12 User Counter Output 2 68 46 External Gate 2 69 45 Digital Ground 70 11 User Clock Input 3 71 10 User Counter Output 3 72 44 External Gate 3 73 43 Digital Ground 74 9 External D A Sample Clock In 75 8 External D A TTL Trig...

Страница 62: ...ank A 5 95 59 Digital I O Bank A 6 96 58 Digital I O Bank A 7 97 22 Digital I O Bank B 0 98 21 Digital I O Bank B 1 99 20 Digital I O Bank B 2 100 19 Digital I O Bank B 3 101 56 Digital I O Bank B 4 102 55 Digital I O Bank B 5 103 54 Digital I O Bank B 6 104 53 Digital I O Bank B 7 105 33 Digital Shield Ground 106 68 Analog Ground 107 34 Analog Trigger 108 67 Digital Shield Ground 109 32 Reserved ...

Страница 63: ...erence less than 1 mA The 5 V output signal on the STP268 screw terminal panel is current limited through a series 10 Ω resistor and supports loads up to 100 mA Note that you must take the drop current I multiplied by resistance R across the series 10 Ω resistor 1 V at 100 mA into consideration Note If you are connecting a high speed clock to the STP268 it is recommended that you connect the retur...

Страница 64: ...alog Input 03 8 65 Analog In 11 Analog Input 03 Return 9 30 Analog Input 04 10 64 Analog In 12 Analog Input 04 Return 11 29 Analog Input 05 12 63 Analog In 13 Analog Input 05 Return 13 28 Analog Input 06 14 62 Analog In 14 Analog Input 06 Return 15 27 Analog Input 07 16 61 Analog In 15 Analog Input 07 Return 17 26 Analog Input 16 18 60 Analog In 24 Analog Input 16 Return 19 25 Analog In 17 20 59 A...

Страница 65: ... Trigger 40 52 Analog Ground 41 17 Analog Output 0 42 51 Analog Output Ground 43 16 Analog Output 1 44 50 5 Volts_Ref Output 45 10 External D A TTL Trigger 46 44 External D A Clock Input 47 47 A D Sample Clock Output 48 13 External A D Sample Clock Input 49 14 External A D TTL Trigger 50 48 External A D Trigger and Clock Enable 51 35 Digital Ground 52 1 5 V Output 53 39 Digital Ground 54 5 User Cl...

Страница 66: ... Bank A7 Table 5 ScrewTerminal Assignments on the STP268 for Connector J2 on the DT3010 268 TB J2 Pin Signal Description TB J2 Pin Signal Description 1 Reserved 2 Reserved 3 Reserved 4 Reserved 5 Reserved 6 Reserved 7 Reserved 8 Reserved 9 Reserved 10 Reserved 11 Reserved 12 Reserved 13 Reserved 14 Reserved 15 Reserved 16 Reserved 17 Reserved 18 Reserved Table 4 Screw Terminal Assignments on the S...

Страница 67: ... Reserved 38 Reserved 39 Reserved 40 Reserved 41 Reserved 42 Reserved 43 Reserved 44 Reserved 45 Reserved 46 Reserved 47 Reserved 48 13 Dynamic Digital Output 0 49 14 Dynamic Digital Output 1 50 4 35 39 Digital Ground 51 4 35 39 Digital Ground 52 1 5 V Output 53 4 35 39 Digital Ground 54 5 User Clock Input 2 Table 5 ScrewTerminal Assignments on the STP268 for Connector J2 on the DT3010 268 cont TB...

Страница 68: ...TP268 EC screw terminal panel 55 3 User Counter Output 2 56 37 External Gate 2 57 4 35 39 Digital Ground 58 38 User Clock Input 3 59 2 User Counter Output 3 60 36 External Gate 3 61 9 Digital I O Bank B0 62 8 Digital I O Bank B1 63 7 Digital I O Bank B2 64 6 Digital I O Bank B3 65 43 Digital I O Bank B4 66 42 Digital I O Bank B5 67 41 Digital I O Bank B6 68 40 Digital I O Bank B7 Table 5 ScrewTerm...

Страница 69: ...le Input 14 14 External A D TTL Trigger 15 15 Analog Trigger 16 16 Analog Output 1 17 17 Analog Output 0 18 18 Amp Low 19 19 Analog Input 23 20 20 Analog Input 22 21 21 Analog Input 21 22 22 Analog Input 20 23 23 Analog Input 19 24 24 Analog Input 18 25 25 Analog Input 17 26 26 Analog Input 16 27 27 Analog Input 07 28 28 Analog Input 06 29 29 Analog Input 05 30 30 Analog Input 04 31 31 Analog Inpu...

Страница 70: ...Analog Input 27 Analog Input 19 Return 58 58 Analog Input 26 Analog Input 18 Return 59 59 Analog Input 25 Analog Input 17 Return 60 60 Analog Input 24 Analog Input 16 Return 61 61 Analog Input 15 Analog Input 07 Return 62 62 Analog Input 14 Analog Input 06 Return 63 63 Analog Input 13 Analog Input 05 Return 64 64 Analog Input 12 Analog Input 04 Return 65 65 Analog Input 11 Analog Input 03 Return 6...

Страница 71: ...ital I O 3 7 43 Digital I O 2 8 45 Digital I O 1 9 47 Digital I O 0 40 33 Digital I O 7 41 35 Digital I O 6 42 37 Digital I O 5 43 39 Digital I O 4 Table 8 Screw Terminal Assignments for Connector J3 on the STP268 EC TB J3 Pin SIgnal Description TB J3 Pin Signal Description 16 22 DAC1_OUTa 17 20 DAC0_OUTb 18 25 Amp Low 26 Not Connected 27 23 Analog Input 07 28 19 Analog Input 06 29 17 Analog Input...

Страница 72: ...rough this connector b Jumper W2 must be installed on the STP268 EC If this jumper is not installed this signal is not available through this connector c Jumper W1 must be installed on the STP268 EC for DAC0 Ground jumper W4 must be installed on the STP268 EC for DAC1 Ground If these jumpers are not installed this signal is not available through this connector d If jumper W3 is installed on the ST...

Страница 73: ... 13 Analog Input 20 23 11 Analog Input 19 24 7 Analog Input 18 25 5 Analog Input 17 26 1 Analog Input 16 52 3 6 9 12 15 18 21 24 Analog Ground 53 22 Analog Input 31 Analog Input 23 Return 54 20 Analog Input 30 Analog Input 22 Return 55 16 Analog Input 29 Analog Input 21 Return 56 14 Analog Input 28 Analog Input 20 Return 57 10 Analog Input 27 Analog Input 19 Return 58 8 Analog Input 26 Analog Inpu...

Страница 74: ...als of the signal source and the ground of the screw terminal panel or between the grounds of other signals exists and the differential configuration is not suitable for your application This option provides less noise rejection than the differential configuration however all 32 analog input channels are available Differential Choose this configuration when you want to measure low level signals le...

Страница 75: ... Ended Voltage Inputs to the DT740 or STP268 Shown for Channels 0 and 1 Figure 16 shows how to connect single ended voltage inputs to the STP268 EC screw terminal panel DT740 or STP268 Panel Signal Source Vsource 0 TB1 TB3 TB33 Analog In 0 Analog In 1 TB2 Jumper W1 Installed Amp Low W1 TB34 Analog Ground Vsource 1 Note that the signals shown for the STP268 screw terminal panel correspond to connec...

Страница 76: ...pter 5 66 Figure 16 Connecting Single Ended Voltage Inputs to the STP268 EC Shown for Channels 0 and 1 STP268 EC Panel Signal Source Vsource 0 TB34 TB33 Analog In 0 Analog In 1 TB52 Analog Ground Vsource 1 ...

Страница 77: ... 17 shows how to connect pseudo differential voltage inputs to the STP268 EC screw terminal panel DT740 or STP268 Panel Signal Source TB1 TB3 TB33 Analog In 0 Analog In 1 VCM Remove Jumper W1 to use Amp Low as a remote ground sense TB34 Analog Ground Make this connection as close to Vsources as possible to reduce ground loop errors Vcm is the common mode voltage for all 32 analog inputs TB2 Vsourc...

Страница 78: ... Shown for Channels 0 and 1 TB18 TB52 STP268 EC Panel Signal Source VCM Analog Ground Make this connection as close to Vsources as possible to reduce ground loop errors Vcm is the common mode voltage for all 32 analog inputs Vsource 0 Vsource 1 TB34 TB33 Analog In 0 Analog In 1 Amp Low ...

Страница 79: ...he common mode voltage could be 1 V Theoretically the resistor value Rb should be 1 V divided by the input bias current 20 nA or 50 mΩ However when you add noise from external sources to the high impedance a resistor value of 100 Ω to 100 kΩ is more practical In Figure 19B the signal source itself provides the bias return path therefore you do not need to use bias return resistors Rs is the signal...

Страница 80: ...log In 0 Analog In 0 Return Analog Ground R1 Rs TB1 TB2 TB34 Analog In 0 Analog In 0 Return Analog Ground Rv Rs Bridge DC Supply You can use resistor R1 to connect the low side of channel 0 to analog ground A B Note that the signals shown for the STP268 screw terminal panel correspond to connector J1 DT740 or STP268 Panel DT740 or STP268 Panel ...

Страница 81: ...for Channel 0 TB52 TB52 Floating Signal Source TB34 Analog In 0 Analog In 0 Return Analog Ground User Supplied Resistor Rs TB34 Analog In 0 Analog In 0 Return Analog Ground Rv Rs Bridge DC Supply Supply a bias return resistor to connect the low side of channel 0 to analog ground A B STP268 EC Panel TB68 TB68 ...

Страница 82: ...in Figure 22 Make sure that the low side of the signal is connected to ground at the signal source not at the screw terminal panel and do not tie the two grounds together Figure 21 Connecting DifferentialVoltage Inputs from a Grounded Signal Source to the DT740 or STP268 Shown for Channel 0 Grounded Signal Source TB1 TB2 Analog In 0 Analog In 0 Return Es Signal Source Ground Vg1 DT740 or STP268 Pa...

Страница 83: ... to the DT740 screw terminal panel Figure 24 shows how to connect a current loop input to the STP268 screw terminal panel and Figure 25 shows how to connect a current loop input to the STP268 EC screw terminal panel Grounded Signal Source TB34 Analog In 0 Analog In 0 Return Es Signal Source Ground Vg1 STP268 EC Panel Supply a bias return resistor in case the external ground is floating Analog Grou...

Страница 84: ... Analog Input 0 Return TB2 TB50 Analog Shield Use current shunt resistor R17 to convert current to voltage 250 Ω for 4 to 20 mA 1 to 5 V The common side of the external loop supply must either connect to analog ground or if needed to a bias return resistor R1 in this case 4 to 20 mA VCC R1 R17 TB51 Analog Ground ...

Страница 85: ...TB2 TB34 Use current shunt resistor R17 to convert current to voltage 250 Ω for 4 to 20 mA 1 to 5 V The common side of the external loop supply must either connect to analog ground or if needed to a bias return resistor R1 in this case 4 to 20 mA VCC R1 R17 Analog Ground Note that the signals shown for the STP268 screw terminal panel correspond to connector J1 ...

Страница 86: ... Input 0 Return Supply a current shunt resistor to convert current to voltage 250 Ω for 4 to 20 mA 1 to 5 V The common side of the external loop supply must either connect to analog ground or if needed to a bias return resistor 4 to 20 mA VCC User Supplied Bias Return Resistor Analog Ground User Supplied Shunt Resistor TB52 TB68 ...

Страница 87: ...el Figure 27 shows how to connect analog output voltage signals to the STP268 screw terminal panel and Figure 28 shows how to connect analog output voltage signals to the STP268 EC screw terminal panel Figure 26 Connecting Analog OutputVoltages to the DT740 Shown for Channel 0 DT740 Panel TB41 Analog Output 0 Analog Output 0 Return TB42 Load TB51 Analog Shield ...

Страница 88: ...nnecting Analog Output Voltages to the STP268 EC Shown for Channel 0 STP268 Panel TB41 Analog Output 0 Analog Output Return TB42 Load TB34 Analog Ground Note that the signals shown for the STP268 screw terminal panel correspond to connector J1 TB51 STP268 EC Panel TB17 Analog Output 0 Load Analog Ground ...

Страница 89: ...igure 30 shows how to connect digital input signals to the STP268 screw terminal panel and Figure 31 shows how to connect digital input signals to the STP268 EC screw terminal panel Figure 29 Connecting Digital Inputs to the DT740 Shown for Lines 0 and 1 Bank A TB105 Digital I O Bank A 0 DT740 Panel TB89 TB90 Digital I O Bank A 1 Digital Shield TTL Inputs ...

Страница 90: ... to the STP268 EC Shown for Lines 0 and 1 Bank A Digital I O Bank A 0 STP268 Panel TB61 TB62 Digital I O Bank A 1 Digital Ground TTL Inputs TB51 Note that the signals shown for the STP268 screw terminal panel correspond to connector J1 Digital I O Bank A 1 STP268 EC Panel TB8 TB9 Digital I O Bank A 0 TTL Inputs Digital Ground TB4 ...

Страница 91: ...33 shows how to connect a digital output signal to the STP268 screw terminal panel and Figure 34 shows how to connect a digital output signal to the STP268 EC screw terminal panel Figure 32 Connecting Digital Outputs to the DT740 Shown for Line 0 Bank B TB81 Digital I O Bank B 0 DT740 Panel TB97 Digital Ground 500 Ω 5 V 0 Out LED On ...

Страница 92: ...igital Outputs to the STP268 EC Shown for Line 0 Bank A TB51 Digital I O Bank B 0 STP268 Panel TB61 Digital Ground 500 Ω 5 V 0 Out LED On Note that the signals shown for the STP268 screw terminal panel correspond to connector J2 STP268 EC Panel TB9 TB4 Digital I O Bank A 0 Digital Ground 500 Ω 5 V 0 Out LED On ...

Страница 93: ...t and Pulse output rate generation one shot and repetitive one shot This section describes how to connect counter timer signals to perform these operations Refer to the DT3010 Series User s Manual for more information on using the counter timers refer to page 11 for information on viewing this document online Connecting Event Counting Signals Figure 35 Figure 36 and Figure 37 show examples of conn...

Страница 94: ...DT740 Shown for Clock Input 0 and an External Gate 0 DT740 Panel TB58 Signal Source Digital Ground User Clock Input 0 TB83 TB61 TB60 Digital Ground Gate 0 External Gating Switch TB108 Digital Shield In this example rising clock edges are counted while the gate is active ...

Страница 95: ... Counting Applications to the DT740 Shown for Clock Input 0 without an External Gate DT740 Panel TB58 Signal Source Digital Ground User Clock Input 0 TB83 TB61 TB60 TB108 Digital Shield In this example a software gate is used to start the event counting operation ...

Страница 96: ... Panel TB58 Signal Source Digital Ground User Clock Input 0 TB83 TB61 TB60 Digital Ground Gate 0 External Gating Switch TB59 TB62 User Counter Output 0 User Clock Input 1 TB64 Gate 1 TB108 Digital Shield Note that you can also internally cascade counters using software if you internally cascade the counters you do not have to make the external cascading connections Note also that this example show...

Страница 97: ... Gate TB54 TB57 TB56 STP268 Panel Signal Source Digital Ground User Clock Input 0 Digital Ground Gate 0 External Gating Switch Note that the signals shown for the STP268 screw terminal panel correspond to connector J1 In this example rising clock edges are counted while the gate is active STP268 Panel TB54 Signal Source Digital Ground User Clock Input 0 TB57 Note that the signals shown for the STP...

Страница 98: ...ource User Clock Input 0 TB57 TB56 Digital Ground Gate 0 External Gating Switch TB55 TB58 User Counter Output 0 User Clock Input 1 TB60 Gate 1 Note that the signals shown for the STP268 screw terminal panel correspond to connector J1 Note that you can internally cascade counters using software if you internally cascade the counters you do not have to make the external cascading connections Note al...

Страница 99: ... Applications to the STP268 EC Shown for Clock Input 0 and External Gate 0 TB5 STP268 EC Panel Signal Source Digital Ground User Clock Input 0 Digital Ground Gate 0 External Gating Switch In this example rising clock edges are counted while the gate is active TB4 TB37 TB35 ...

Страница 100: ...Chapter 5 90 Figure 42 Connecting Event Counting Applications to the STP268 EC Shown for Clock Input 0 without an External Gate TB5 STP268 EC Panel TB4 Signal Source Digital Ground User Clock Input 0 ...

Страница 101: ...al Source User Clock Input 0 Digital Ground Gate 0 External Gating Switch Gate 1 Note that you can internally cascade counters using software if you internally cascade the counters you do not have to make the external cascading connections Note also that this example shows the use of an external gate however this connection is not required Digital Ground TB36 TB38 TB3 User Clock Input 1 User Clock...

Страница 102: ...pecify the duration of the frequency measurement In this configuration the frequency of the clock input is the number of counts divided by the duration of the Windows timer If you need more accuracy than the Windows timer provides you can connect a pulse of a known duration such as a one shot output of another user counter to the external gate input In this configuration the frequency of the clock...

Страница 103: ...cting Frequency Measurement Applications to the DT740 Screw Terminal Panel Shown for Clock Input 0 and External Gate 0 DT740 Panel TB58 Signal Source Digital Ground User Clock Input 0 TB83 TB61 TB60 Gate 0 TB63 User Counter Output 1 TB108 Digital Shield ...

Страница 104: ...cations to the STP268 EC Screw Terminal Panel Shown for Clock Input 0 and External Gate 0 STP268 Panel TB54 Signal Source Digital Ground User Clock Input 0 TB56 Gate 0 TB59 User Counter Output 1 Note that the signals shown for the STP268 screw terminal panel correspond to connector J1 TB57 TB5 STP268 EC Panel TB4 TB37 Signal Source User Clock Input 0 Digital Ground Gate 0 TB2 User Clock Output 1 ...

Страница 105: ...ions to the DT740 screw terminal panel Other combinations of signals can be used Figure 47 Connecting Pulse Output Applications to the DT740 Screw Terminal Panel Shown for Counter Output 0 and Gate 0 DT740 Panel TB59 Heater Controller Digital Ground User Counter Output 0 TB83 TB61 TB60 Digital Ground Gate 0 External Gating Switch TB108 Digital Shield ...

Страница 106: ...round User Clock Input 0 TB61 TB60 Digital Ground Gate 0 External Gating Switch TB58 TB62 User Counter Output 0 User Clock Input 1 TB57 TB108 Digital Shield Note that you can also internally cascade counters using software if you internally cascade the counters you do not have to make the external cascading connections In this example counter 1 gate is logic high ...

Страница 107: ... 50 Figure 51 and Figure 52 show examples of connecting pulse output applications to the STP268 screw terminal panel Other combinations of signals can be used DT740 Panel TB58 Signal Source Digital Ground User Clock Input 0 TB61 TB64 Digital Ground Gate 1 One Shot Trigger TB59 TB62 User Counter Output 0 User Clock Input 1 TB57 TB108 Digital Shield ...

Страница 108: ...crew Terminal Panel Shown for Counter Output 0 and Gate 0 STP268 Panel TB55 Heater Controller Digital Ground User Counter Output 0 TB57 TB56 Digital Ground Gate 0 External Gating Switch Note that the signals shown for the STP268 screw terminal panel correspond to connector J1 ...

Страница 109: ... 0 TB57 TB56 Digital Ground Gate 0 External Gating Switch TB54 TB58 User Counter Output 0 User Clock Input 1 TB53 Note that the signals shown for the STP268 screw terminal panel correspond to connector J1 Note also that you can internally cascade counters using software if you internally cascade the counters you do not have to make the external cascading connections In this example counter 1 gate ...

Страница 110: ...necting pulse output applications to the STP268 EC screw terminal panel Other combinations of signals can be used TB54 Signal Source Digital Ground User Clock Input 0 TB57 TB60 Digital Ground Gate 1 One Shot Trigger TB55 TB58 User Counter Output 0 User Clock Input 1 TB53 Note that the signals shown for the STP268 screw terminal panel correspond to connector J1 STP268 Panel ...

Страница 111: ... Connecting Pulse Output Applications to the STP268 EC Screw Terminal Panel Shown for Counter Output 0 and Gate 0 Heater Controller Digital Ground User Counter Output 0 Digital Ground Gate 0 External Gating Switch STP268 EC Panel TB4 TB37 TB35 TB3 ...

Страница 112: ...TP268 EC Shown for Rate Generation Using Counters 0 and 1 and External Gate 0 TB5 STP268 EC Panel TB4 TB37 TB35 Signal Source User Clock Input 0 Digital Ground Gate 0 External Gating Switch Digital Ground TB38 TB3 User Clock Input 1 User Clock Output 0 ...

Страница 113: ... Counters for the STP268 EC Shown for One Shot Using Counters 0 and 1 and External Gate 1 TB5 STP268 EC Panel TB4 TB36 TB35 Signal Source User Clock Input 0 Digital Ground Gate 1 One Shot Trigger Digital Ground TB38 TB3 User Clock Input 1 User Clock Output 0 ...

Страница 114: ...Chapter 5 104 ...

Страница 115: ...105 6 Verifying the Operation of a DT3010 Series Board Installing the Quick Data Acq Application 108 Running the Quick Data Acq Application 110 ...

Страница 116: ...ee Chapter 3 starting on page 13 Wire Signals see Chapter 5 starting on page 43 Verify the Operation of the Board this chapter Attach and Configure the Screw Terminal Panel see Chapter 4 starting on page 27 Prepare to Use a Board see Chapter 2 starting on page 5 ...

Страница 117: ...single analog input channel or digital input port Acquire data continuously from one or more analog input channels using an oscilloscope strip chart or Fast Fourier Transform FFT view Measure the frequency of events Output data from a single analog output channel or digital output port Output pulses either continuously or as a one shot and Save the input data to disk This chapter describes how to ...

Страница 118: ...ll appears 6 Click Quick Data Acq The Quick Data Acq setup wizard appears 7 Click Next You are prompted for the destination location 8 Either change the directory path and or name using Browse or accept the default directory then click Next You are prompted to select the software components to install 9 Click Typical then click Next You are prompted for the program folder name 10 Either change the...

Страница 119: ...Verifying the Operation of a DT3010 Series Board 109 6 6 6 6 6 6 6 6 6 12 Click Finish The DT Data Acquisition Software setup program reappears 13 Click Main Menu 14 Click Exit ...

Страница 120: ...ons on the board however it may not support all of the board s features For information on each of the features provided use the online help for the Quick Data Acq application by pressing F1 from any view or selecting the Help menu If the system has trouble finding the help file navigate to C Program Files Data Translation Inc Quick Data Acq Qkdataacq hlp where C is the letter of your hard disk dr...

Страница 121: ...ard from the Board list box 5 In the Channel list box select analog input channel 0 6 In the Range list box select the range for the channel The default is 10 V 7 Select Differential 8 Click Get to acquire a single value from analog input channel 0 The value is displayed on the screen in both text and graphical form Performing a Single Value Analog Output Operation To verify that the board can out...

Страница 122: ...n voltage sources such as the outputs of a function generator to analog input channels 0 and 1 on the DT3010 Series board using the differential configuration Refer to page 70 for an example of how to connect a differential analog input 2 Click the Acquisition menu 3 For this example click Scope 4 Select the appropriate DT3010 Series board from the Board list box 5 In the Sec Div list box select t...

Страница 123: ...elect Auto to acquire data continuously from the specified channels or Manual to acquire a burst of data from the specified channels 12 Click Start from the Toolbar to start the continuous analog input operation The values acquired from each channel are displayed in a unique color on the oscilloscope view 13 Click Stop from the Toolbar to stop the operation Performing a Single Value Digital Input ...

Страница 124: ...n example of how to connect a digital output 2 Click the Control menu 3 Click Digital Output 4 Select the appropriate DT3010 Series board from the Board list box 5 Select digital output port B by clicking Port B 6 Click the appropriate bits to select the digital output lines to write to If the bit is selected a high level signal is output to the digital output line if the bit is not selected a low...

Страница 125: ...ement operation Note The Quick Data Acq application works only with counter timer 0 2 Click the Acquisition menu 3 Click Frequency Counter 4 Select the appropriate DT3010 Series board from the Board list box 5 In the Count Duration text box enter the number of seconds during which events will be counted 6 Click Start to start the frequency measurement operation The operation automatically stops af...

Страница 126: ...r Continuous to output a continuous pulse stream or One Shot to output one pulse 6 Select either Low to high to output a rising edge pulse the high portion of the total pulse output period is the active portion of the signal or High to low to output a falling edge pulse the low portion of the total pulse output period is the active portion of the signal 7 Enter a percentage or use the slider to se...

Страница 127: ...117 A Using Your Own Screw Terminal Panel Analog Inputs 119 Analog Outputs 122 Digital Inputs and Counter Timer Inputs 123 Digital Outputs 124 Cabling Information 125 ...

Страница 128: ...ose not to use the DT740 STP268 or STP268 EC screw terminal panel considerations must be given as to how the signals interact in the real world as well as how they interact with each other This appendix describes additional considerations to keep in mind when designing your own screw terminal panel for use with a DT3010 Series board ...

Страница 129: ... Even with conditioning consideration must be given to the cable length and how the cable is routed If the cable is over 3 feet you must consider the ringing and cross talk in the cable A typical cable has 30 pF per foot of capacitance If the source impedance is 1 000 Ω and the cable is 3 feet then the cross talk based on the source impedance is 1 000 Ω x 30 pF x 3 ft 90 ns This seems negligible b...

Страница 130: ...nal ground and the data acquisition ground or analog common Even if it is 100 Ω this impedance provides the bias return currents for the inputs and causes only 10 mA of current to flow with a ground potential difference of 1 V The input bias current is typically in milliamperes This is usually manageable by the common mode range of the instrumentation amplifier and analog ground system Consider th...

Страница 131: ... thermal errors One problem to consider with differential inputs is the bias current error The differential impedance is usually hundreds of megaohms With a very small bias current multiplied by this high input impedance the voltage produced is out of the common mode input range of the instrumentation amplifier An external resistor must be provided to return this bias current to the analog common ...

Страница 132: ...ith higher capacitive loads The grounds of most boards are optimized for analog inputs at the expense of some logic or high frequency noise on the analog outputs This is because the analog and digital grounds of the board are connected at the ADC s input The analog outputs are brought out as a high and a low signal but the low side is the analog ground at the DAC s output buffer To remove the high...

Страница 133: ...rrent limiting so that circuitry is not damaged when power is removed On all Data Translation PCI boards current limiting is used to prevent damage in this fault condition On high speed clock inputs a ground that is located in the connector next to the clock must be connected as a twisted pair with the high speed clock input ...

Страница 134: ... ground provided in the connector next to the outputs If just eight of the digital outputs are switching 16 mA per output then 128 mA of current flows To minimize problems with ringing loading and EMI a 22 Ω resistor is used in series with all digital outputs You must consider this 22 Ω resistor if you are matching cable impedance to the far end ...

Страница 135: ...Own ScrewTerminal Panel 125 A A A A A A A A A Cabling Information If you are building your own screw terminal panel and or cable refer to Appendix A of the DT3010 Series User s Manual for connector specifications ...

Страница 136: ...Appendix A 126 ...

Страница 137: ...le ended 64 application wiring connecting analog outputs 77 connecting counter timer signals 83 connecting current loop analog inputs 73 connecting differential analog inputs 69 connecting digital I O signals 79 connecting event counting signals 83 92 connecting externally cascaded counter timers 97 100 103 connecting pseudo differential analog inputs 67 connecting pulse output signals 95 connecti...

Страница 138: ... panel 54 STP268 EC screw terminal panel 59 connector J2 pin assignments DT740 screw terminal panel 51 STP268 screw terminal panel 56 STP268 EC screw terminal panel 61 connector J3 pin assignments STP268 EC screw terminal panel 61 connector J4 pin assignments STP268 EC screw terminal panel 63 conventions used viii counter timers when using your own screw terminal panel 123 current loop inputs 73 c...

Страница 139: ...l panel 61 J4 connector pin assignments STP268 EC screw terminal panel 63 jumper W1 DT740 38 STP268 40 STP268 EC 41 jumper W2 STP268 EC 41 jumper W3 5B Series backplanes 47 STP268 EC 42 jumper W4 STP268 EC 42 L layout DT740 37 STP268 39 STP268 EC 32 loading the device driver Windows 2000 24 Windows 98 22 Windows Me 23 Windows NT 4 0 23 M manuals 3 O online help 110 Opto 22 backplane 31 attaching 3...

Страница 140: ...tal output operations 114 R related documents ix requirements 8 resistors R1 to R16 38 40 R17 to R32 38 40 running the Quick Data Acq application 110 S selecting an expansion slot 17 selecting expansion slots 16 setting up the computer 15 single ended inputs 64 slot selection 16 17 software supported 3 STP268 40 attaching 30 configuring 39 jumper W1 40 layout 39 resistors R1 to R16 40 resistors R1...

Страница 141: ...ce driver 23 wiring recommendations when using your own screw terminal panel 117 wiring signals analog outputs 77 counter timer signals 83 current loop analog inputs 73 differential analog inputs 69 digital I O signals 79 event counting signals 83 92 externally cascadied counter timers 97 100 103 pseudo differential analog inputs 67 pulse output signals 95 single ended analog inputs 65 ...

Страница 142: ...Index 132 ...

Отзывы: