Dantherm DanX XWPRS Series Скачать руководство пользователя страница 6

 
2. TRANSPORTATION 


4


2. T ran sport ation  
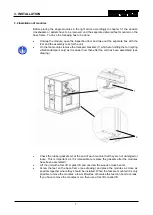
2.1 Unloading 


The  unit  is  normally  delivered  in  separate  modules  placed  on  wooden  cross  beams  or  a 
wooden  pallet.  Each  part  is  wrapped  in  protective  packing.  The  following  steps  should  be 
taken when unloading the modules: 


Find a suitable place for unloading as modules can be very heavy (up to 2500 kg). 


Unload the modules with a forklift or crane (see instructions below). 


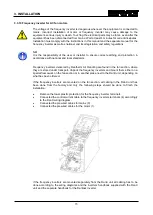
Do not tilt or lay down modules with integrated refrigeration system (compressor). 


Check  the  packing  and  modules  for  transport  damage  and  report  immediately  any 


damage to the driver and to Dantherm Air Handling.  


Retain the packing until the sections/modules are placed on the mounting location to 


avoid damages on cabinet parts or connecting pieces that overhang.  


If the unit is delivered with a separate control panel, it should be handled with special 


caution and stored in a safe and dry location until the installation is carried out. 


2.2 Lifting with a forklift 


If a fork-lift is being used it must be ensured that the forks are long enough to reach all through 
under the unit so that the bottom of the cabinet is not damaged. Rough and incorrect handling 
can damage the unit and hereby result in glitch. 

Make sure that the modules centre of gravity is always in the centre of the two forks, so the 
module can be transported stable. Be extra careful when transporting short but high and wide 
units. 


Depending if the module is short or long there are two ways to lift. Long modules with a base 
frame and wooden cross beams or without a base frame on a pallet, should always be lifted 
from  the  inspection  or  backside  of  the  unit,  never  in  the  longitudinal  direction,  as  the  base 
frame or pallet is not designed for this. 
 
Short modules (475 up to 600 mm) with or without a base frame will always stand on a pallet 
and can only be lifted in the longitudinal direction as they are too short for lifting from the 
inspection or back side. 


Содержание DanX XWPRS Series

Страница 1: ...DanX Pool XWPRS User Manual Rev 2 3 066422 en...

Страница 2: ...hold for trykfejl og ndringer Dantherm can accept no responsibility for possible errors and changes Irrt mer und nderungen vorbehalten Dantherm n assume aucune responsabilit pour erreurs et modificati...

Страница 3: ...on of components 11 3 3 1 Cooling circuit XWPRS 16 32 11 3 3 2 Drop bridge 12 3 3 3 Condensed water outlet 13 3 3 4 Damper motors 13 3 3 5 Filter gauges 13 3 3 6 Supply air temperature duct sensor 14...

Страница 4: ...n 24 5 2 Maintenance plan 24 5 3 Cabinet 24 5 4 Fans 25 5 5 Filter 25 5 6 Heating coil 26 5 7 Cross flow heat exchanger 26 5 8 Dampers 26 5 9 Cooling circuit 26 5 10 Drop catcher 27 6 Faultfinding 28...

Страница 5: ...table and vibration free The supporting structure must be able to bear the weight of the unit The deflection of the substructure should be max 1 mm m For the connection of the condensate drain it is n...

Страница 6: ...nd stored in a safe and dry location until the installation is carried out 2 2 Lifting with a forklift If a fork lift is being used it must be ensured that the forks are long enough to reach all throu...

Страница 7: ...min 1 in the holes of the base frame and secure them Use four soft straps push them over the iron bars and put them together in the crane hook 2 4 Storage If the unit is not installed at once but sho...

Страница 8: ...carried out by trained specialists or by people supervised by authorized staff It is the responsibility of the fitter to read and understand this guide and other given information 3 1 1 Unit construc...

Страница 9: ...ation dampers only as it is easier now then after the unit has been assembled see drawing Check the rubber gaskets 2 at the end of each module that they are not damaged or loose This is important as i...

Страница 10: ...les are in level and in same height Use straps 1 to move the modules the last few millimetres Straps should only be mounted at the bottom or and top of the modules Connect neighbour modules by pushing...

Страница 11: ...ging filter modules Half height hanging filter modules are mounted on a set of support brackets to be found in a box inside the module Follow these steps for mounting the modules Screw the two bracket...

Страница 12: ...xible connection is used an earth connection must be mounted between unit and duct work 3 2 5 Outdoor unit Installation of outdoor and indoor units are done in the same way however outdoor units often...

Страница 13: ...ing circuit XWPRS 16 32 Because of the weight of the cooling section the XWPRS 16 32 is delivered in two parts This means that the cooling circuit first has to be connected before the compressor can b...

Страница 14: ...aling on the backside of the bridge Detail C Turn over the bridge and place it between the two drip trays with the sealed side facing the drop catcher If the sealing should not be enough to keep the b...

Страница 15: ...filling with water and check can be used for negative and positive pressure The length of the pipe can be calculated the following way Positive pressure H1 50 mm H2 p 50 mm Negative pressure H1 p 50 m...

Страница 16: ...umidity temperature sensor If you have ordered a room thermostat humidistat sensor instead of a duct mounted on this will only be connected to the terminal strip of the unit with a short cable to test...

Страница 17: ...ed by Dantherm Air Handling are found in the fan section where they are stored under transport Unpack the frequency inverters and mount them either on a special framework on the fan section or in anot...

Страница 18: ...Pump for water cooled condenser control signal from DanX control panel 5 Water consumption gauge 6 Regulation valve 7 Temperature sensor separate water temperature control with on off signal to DanX...

Страница 19: ...t exchanger counter hold with a suitable tool in order to avoid any damage to the pipes Mount the connections in a way that it is possible to access the heat exchanger for maintenance afterwards 3 3 1...

Страница 20: ...exchanger in combination with a compressor driven heat pump for heating cooling and dehumidification in the same module The DanX XWPRS is using a minimum of outdoor air which is required for hygienic...

Страница 21: ...ransducers for the supply and exhaust fan are installed in a separate box below the electrical connection box for the fan motors The transducer factory settings should normally not be changed After in...

Страница 22: ...asured at these two points compares the static pressure in front of the inlet ring with the static pressure in the inlet ring of the narrowest point The differential pressure between the static pressu...

Страница 23: ...ic display 1 Parameter number und name 2 Parameter value 3 Active set up number 4 Motor running direction B Menu key 5 Use the MENU key to select one of the three menus C Navigation key and indicator...

Страница 24: ...te instruction manual controls 4 3 1 Cooling circuit When starting up the compressor of the cooling circuit for the first time please check the following Start up the compressor and check if the HP an...

Страница 25: ...en the following positions Dehumidification damper 1 and recirculation damper 3 fully closed Outdoor damper 4 and exhaust air damper 5 fully open Now check only on XWPRS the operation of the by pass d...

Страница 26: ...read and understand this guide and other given information 5 2 Maintenance plan Or when filter alarm is shown 5 3 Cabinet The following steps should be taken to maintain the cabinet of the unit Check...

Страница 27: ...mage every 3 month 5 5 Filter If the filters are equipped with a pressure transducer the control panel automatically gives an alarm when the filters have to be changed Still every 6 month the filters...

Страница 28: ...ry 6 month Check that the damper louvers can rotate when the damper motor is running and that they close open completely every 6 month Check the fixing of the motor damper shaft To get access to the r...

Страница 29: ...e compressor at once to avoid damage and call a cooling technician or the Dantherm service 5 10 Drop catcher The following steps should be taken to maintain the drop catcher To get access to the drop...

Страница 30: ...lding Supply air temperature 70 C After heating coil not working correct at low air volume Fire in the unit Check heating coil controls Filter Filter is dirty Filter blocked Change filter Fan Frequenc...

Страница 31: ...tat must be reset before the unit is started again Press the red button on the thermostat to reset The thermostats are located in the exhaust 70 C thermostat and supply 40 C air 3 For further explanat...

Страница 32: ...must be shut down before decommissioning and dismantling the equipment Make sure that no water glycol mixture is leaking Empty the heating coil for the water glycol mixture before removing it from th...

Страница 33: ...tion 4 ETR Trip No thermistor 1 93 Connection 6 Digital input 29 With thermistor Connection 0 No thermistor No thermistor 3 02 Minimum Reference 0 Hz 3 03 Maximum Reference Hz Max motor frequency 3 41...

Страница 34: ......

Страница 35: ...40 Fax 0 121 133 70 infose dantherm com www dantherm se Dantherm Air Handling Suzhou Ltd Bldg 9 No 855 Zhu Jiang Rd Suzhou New District Jiangsu 215219 Suzhou China Phone 86 512 6667 8500 Fax 86 512 6...

Страница 36: ...Dantherm A S Marienlystvej 65 7800 Skive Denmark www dantherm com service dantherm com 066422 066422...

Отзывы: