background image

DLS 4 / DLS 8 / 8 PLUS / DLS 16 / 16 PLUS

69

Dallmeier electronic

9  Display settings

9.1 

Recorder and camera description

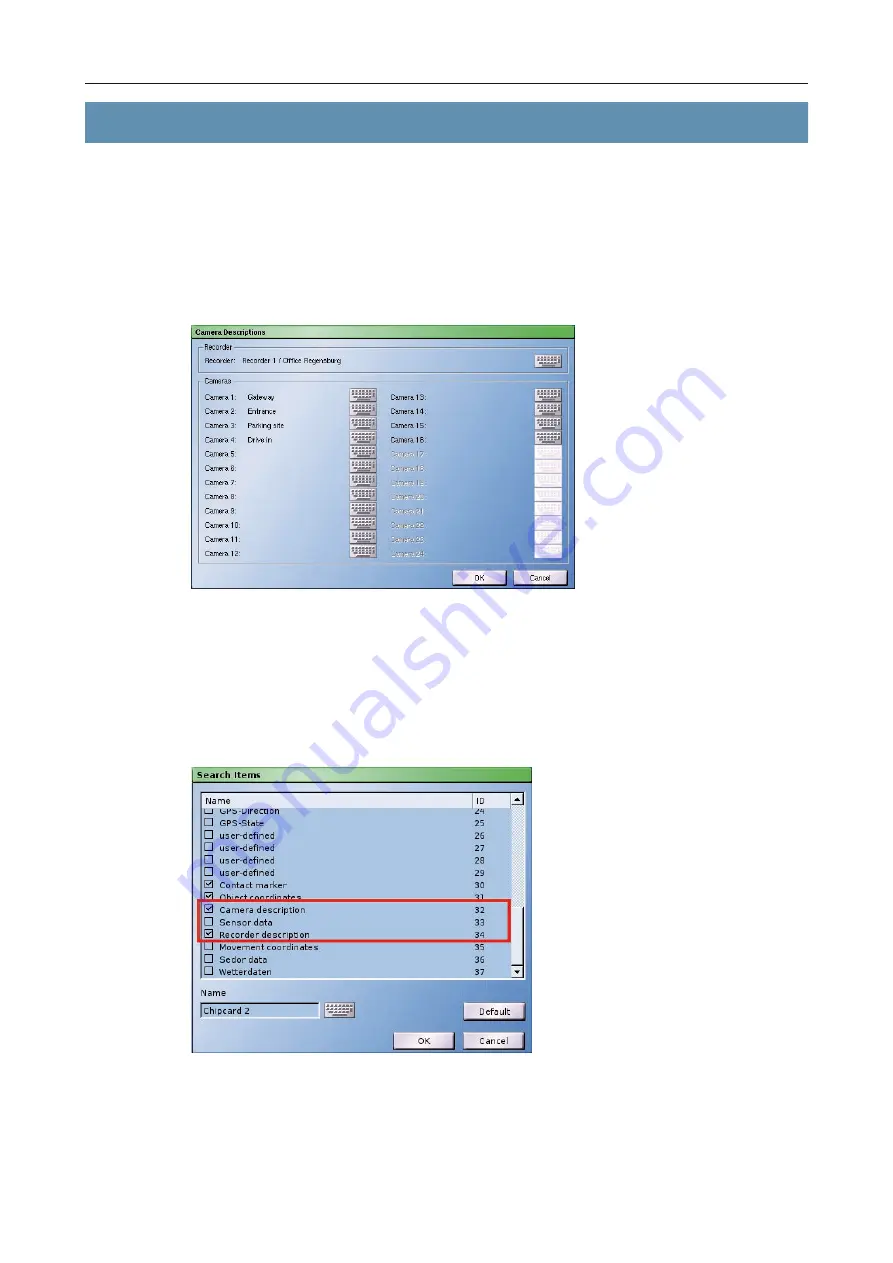
The recorder or camera description allows more exact information to be entered on the 

recorder used and on the respective camera. During playback this information can be used 

for more exact identification of the recording.

Ø

  Click on 

Setup

 > 

Recording

 > 

Camera Descriptions

.

Fig. 9-1

In the 

Camera Descriptions

 dialog you can enter a more precise designation for both your 

recording system and for the various cameras.

Activate displaying

Ø

  Click 

Setup

 > 

Recording

 > 

Search criteria

.

Fig. 9-2

Ø

  Activate the respective checkbox next to 

Camera description

 and/or 

Recorder description


in the 

Search Items

 dialog.

Содержание DLS 4

Страница 1: ...Installation and Configuration 3 0 2 090504 English Audio and video recorder DLS 4 DLS 8 8 PLUS DLS 16 16 PLUS...

Страница 2: ...of the product or documentation e g print or spelling errors and for those not caused by intenti on or gross negligence of the manufacturer Dallmeier electronic GmbH Co KG Cranachweg 1 D 93051 Regens...

Страница 3: ...ng 15 5 Connection 16 5 1 Connection assignment 16 5 2 Power supply 17 5 3 Cameras 17 5 4 Monitors 18 5 5 Audio 18 5 6 Mouse and keyboard 19 5 7 Contact IN 19 5 7 1 Global contacts 19 5 7 2 Contacts f...

Страница 4: ...types 44 8 1 2 4 Recording modes 44 8 1 3 Automatic 44 8 1 3 1 Recording 45 8 1 3 2 Modifications 45 8 1 3 3 Track types 45 8 1 3 4 Recording modes 45 8 1 4 Change 45 8 2 Connection 46 8 3 Basic conf...

Страница 5: ...2 PSTN Terminal Adapter 76 10 3 Alarm hosts 76 10 3 1 Selection and name 76 10 3 2 Connection 77 10 3 3 Alternative alarm host 78 10 3 4 Connection check 79 10 3 5 Messages 80 10 3 6 Timer 83 10 3 7...

Страница 6: ...menu and save configuration 113 15 2 4 3 Save camera configuration for direct selection 114 15 2 5 Reset camera settings 115 15 2 6 End UTC camera configuration 115 15 3 PRemote 115 15 4 Serial camer...

Страница 7: ...DLS 4 DLS 8 8 PLUS DLS 16 16 PLUS 7 Dallmeier electronic 21 Technical data 135 22 Pin assignment 137 23 Technical drawing 138...

Страница 8: ...s required Store this document in an accessible location near the product and keep it in readable con dition Pass on this document to each successive owner or user of the product Installation and Conf...

Страница 9: ...incorrect configurations or incorrect actions NOTE A NOTE offers information on principles special features and efficient procedure as well as general recommendations Expression Expressions in bold a...

Страница 10: ...hat may be subject to data protection The collecting recording processing or disclosure of such data may be forbidden and thus have legal consequences Therefore inform yourself on data protection laws...

Страница 11: ...Do not open the unit Do not open the housing of the unit There are no components inside the unit that require maintenance by the user The inspection maintenance and repair with an open housing must o...

Страница 12: ...ommissioning printed The scope of delivery may differ depending on the ordered equipment or device variant The device s range of functions depends on the ordered equipment or device variant and may th...

Страница 13: ...et Comply with all the safety instructions and technical data 4 2 Stand alone installation The DLS may be freely positioned in a place respecting the requirements mentioned above Attention should be p...

Страница 14: ...nt temperature in the rack complies with the requirements specified in the technical data Reduced air flow The air flow in a closed rack may be reduced Ensure that the amount of air flow required for...

Страница 15: ...mountings against the housing Fig 4 3 Secure the 19 mountings to the housing using the removed screws Install the device in the 19 rack IMPORTANT Follow the instructions supplied by the rack manufactu...

Страница 16: ...Connection assignment NOTE The number of connections can differ depending on the ordered equipment or device variant The following description relates to a device with full equipment 1 12V IN 2 pin OD...

Страница 17: ...to keep the recorder from rebooting or shutting down In order to absorb longer voltage fluctuations the DLS has to be powered with a suitable uninterruptible power supply UPS These devices allow the...

Страница 18: ...ode Display configuration dialogs GUI graphic user interface Playback mode Playback Track evaluation Picture export and printing Playback control GUI graphic user interface CVBS Two CVBS monitors can...

Страница 19: ...l contact inputs l Interfering pulses 10 ms are filtered out l Contact input must be 1V for low level at 1 mA l VdS calms a contact duration of min 200 ms for alarm systems Proceed as follows to conne...

Страница 20: ...ed contact inputs The outer pins on the plug connector strip are connected to ground The pins on contacts 1 to 16 are arranged from left to right The function that should be initiated by making contac...

Страница 21: ...output relay 200 ms or slower VdS must be reduced via soft ware as approx 100 ms is possible Proceed as follows to connect the contact input on an external device Use the supplied 18 pin Weidm ller pl...

Страница 22: ...es In addition to system components developed by Dallmeier electronic third party devices may also be used with the DLS recorder l Printer l Dallmeier Network Interface DNI l Weather server for exampl...

Страница 23: ...r After the booting process has been completed the recorder is in sequencer live mode Depending on the configuration of the splitter the live pictures from the connected ca meras may be shown in a spe...

Страница 24: ...ick on Later to log in straight away to configure the recorder IMPORTANT Danger of unauthorized access It is imperative that you define the group passwords before you hand over the recorder for practi...

Страница 25: ...possible to log in at user level if Login as user has been activated in User Management In addition the user and a password must have been defined Left click into a split The Login dialog will be dis...

Страница 26: ...hanges you make in the Search criteria dialog are not lost the language is not adjusted automatically in the Search criteria dialog The language must be adjusted by clicking on Standard IMPORTANT If e...

Страница 27: ...ms then changes according to the change in the master DLS If the master DLS is operated with a radio clock all connected slave recorders Clients run in sync with the radio clock Setting DLS as Master...

Страница 28: ...y back and forth between red green Reception OK Notes on time synchronization Please ensure that the time is not corrected right away after some time has passed as is done with conventional radio cloc...

Страница 29: ...the factory by blocking the ports definitely not required for Dallmeier systems The few ports which are still relevant are enabled in the default setting to ensure full com patibility to the other Dal...

Страница 30: ...different settings for the duration of the alarm status The alarm status can be ended either by triggering the opposite Contact IN function or after the elapse of the Alarm Duration set in the Option...

Страница 31: ...comparison motion detection function in four different views The output alternates between all the analog cameras that are configured for Picture com parison recording mode Fig 7 10 Example of test m...

Страница 32: ...ck 2 b etc Fig 7 12 Example Performance test mode If recording is taking place in a track the frame rate Fp 1s and bit rate BRate will be shown in the following two lines The last line contains the to...

Страница 33: ...board Mode Please note that the serial interface must also be configured 7 4 4 Single split replay To replay a track in a single split the whole of the split size is not used by the smaller formats QC...

Страница 34: ...allows to switch playback to on of the two CVBS monitors M1 or M2 Fig 7 17 In this case the VGA monitor will display a live image in playback mode But the panel for playback control displayed on the...

Страница 35: ...log Deactivate or activate the relevant message category Finally confirm with OK NOTE Even deactivated messages will be indicated by the appropriate LED s on the front of the recorder 7 4 7 Assistant...

Страница 36: ...User management Finally confirm with OK 7 4 8 Recording timeout The Recording Timeout function can be used to monitor the recording of cameras tracks with Motion Detection or Contact recording mode Th...

Страница 37: ...ter text To enter texts in boxes 1 8 click in section A The virtual keyboard will be displayed Enter the text Confirm with OK The text will be displayed in the appropriate line in the OSD Text Configu...

Страница 38: ...tioned one on top of the other in the top left hand corner Fig 7 24 Position of OSD Text Move the relevant text boxes to the required positions using drag drop Confirm with OK Please note The text box...

Страница 39: ...or High A If necessary adjust the logging settings by checking or unchecking the corresponding checkboxes Finally confirm with OK 7 4 11 Simple Export The datailed export function is activated in the...

Страница 40: ...ayed in the live mode see Operation chapter Sequencer Live mode This info field displays recording activity recording duration and the occupancy of the video memory track or HDD The detailed display w...

Страница 41: ...Recording B the recording of each camera can be activated in the appropriate track recording but tons The recording is configured in the next columns C The size of the recording track LP track can the...

Страница 42: ...n be dropped and new tracks can be created In this case all recordings in all tracks have to be deleted The video quality settings can be modified In this case normally the recordings in the correspon...

Страница 43: ...ording modes can be used in the Standard track mode l Permanent l Motion l Contact 8 1 2 Manual In the manual track mode the entire video memory will be segmented into memory units automatically Every...

Страница 44: ...ding track do not have to be deleted 8 1 2 3 Track types One LP track see above can be defined manually as a ring memory for each camera One reference track see above is available independent from the...

Страница 45: ...adopted automatically No recordings have to be deleted Tracks can be dropped and new tracks can be created without deleting other tracks or recordings The video quality settings can be modified anyti...

Страница 46: ...ecording permanent will be activated for all connected cameras Configure the recording as described below if required 8 2 Connection The recording configuration mostly can be done before the connectio...

Страница 47: ...current image of a camera for verification Right click on a camera button The Preview Camera x dialog will be displayed Check the image Confirm with OK Camera name The camera name may consist of 2 x...

Страница 48: ...wing Set Exceptions as described in the following Proceed analogous for all relevant cameras Finally confirm with OK NOTE When changing the track mode the camera timer will be reset Active und inactiv...

Страница 49: ...y will be displayed in the Exceptions list Proceed analogous for all relevant days Finally confirm with OK NOTE The Exception will replace not complement the Standard setting of the relevant day 8 3 3...

Страница 50: ...imer will be reset when the track mode is changed 8 3 4 Areas The Areas dialog enables the definition of active relevant image areas for motion detection Furthermore privacy zones for critical image a...

Страница 51: ...d inactive areas Proceed analogous for all relevant cameras Finally confirm with OK 8 3 4 2 Private Zones In default configuration the entire image will be displayed and recorded Private zones can be...

Страница 52: ...be rebuilt 8 4 Recording mode Recording configuration is done separately for every camera track Note that the Standard track mode differs basically from the modes manual and automa tic in regard to th...

Страница 53: ...f required Confirm with OK Database In the default configuration it is possible to save certain information with the pictures in the track for example indices set using the Set marker on Camera Contac...

Страница 54: ...base option if required Configure the Active Areas if required see chapter Basic configuration Set the Sensitivity of the motion detection Set the Pre Event time and the Post Event time Set the Motion...

Страница 55: ...e the explanations given below Fig 8 19 Contact recording mode Configure Private Zones if required see chapter Basic configuration Activate configure the Camera Timer if required see chapter Basic con...

Страница 56: ...camera can be recorded in the LP track and in the S track Thereby different recording modes may be used The video quality settings and the connection data are always valid The following recording mod...

Страница 57: ...s option is available for S tracks only recording will be stopped when the contact has been triggered The S track will be locked If an empty S track is available recording will be continued in it Even...

Страница 58: ...e estimated recording duration Estimate in the track Pre Event time This option enables you to set a period during which the latest images from the camera are retained in a buffer If an event occurs t...

Страница 59: ...ecording Duration expired Toggle The recording is triggered by the contact switching It is stopped again by the same contact switching again Mark A marker index will be saved to the track when the con...

Страница 60: ...ommon Intermediate Format and define length x width in pixels Frame Rate The frame rate defines the number of individual images that are saved every second The higher the frame rate the more fluid the...

Страница 61: ...ck mode the video quality settings are valid for recording in the LP track and in the S track Analogue cameras Note that the settings on the Alarm and Pre Event tabs are not supported in this version...

Страница 62: ...the Auto Configuration Options dialog will be displayed It can be used anytime in the Standard track mode and enables the uniform configuration of all cameras with default settings IMPORTANT When usin...

Страница 63: ...set recording mode Fig 8 28 Recording buttons Proceed analogous for all relevant cameras Finally confirm the Recording Settings dialog with OK 8 7 Video memory The recorder can be operated in three di...

Страница 64: ...ogous for all relevant tracks Finally confirm with OK 8 7 1 2 Secure tracks The video memory for the secure tracks is defined in the Secure Tracks dialog Ensure that the Delete only modified tracks op...

Страница 65: ...If this option is deactivated the recording of the corresponding camera in the S track will be stopped 8 7 2 Manual In the manual track mode the entire video memory will be segmented into memory unit...

Страница 66: ...signal of the corresponding audio channel also will be recorded Fig 8 33 Audio activation Activate the Audio function with the appropriate checkbox Confirm with OK 8 8 2 Dual Streaming NOTE This reco...

Страница 67: ...on of the SmartFinder function is done in the Settings for Smart Finder dialog Right click the relevant SmartFinder button The Settings for SmartFinder dialog will be displayed Fig 8 35 SmartFinder co...

Страница 68: ...entation Depending on the camera various connection types can be used l Connection via serial interface and a DNI Dallmeier Network Interface l Direct connection via the serial interface l Connection...

Страница 69: ...ayback this information can be used for more exact identification of the recording Click on Setup Recording Camera Descriptions Fig 9 1 In the Camera Descriptions dialog you can enter a more precise d...

Страница 70: ...e search items the detailed description is displayed at the upper right Fig 9 3 Display during playback 9 2 Splitter The Splitter function allows pictures from several cameras to be displayed on a sin...

Страница 71: ...a camera to a split 9 2 1 Automatic assignment Fig 9 5 Automatic assignment Click on Auto to assign the connected cameras to the splits of the current split type in order Auto all results in the auto...

Страница 72: ...display sequence The display sequences for the various monitors must be defined on separate tabs All the available cameras will always be displayed by a yellow button in the Cameras box Fig 9 7 Sequen...

Страница 73: ...he live picture from this camera will be displayed for 5 seconds After this the sequencer will continue automatically Contact An arbitrary camera can be defined to record using the Contact recording m...

Страница 74: ...re performance available for the recording functions But please note that a very low frame rate e g 1 fps will result in jerky playback Open the relevant monitor s drop down box Select a frame rate fp...

Страница 75: ...tings Ethernet Fig 10 1 IP Finder configuration The recorder s IP address can be set with the Dallmeier IP Finder software via network if this option is activated This option is activated in default s...

Страница 76: ...t is an addressee of messages and alarms that can send by a recorder The individual configuration connection type message type and activation period of up to 8 addressees is made in the Alarm Hosts di...

Страница 77: ...OK 10 3 2 Connection The specification of the connection type and the entry of the address data are made in the Connection type section Take into account that the current recorder version supports mes...

Страница 78: ...ations below If necessary make the required changes Confirm with OK finally If options A or C have been selected the connection attempt will be tried until it actually is successful and the message ca...

Страница 79: ...e successful transmission can be controlled at the alarm host PGuard The recorder does not receive an acknowledgement Select an alarm host with a left click in the alarm host list Open the Alarm Host...

Страница 80: ...checkbox Please not the explanations below Confirm with OK finally Message category Description Alarm This message will be send if the recorder starts or ends its alarm state The alarm state is trigg...

Страница 81: ...ion of the front fan can be determined The front fan does not rotate anymore The front fan rotates again The revolution of the rear fan cannot be determined Error during determination of the revolutio...

Страница 82: ...e of a contact IN function Start recor ding camera recording mode Contact No Recording This message will be send if no recording is triggered in a particular track in a defined period Relevant are cam...

Страница 83: ...rruptible power supply unit UPS sends a message that is forwarded to the alarm host 10 3 6 Timer After its activation see in the following the messages will be sent to the alarm host anytime 24 7 Diff...

Страница 84: ...ages between a recorder and an alarm host The recorder can send all messages concerning states and events see chapter Alarm hosts Messages Which messages actually will be processed and displayed by EB...

Страница 85: ...t message Finally confirm OK The EBueS alarm host can be configured subsequently as described above 10 4 Parameter backup The network parameter can be saved on an external medium for backup or editing...

Страница 86: ...thernet l PSTN and where applicable time server UPS network printer etc Open the Export network files dialog via Setup Network Import Export Export Fig 10 15 Select the relevant medium as Target Confi...

Страница 87: ...aces dialog Define the Function of the interface NOTE Additional settings may be required for some functions See the documentation supplied with the connected device for details of these values Confir...

Страница 88: ...be sent via the recorder to another device The data then arrive at the receiver in exactly the same form as they were sent by the transmitter transparent data channel This is used for example to send...

Страница 89: ...e relevant camera is started if the required recording settings have also been made Make the required recording settings under Setup Recording Cameras Tracks see also the chapter entitled Recording Se...

Страница 90: ...y contact input can be assigned 4 functions for the Function n o and the Function n c These are executed in order when the contact is switched or released Click on one of the Function 1 4 lines for th...

Страница 91: ...duration the alarm state will be extended indefinitely or until the corresponding track is full The alarm state can then only be stopped by the Stop alarm contact function Delete alarm The last alarm...

Страница 92: ...function starts the recording of one camera that is defined with recording mode Contact Which camera is relevant is defined in the Contact Parameter dialog Stop recording camera recoding mode Contact...

Страница 93: ...should switch is defined in the Contact Parameter dialog Reboot This contact function causes a reboot of the recorder Switch Recording Quality This function is relevant for cameras with the recording...

Страница 94: ...16 PLUS 94 Dallmeier electronic Make the required settings Confirm with OK The camera related contact input for each enabled camera can be configured It is of no consequence whether it is connected or...

Страница 95: ...ab for the relevant relay Select a Function Define whether the preservation time of the relay should be controlled by a Timer Fix the duration of the timer Timer Times Sec if applicable Finally decide...

Страница 96: ...event Error message of UPS Initialization error RAID internal error The relay is held until the system error is eliminated The time for which the relay is held can also be set via the Timer Note The b...

Страница 97: ...before the HDD access read write The relay is reset after the HDD access Note The behavior of the relay corresponds to the Record LED of the recorder Remote control through PView This function allows...

Страница 98: ...of the category error are The I O board could not be put into operation The I O board is ready for operation The display could not be put into operation The display is ready for operation The CPU temp...

Страница 99: ...n Power supply unit 2 failed Power supply unit 2 is operational again The relay is held until the system monitoring defines the status as normal The time for which the relay is held can also be set vi...

Страница 100: ...network printer may also be used 14 1 1 Create printer Open the Printer dialog via Setup Interfaces Printer to configure the printer Fig 14 1 Printer dialog Click on New to create a new printer The N...

Страница 101: ...itable Model Enter the Printer Name Confirm with OK The new printer is listed in the Printer dialog with the name you have entered for it In ad dition the default Properties will be displayed Fig 14 3...

Страница 102: ...d Saturation controls Confirm with OK The Printer dialog will appear again End the configuration of the printer by clicking on OK NOTE After ending the configuration clicking on OK in the Printer dial...

Страница 103: ...d display the data Fig 14 6 Sensor data from weather sensor 14 5 Dallmeier network interface The DNI 1 Dallmeier network interface is a wide ranging data interface that is connected to the recorder s...

Страница 104: ...Set DNI external system as the function Confirm with OK Protocol The next step is to configure the DNI itself Open the Dallmeier Network Interface dialog via Setup Interfaces DNI Setup Fig 14 8 Dallme...

Страница 105: ...accordingly Open the Serial Interfaces dialog via Setup Interfaces Serial Fig 14 9 Serial Interfaces dialog Select the COM port to which the DNI is connected as the Interface Set DNI camera control a...

Страница 106: ...The use of a UPS uninterruptible power supply allows the recorder to be operated without problems even in the case of temporary power cuts In addition the recorder can receive and display the status m...

Страница 107: ...below for configuring the UPS will then be displayed automatically 14 6 2 UPS configuration Open the UPS dialog via Setup Interfaces UPS Fig 14 13 UPS dialog Check the Enable UPS checkbox Select the M...

Страница 108: ...e that will be used These settings are valid in every mode with or without login Additionally the dialog allows the specification of the permission to use the control station in Sequencer Live mode wi...

Страница 109: ...monitor the termination of the appropriate video input must be cancelled Open the dialog via Setup System Camera Termination Fig 15 1 Camera Termination dialog Set the appropriate drop down box to OFF...

Страница 110: ...to control a camera using DNI the symbol for a dome camera will first be displayed in the Control column In this case right click on the symbol The Recording settings camera control dialog will appear...

Страница 111: ...full picture is displayed in the preview window with a border If the mouse pointer is inside the rectangle you can position the zoom area A whilst holding the mouse button Fig 15 6 Click on the Cente...

Страница 112: ...eight picture sections for each camera Fig 15 8 By clicking on one of the buttons you can select the appropriate section directly 15 2 4 Configure camera If you wish to adjust the settings of the came...

Страница 113: ...n in the manual for the appropriate camera 15 2 4 1 Functions 15 2 4 2 Close menu and save configuration If you have changed the settings on the camera click again on Open Close menu Fig 15 11 Select...

Страница 114: ...15 12 Configure the camera to suit you wishes Close the camera menu using the Save settings option Go to one of the three selection buttons with the mouse pointer and right click on it Fig 15 13 Selec...

Страница 115: ...audio will be transferred via the LAN or WAN in recording format H 264 However this can result in errors during playback caused by an external application for example in PView if the available bandwid...

Страница 116: ...documentation Operation after configuring the recorder Open the Serial Interfaces dialog via Setup Interfaces Serial Fig 15 18 Serial Interfaces dialog Select COM 1 as Interface Select Transparent da...

Страница 117: ...ontrol dialog will be displayed Fig 15 20 Direct camera control dialog Set the Camera ID Finally confirm with OK The camera will be labeled as controllable in the Recording Setting dialog Fig 15 21 Re...

Страница 118: ...ure tree The total capacity available for recording is shown at the top right To enable or disable a hard disk drive for recording check or uncheck the checkbox in the Rec column RAID systems RAID Sys...

Страница 119: ...llmeier electronic IMPORTANT If any changes are made to the RAID settings all recordings must be deleted NOTE The Standard button can reset all RAID settings All HDD s that are currently connected wil...

Страница 120: ...is case individual users are assigned to the various groups with the rights of the group being granted to all the relevant users The login takes place using the user s name and password 17 1 Edit grou...

Страница 121: ...izations in this group are displayed on the right in the form of a structure tree They can now be activated or deactivated by clicking on the appropriate checkbox Confirm with OK 17 1 2 Change group n...

Страница 122: ...me for confirmation Click OK 17 1 4 Dual control login If access to a group is only possible by entering two passwords you can assign a second password to every group apart from the administrator whic...

Страница 123: ...in as User using the appropriate radio button NOTE Even if Login as User is active the group passwords for the group login must be changed If they are not changed external programs such as PView may a...

Страница 124: ...the group to which they belong Proceed as described in the chapter entitled Access rights to activate or deactivate the rights of a group 17 2 3 Change user password Fig 17 8 Select the required user...

Страница 125: ...Administrator group 17 2 5 User options Using this dialog you can make the conditions for access to your recorder more secure Click on System User management NOTE The settings made in the Options dial...

Страница 126: ...gins and Passwords in order to log into the system Single admin user login If you also check the Single admin user login checkbox every user in the Administrator group will be given the right to log i...

Страница 127: ...also be activated retrospectively It may be necessary to purchase some additional hardware together with an activation code for this purpose To enter the activation code open the Activation dialog vi...

Страница 128: ...28 Dallmeier electronic Fig 18 2 Load update file Select the data Source where the update is located Click Load to load the files Mark the Update File Confirm with OK Follow the instructions show in t...

Страница 129: ...p System System Parameter Default Mark Automatic or Standard_609 Confirm with OK Fig 19 1 Default System Parameters dialog IMPORTANT When the recorder has been reset to factory settings all recor ding...

Страница 130: ...ntains various log and protocol files which permit the Dallmeier Support team to analyze the recorder if necessary 19 3 Parameter import System parameters that have been changed on a PC can be read ba...

Страница 131: ...order are not hot pluggable or hot swappable The recorder must therefore be switched off before an HDD drawer unit can be changed Tested and approved hard disk drives Use only hard disk drives that ha...

Страница 132: ...lace the HDD IMPORTANT Risk of data loss and or damage to the hard disk drive Ensure that both the recorder and the DAS 4 Eco have been switched off before you replace the HDD drawer unit IMPORTANT Da...

Страница 133: ...3 Remove the HDD drawer unit Undo the 4 screws on the underside of the HDD drawer unit Fig 20 4 Screws loosen Remove the defective HDD Secure the HDD drawer unit to the new HDD Use only the original...

Страница 134: ...e any force Fig 20 7 Close the HDD drawer unit Lock the HDD drawer unit using the wrench Fig 20 8 Lock the HDD drawer unit The front cover on the HDD drawer unit must be flush with the edge of the hou...

Страница 135: ...S 16 PLUS Up to 400 fps Bit rate per channel DLS 4 Up to 1 5 Mbps DLS 8 Up to 1 5 Mbps DLS 8 PLUS Up to 2 Mbps DLS 16 Up to 1 5 Mbps DLS 16 PLUS Up to 2 Mbps Interfaces Camera inputs DLS 4 8x CVBS BNC...

Страница 136: ...rtifications CE FCC UL ACA CB DIN EN 50130 4 Recording speed DLS 4 DLS 8 DLS 8 Plus DLS 16 DLS 16 Plus Total 100 fps 200 fps 200 fps 400 fps 400 fps Per camera 3 fps 4CIF 3 fps 4CIF 12 fps 4CIF 3 fps...

Страница 137: ...DLS 4 DLS 8 8 PLUS DLS 16 16 PLUS 137 Dallmeier electronic 22 Pin assignment RS485 2 pin ODU jack 12V RX RX...

Страница 138: ...DLS 4 DLS 8 8 PLUS DLS 16 16 PLUS 138 Dallmeier electronic 23 Technical drawing Unit mm 88 without feet 98 with feet...

Страница 139: ...patibility 2004 108 EG and the Council Directive relating to Low Voltage 2006 95 EC The following company is responsible for this declaration Dallmeier electronic GmbH Co KG Cranachweg 1 D 93051 Regen...

Отзывы: