background image


www.daisalux.com 

18


LPS24 

– USER MANUAL 


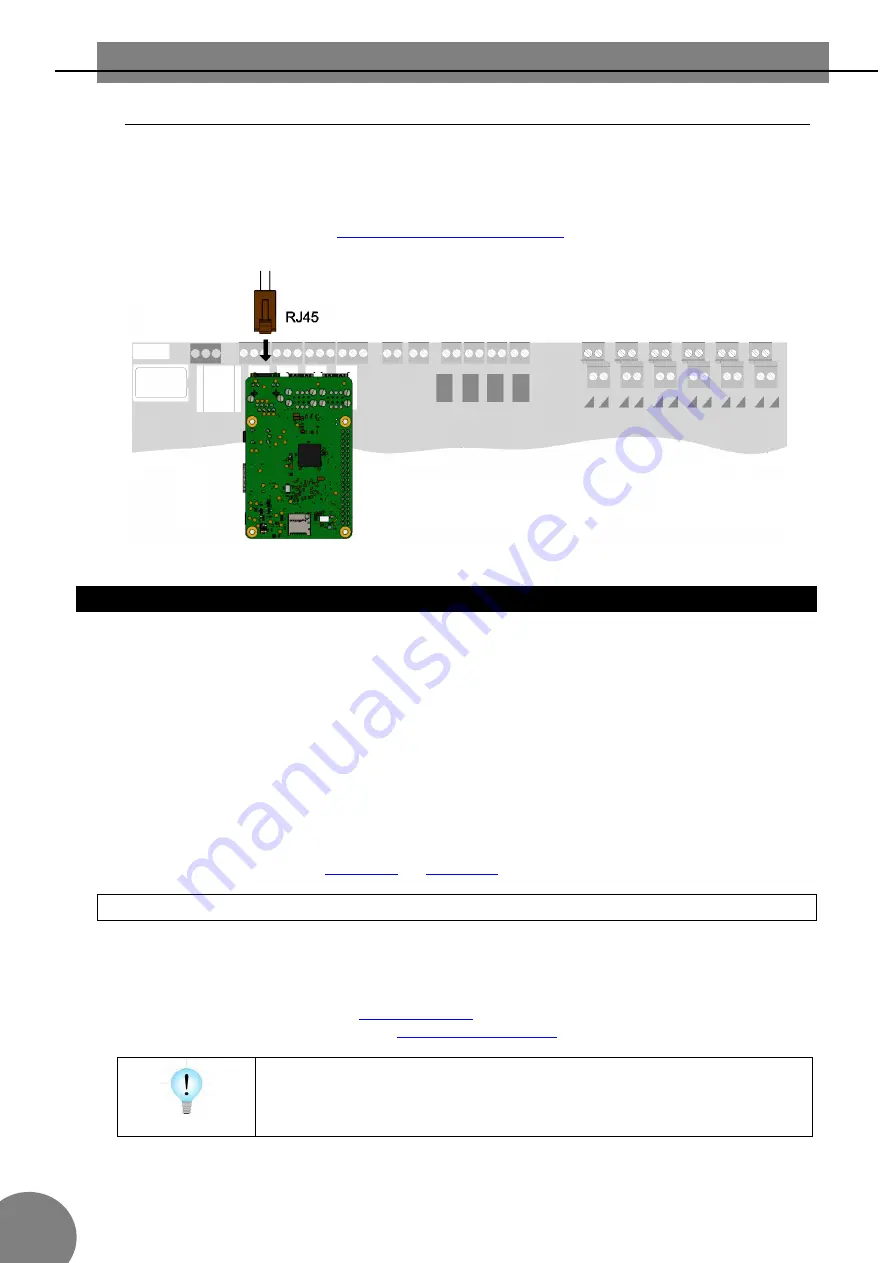
6.3.7. LPSLan 

Connect the Ethernet cable to the optional LPSLan module if the latter is installed.  
The status of the centralised power unit and LPS system can be monitored by using the 
same. 
The  status  of  the  luminaires  is  displayed  graphically  by  the  corresponding  software 
(LPSWeb 

 web browser, WinCB

 LPS or Daisatest Evac system control software). 

For further information see 

11.1 LPSLan/LPSWeb/ModBus


7. Switching on the LPS centralised power unit


Follow these steps in order: 


Disconnect battery fuses. 


Perform all connections of the centralised power unit. 


Check that the polarity in the battery connections are correct. 


Insert battery fuses. 


Activate the main power supply. 


Before performing any operating test, make sure to charge the batteries for at least 24 
hours. 


Configure  the  circuit  according  to  the  desired  load  (

ELC

  luminaires, 

beacons,  non-

communicating

). By default configured in 

non-communicating

 mode. 


Perform a test on the circuits to check the loads on the circuits. 


Zoning the ELC luminaires. 
 

  See quick installation guide: 

LPS24-26


LPS24-65


7.1. Switching off the LPS centralised power unit 

Take the following steps in this order to switch off the LPS centralised power unit: 


Remove the main power supply. 


Place  the  LPS  centralised  power  unit  in  standby  mode  (there  are  two  modes). 


Centralised power unit on standby 

-


 Through the display: 

8.2.5.1 Actions


-


 Using the remote control: 

6.3.6 Remote control


Removing  the  battery  fuse  is  recommended  before  moving  the 
centralised power unit  once it is switched off.


Содержание LPS24

Страница 1: ...V20200515 F8 LPS24 USER MANUAL Centralised emergency lighting device...

Страница 2: ...V20200515 F8...

Страница 3: ...S24 device 14 6 3 3 2 Remote fault connection to several LPS24 devices 15 6 3 4 Dry contacts CLP1 CLP4 15 6 3 5 Input 0 10V 17 6 3 6 Remote control TELEM 17 6 3 7 LPSLan 18 7 Switching on the LPS cent...

Страница 4: ...roubleshooting 35 10 1 Output problems 35 10 1 1 Short circuit on the outputs 35 10 1 2 Over consumption in the outputs 35 10 1 3 Electronic fault in the outputs 35 10 2 Functional problems 35 10 2 1...

Страница 5: ...The use of unauthorised or inappropriate components in conjunction with the emergency lighting system Incorrect installation 1 3 Parts Defective components may only be replaced by original DAISALUX pa...

Страница 6: ...1 Operating instructions Always read the instructions for mounting and start up before installing the system These instructions contain important information about safety use and maintenance and prot...

Страница 7: ...nalogue input 0 to 10V to regulate the brightness of one or more outputs defined as beacons Four auxiliary inputs configurable by the user Optional Ethernet or wireless connection module By LPSLan acc...

Страница 8: ...4 USER MANUAL 4 1 Design and structure of the LPS centralised power unit LPS24 26 LPS24 65 1 Cable input 2 Connections 3 Control Panel 4 Converter 230 or 110VAC 24VDC 5 Battery Type of centralised pow...

Страница 9: ...of discharge is estimated remaining duration less than 10 mins Stopping Occurs in any of the following situations Battery open or in bad state Incorrectly connected battery Battery voltage equal or le...

Страница 10: ...150 Protection Overcurrent 4 1 A Overvoltage 34V Short circuit 12 24 A constant current up to thermal protection Self resetting detection 20s Overtemperature 80 C Protection of outputs from overtempe...

Страница 11: ...that the wall where it is installed is strong enough to support the weight of the entire centralised power unit and that the mountings used are adequate to support the weight The batteries are not in...

Страница 12: ...s soon as possible After assembling the centralised power unit remove the battery fuse before proceeding with the following points Then connect the battery cables and terminals supplied When connectin...

Страница 13: ...exceed the system output power See 5 Technical data Check the compatibility of each luminaire connected to an output circuit configured as beacons as not all beacons allow such functionality The ELC...

Страница 14: ...witching on all luminaires due to power failure in another part of the facility Switch On off Switching on on activation of the input or off on deactivating the input the circuits associated to the au...

Страница 15: ...ere are four dry contacts three of them fixed according to the EN 50171 standard and the fourth configurable by the user Available options Option details Default configuration of the contacts 1 2 3 4...

Страница 16: ...on test is scheduled to run on a particular date Battery charge failure Battery charge regulation fault x x Rectifier failure Failure in the rectifier x x Battery discharging Battery discharging x End...

Страница 17: ...d through the display by selecting the percentage desired by circuit or by this 0 10V input which is controlled by an analogue signal from 0 to 10V or potentiometer 30K the latter is not linear Regula...

Страница 18: ...fuses Activate the main power supply Before performing any operating test make sure to charge the batteries for at least 24 hours Configure the circuit according to the desired load ELC luminaires bea...

Страница 19: ...circuit the battery must be disconnected from the system and the emergency lighting system will not be available therefore it must only be performed when failure of the emergency lighting system does...

Страница 20: ...dules power input rectifier contactor battery and output circuits To access the system s menu press OK Overview On the different screens there are a number of symbols that can be pressed for different...

Страница 21: ...e 24 3 C Charge 100 20 0Ah Status ok Gen Bat Rect Fails Vbat Battery voltage VbatInt Mid battery voltage To determine whether the two batteries are balanced Ibat Battery charge discharge current Tempe...

Страница 22: ...Rect FAILURES Low security Gen Bat Rect Fails List of faults and alerts detected in the device See 8 2 7 1 faults marked with are those that can be seen on this screen 8 2 2 Test 8 2 2 1 Function tes...

Страница 23: ...ast test 07 05 16 100 Automatic yes Period days 365 Test Time 23 30 Weekday Sunday Status on course Schedule test 07 12 2016 Run test Func Dur Cap Last test Indicates the date mm dd yy and result of t...

Страница 24: ...tes the simulated consumption with which the capacity test is performed Cancel Launch test It enables a capacity test to be ordered or cancelled if it is running One option or another or none is displ...

Страница 25: ...nge of daylight saving time European change to daylight saving time on the last Sunday of March and back to winter time on the last Sunday in October Other change to daylight saving time according to...

Страница 26: ...have been configured it connects terminals 1 and 2 Configurable alerts System working Mains failure 8 2 3 3 Auxiliary inputs The LPS24 device has four auxiliary inputs Use this screen to check their s...

Страница 27: ...device the above information will not appear and instead the text no gateway will be displayed Overview OK Main menu Config OK Gatew OK GATEWAY BOARD Reset web server Mode DCHP IP address 192 168 106...

Страница 28: ...t some point has exceeded the alert limit for overload Check the load connected to the circuit and to correct it run a circuit test section 12 1 1 Electronic fail fault in electronic circuit component...

Страница 29: ...e made at the luminaire level P lum fail only available for Non communicated type circuits Deactivate or configure a threshold in watts w to generate an alarm if consumption is above or below the thre...

Страница 30: ...he luminaires will be displayed not located and 1 to 6 Serial number select with and the various luminaires on the selected circuit Status displays the status of the ELC luminaire Communication loss t...

Страница 31: ...rly if it is running Battery charge 100 send a command to the device to place the battery charge estimate to 100 Uninstall lumin if there is any uninstallable luminaire to be uninstallable it must hav...

Страница 32: ...e of scenario Action action to execute when the scenario runs The scenarios screen can display only the scenarios programmed on the device To generate a scenario use the WinCB software or the LPSLAN m...

Страница 33: ...test Circuit test on course The device is running a circuit test Duration test required The duration test period has transpired without a test having been performed A test must be run to check the sys...

Страница 34: ...inspections With the aim of maintaining equipment in optimal operating conditions annual inspection is recommended EN50171 requires at least one installation test during this period of time 9 1 2 Defi...

Страница 35: ...its stipulated in this manual A circuit test can be conducted to verify that the voltage connected to said outlet is correct 10 1 2 Over consumption in the outputs If the device has signalled an outpu...

Страница 36: ...device because the total power demanded exceeds the maximum admissible for the device Once the device s load is adjusted run a functional test to eliminate the overload alarm If the fault persists ca...

Страница 37: ...tery duration fault When the device notifies a duration fault check the following Device s output power must be within the ranges described in this manual If the power is excessive it is outside of sp...

Страница 38: ...nd an installation of devices and emergency equipment using the ON OFF button on the front panel The basic operation in the absence of POWER is OFF sends a command to the LPS24 devices to go to standb...

Страница 39: ...www daisalux com 39 LPS24 USER MANUAL B SCH...

Отзывы: