background image

5 Installation

Installation and operation manual

12

RKXYQ5T7Y1B

VRV IV compressor unit for indoor installation

4P408443-1 – 2015.07

NOTICE

If  the  power  of  some  units  is  turned  off,  the  charging
procedure cannot be finished properly.

NOTICE

Be  sure  to  turn  on  the  power  6  hours  before  operation  in
order  to  have  power  running  to  the  crankcase  heater  and
to protect the compressor.

NOTICE

If  operation  is  performed  within  12  minutes  after  the
compressor unit, heat exchanger unit and indoor units are
turned  on,  the  compressor  will  not  operate  before  the
communication is established in a correct way between the
compressor unit, heat exchanger unit and indoor units.

NOTICE

Before  starting  charging  procedures,  check  if  the  7‑LEDs
display is as normal (see 

"6.1.4 To access mode 1 or 2" on

page  16

),  and  there  is  no  malfunction  code  on  the  user

interface  of  the  indoor  unit.  If  a  malfunction  code  is
present,  see 

"8.1  Solving  problems  based  on  error

codes" on page 22

.

NOTICE

Make  sure  all  connected  units  (heat  exchanger  unit  +
indoor units) are recognised (setting [1‑5]).

5.6.2

To determine the additional refrigerant
amount

Additional refrigerant to be charged=R (kg). R should be rounded off
in units of 0.1 kg.

R=[(X

1

×

Ø12.7

)×0.12+(X

2

×

Ø9.5

)×0.059+(X

3

×

Ø6.4

)×0.022]×0.8+B

X

1...3

=Total length (m) of liquid piping size at 

Øa

Model

B parameter (kg)

RKXYQ5

3.1

When  using  metric  piping,  please  take  into  account  following  table
concerning the weight factor to be allocated. It should be substituted
in the formula for R.

Inch piping

Metric piping

Size (Ø) (mm)

Weight factor

Size (Ø) (mm)

Weight factor

6.4

0.022

6

0.018

9.5

0.059

10

0.065

12.7

0.12

12

0.097

5.6.3

To charge refrigerant

Charging refrigerant consists of 2 stages:

Stage

Description

Stage 1: Pre-charging Recommended in case of larger systems.

Can be skipped, but charging will take longer
then.

Stage 2: Manual
charging

Only necessary if the determined additional
refrigerant amount is 

not reached

 yet by

pre-charging.

Stage 1: Pre-charging

Summary – Pre-charging

:

Refrigerant bottle

Connected to the service ports of the stop
valves. Which stop valves to use depends
on the circuits you choose to pre-charge to:

▪ Circuits  1  and  2  together  (manifold  with

refrigerant line splitters required).

▪ First circuit 1, then circuit 2 (or vice versa).

▪ Only circuit 1

▪ Only circuit 2

Stop valves

Closed

Compressor

Does NOT operate

1

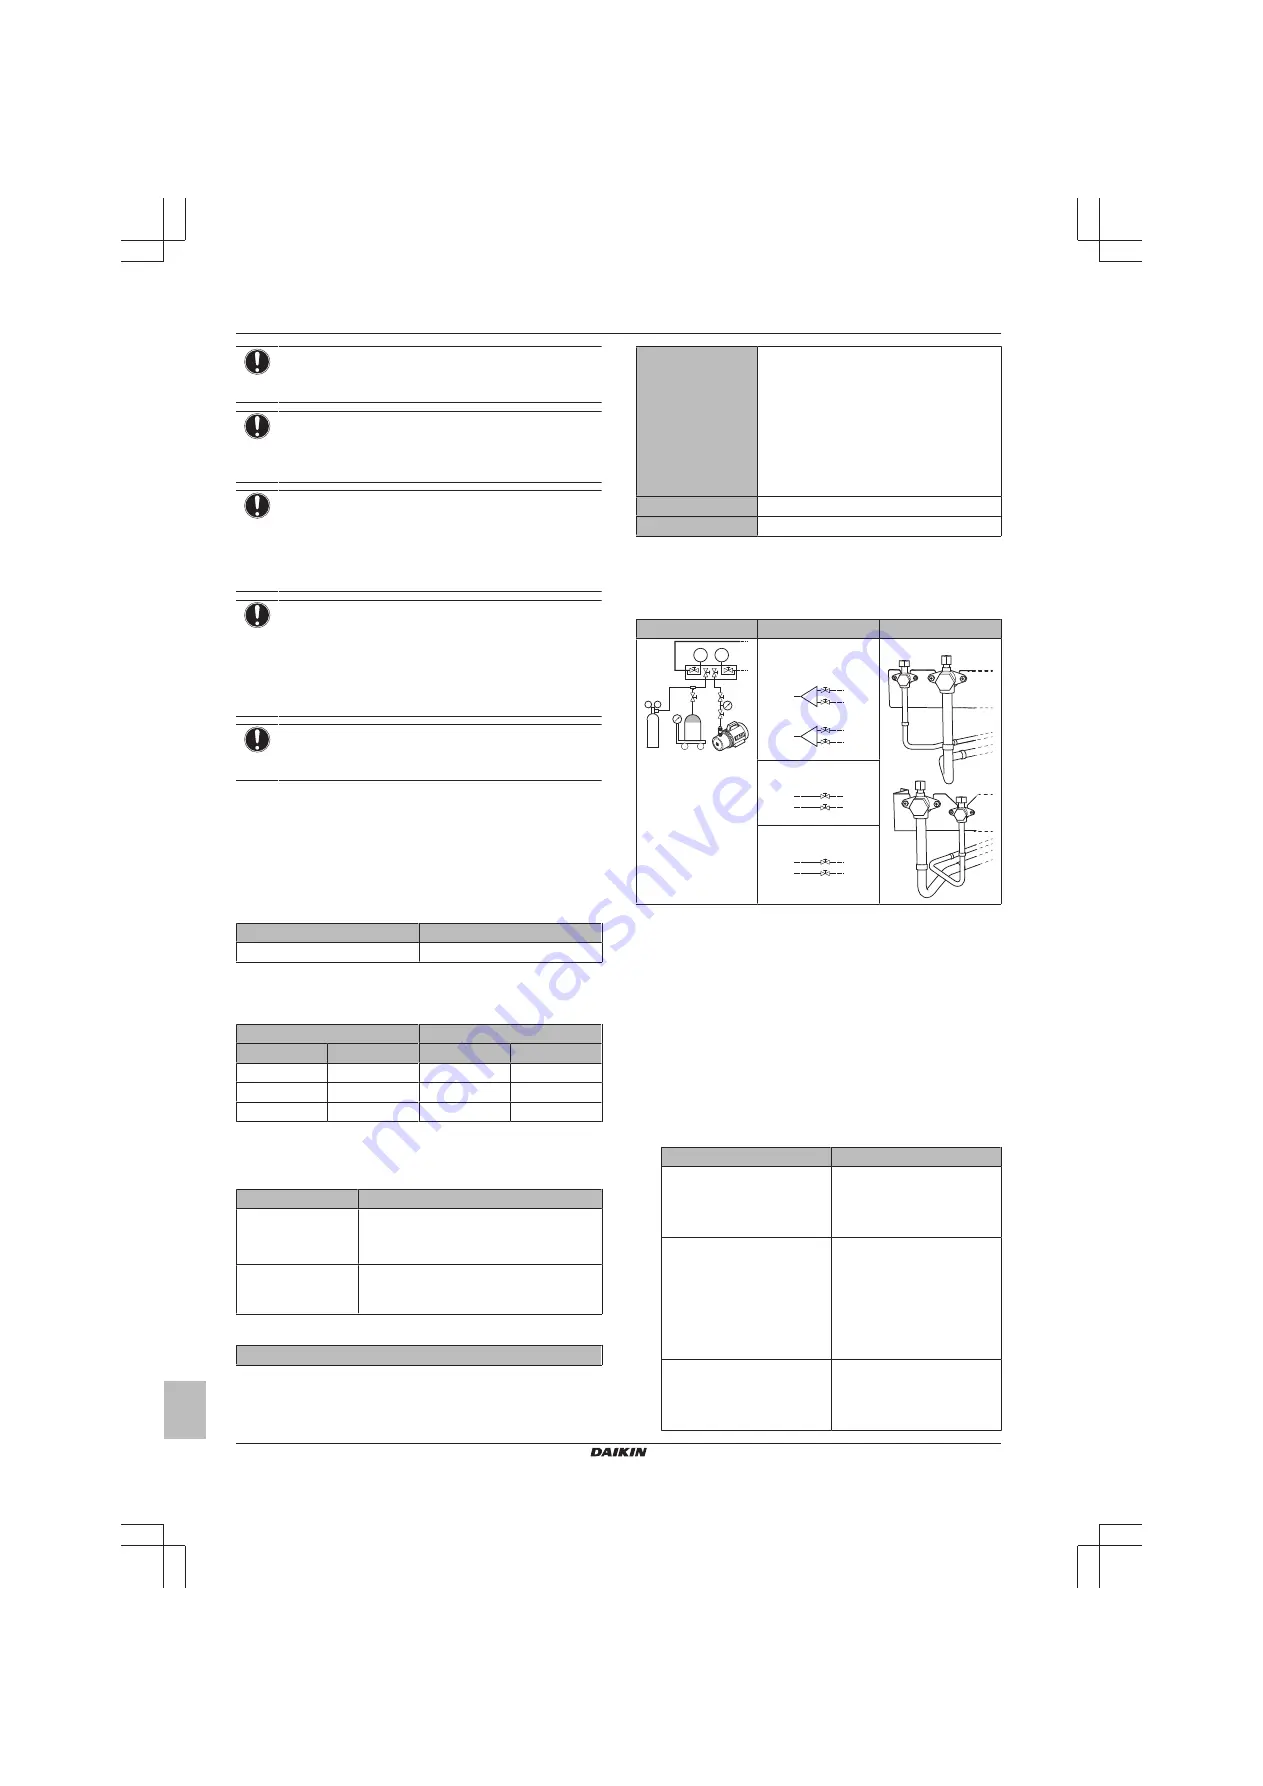
Connect  as  shown  (choose  one  of  the  possible  connections).
Make sure that all compressor unit stop valves, as well as valve
A are closed.

Possible connections:

Manifold

Connections

Compressor unit

p< p>

R410A

N2

b

c

e

a

d

B

A

Circuit 1 and 2

together

C

g

h

A

f

i

B

C

C

C

D

D

h

i

g

f

Only circuit 1

i

B

h

A

C

C

Only circuit 2

C

C

f

B

g

A

a

Pressure reducing valve

b

Nitrogen

c

Weighing scales

d

Refrigerant R410A tank (siphon system)

e

Vacuum pump

f

Liquid line stop valve (circuit 2: to indoor units)

g

Gas line stop valve (circuit 2: to indoor units)

h

Gas line stop valve (circuit 1: to heat exchanger unit)

i

Liquid line stop valve (circuit 1: to heat exchanger unit)

A, B, C

Valves A, B and C

D

Refrigerant line splitter

2

Open valves C (on line of B) and B.

3

Pre‑charge refrigerant until the determined additional refrigerant
amount is reached or pre‑charging is not possible anymore, and
then close valves C and B.

4

Do one of the following:

If

Then

The determined additional
refrigerant amount is 

reached

Disconnect the manifold from
the liquid line(s).

You do not have to perform the
"Stage 2" instructions.

Too much

 refrigerant is

charged

Recover refrigerant until the
determined additional
refrigerant is reached.

Disconnect the manifold from
the liquid line(s).

You do not have to perform the
"Stage 2" instructions.

The determined additional
refrigerant amount is 

not

reached

 yet

Disconnect the manifold from
the liquid line(s).

Continue with the "Stage 2"
instructions.

Содержание RKXYQ5T7Y1B

Страница 1: ...Installation and operation manual VRV IV compressor unit for indoor installation English Installation and operation manual VRV IV compressor unit for indoor installation RKXYQ5T7Y1B...

Страница 2: ...e dokumentidega kui neid kasutatakse vastavalt meie juhenditele atitinka emiau nurodytus standartus ir arba kitus norminius dokumentus su s lyga kad yra naudojami pagal m s nurodymus tad ja lietoti at...

Страница 3: ...components 15 6 1 4 To access mode 1 or 2 16 6 1 5 To use mode 1 and default situation 16 6 1 6 To use mode 2 17 6 1 7 Mode 1 and default situation Monitoring settings 17 6 1 8 Mode 2 Field settings...

Страница 4: ...unit Heat exchanger unit installation manual Installation instructions Format Paper in the accessory bag of the heat exchanger unit Installer and user reference guide Preparation of the installation...

Страница 5: ...stallation site 4 1 1 Installation site requirements of the compressor unit Service space Mind the following requirements 10 a 10 10 500 10 mm 3D098835 1 b a Top view b Front view NOTICE This is a cla...

Страница 6: ...HP Piping outer diameter size mm Gas pipe Liquid pipe Standard Size up 5 15 9 19 1 9 5 C Piping between refrigerant branch kits Use the following diameters Indoor unit capacity index Piping outer diam...

Страница 7: ...tted to the building use a vibration proof rubber field supply You can install the compressor unit directly on the floor or on a structure On the floor You do NOT have to fix the unit with anchor bolt...

Страница 8: ...mm 22 5 27 5 5 3 2 To remove the pinched pipes WARNING Any gas or oil remaining inside the stop valve may blow off the pinched piping Failure to observe the instructions in procedure below properly ma...

Страница 9: ...hole b Hit on the knockout hole and remove it c Remove the burrs d Paint the edges and areas around the edges using repair paint to prevent rusting NOTICE Precautions when making knockout holes Avoid...

Страница 10: ...ping for example water may have entered the piping first carry out the vacuum drying procedure below until all moisture has been removed All piping inside the unit has been factory tested for leaks On...

Страница 11: ...orrosive effect between the brass flare nut and the copper flare 5 4 5 To perform vacuum drying To remove all moisture from the system proceed as follows 1 Evacuate the system for at least 2 hours to...

Страница 12: ...ill take longer then Stage 2 Manual charging Only necessary if the determined additional refrigerant amount is not reached yet by pre charging Stage 1 Pre charging Summary Pre charging Refrigerant bot...

Страница 13: ...efrigerant on page 13 and solve the malfunction accordingly Resetting the malfunction can be done by pushing BS3 You can restart the Charging instructions Aborting the manual refrigerant charge is pos...

Страница 14: ...cal wiring on the compressor unit NOTICE Follow the wiring diagram delivered with the unit located on the switch box cover Make sure the electrical wiring does NOT obstruct proper reattachment of the...

Страница 15: ...C configurator You can also make field settings through a personal computer interface for this option EKPCCAB is required The installer can prepare the configuration off site on PC and afterwards uplo...

Страница 16: ...re operation in order to have power running to the crankcase heater and to protect the compressor Turn on the power supply of the compressor unit heat exchanger unit and all indoor units When the comm...

Страница 17: ...set in mode 2 There are two methods to activate low noise operation of the compressor unit and heat exchanger unit The first method is to enable an automatic low noise operation during night time by f...

Страница 18: ...settings In mode 2 you can make field settings to configure the system The LEDs give a binary representation of the setting value number Setting binary Value Description 2 8 Te target temperature dur...

Страница 19: ...ne the level of operation Depending on the chosen level the noise level will be lowered The start and stop moments for this function are defined under setting 2 26 and 2 27 default Deactivated Level 1...

Страница 20: ...t exchanger unit while performing a test operation is dangerous NOTICE Be sure to turn on the power 6 hours before operation in order to have power running to the crankcase heater and to protect the c...

Страница 21: ...erform a test run 7 3 1 About test run The procedure below describes the test operation of the complete system This operation checks and judges following items Check of wrong wiring communication chec...

Страница 22: ...splayed on the user interface of the indoor unit 8 1 1 Error codes Overview Main code Cause Solution Heat exchanger fan malfunction Drain pump feedback contact is open In the heat exchanger unit Check...

Страница 23: ...anger unit capacity setting malfunction Check the type of heat exchanger unit If necessary replace the heat exchanger unit Insufficient supply voltage Check if the supply voltage is supplied properly...

Страница 24: ...vice port refrigerant charge f Filter 5 g Subcool heat exchanger h Pressure regulating valve i Capillary tube j Accumulator k Compressor accumulator l Heat exchanger M1C Compressor M1F M2F Fan motor R...

Страница 25: ...g cooling applications NOTICE Do not use the air conditioner for other purposes In order to avoid any quality deterioration do not use the unit for cooling precision instruments food plants animals or...

Страница 26: ...om dropping or cold air from blowing Defrost operation In heating operation freezing of the heat exchanger unit s air cooled coil increases over time restricting the energy transfer to the heat exchan...

Страница 27: ...irection adjust button only for double flow multi flow corner ceiling suspended and wall mounted Refer to 12 4 Adjusting the air flow direction on page 27 for details To stop 5 Press the ON OFF button...

Страница 28: ...ter diluted neutral detergent squeeze it well and wipe the panel clean Wipe it with another dry cloth 13 1 After sales service and warranty 13 1 1 Warranty period This product includes a warranty card...

Страница 29: ...the warranty card 14 1 Error codes Overview In case a malfunction code appears on the indoor unit user interface display contact your installer and inform the malfunction code the unit type and serial...

Страница 30: ...s max till this process is finished 14 2 4 Symptom The fan strength does not correspond to the setting The fan speed does not change even if the fan speed adjustment button in pressed During heating o...

Страница 31: ...ptom The heat exchanger unit fan does not spin During operation The speed of the fan is controlled in order to optimise product operation 14 2 15 Symptom The display shows 88 This is the case immediat...

Страница 32: ...4P408443 1 0000000L 4P408443 1 2015 07 Copyright 2015 Daikin...

Отзывы: