www.DaikinApplied.com 49
IOM 1210-1 • MAGNITUDE
®
MODEL WMC CHILLERS
o
peraTIon
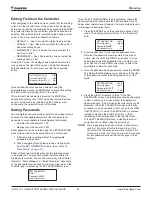
2nd Level Menu Selection
Data Screen
VIEW < COMPRESSOR
< UNIT
<
EVAPORATOR
< CONDENSER
→
VIEW EVAPORATOR
Suct SH = 000.0°F
Approach = 00.0°F
Other selections, such as VIEW → UNIT, will bring up a
third level of menu screens.
2nd Level Menu Selection
3rd Level Menu Screen
VIEW < COMPRESSOR
<
UNIT
< EVAPORATOR
< CONDENSER
→
VIEW < STATUS
UNIT < WATER
< REFRIGERANT
< TOWER
For instances such as this, make selections on the 3rd
level menu screen in order to reach the data screens. A
data screen will be apparent by the lack of the following
symbol: < .
4.
The first data screen that is reached will be at the top
row of the data menu structure. Once a data screen is
reached, the arrow keys will automatically exit out of the
“key-to-screen pathway” mode and will enter the “scroll”
mode. Select different data screens by using the arrow
keys on the controller. See
"Menu Structure (Scrolled)"
for more information on navigating using the “scroll”
mode.
Menu Structure (Scrolled)
As an alternate to selecting data screens with the menu
function, it is possible to scroll through the screens with the
four arrow keys. (Use the LEFT/RIGHT keys to move between
columns and the UP/DOWN keys to move between rows.)
For this use, the screens are arranged logically in a matrix as
shown in
Table 19 on page 50
. In the “scroll” mode, there will
be a blinking cursor located at the top left of the screen.
The controller holds memory during scroll navigation to make
it easier to compare two screens to one another. Take the
example of comparing the following two screens:
VIEW COMP (7)
Hours = 00000 x10
Starts = 00000 .
VIEW COMP#2 (7)
Hours = 00000 x10
Starts = 00000 .
Both of these screens are the seventh row in the “VIEW
COMPRESSOR” section of the Menu Matrix (see
Table 19 on
page 50
). The left screen is the data for Compressor 1 while
the right screen is the data for Compressor 2.
In order to toggle between these two screens:
1. Use the DOWN arrow key to scroll to the “VIEW COMP
(7)” screen.
VIEW COMP (7)
Hours = 00000 x10
Starts = 00000 .
2. Press the RIGHT arrow key. The controller will display
the “VIEW COMP #2 (1)” screen (the screen at the top
row of the next column).
VIEW COMP#2 (1)
State = Run
% RLA = 095%
Evap LWT = 054.0°F
3. Use the DOWN arrow key to scroll down to the “VIEW
COMP #2 (7)” screen.
VIEW COMP#2 (7)
Hours = 00000 x10
Starts = 00000 .
4. Press the LEFT arrow key. Due to the controller memory,
the controller will display the “VIEW COMP (7)” screen
rather than showing the “VIEW COMP (1)” screen (the
screen at the top of that column).
VIEW COMP (7)
Hours = 00000 x10
Starts = 00000 .
5. At this time, the LEFT and RIGHT arrow keys can be
used to toggle back and forth between the “VIEW COMP
(7)” screen and the “VIEW COMP#2 (7)” screen.
Содержание Magnitude WMC Series
Страница 4: ......
Страница 14: ...IOM 1210 1 MAGNITUDE MODEL WMC CHILLERS 12 www DaikinApplied com Installation Figure 12 Wiring Index...
Страница 15: ...www DaikinApplied com 13 IOM 1210 1 MAGNITUDE MODEL WMC CHILLERS Installation...
Страница 16: ...IOM 1210 1 MAGNITUDE MODEL WMC CHILLERS 14 www DaikinApplied com Installation Figure 13 Controller Box Wiring...
Страница 19: ...www DaikinApplied com 17 IOM 1210 1 MAGNITUDE MODEL WMC CHILLERS Installation...
Страница 67: ......


