background image

ESIE15-08B


Part 2. Troubleshooting

4. Component checklist - Water Circuit 

Page 86

 19/07/16

Daikin Altherma Monobloc CA

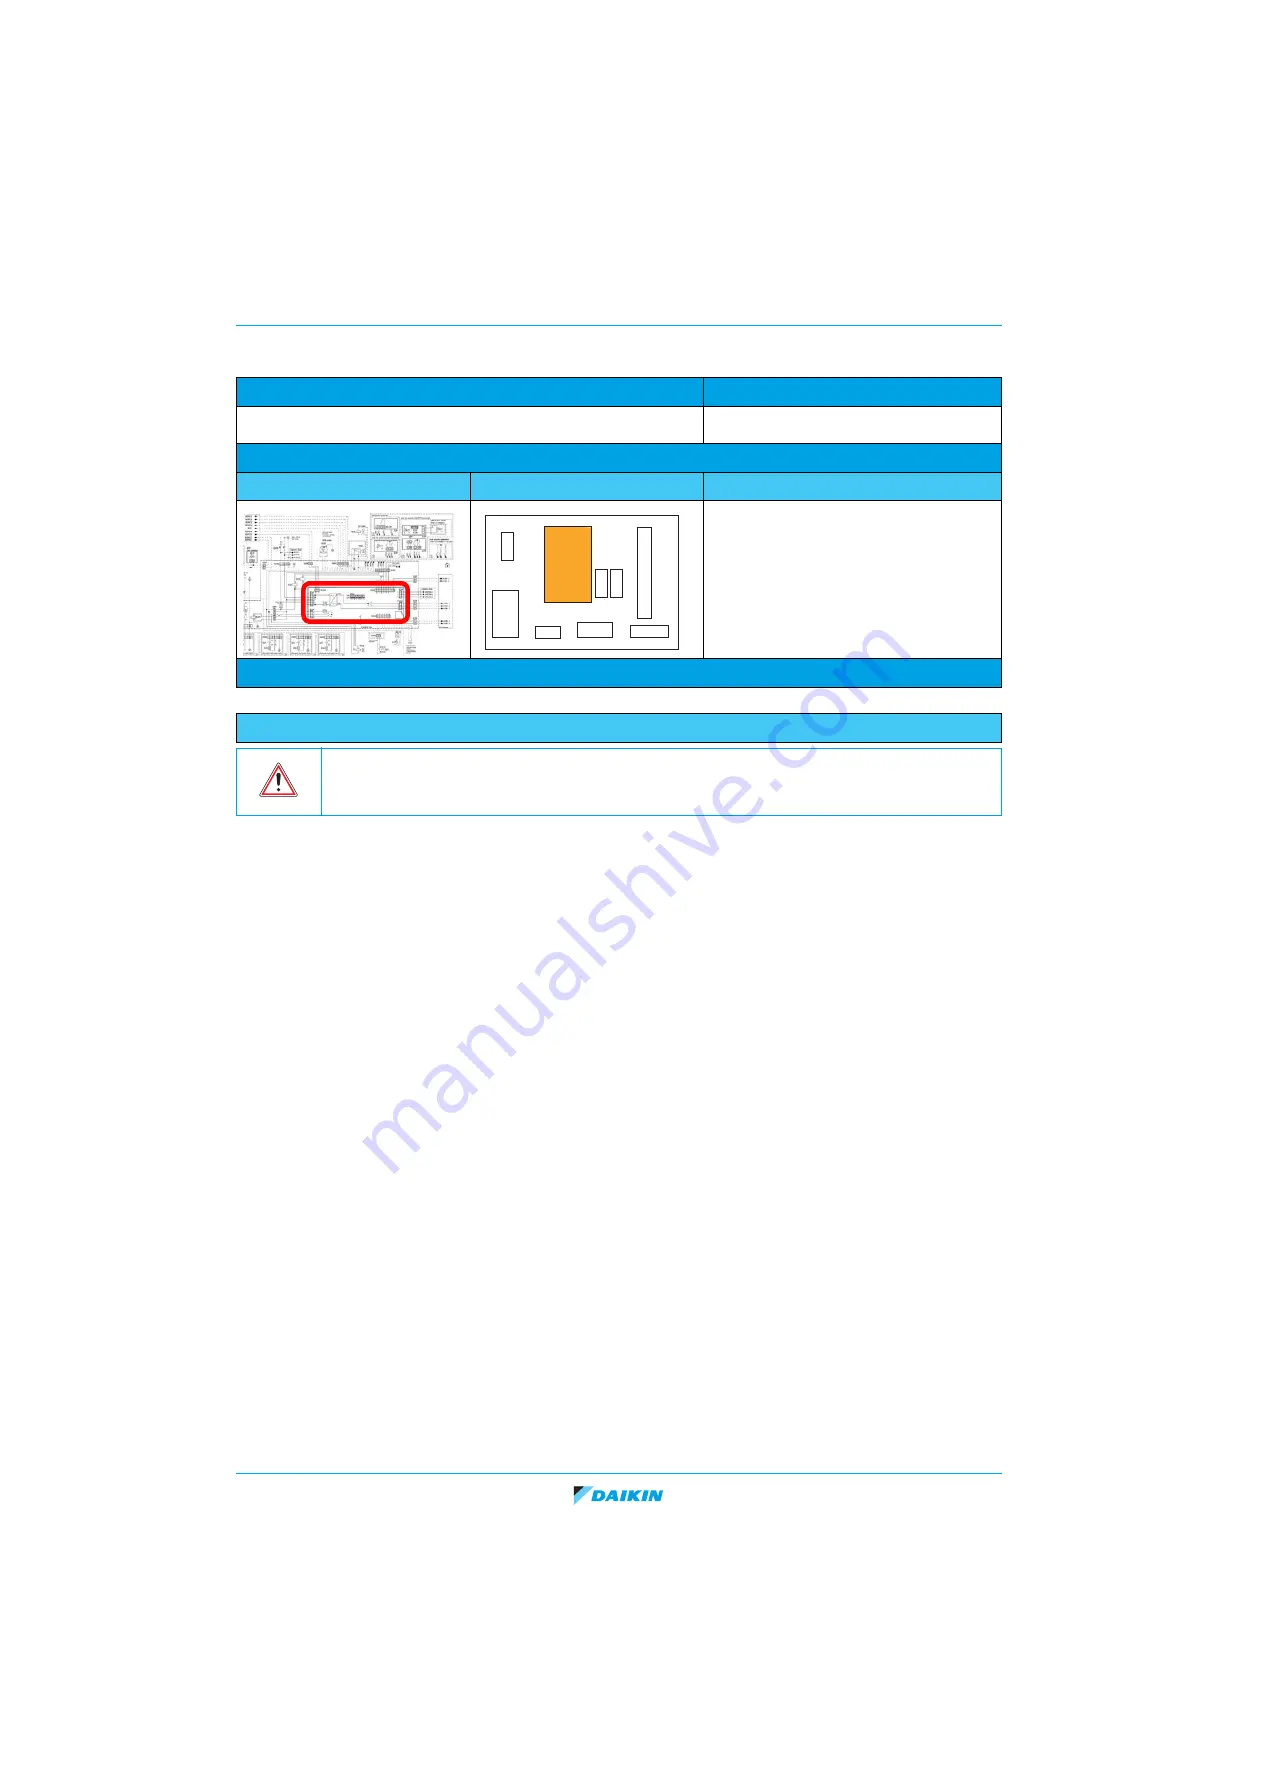
4.11.  Extension PCB A4P

1.

Switch off the Daikin Altherma Monobloc CA via the user interface.

2.

Switch off the Daikin Altherma Monobloc CA with the field supplied circuit breaker.

3.

Remove the hydrobox top plate assembly, refer to 

"Removing the hydrobox top plate assembly" on page 110

4.

Remove the hydrobox front plate, refer to 

"Removing the hydrobox front plate" on page 111

.

5.

Remove the switch box cover.

6.

LED:

If LED 5 is blinking = communication error between PCB A4P and PCB A1P:

Check connectors on PCB.

Check connection between PCB A4P (X10A) and A6P (X10A)

Check connection between PCB A2P (X1A) and A1P (X10A)

Check power supply to PCB A1P.

If all above checks are OK, replace PCB A4P. 

If LED 2 is not blinking: 

- Replace 

PCB 

A4P.

Technical specification

Description

-

The extension PCB A4P is used to control the unit 
from the control box.

Location

Wiring diagram

Switch box - Control Box

Unit

Check procedure

Electrical check

W

ARNING

: R

ISK


OF

 F

IRE

• 

When reconnecting a connector to the PCB, do not apply force or damage the connector or the connector pins on 
the PCB.

X1M

X8M

X2M

K2A

K3M

K1A

A4P

F2B

X4M

Not applicable

Содержание EK2CB07CAV3

Страница 1: ...Daikin Altherma Monobloc CA ESIE15 08B Service Manual EBLQO5 O7CAV3 EDLQO5 O7CAV3 EKCB07CAV3 EK2CB07CAV3 EKMBUHCA3V3 EKMBUHCA9WA ...

Страница 2: ...dge No express or implied warranty is given for the completeness accuracy reliability or fitness for particular purpose of its content and the products and services presented therein Specifications are subject to change without prior notice Daikin Europe N V explicitly rejects any liability for any direct or indirect damage in the broadest sense arising from or related to the use and or interpreta...

Страница 3: ...on operation error 21 2 4 AJ 03 Domestic hot water heat duration is too long warning 21 2 5 A1 00 Zero cross detection problem 22 2 6 A1 01 Hydro PCB A1P abnormality 22 2 7 A5 00 Freeze up prevention refrigerant 22 2 8 CJ 02 User interface room temperature error 23 2 9 C0 00 Flow sensor error 23 2 10 C0 01 Flow switch warning 23 2 11 C0 02 Flow switch error 24 2 12 C4 00 Refrigerant liquid thermis...

Страница 4: ...smission 42 2 53 U5 00 Transmission error between user interface and hydro PCB A1P 43 2 54 U7 00 Transmission malfunction between outdoor unit main PCB and inverter PCB 43 2 55 7H 01 Water flow abnormality 43 2 56 7H 04 Water flow abnormality during DHW operation 44 2 57 7H 05 Water flow abnormality during space heating operation 45 2 58 7H 06 Water flow abnormality during defrost cooling operatio...

Страница 5: ...sion valve Y1E 97 5 8 4 way valve Y1R 99 5 9 Inverter PCB2 101 5 10 Fan motor 103 Part 3 Repair 105 1 General Repair procedures 105 1 1 Refrigerant handling procedures 105 1 1 1 Refrigerant recovery 106 1 1 2 Refrigerant pump down 107 1 2 Pipe work procedures 108 1 3 Products 109 1 3 1 Required products when servicing the Daikin Altherma Monobloc CA 109 1 4 Tools 109 1 4 1 Required special tooling...

Страница 6: ...5 2 2 Checking the pressure relief valve hose 135 2 3 Checking the pressure relief valve of Space Heating circuit 136 2 4 Checking the relief valve of the Domestic Hot Water tank field supply 136 2 5 Checking the filters of Space Heating circuit 136 2 6 Draining the Domestic Hot Water tank 137 2 7 Anode 137 2 8 Descaling and chemical disinfection 137 2 9 Checking the Switch box 138 2 10 Domestic h...

Страница 7: ... PCB assembly main 2 121 Removing the PCB assembly inverter 2 123 Thermistor location 124 Removing the compressor 126 Removing the 4 way valve coil 127 Removing the 4 way valve 128 Removing the high pressure switch S1PH 129 Removing the pressure sensor S1NPH 131 Removing the expansion valve Y1E motor 132 Locking the expansion valve Y1E motor 132 Removing the water pump M1P 133 Field settings table...

Страница 8: ...ESIE15 08B Page 8 19 07 16 Daikin Altherma Monobloc CA ...

Страница 9: ...d at an accessible place at the product Instructions for shutting down the system in case of an emergency Name and address of fire department police and hospital Name address and day and night telephone numbers for obtaining service In Europe EN378 provides the necessary guidance for this logbook 2 1 Meaning of symbols Version code Description Date Version A Document release 22 09 2015 ESIE15 08B ...

Страница 10: ...from possible damage cause by service works WARNING Wear adequate personal protective equipment protective gloves safety glasses when installing maintaining or servicing the system WARNING Tear apart and throw away plastic packaging bags so that nobody especially children can play with them Possible risk suffocation WARNING Do NOT touch the air inlet or aluminium fins of the unit WARNING Do NOT pl...

Страница 11: ...C before you can touch electrical components For the location of the terminals refer to Wiring diagram on page 144 Do NOT touch electrical components with wet hands Do NOT leave the unit unattended when the service cover is removed Protect electric components from getting wet while the service cover is opened WARNING Only use copper wires All field wiring must be performed in accordance with the w...

Страница 12: ...C Check the system for leaks after each repair modification of the water side Check drainage system s after repairs Be careful when tilting units as water may leak INFORMATION Make sure refrigerant piping installation complies with applicable legislation In Europe EN378 is the applicable stand ard INFORMATION Make sure the field piping and connections are not subjected to stress ...

Страница 13: ... Figure 1 General operation of the Daikin Altherma low temperature heat pump In the refrigerant circuit there is a compressor which will increase the pressure and thus increase the temperature of the refrigerant before it s being exchanged with water in the plate heat exchanger A water pump ensures flow in the water circuit Operation range can be found back in the engineering data book The request...

Страница 14: ...he domestic hot water function is activated the 3 way valve will switch over to the domestic hot water tank and space heating side is closed Domestic hot water and space heating cannot be active simultaneously The 3 way valve will switch back to space heating when domestic hot water setpoint is reached or when running timers are finished refer to the Installer Reference Guide for more details When...

Страница 15: ...hen Adobe Acrobat Reader is used the Alt Back Arrow keys can be used to return to the previously viewed page NO YES NO YES N N N N N NO O O O O O Y Y Y Y Y YE E E E E ES S S S S S Is this your 1st encounter with this particular unit I I Is Is Is Is Is t t t t t th h h his with th What do you need to do W Wh Wh Wh Wh Wha at d Is an Error Code displayed I I Is Is Is Is Is a a a an n n Er displ Is re...

Страница 16: ...epair The possible causes have been sorted to probability of occurrence and speed of execution 4 2 3 The repair chapter The chapter Repair on page 105 handles the removal and replacement of the major components in the product and discusses cleaning methods as well if applicable such as for filters Where applicable refrigerant handling precautions are mentioned for certain actions please consider t...

Страница 17: ...problem All errors are listed in the Error History 6 3 1 which is only visible when in installer level 2 Warning not a severe problem but might lead to an error in case it occurs a number of times within a certain time frame The system will not stop but the i symbol information will be blinking All warnings are listed in the Warning History 6 3 3 which is only visible when in installer level 3 Cau...

Страница 18: ...interface can remember up to 20 error codes They are split up in an error history list which only lists errors and a warning history list which lists warnings and some cautions Both lists are always visible when in installer level End user will only see error history in case the error occurs so he can inform the installer first level of end user cannot see the history They can be found on the foll...

Страница 19: ...on box 40 UA 60 PCB combination malfunction 40 U0 Refrigerant shortage 41 U7 00 Transmission malfunction between outdoor unit main PCB and inverter PCB 43 UF 00 Communication error between hydro PCB A1P and out door main PCB or gas shortage 41 U3 00 Abnormal stop of underfloor heating dry out scheduled operation 42 U4 00 Defective indoor outdoor transmission 42 U5 00 Transmission error between use...

Страница 20: ...e tank clixon Incorrect parameter of solar pump station Check maximum tank temperature of solar pump station Set maximum tank temperature to a reason able value Air in water circuit Booster heater Check if all air purge valves are open Check if air purge valves are installed on all highest points of the field installed water cir cuit Purge the unit and field supplied water sys tem and backup heate...

Страница 21: ...ion PCB A4P Check PCB A4P see page 86 Check if the correct spare part is installed Replace extension PCB A4P when required Booster heater not allowed Check all electrical heater related settings e g 4 00 Change settings when required Trigger Effect Reset DHW heat up 6 hours Unit switches to space heating for 3 hours Automatic reset via user interface Possible cause Check Corrective action Faulty b...

Страница 22: ...ing Via power reset via user interface Possible cause Check Corrective action Faulty hydro PCB A1P Check if the alive led is blinking in regular intervals Check if the correct spare part is installed Check if hydro PCB A1P receives power Adjust the power to the PCB Replace hydro PCB A1P when alive led is not blinking in regular intervals Adjust software of hydro PCB A1P or install correct spare pa...

Страница 23: ...ce user interface or replace hydro PCB A1P when required Trigger Effect Reset Flow sensor still detects a water flow after 45 seconds when pump has stopped Unit will stop operating Manual reset via user interface Possible cause Check Corrective action Water flow caused by external pump Check if another external pump is installed on the same water circuit Correct hydraulic field circuit Refer to th...

Страница 24: ...Replace the wire harness when required Trigger Effect Reset Thermistor detects an abnormal value open or short circuit Unit will stop operating Auto reset when problem is solved Possible cause Check Corrective action Faulty refrigerant liquid thermistor R3T Check refrigerant liquid thermistor R3T see page 70 Replace refrigerant liquid thermistor R3T when required see page 124 Faulty hydro PCB A1P ...

Страница 25: ...alled Check if hydro PCB A1P receives power Adjust the power to the PCB Replace hydro PCB A1P when alive led is not blinking in regular intervals Adjust software of hydro PCB A1P or install correct spare part when required Trigger Effect Reset Water tank thermistor detects temperature above 89 C Unit will continue operating Auto reset when trouble is solved Possible cause Check Corrective action I...

Страница 26: ...h virgin refriger ant Non condensables in refrigerant Check for non condensables in refriger ant In case of suspicion of non condensables recover vacuum and recharge with virgin refrigerant Refrigerant circuit is clogged Check for possible blockage blockages can be checked by measuring the refriger ant pipe temperature Sudden drop in temperature could indicate a blockage remark this is not valid f...

Страница 27: ...cuit is clogged HP LP 0 26 MPa Check for possible blockage blockages can be checked by measuring the refriger ant pipe temperature Sudden drop in temperature could indicate a blockage remark this is not valid for the expansion valve Replace the blocked part Faulty compressor Check compressor see page 91 Check compressor connection and wiring Check expansion valve operation liquid back issue Check ...

Страница 28: ...e Check Corrective action Faulty fan motor Check fan motor see page 103 Check fan motor connection and wiring Replace fan motor when required Adjust wiring when required Faulty outdoor inverter PCB Check outdoor inverter PCB see page 101 Check if the alive led is blinking in regular intervals Check if the correct spare part is installed Adjust the power to the outdoor inverter PCB Replace outdoor ...

Страница 29: ...lty thermistor on outdoor Check thermistors on outdoor see page 70 Replace thermistors when required see page 124 Faulty pressure sensor outdoor main PCB Check pressure sensor see page 94 Replace the pressure sensor see page 130 or outdoor main PCB see page 119 when required Wet operation Check for wet operation Wet operation can be detected by checking the suction superheat If the suction superhe...

Страница 30: ...tion space is not large enough Check if the installation space is conform with regulations Refer to Installer Refer ence Guide Adjust installation space when required Faulty fan motor Check fan motor see page 103 Check fan motor connection and wiring Replace fan motor when required see page 116 Adjust wiring when required Faulty expansion valve Check expansion valve see page 97 Replace expansion v...

Страница 31: ...t Faulty power supply conditions are detected before or right after compressor start up Supplied voltage is too high or too low Compressor current doesn t run when te compressor is started Unit will stop operating Manual reset via user interface Possible cause Check Corrective action Faulty compressor Check compressor see page 91 Check compressor connection and wiring Check expansion valve operati...

Страница 32: ...ssure switch see page 96 Replace the high pressure switch see page 129 Stop valve is closed Check if stop valve is open Open stop valve when required Faulty outdoor main PCB Check if the alive led is blinking in regular intervals Check if the correct spare part is installed Check if the outdoor main PCB receives power Adjust the power to the outdoor main PCB Replace outdoor main PCB when alive led...

Страница 33: ...eck expansion valve operation liquid back issue Check refrigerant charge see page 106 check for leaks Replace the compressor when required see page 125 Investigate the reason of breakdown Replace expansion valve when required see page 131 Fix the possible leak Faulty or disturbance of the power supply Imbalance 10 Power drop Short circuit Check if the power supply is conform with regulations No fl...

Страница 34: ...ops operating Auto reset when problem is solved Possible cause Check Corrective action Faulty discharge thermistor Check discharge thermistor see page 88 Replace discharge thermistor when required see page 124 Faulty outdoor main PCB Check if the alive led is blinking in regular intervals Check if the correct spare part is installed Check if the outdoor main PCB receives power Adjust the power to ...

Страница 35: ...ective action Faulty intermediate heat exchanger ther mistor R6T Check thermistor R6T see page 88 Replace thermistor R6T when required see page 124 Faulty outdoor main PCB Check if the alive led is blinking in regular intervals Check if the correct spare part is installed Check if the outdoor main PCB receives power Adjust the power to the outdoor main PCB Replace outdoor main PCB when alive led i...

Страница 36: ...rvals Check if the correct spare part is installed Check if the outdoor main PCB receives power Adjust the power to the outdoor main PCB Replace outdoor main PCB when alive led is not blinking in regular intervals see page 119 External factor e g electrical noise cause when error is reset after power reset and error happens again after awhile Check for source which could cause elec trical interfer...

Страница 37: ...ir the leak and charge the correct amount of refrigerant Trigger Effect Reset Outdoor inverter PCB detects overcurrent to power transistor Unit will stop operating Manual reset via user interface Possible cause Check Corrective action Refrigerant circuit is clogged Check for possible blockage blockages can be checked by measuring the refriger ant pipe temperature Sudden drop in temperature could i...

Страница 38: ...pansion valve when required see page 131 Fix the possible leak Faulty outdoor inverter PCB Check outdoor inverter PCB see page 101 Check if the alive led is blinking in regular intervals Check if the correct spare part is installed Adjust the power to the outdoor inverter PCB Replace outdoor inverter PCB when required see page 122 Trigger Effect Reset Outdoor main PCB detects a defective capacity ...

Страница 39: ...iring connect ing the outdoor and indoor unit Refer to the Installer Reference Guide Trigger Effect Reset Communication between hydro PCB A1P and control box has failed Unit will stop operating Manual reset via user interface Possible cause Check Corrective action Wiring between Hydro PCB A1P and con trol box is too long Check if wiring is conform with require ments Refer to Installer Reference Gu...

Страница 40: ...he correct spare part is installed Replace extension PCB A4P when required Faulty wiring between control box and option box Check in control box X5A X1M Terminals for wiring Check in option box X5A X1M Terminals for wiring Correct wiring when required Trigger Effect Reset Communication between hydro PCB A1P and extension PCB A4P has failed Unit will stop operating Manual reset via user interface P...

Страница 41: ...Replace the blocked part Trigger Effect Reset 1 Outdoor main PCB detects maximum opening expansion valve and discharge superheat 50 C for 5 minutes 2 4 times a secondary current drop for 5 minutes unit goes thermo off after every drop Unit will stop operating Manual reset via user interface Possible cause Check Corrective action Refrigerant shortage incorrect charge leakage Check for refrigerant s...

Страница 42: ...door main PCB for a certain time Unit will stop operation Auto reset Possible cause Check Corrective action Power supply is not OK imbalance 10 Check power supply for voltage fluctua tions 10 Voltage fluctuations should be less than 10 Wiring between outdoor main PCB and hydro PCB A1P is not OK Check the wiring refer to the wiring dia gram Correct the wiring Faulty outdoor main PCB Check if the al...

Страница 43: ...nd error happens again after awhile Check for source which could cause elec trical interference Trigger Effect Reset Malfunction of connection between outdoor unit main and inverter PCB Unit will stop operating Auto reset when data is successfully received Possible cause Check Corrective action Wiring between outdoor main PCB and outdoor inverter PCB is not correct Check wiring between outdoor mai...

Страница 44: ... water quality and possible source of dirt Faulty 3 way valve integrated EKSWW U EKHWS U EKHWE Check 3 way valve see page 84 Replace 3 way valve when required Faulty shut off valve or tank thermostat Q2L EKSWWU EKHWSU Check shut off valve and Q2L see page 69 Replace 3 way valve when required Faulty flow sensor Check flow sensor see page 81 Replace flow sensor or replace hydro PCB A1P when required...

Страница 45: ...nual reset via user interface Possible cause Check Corrective action See possible cause for 7H 01 Focus error handling on cooling circuit Trigger Effect Reset Outlet backup heater thermistor detects temperature above 75 C during domestic hot water operation Unit will stop operating Manual reset via user interface Possible cause Check Corrective action Increased water temp by external heat source C...

Страница 46: ...ar intervals Adjust software of hydro PCB A1P or install correct spare part when required Trigger Effect Reset Entering water thermistor R4T detects an abnormal value open or short circuit Unit will stop operating Auto reset Possible cause Check Corrective action Faulty entering water thermistor R4T Check entering water thermistor R4T see page 70 Replace entering water thermistor R4T when required...

Страница 47: ...o PCB A1P or install correct spare part when required Refrigerant shortage Check for refrigerant shortage see page 106 Perform leak test If charge is lower than indicated on name plate check for leaks and recharge unit with correct amount of refrigerant Water pressure is too low Check the water pressure on the pressure gauge Increase water pressure till 2 bar Refer to the Installer Reference Guide...

Страница 48: ...rupted but unit will continue operation Auto reset when problem is solved Warning might result to 89 01 error if it occurs 3 times R2T measures 6 C during defrost Units stops after guard timer of compres sor PHE outlet temperature increases auto matic restart Possible cause Check Corrective action Faulty outlet backup heater thermistor Check outlet backup heater thermistor Replace outlet backup he...

Страница 49: ...ering is wrong 63 Water volume flow related 64 Possible failures Root cause Check Corrective action Root cause category software control Compressor M1C frequency limited high discharge tem perature protection function active In case the discharge temper ature is higher than 105 C the compressor frequency will be reduced When the discharge temperature is lower than 105 C the frequency can increase ...

Страница 50: ...ly exe cuted Daylight Saving Time not set correctly Check Daylight Saving Time settings Set Daylight Saving Time according to operation man ual Schedules not activated Schedules were not con firmed refer to schedule set tings Check schedules on the user interface Set schedule according to user reference guide Holiday setting active Holiday setting is activated in the user interface Check holiday s...

Страница 51: ...king Component failure Check backup heater see page 65 Replace backup heater Deviation of backup heater outlet thermistor will influence the backup heater control Deviation of thermistor higher temperature measured than actual Bad contact between sensor and pipe Check backup heater outlet thermistor see page 70 Replace backup heater outlet thermistor or PCB A1P Flow sensor deviation flow measured ...

Страница 52: ... not switch correctly between space heat ing connection and domestic hot water connection 3 way valve incorrectly mounted Check the 3 way valve see page 84 Correct the position of the 3 way valve Root cause category component electrical 3 way valve blocked Component failure Check the 3 way valve see page 84 Replace the 3 way valve Root cause category system design Water circuit requested capacity ...

Страница 53: ...ontrol is acti vated Domestic hot water not acti vated Check if domestic hot water heating is activated Root cause category parameter setting Setting domestic hot water operation mode 6 0D not set optimally Setting domestic hot water operation mode 6 0D is set to 2 scheduled only Check setting 6 0D In case schedule only is used assure that the programmed schedule is inline with the tim ings hot wa...

Страница 54: ...domestic hot water will go thermo off when reheat setpoint setting 6 0C is reached Domestic hot water will go thermo on when reheat setpoint setting 6 0C 10 C is reached In case reheat setpoint is higher than 55 C domestic hot water will go thermo off when reheat setpoint setting 6 0C setting 7 00 is reached Domestic hot water will go thermo on when reheat setpoint setting 6 0C setting 7 01 is rea...

Страница 55: ...component electrical Hydro PCB A1P not opera tional No power supply Faulty transformer TR1 PCB malfunction Confirm if a small green led is blinking in regular intervals Confirm power supply towards PCB A1P Check good operation of transformer TR1 Re establish power to PCB Replace Hydro PCB A1P in case power supply and transformer TR1 are OK but led is not blinking Reactor coil L1R L2R L3R broken Co...

Страница 56: ... temperature sensor Compare temperature meas ured by user interface with actual room temperature In case of deviation the room temperature offset can be adjusted through setting 2 0A Possible failures Root cause Check Corrective action Root cause category installation Drain connection of water safety valve leaking Bad connection between unit drain pipe and field drain pipe Check the drain connecti...

Страница 57: ... Request 2 Refer to installer reference guide for applicable value Setting disinfection operation day 2 00 was set to 0 each day Setting disinfection operation day 2 00 was set to 0 each day Check setting 2 00 Adjust setting if necessary Unit is running in emergency operation and is using backup heater only 4 06 is set to 1 Unit is running in emergency operation and is using backup heater only 4 0...

Страница 58: ...circuit for block ages Remove possible blockages and check the water quality Root cause category component mechanical Water pump mechanical prob lem Internal pump friction Check water pump see page 73 Replace water pump Air Purge blocked air trapped in water system Component failure Check air purge valve Replace air purge valve Possible failures Root cause Check Corrective action Root cause catego...

Страница 59: ...re reducing valve Possible failures Root cause Check Corrective action Root cause category installation Extreme formation of anode residue Water quality and composition of the water chlorides con ductivity can lead to acceler ated reduction of the anode in the tank and aluminium hydroxides will be formed on the bottom of the tank Remark a not well controlled water softener can cause an increased a...

Страница 60: ...the discharge temperature is lower than 105 C the frequency can increase again Activation of the protection function can be caused by var ious reasons therefore we recommend to check the fol lowing Check refrigerant charge Check expansion valve for correct operation see page 97 and check suction thermistor see page 88 Check discharge thermistor see page 88 Based on the diagnosis exe cute one of th...

Страница 61: ...k water flow rate registered by flow sensor Check water side plate type heat exchanger for blockage see page 77 If required replace the water plate type heat exchanger Check the water quality Root cause category component mechanical Limited heat exchange between refrigerant loop and heat sink inverter could result in high inverter temperatures and limited compressor fre quency Bad contact between ...

Страница 62: ...irm setting F 0 Adapt setting F 0 if required factory setting F 0 1 Possible failures Root cause Check Corrective action Root cause category component electrical Hydro PCB A1P not opera tional No power supply Faulty transformer PCB malfunction Confirm if a small green led is blinking in regular intervals Confirm power supply towards hydro PCB A1P Check good operation of transformer Re establish po...

Страница 63: ...defrost due to too strong wind snow Outdoor unit installation must be protected from weather wind snow Refer to Installer Reference Guide for correct installation Possible failures Root cause Check Corrective action Root cause category Software kWh values measured with field supplied meters show different values as the user interface Backup heater wiring is not cor rect Check backup heater wiring ...

Страница 64: ...rm an air purge refer to Installer Reference Guide Water pressure is 1bar Check the water pressure on the manometer Add water when required until water pressure is 2 bar Expansion vessel is broken Check the expansion vessel Replace expansion vessel when required The resistance in the water cir cuit is too high for the pump Check ESP curves Adjust water circuit when required Flow sensor is broken C...

Страница 65: ...pply Pump 73 Water pump M2P DHW pump 75 Plate type heat exchanger 77 Thermal protector backup heater Q1L 79 Water flow sensor B1L 81 3 way valve M3S 84 Extension PCB A4P 86 Technical specification Description The 2 stage backup heater is composed of heater E1H 3 x 1 kW and E2H 3 x 2 kW or E3H 1 x 3 kW The backup heater is used to assist the heat pump system to heat the water for space heating and ...

Страница 66: ...heater step 1 2 in Menu 6 5 Actuators status must be 6 5 3 BUH step 1 ON 6 5 4 BUH step 2 ON 5 Measure the voltage Check if field installed circuit breaker Q1D1 tripped Check if the overcurrent fuse F1B or F2B of the backup heater tripped Check the thermal protector Q1L of the backup heater Check contactors K1M K2M K5M if used Example Measure the voltages between connectors K1M 2 4 4 6 6 2 before ...

Страница 67: ...ed 4 Set the Megger voltage to 500 VAC 5 Connect the Megger ground test lead directly to the backup heater ground wire see red arrow below 3 kW 6 kW 6 kW 9 kW 1 230 V 1 230 V 3N 400 V 3N 400 V K1M 1 K5M 13 52 9 Ω 52 9 Ω K1M 3 105 8 Ω 105 8 Ω K1M 5 105 8 Ω 105 8 Ω K1M 3 K1M 5 26 5 Ω 26 5 Ω 105 8 Ω 105 8 Ω K2M 1 K5M 13 26 5 Ω K2M 3 52 9 Ω 52 9 Ω K2M 5 52 9 Ω 52 9 Ω K2M 3 K2M 5 52 9 Ω 52 9 Ω 52 9 Ω 5...

Страница 68: ...ge 68 19 07 16 Daikin Altherma Monobloc CA 6 Measure the leak current between K1M 1 earth single phase or K1M 1 earth K1M 3 earth K1M 5 earth K2M 1 earth K2M3 earth K2M5 earth three phase 7 The measured insulation resistance must exceed 3 MΩ if not replace the backup heater ...

Страница 69: ...ic hot water 7 Measure the voltage on connector X4M pin 1 neutral and measure the voltage on X4M pin 3 neutral if no 230 VAC is present in both measurements clixon Q2L Q3L tripped reset Q2L Q3L Technical specification Description The booster heater is a single element heater The booster heater is used to assist the heat pump system to heat the domestic hot water Location Wiring diagram Control Box...

Страница 70: ...Description 2 different types of thermistors are used the resistance vs temperature charac teristic for each type is shown in Table 2 5 on page 90 The thermistors are used to measure the temper ature at multiple locations inside the Daikin Altherma Monobloc CA The measured tempera tures are processed by the A1P board Location Wiring diagram R1T R3T R4T Switch box Unit Wiring diagram R1T R5T Contro...

Страница 71: ... 9 If the measured resistance does not match the listed value the thermistor must be replaced refer to Replacing a thermistor on page 124 E g thermistor R4T A1P Measured temperature with contact thermometer 23 1 C Unplug the sensor and measure the resistance between X8A 1 2 21 86 kΩ The resistance values are defined by Table 2 2 on page 72 Resistance at 23 C 21 85 kΩ Resistance at 24 C 20 90 kΩ Th...

Страница 72: ...5 6 7 8 9 62 54 59 43 56 49 53 71 51 09 48 61 46 26 44 05 41 95 21 22 23 24 25 26 27 28 29 23 91 22 85 21 85 20 90 20 00 19 14 18 32 17 54 16 80 41 42 43 44 45 46 47 48 49 10 21 9 81 9 42 9 06 8 71 8 37 8 05 7 75 7 46 61 62 63 64 65 66 67 68 69 4 70 4 54 4 38 4 23 4 08 3 94 3 81 3 68 3 56 10 111 99 10 39 96 30 16 10 50 7 18 70 3 44 9 8 7 6 5 4 3 2 1 106 03 100 41 95 14 90 17 85 49 81 08 76 93 73 0...

Страница 73: ...Daikin Altherma Monobloc CA via the user interface 2 Switch off the Daikin Altherma Monobloc CA with the field supplied circuit breaker 3 Remove the hydrobox top plate assembly refer to Removing the hydrobox top plate assembly on page 110 4 Remove the hydrobox front plate refer to Removing the hydrobox front plate on page 111 5 Power the Daikin Altherma Monobloc CA 6 Activate Installer level on th...

Страница 74: ...cording to its setting Blinks green fast PWM model Pump in stand by Normal operation Blinks red green Pump in operation but stopped Pump will restart after fault is solved Undervoltage U 160 V or overvoltage U 230 V Check voltage supply 195 V U 253 V Module overheating motor temperature too high Check water and ambi ent temperature Too hot water of exter nal circuit entering the system Check exter...

Страница 75: ...water circuit check pump for leaks Replace the seal if the water pump leaks 1 Switch off the Daikin Altherma Monobloc CA via the user interface 2 Switch off the Daikin Altherma Monobloc CA with the field supplied circuit breaker 3 Remove the front panel of the control box 4 Power the Daikin Altherma Monobloc CA 5 Check fuse FU1 on A1P if blown find cause and replace Technical specification Descrip...

Страница 76: ... 07 16 Daikin Altherma Monobloc CA 6 Measure the voltage on terminal strip X8M pin 8 9 in the control box if no 230VAC 10 is measured replace PCB A1P 7 If 230VAC 10 is present on n terminal strip X8M pin 8 9 replace the water pump M2P Location M2P Control box X8M 9 X8M 8 230 VAC 10 ...

Страница 77: ...emperature difference of 5 to 10 C is acceptable if the temperature difference exceeds 10 C the heat exchanger s efficiency is too low and could indicate partial blockage Check 1 1 Check the water manometer raised water pressure indicates a refrigerant leak in the plate type heat exchanger Check 2 1 Visually check the plate type heat exchanger for water leakage 2 In case there is an indication of ...

Страница 78: ... 3 Refer to the nameplate for the correct charge If less than the indicated charge is recovered a pressure test must be performed 4 Pressurize the refrigerant circuit with Nitrogen at 40 bar 5 Check the pressure after 30 minutes 6 Decrease of nitrogen pressure and increase of water pressure indicates a leak of the plate type heat exchanger ...

Страница 79: ...2 Heat the water and measure the temperature of the water The thermal protector backup heater Q1L must trip at approximately 92 C Technical specification Description The thermal protector backup heater Q1L is triggered if the temperature exceeds 92 C The thermal protector backup heater Q1L will cut power supply to the backup heater to prevent the water circuit from overheating The thermal protecto...

Страница 80: ...ater Q1L 6 Measure the circuit breakers between Q1L terminals 11 12 Q1L terminals 21 22 and Q1L terminals 31 32 all circuit breakers must be closed 7 If one or more measurements fail replace the thermal protector backup heater Q1L Electrical check WARNING RISK OF FIRE When reconnecting a connector to the PCB do not apply force or damage the connector or the connector pins on the PCB 11 1 1 1 11 11...

Страница 81: ...r pump A 7 4 6 5 On the user interface select Flow Rate 6 1 8 6 The displayed flow rate must be between 5 and 40 l minute Technical specification Description The water flow sensor output signal versus flow is shown in the graph below The water flow sensor measures the flow in the water circuit Location Piping diagram Switch box Unit Check procedure Electrical check WARNING RISK OF FIRE When reconn...

Страница 82: ... replace the water flow sensor B1L if the measured voltage does not correspond with the displayed flow on the user interface replace PCB A1P 8 Measure the voltage on X4A pin 3 blue pin 4 brown flow sensor power supply If no 5 VDC is measured measure again directly on the PCB If 5 VDC is measured replace the flow sensor if no 5 VDC is measured replace PCB A1P X4A 0 0 0 55 10 5 20 30 40 50 flow l mi...

Страница 83: ...d flow rate must be between 12 and 40 l minute 7 Measure the voltage on X45A pin 1 3 If 230 VAC is measured but no flow is displayed replace the flow switch S1L If no 230 VAC is measured remove connector X45A and measure again on PCB if now 230 VAC is measured replace flow switch else replace hydro PCB A1P Technical specification Description Open close contact 230 VAC setpoint 12 0 l min The water...

Страница 84: ...ltherma Monobloc CA and activate domestic hot water 7 Measure the voltage between X26A pin 1 2 on PCB A1P if no 230 VAC is present check fuse FU1 on PCB A1P replace if blown Check the voltage between X19A pin 1 3 if no 230 VAC present check main power supply on X1M Check the voltage between X1A pin 1 3 if no 230 VAC present check main power supply on X1M If 230 VAC is present on X19A pin 1 3 and 1...

Страница 85: ...must have a much lower temperature 13 If one or both checks above are not OK remove the 3 way valve motor from the 3 way valve 14 Set the 3 way valve manually in the Domestic Hot Water position 15 Using a contact thermometer measure the temperature at the 3 way valve Domestic Hot Water exit and at the Space Heating exit the Domestic Hot Water exit must have the same temperature as the 3 way valve ...

Страница 86: ...box cover 6 LED If LED 5 is blinking communication error between PCB A4P and PCB A1P Check connectors on PCB Check connection between PCB A4P X10A and A6P X10A Check connection between PCB A2P X1A and A1P X10A Check power supply to PCB A1P If all above checks are OK replace PCB A4P If LED 2 is not blinking Replace PCB A4P Technical specification Description The extension PCB A4P is used to control...

Страница 87: ...ng 4 Component checklist Water Circuit 19 07 16 Page 87 Daikin Altherma Monobloc CA LED INFORMATION LED 1 blinks when Ethernet cable is connected to PCB A4P LED 4 is on when SD card is connected to PCB A4P LED 3 has no functionality ...

Страница 88: ...hecker Extranet Software downloads D checker Driver for D checker Extranet Software downloads Heating products USB driver Thermistors 88 Compressor M1C 91 Muffler 93 Pressure sensor S1NPH 94 High pressure switch S1PH 96 Electronic expansion valve Y1E 97 4 way valve Y1R 99 Inverter PCB2 101 Fan motor 103 Technical specification Description A single type of thermistor is used the resistance vs tempe...

Страница 89: ...ure the temperature of the thermistor using a contact thermometer 6 Unplug the connector from the appropriate PCB and measure the resistance between the pins listed in Table 2 5 on page 90 Compare the measured resistance with the range determined by the lower and higher temperature in Table 2 5 on page 90 7 If the measured resistance does not match the listed value the thermistor must be replaced ...

Страница 90: ...B1 S90 3 4 Heat exchanger R3T PCB1 S90 1 2 Air T C kΩ T C kΩ T C kΩ T C kΩ T C kΩ 20 197 81 0 65 84 20 25 01 40 10 63 60 4 87 19 18 17 16 15 14 13 12 11 186 53 175 97 166 07 156 80 148 10 139 94 132 28 125 09 118 34 1 2 3 4 5 6 7 8 9 62 54 59 43 56 49 53 71 51 09 48 61 46 26 44 05 41 95 21 22 23 24 25 26 27 28 29 23 91 22 85 21 85 20 90 20 00 19 14 18 32 17 54 16 80 41 42 43 44 45 46 47 48 49 10 2...

Страница 91: ...itch off the Daikin Altherma Monobloc CA via the user interface 2 Switch off the Daikin Altherma Monobloc CA with the field supplied circuit breaker 3 Remove the hydrobox top plate assembly refer to Removing the hydrobox top plate assembly on page 110 4 Remove the hydrobox front plate refer to Removing the hydrobox front plate on page 111 5 Remove the top plate refer to Removing the top plate on p...

Страница 92: ...s U V and W from the compressor 12 Measure the compressor motor windings U V V W and U W all measurements must read 1 7 Ω 13 Megger the compressor using 500 or 1000 V DC the insulation must be higher than 3 MΩ 14 Replace the compressor if the windings and or insulation measurements fail refer to Replacing the compressor on page 125 15 Run the compressor and measure the current in each phase the cu...

Страница 93: ...plate assembly refer to Removing the front plate assembly on page 113 5 Remove the compressor insulation 6 Power the outdoor unit and activate space heating or domestic hot water 7 After the compressor has been running for 5 minutes measure the temperature before and after the muffler 8 If a temperature difference above 3 C is measured over the muffler it indicates the muffler is obstructed and mu...

Страница 94: ...refer to Removing the top plate on page 112 6 Remove the front plate assembly refer to Removing the front plate assembly on page 113 7 Open the compressor insulation 8 Connect a pressure gauge to the high pressure service port and read the pressure 9 From the graph below determine the expected sensor output signal Technical specification Description The pressure sensor S1NPH is an analog pressure ...

Страница 95: ...d across connector S60 pin 4 3 if not replace PCB1 refer to Replacing the PCB1 main on page 119 In case all 3 checks above are OK but still no voltage is measured between X17 pin 1 3 replace the pressure sensor S1NPH refer to Replacing the pressure sensor S1NPH on page 130 INFORMATION The pressure sensor connector must be plugged into X60A on PCB1 5 1 0 5 0 0 5 1 1 5 2 2 5 3 3 5 4 0 5 1 10 2 15 3 ...

Страница 96: ...easure the switch contacts between S40 pin 1 and 2 the switch must be open 12 Replace the high pressure switch S1PH if the contact is not open refer to Replacing the high pressure switch S1PH on page 129 13 Lower the refrigerant circuit pressure to 30 bar 14 Measure the switch contacts between S40 pin 1 and 2 the switch must be closed 15 Replace the high pressure switch S1PH if the contact is not ...

Страница 97: ... valve Y1E clockwise closing and counterclockwise opening 9 If it is not possible to open the expansion valve Y1E with the magnet the expansion valve Y1E is blocked and the expansion valve Y1E body must be replaced 1 Switch off the Daikin Altherma Monobloc CA via the user interface 2 Switch off the Daikin Altherma Monobloc CA with the field supplied circuit breaker 3 Remove the top plate refer to ...

Страница 98: ...mbly refer to Removing the front plate assembly on page 113 5 Disconnect the connector S20 from PCB1 6 Measure the 4 electromagnet windings S20 red white red orange red yellow and red blue All windings must read 46 Ω 4Ω 7 If one or more winding measurements fail replace the expansion valve Y1E electromagnet 1 2 3 4 M Yellow Blue Orange Red COM White ...

Страница 99: ...emperature after the plate type heat exchanger drops proceed with step 10 If the temperature after the plate type heat exchanger rises the 4 way valve is stuck in heating position replace the 4 way valve refer to Replacing the 4 way valve on page 127 If the temperature after the plate type heat exchanger does not rise check the refrigerant pressure by connecting a manifold to one of the service po...

Страница 100: ...sured directly on the PCB does not range 220 240 VAC replace PCB1 refer to Replacing the PCB1 main on page 119 If the voltage measured directly on the PCB does range 220 240 VAC replace the 4 way valve coil refer to Replacing the 4 way valve coil on page 127 9 Unplug connector S80 from the inverter PCB2 and measure the resistance of the 4 way valve coil If the measured resistance does not range 10...

Страница 101: ...ssembly on page 113 7 Open the compressor insulation refer to Removing the compressor sound insulation on page 114 8 Remove the terminal cover 9 Measure the voltage on S70 pin 7 4 and wait until it drops below 10 VDC Technical specification Description The inverter PCB2 is a 400 V 3 phase inverter The inverter PCB2 drives the compressor motor and powers the DC fan motor Location Wiring diagram PCB...

Страница 102: ...rter test 14 Check that all LEDs on the Inverter Analyzer are lit if not replace the inverter board refer to Replacing the PCB2 inverter on page 122 15 Switch off the Daikin Altherma Monobloc CA with the field supplied circuit breaker 16 Wait a few minutes and confirm that the LED s on the inverter analyzer are off 17 Disconnect the inverter analyzer from the U V W wiring 18 Re connect the U V W l...

Страница 103: ... on page 115 8 Check the motor friction only perform electrical check if motor runs with low friction Replace fan motor if friction is abnormal refer to Replacing the DC fan motor assembly on page 116 General 1 Switch off the Daikin Altherma Monobloc CA via the user interface 2 Switch off the Daikin Altherma Monobloc CA with the field supplied circuit breaker 3 Remove the top plate refer to Removi...

Страница 104: ... on ON signal 2 Measure the voltage on S70 pin 4 7 If the measured voltage does not equal 300 VDC 30 VDC disconnect S70 and check the inverter PCB2 refer to Inverter PCB2 on page 101 If the inverter PCB2 check is OK replace the fan motor refer to Replacing the DC fan motor assembly on page 116 If the inverter PCB2 check is not OK replace the inverter PCB2 refer to Inverter PCB2 on page 101 3 Measu...

Страница 105: ...amount factory additional where required of refrigerant is charged after repair Make sure to use the appropriate equipment and tools according to the refrigerant and unit type Charge non azeotropic refrigerant e g R 410A always in a liquid state Make sure to use a digital scale no charging cylinder Execute correct vacuum drying procedure after repair work 0 1 MPa 760 mmHg 750 Torr for at least 1 h...

Страница 106: ... manifold Valve recovery unit Valve bottle Operate Purpose OS L V H BYP RC1 RC2 RC3 RB VP RU Connections C C C C C C C Rec C Vacuuming C O O O O O O Rec C End vacuuming C O C O C O O Rec O Recover liquid O C O O C 1 2 O Rec O Recover gas O C O O C O O Rec O Purge C C C C C O Pur O Disconnect C C C C C C C Rec C OS outdoor suction C closed O open BYP Bypass RC1 2 3 Recovery unit Connection 1 2 3 1 ...

Страница 107: ...emove the valve lid from liquid stop valve and gas stop valve 2 Carry out forced cooling operation by pressing SW3 on the service PCB 3 After 5 10 min after only 1 2 min in case of very low Ta 10 C close the liquid stop valve with a hexagonal wrench 4 Check on the manifold if vacuum is reached 5 After 2 3 minutes close gas stop valve and stop forced cooling operation by pressing forced cooling ope...

Страница 108: ...e pipe walls and cause cracking of the pipe Make sure the flare has the correct size use a flare gauge Make sure no particles remain in the piping Apply refrigerant oil on the inner surface of the flare Make sure the flare connection is tightened with the correct torque torque values refer to installation manual Brazing Use correct brazing tool Use a phosphor copper filler metal silver composition...

Страница 109: ...ight be necessary to apply some heat sink compound 2 Figure 3 Required products 1 4 Tools 1 4 1 Required special tooling when servicing the Daikin Altherma Monobloc CA Daikin strongly recommends to use special tools to avoid damage to the equipment or to facilitate the replacement of certain spare parts Figure 4 Required tools 1 Thread sealant Permabond A131 local supply 2 Heat sink compound Part ...

Страница 110: ...nd remove the 3 screws 1 that fixe the hydrobox top plate 2 to the hydrobox 4 Lift the hydrobox top plate assembly 2 and remove it from the hydrobox Figure 5 Removing the hydrobox top plate assembly CAUTION If the platework of the Daikin Altherma Monobloc CA is bent e g when replacing a thermistor chances are the platework no longer aligns correctly with the heat exchanger This will increase the r...

Страница 111: ...ff the Daikin Altherma Monobloc CA via the user interface 2 Switch off the Daikin Altherma Monobloc CA with the field supplied circuit breaker 3 Loosen and remove the 3 screws 1 that fix the hydrobox front plate 2 to the hydrobox 4 Remove the hydrobox front plate 2 from the hydrobox Figure 6 Removing the hydrobox front plate 1 Screw 2 Hydrobox front plate 2 1 1 2 1 1 ...

Страница 112: ...es the top plate 2 to the heat exchanger 4 Loosen and remove the 2 screws 3 that fix the top plate 2 and the hydrobox top plate holder 5 to the right side plate assembly remove the hydrobox top plate holder 5 5 Loosen and remove the screw 4 that fixes the top plate 2 to the front plate assembly 6 Lift the top plate 2 and remove it from the unit Figure 7 Removing the top plate CAUTION When installi...

Страница 113: ...bly 2 to the top plate support 5 Loosen and remove the 2 screws 4 that fix the front plate assembly 2 to the bottom frame 6 Loosen and remove the screw 5 that fixes the front plate assembly 2 to the partition plate assembly 7 Loosen and remove the 2 screws 7 that fix the front plate assembly 2 to the heat exchanger 8 Loosen and remove the 2 screws 6 that fix the front plate assembly 2 to the right...

Страница 114: ...ith the field supplied circuit breaker 3 Remove the front plate assembly refer to Removing the front plate assembly on page 113 4 Untie the strings 1 and open the sound insulation sleeve 2 5 Open the sound insulation inner 3 6 Remove the sound insulation inner 3 7 Remove the sound insulation sleeve 2 8 Remove the sound insulation top 4 Figure 9 Removing the compressor sound insulation 1 String 3 S...

Страница 115: ...e nut 1 that fixes the propeller fan blade assembly 2 2 Pull the propeller fan blade assembly 2 from the fan motor assembly 3 Figure 10 Removing the propeller fan blade assembly Installation 1 Proceed in reverse order Replacing the propeller fan blade assembly 115 Replacing the DC fan motor assembly 116 Replacing the switch box 117 Replacing the PCB1 main 119 Replacing the PCB2 inverter 122 Replac...

Страница 116: ...1 from PCB2 2 2 Unlock the ferrite bead 3 3 Release the fan motor assembly harness 4 from the electrical component box 5 4 Slightly bend the harness retainers 6 to release the fan motor assembly harness 4 5 Loosen and remove the 4 screws 7 that fix the DC fan motor assembly 8 6 Remove the DC fan motor assembly 8 Figure 11 Removing the DC fan motor assembly Installation 1 Proceed in reverse order W...

Страница 117: ...he Sercive PCB cable harness 13 from the cable harness clip 14 9 Unplug connector X19 15 from the A1P PCB 16 10 Open the connector X6YA X6Y 17 11 Guide connector X19 15 and connector X6YA 17 through the grommet 18 12 Remove the 3 harnesses from the cable feed through 19 13 Loosen the screw 20 that fixes the switch box to the frame 14 Detach the cable clamp on the compressor wires located at the fe...

Страница 118: ...ervice PCB 21 Ferrite core 30 S70 4 Ground wire 13 Service PCB cable harness 22 Fan motor assembly harness 31 U V W 5 Wiring 14 Cable harness clip 23 Electrical component box 32 PCB2 assembly inverter 6 X4M 15 X19 24 PCB assembly main 33 Screw 7 Grommet 16 PCB A1P 25 S90 34 Screw 8 Hydrobox switch box 17 X6YA X6Y 26 S60 35 Switch box 9 S501 18 Grommet 27 S20 30 29 19 14 11 10 17 13 9 12 18 15 16 4...

Страница 119: ...circuit breaker 3 Remove the switch box refer to Replacing the switch box on page 117 2 2 4 2 Procedure Removal 1 Unlock the 4 latches 1 and remove the electrical component box cover 2 from the electrical component box 3 2 Loosen and remove the 2 screws 4 that fix the PCB assembly main 5 3 Loosen and remove the screw 6 that fixes ground wires E1 E2 7 INFORMATION Replace all tie wraps that were cut...

Страница 120: ...M2 6 from the PCB2 inverter 6 Unplug connectors S411 7 and S401 8 from the PCB2 inverter 7 Unplug connectors S206 9 S209 10 S210 11 S10 12 S20 13 S40 14 S50 15 S60 16 S90 17 MR30_A 18 and MR30_B 19 from the PCB assembly main 5 8 Unlock the PCB latches 8 Figure 13 and remove the PCB assembly main 5 1 Latch 5 PCB assembly main 2 Electrical component box cover 6 Screw 3 Electrical component box 7 Gro...

Страница 121: ...ltherma Monobloc CA Figure 14 Removing the PCB assembly main 2 Installation 1 Proceed in reverse order 1 X1M L 5 DCP2 9 S206 13 S20 17 S90 2 X1M N 6 DCM2 10 S209 14 S40 18 MR30_A 3 HL402 7 S411 11 S210 15 S50 19 MR30_B 4 HN402 8 S401 12 S10 16 S60 2 11 9 14 17 8 16 15 12 18 19 4 6 5 3 2 1 10 13 7 1 ...

Страница 122: ...r to Replacing the switch box on page 117 4 Remove the PCB assembly main refer to Replacing the PCB1 main on page 119 2 2 5 2 Procedure Removal 1 Loosen and remove the 3 screws 1 2 Unplug Faston plugs U 2 V 3 and W 4 from the PCB2 assembly inverter 7 3 Unplug connectors S70 5 and S80 6 from the PCB2 assembly inverter 7 4 Remove the PCB2 assembly 7 5 Loosen and remove the 8 screws 8 6 Separate PCB2...

Страница 123: ...ma Monobloc CA Figure 15 Removing the PCB assembly inverter 2 Installation 1 Apply Heat sink compound Part number 999308P to the components that touch the heat sink 2 Proceed in reverse order 1 Screw 6 S80 2 U 7 PCB2 assembly inverter 3 V 8 Screw 4 W 9 PCB2 5 S70 10 Heat sink 5 6 9 10 8 4 3 2 7 1 1 7 1 ...

Страница 124: ...e front panel refer to Removing the front plate assembly on page 113 2 2 6 2 Procedure The position of the thermistors is illustrated in Components overview on page 154 Figure 16 Thermistor location WARNING RISK OF FIRE When reconnecting a connector to the PCB do not apply force or damage the connector or the connector pins on the PCB 1 R1T 3 R3T 2 R2T Thermistor Processed on PCB Connector pin Acc...

Страница 125: ...e port 7 Attach a hose with core depressor to allow the release of the nitrogen 2 2 7 2 Procedure Removal 1 Loosen and remove the 2 screws 1 that fix the partition plate assembly 2 2 Remove the partition plate assembly 2 3 Remove the terminal cover 3 and unplug the compressor wiring 4 4 Using a pipe cutter cut the compressor pipes 5 below the soldered joint 5 Loosen and remove the 3 nuts 6 that fi...

Страница 126: ...es Monobloc CA Page 126 19 07 16 Daikin Altherma Monobloc CA Figure 17 Removing the compressor 1 Screw 6 Nut 2 Partition plate assembly 7 Compressor 3 Terminal cover 8 Putty 4 Compressor wiring 9 Dampers 5 Compressor pipe 10 Bushing 1 2 1 3 8 7 4 5 5 8 9 8 9 ...

Страница 127: ...oceed in reverse order 2 2 9 Replacing the 4 way valve 2 2 9 1 Preliminary actions 1 Switch off the Daikin Altherma Monobloc CA via the user interface 2 Switch off the Daikin Altherma Monobloc CA with the field supplied circuit breaker 3 Recover the refrigerant refer to Refrigerant recovery on page 106 4 Remove the switch box refer to Replacing the switch box on page 117 5 Remove the compressor so...

Страница 128: ...der material is liquid pull the 4 way valve pipe 5 9 Repeat steps 7 and 8 for the 3 remaining 4 way valve pipes 5 10 Cut the nitrogen supply when the piping has cooled down Figure 19 Removing the 4 way valve Installation 1 Wrap a wet rag around the 4 way valve 5 2 Proceed in reverse order CAUTION The maximum applied Nitrogen pressure must not exceed 0 02 MPa 1 Tie wrap 4 Insulation 2 4 way valve p...

Страница 129: ...to the outdoor suction service port 6 Attach a hose with core depressor to allow the release of the nitrogen 2 2 10 2 Procedure Removal 1 Remove the connectors 1 from the high pressure switch 2 2 Using a pipe cutter cut the pressure sensor pipe 3 3 Remove the high pressure switch 2 4 Supply nitrogen to the piping circuit 5 Heat the high pressure switch pipe 3 using an oxygen acetylene torch 6 When...

Страница 130: ...mpressor sound insulation refer to Removing the compressor sound insulation on page 114 6 Connect a nitrogen hose to the outdoor suction service port 7 Attach a hose with core depressor to allow the release of the nitrogen 2 2 11 2 Procedure Removal 1 Cut the tie wrap that fixes the pressure sensor S1NPH cable 1 2 Using a pipe cutter cut the pressure sensor S1NPH pipe 3 3 Remove the pressure senso...

Страница 131: ... interface 2 Switch off the Daikin Altherma Monobloc CA with the field supplied circuit breaker 2 2 12 2 Procedure Removal 1 Remove the expansion valve motor 1 from the expansion valve Y1E 2 2 Unplug connector S20 from PCB1 3 Cut all tie wraps that fix the expansion valve motor 1 wiring 1 Pressure sensor S1NPH cable 3 Pressure sensor S1NPH pipe 2 Pressure sensor S1NPH WARNING Overheating the press...

Страница 132: ... motor 3 lock it on the expansion valve Figure 23 Locking the expansion valve Y1E motor 1 Expansion valve motor 2 Expansion valve Y1E INFORMATION Replace all tie wraps that were cut during removal INFORMATION The expansion valve Y1S motor 3 is equipped with a pipe retention clip 1 The pipe retention clip 1 must be placed over the pipe 2 to lock the expansion valve Y1S motor 3 1 Pipe retention clip...

Страница 133: ...mpty the water circuit refer to the Installer Reference guide 2 Loosen and remove the 2 screws that fix the hydrobox switch box cover plate 3 Remove the hydrobox switch box cover plate 4 Unplug connector X16A and X25A PCB A1P 5 Cut all tie wraps that fix the water pump wiring 6 Loosen the 4 screws 1 that fix the water pump M1P 2 7 Remove the water pump M1P 2 Figure 24 Removing the water pump M1P W...

Страница 134: ...7 16 Daikin Altherma Monobloc CA Installation 1 Proceed in reverse order 2 Purge the water circuit refer to the Installer Reference guide CAUTION To prevent damage to the O ring moisten the O ring before installing the pump INFORMATION Replace all tie wraps that were cut during removal ...

Страница 135: ...k booster heater in case non integrated tank Heat exchangers 2 Maintenance procedures The following procedures describe how to perform the maintenance on each items 2 1 Checking fluid pressure of Space Heating circuit 2 2 Checking the pressure relief valve hose WARNING Before performing any maintenance power off the unit INFORMATION After all checks are made make sure the water and brine circuits ...

Страница 136: ...nal water filter A magnetic cyclone filter is to be preferred Make sure to check the water pressure again after this check as it might have dropped When below 1 bar add fluid Do not exceed 2 bar WARNING Discharged fluid may be very hot Actions Remarks Open the valve and check the correct operation If the fluid flow is high no blockage is suspected If the fluid flow is low or contains debris or dir...

Страница 137: ...ger inside the domestic hot water tank and can restrict heat transfer For this reason descaling of the heat exchanger may be required at certain intervals If the applicable legislation requires a chemical disinfection in specific situations involving the domestic hot water tank please be aware that the domestic hot water tank is a stainless steel cylinder containing an aluminium anode We recommend...

Страница 138: ...marks Remove lime build up on the booster heater to extend its life span especially in regions with hard water Applies only to installations with a separate non integrated tank Drain the domestic hot water tank Remove the booster heater from the tank Immerse the heater in a bucket or similar with lime removing product for 24 hours Refer to Booster heater E4H on page 69 Actions Remarks Check that t...

Страница 139: ...ESIE15 08B Part 5 Appendix 1 Field settings 19 07 16 Page 139 Daikin Altherma Monobloc CA Part 5 Appendix 1 Field settings For more information refer to table on next pages ...

Страница 140: ...ings System layout Standard A 2 1 1 E 00 R O 0 5 2 Monobloc A 2 1 2 E 01 R O 0 1 0 8 A 2 1 3 E 02 R O 0 Type 1 1 1 Type 2 2 A 2 1 7 C 07 R W 0 LWT control 1 Ext RT control 2 RT control A 2 1 8 7 02 R W 0 1 LWT zone 1 2 LWT zones A 2 1 9 F 0D R W 0 Continuous 1 Sample 2 Request A 2 1 A E 04 R O 0 No 1 Yes Field settings table Installer setting at variance with default value Comfort heating Eco heat...

Страница 141: ...C step 1 C 55 C A 8 0 0C R W 45 6 0E C step 1 C 60 C A 8 0 0D R W 10 25 C step 1 C 15 C A 8 0 0E R W 40 5 C step 1 C 10 C A 8 1 00 R W 40 5 C step 1 C 10 C A 8 1 01 R W 10 25 C step 1 C 15 C A 8 1 02 R W 9 01 9 00 step 1 C 45 C A 8 1 03 R W 9 01 min 45 9 00 C step 1 C 35 C A 8 1 04 R W 0 Disabled 1 Enabled A 8 1 05 R W 0 Disabled 1 Enabled A 8 1 06 R W 10 25 C step 1 C 20 C A 8 1 07 R W 25 43 C st...

Страница 142: ... hysteresis How many leaving water temperature zones are there Boiler efficiency Maximum running time for domestic hot water operation Anti recycling time Booster heater delay timer Additional running time for the maximum running time Allow modulation of the LWT to control the room temp Leaving water temperature maximum modulation What is the desired comfort main LWT in cooling What is the desired...

Страница 143: ... with glycol R W 0 No 1 Yes A 8 F 00 R W 0 Disabled 1 Enabled A 8 F 01 R W 10 35 C step 1 C 20 C A 8 F 02 3 A 8 F 03 5 A 8 F 04 0 A 8 F 05 0 A 8 F 06 0 A 8 F 09 R W 0 Disabled 1 Enabled A 8 F 0A 0 A 8 F 0B 0 A 8 F 0C 1 A 8 F 0D R W 0 Continuous 1 Sample 2 Request Is an external kWh meter used for power measurement What is the high electricity price Do not use What is the medium electricity price D...

Страница 144: ...ESIE15 08B Part 5 Appendix 2 Wiring diagram Page 144 19 07 16 Daikin Altherma Monobloc CA 2 Wiring diagram Figure 26 Wiring diagram EB DLQO5 O7CAV3 1 ...

Страница 145: ...ESIE15 08B Part 5 Appendix 2 Wiring diagram 19 07 16 Page 145 Daikin Altherma Monobloc CA Figure 27 Wiring diagram EB DLQO5 O7CAV3 2 ...

Страница 146: ...ESIE15 08B Part 5 Appendix 2 Wiring diagram Page 146 19 07 16 Daikin Altherma Monobloc CA Figure 28 Wiring diagram EB DLQO5 O7CAV3 3 ...

Страница 147: ...ESIE15 08B Part 5 Appendix 2 Wiring diagram 19 07 16 Page 147 Daikin Altherma Monobloc CA Figure 29 Wiring diagram EB DLQO5 O7CAV3 4 ...

Страница 148: ...ESIE15 08B Part 5 Appendix 2 Wiring diagram Page 148 19 07 16 Daikin Altherma Monobloc CA Figure 30 Wiring diagram EB DLQO5 O7CAV3 5 ...

Страница 149: ...ESIE15 08B Part 5 Appendix 2 Wiring diagram 19 07 16 Page 149 Daikin Altherma Monobloc CA Figure 31 Wiring diagram EB DLQO5 O7CAV3 6 ...

Страница 150: ...ESIE15 08B Part 5 Appendix 2 Wiring diagram Page 150 19 07 16 Daikin Altherma Monobloc CA Figure 32 Wiring diagram EB DLQO5 O7CAV3 7 ...

Страница 151: ...ESIE15 08B Part 5 Appendix 2 Wiring diagram 19 07 16 Page 151 Daikin Altherma Monobloc CA Figure 33 Wiring diagram EB DLQO5 O7CAV3 8 ...

Страница 152: ...ESIE15 08B Part 5 Appendix 2 Wiring diagram Page 152 19 07 16 Daikin Altherma Monobloc CA Figure 34 Wiring diagram EB DLQO5 O7CAV3 9 ...

Страница 153: ...ESIE15 08B Part 5 Appendix 3 Piping diagram 19 07 16 Page 153 Daikin Altherma Monobloc CA 3 Piping diagram 3 1 Piping diagram EB DLQO5 O7CAV3 ...

Страница 154: ... PCB main 11 Service PCB 12 Switch 13 Sensor 14 R1T 15 Liquid Reciever 16 Compressor 17 Muffler Filter 18 Muffler 19 Fanmotor 20 Fan 21 Switch box 22 Flow sensor 23 Water filter 24 Pump 25 Flow switch 26 Expansion vessel 27 Air purge valve 28 Drain outlet 29 Water IN connection 1 M 30 Water OUT connection 1 M 31 Wiring intake power supply 32 Wiring intake high voltage wiring 33 Wiring intake low v...

Страница 155: ... information is required Please fill out the following form before contacting your distributor FIELD INFORMATION REPORT Key person info Name Company name Your contact details Phone number E mail address Site address Your reference Date of visit Claim info Title Problem description Error code Trouble date Problem frequency Investigation steps done Insert picture of the trouble Current situation sol...

Страница 156: ...A1P Software version hydro PCB A4P Software version user interface Software version outdoor PCB Minimum water volume Maximum water volume Brine composition and mixture Brine freeze up temperature Space heating control leaving water temperature room thermostat ext room thermostat Space heating setpoint Domestic hot water control reheat only schedule only reheat schedule Domestic hot water setpoint ...

Отзывы: