193
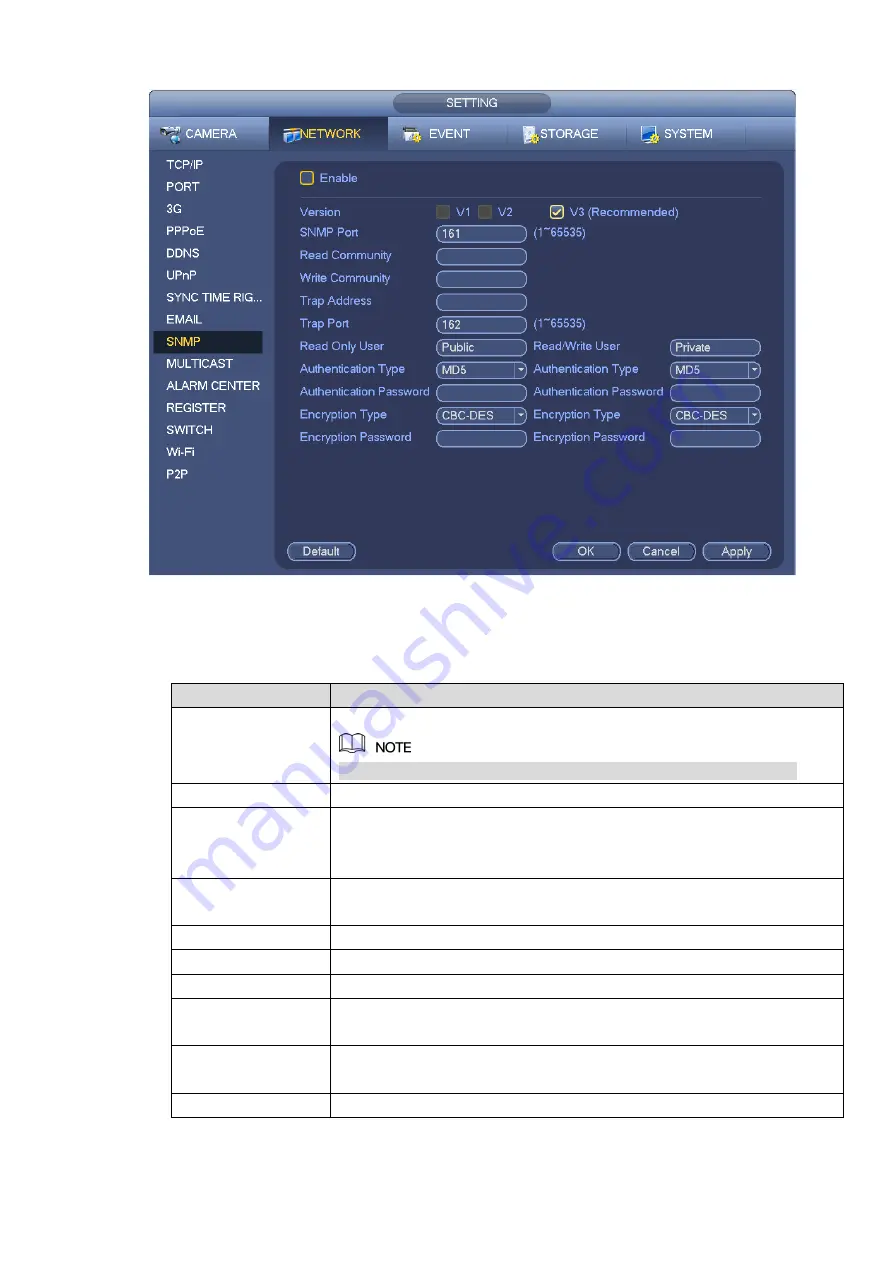
Figure 3-184
Step 2 Select the SNMP check box.
Step 3 Configure the parameyers. For details, see the following table.
Parameter
Description
Version
Select the check box of the corresponding version.
System selects V3 by default. There might be risks for V1 and V2.
SNMP Port
Enter the SNMP port number.
Read
Community/Write
Community
The read community/write community string supported by the program.
Trap Address
Enter the IP address of the PC installed with MG-SOFT MIB Browser. It
is the destination address to receive trap information from the device.
Trap Port
The destination port to receive trap information from the device.
Read Only User
Enter the read only username to access the NVR device.
Read/Write User
Enter the read/write username to access the NVR device.
Authentication
It includes MD5 and SHA. System automatically recognizes it after it is
enabled.
Password
Enter the password for encryption and authentication. The password
shall be no less than 8 characters.
Encryption Type
Select the encryption type. The default type is CBC-DES.
Step 4 Click OK to complete the configuration.
Содержание NVR608-32-4KS2
Страница 1: ...I Network Video Recorder User s Manual V6 0 0 ZHEJIANG DAHUA VISION TECHNOLOGY CO LTD...
Страница 56: ...40 Figure 3 14 Step 2 Click Add new holiday button and device displays the following interface See Figure 3 15...
Страница 121: ...105 Figure 3 92 Figure 3 93...
Страница 144: ...128 Figure 3 111 Figure 3 112 Figure 3 113...
Страница 157: ...141 Figure 3 126 Figure 3 127...
Страница 159: ...143 Figure 3 129 Click draw button to draw the zone See Figure 3 130 Figure 3 130...
Страница 162: ...146 Figure 3 133 Click Draw button to draw a zone See Figure 3 134 Figure 3 134...
Страница 167: ...151 Figure 3 139 Click draw button to draw the zone See Figure 3 140...
Страница 178: ...162 Figure 3 151 Step 2 Add surveillance scene 1 Click Add The Add interface is displayed See Figure 3 152...
Страница 185: ...169 Figure 3 157 Figure 3 158...
Страница 186: ...170 Figure 3 159 Figure 3 160...
Страница 189: ...173 Figure 3 164 Figure 3 165...
Страница 224: ...208 Figure 3 199...
Страница 231: ...215 Figure 3 206 Step 2 Click Add user button in Figure 3 206 The interface is shown as in Figure 3 207 Figure 3 207...
Страница 247: ...231 Figure 3 227 Step 2 Click Add group Enter add group interface See Figure 3 228 Figure 3 228...
Страница 311: ...295 Figure 4 56 Figure 4 57...
Страница 317: ...301 Figure 4 62 Figure 4 63...
Страница 318: ...302 Figure 4 64 Figure 4 65...
Страница 343: ...327 Figure 4 101 Figure 4 102...
Страница 352: ...336 Figure 4 115 Figure 4 116...
Страница 372: ...356 Figure 4 144 Note For admin you can change the email information See Figure 4 145...


