Dahua N45EYN2 Скачать руководство пользователя страница 11

Quick Start Guide 

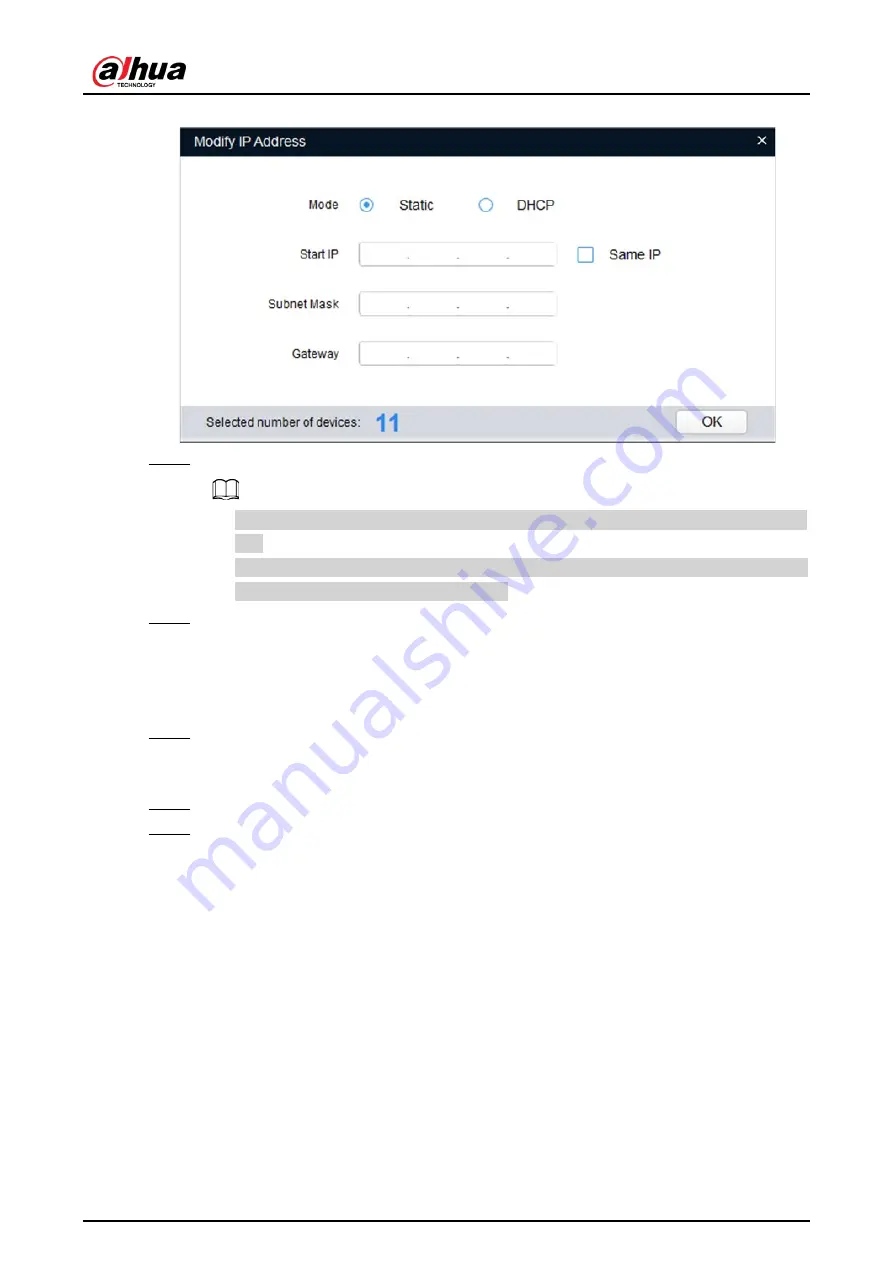
Figure 2-4 Modify IP address 


Step 3 

Select 

Static

 mode, and then enter start IP, subnet mask, and gateway. 


  IP addresses of multiple devices will be set to the same if you select the 

Same IP

 check 

box. 

  If DHCP server is available in the network, devices will automatically obtain IP addresses 

from DHCP server when you select 

DHCP

Step 4 

Click 

OK

2.3 Logging in to Web Interface 

Step 1 

Open IE browser, enter the IP address of the device in the address bar, and then press Enter 
key. 
If the setup wizard is displayed, finish the settings as instructed. 

Step 2 

Enter the username and password in the login box, and then click 

Login

Step 3 

For the first-time login, click 

Click Here to Download Plugin

, and then install the plugin as 

instructed. 
The main interface is displayed when the installation is finished. 

Содержание N45EYN2

Страница 1: ...Dome Network Camera Quick Start Guide V1 0 0 ...

Страница 2: ... laws and regulations of related jurisdictions For detailed information see the paper User Manual use our CD ROM scan the QR code or visit our official website The manual is for reference only Slight differences might be found between the electronic version and the paper version All the designs and software are subject to change without prior written notice Product updates might result in some dif...

Страница 3: ...void heat accumulation Transport use and store the device within the range of allowed humidity and temperature Heavy stress violent vibration or water splash are not allowed during transportation storage and installation Pack the device with standard factory packaging or the equivalent material when transporting the device Install the device in the location where only the professional staff with r...

Страница 4: ... network device data and personal information by adopting measures which include but not limited to using strong password changing password regularly upgrading firmware to the latest version and isolating computer network For some devices with old firmware versions the ONVIF password will not be changed automatically along with changing the system password and you need to upgrade the firmware or m...

Страница 5: ...2 Network Configuration 3 2 1 Initializing Device 3 2 2 Changing Device IP Address 5 2 3 Logging in to Web Interface 6 3 Installation 7 3 1 Packing List 7 3 2 Dimensions 7 3 3 Installing Camera 7 3 3 1 Installation Method 8 3 3 2 Installing SD Card 8 3 3 3 Attaching Camera 8 3 3 4 Optional Installing Waterproof Connector 9 3 3 5 Adjusting Lens Angle 11 ...

Страница 6: ...th network cable Provides power to the device with PoE PoE is available on select models 3 Audio input BNC port Connects to sound pickups to receive audio signal 4 Audio output BNC port Connects to speaker to output audio signal 5 Alarm I O Includes alarm signal input and output ports and the number of I O ports might vary on different devices For detailed information see Table 1 2 6 RS 485 Contro...

Страница 7: ...1 2 Alarm input Step 2 Connect alarm output device to the alarm output end of the I O port The alarm output is relay switch output which can only connect to NO alarm devices NO1 and COM1 or NO2 and COM2 constitute a switch to provide the alarm output which is shown in Figure 1 3 The switch is open normally and closed when there is alarm output Figure 1 3 Alarm output Step 3 Log in to web interface...

Страница 8: ...nd the actual product shall prevail 2 1 Initializing Device Step 1 Double click ConfigTool exe to open the tool Step 2 Click Step 3 Click Search setting Figure 2 1 Setting Step 4 Select the searching way Current Segment Search default Search the devices in the same network segment with ConfigTool Other Segment Search Search the devices in the network segment which ConfigTool is not in If you selec...

Страница 9: ...ide the reserve information for password reset you can reset the password only through XML file When initializing multiple devices ConfigTool initializes all devices based on the password reset mode of the first selected device Figure 2 2 Password setting Step 8 Set and confirm the password of the devices then enter a valid email address and then click Next ...

Страница 10: ...iple devices at one time This section is based on changing IP addresses in batches Changing IP addresses in batches is available only when the corresponding devices have the same login password Step 1 Do Step1 to Step5 in 2 1 Initializing Device to search devices in your network segment After clicking Search setting enter the username and password and make sure that they are the same as what you s...

Страница 11: ...from DHCP server when you select DHCP Step 4 Click OK 2 3 Logging in to Web Interface Step 1 Open IE browser enter the IP address of the device in the address bar and then press Enter key If the setup wizard is displayed finish the settings as instructed Step 2 Enter the username and password in the login box and then click Login Step 3 For the first time login click Click Here to Download Plugin ...

Страница 12: ...tallation such as electric drill is not provided in the package The operation manual and related tool information are contained in the disk or the QR code and the actual package shall prevail Figure 3 1 Packing list 3 2 Dimensions Figure 3 2 Dimensions mm inch 3 3 Installing Camera ...

Страница 13: ...the SD card Press and hold the reset button for 10 seconds to reset the device Figure 3 4 Install SD card 3 3 3 Attaching Camera Make sure that the mounting surface is strong enough to hold at least three times the weight of the camera and bracket Remove the protective film after finishing installation Figure 3 5 Cable going through the mounting surface ...

Страница 14: ... Guide 9 Figure 3 6 Cable going through the side cable tray 3 3 4 Optional Installing Waterproof Connector This part is needed only when a waterproof connector comes with the camera and the camera is used outdoors ...

Страница 15: ...Quick Start Guide 10 Figure 3 7 Install waterproof connector ...

Страница 16: ...Quick Start Guide 11 3 3 5 Adjusting Lens Angle Figure 3 8 Adjust lens angle ...

Страница 17: ... 100 Irvine CA 92618 Tel 949 679 7777 Fax 949 679 5760 Support 877 606 1590 Sales sales usa dahuatech com Support support usa dahuatech com 2021 Dahua Technology USA All rights reserved Design and specifications are subject to change without notice ...

Отзывы: