Dahua C200 Series Скачать руководство пользователя страница 12

User’s Manual 

5


Menu Description 


The color and shape of the OSD menu of the actual computer may be slightly different from them 
shown in the figure. 


Specifications of the OSD menu may change with improvements of functions without prior notice. 

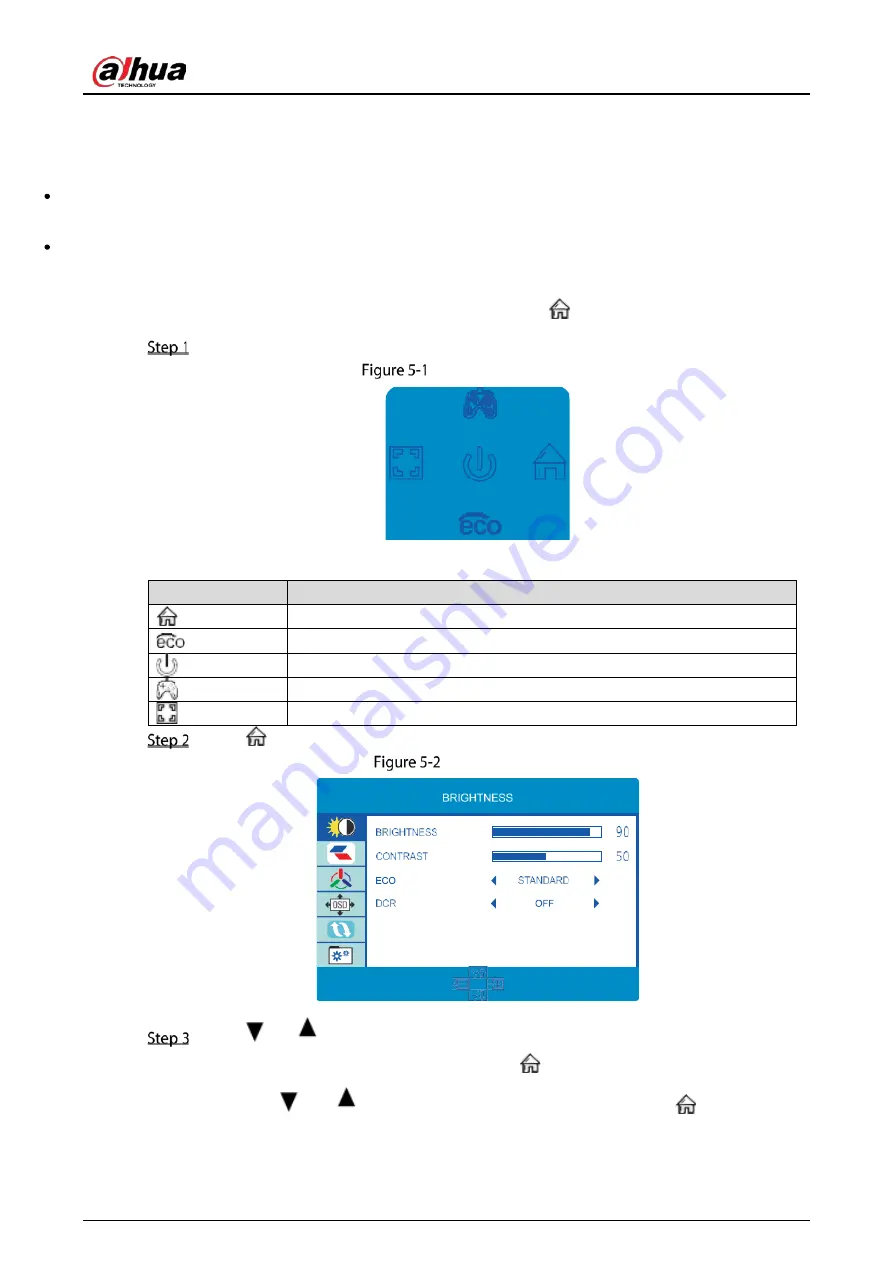
The on-screen display (OSD) menu can be used to adjust the settings of the monitor and is displayed 

on the screen after turning on the monitor and pressing the 

  button. 


Press one of the buttons to activate the browser screen. 


Browser screen 


Table 5-1


Browser screen description 

Icon


Function 


Confirm and enter the main menu. 


Scene mode. 


Power switch. 


Game Crosshair. 


Exit the menu interface. 


Press 

  to enter the OSD screen. 


OSD screen 


Press 

  or 

  to browse through the functions. 


Select the desired function, then press the 

  button to enter the submenu 


Press 

   or 

   to browse the sub-menus, and then press 

   to confirm the 

selection of the desired function. 

Содержание C200 Series

Страница 1: ...C200 Series Displays User s Manual V1 0 0 ZHEJIANG DAHUA VISION TECHNOLOGY CO LTD...

Страница 2: ...y CAUTION Indicates a potential risk which if not avoided could result in property damage data loss reductions in performance or unpredictable results TIPS Provides methods to help you solve a problem...

Страница 3: ...ge without prior written notice Product updates might result in some differences appearing between the actual product and the manual Please contact customer service for the latest program and suppleme...

Страница 4: ...e under allowed humidity and temperature conditions Prevent liquids from splashing or dripping on thedevice Make sure that there are noobjects filled with liquid on top of the device to avoid liquids...

Страница 5: ...not block the ventilation opening Install the product according to this handbook Do not place any items on the product The product may be damaged if foreign objects enter the internal unit Failure to...

Страница 6: ...plug foreign matter or liquid into the unit exposure to rain or humidity loss of function or dropped please contact dealer or after sales service center Be careful during maintenance of product even...

Страница 7: ...ant Safeguards and Warnings III 1 Packing List 1 2 Angle Adjustment 2 3 Button Description 3 4 Cable Connection 4 5 Menu Description 5 6 ECO Modes and Gameplus 7 7 Operation Menu OSD Function Descript...

Страница 8: ...st Packing list Table 1 1 Packing list No Name 1 Power adapter 2 Base Stand 3 Signal cable 4 Screws 5 User s manual 6 Mount stud 7 Mount adapter The above figure is for illustration only and the physi...

Страница 9: ...ic model of the device Generally it may be inclined 5 2 forward and 20 2 backward Angle adjustment When adjusting the angle of the monitor be sure not to touch or press the area of the screen The abov...

Страница 10: ...2 OSD Power button Press the button to turn on the monitor Table 3 2 OSD Buttons OSD Button Function Up rocker button The rocker is used to quick enter the Monitor Control panel Rocker switch button p...

Страница 11: ...OUT interface of a PC Use the HDMI DVI cable to connect the HDMI IN interface of the product to the DVI OUT interface of a PC Use a VGA cable to connect the VGA interface of the product to the VGA in...

Страница 12: ...yed on the screen after turning on the monitor and pressing the button Press one of the buttons to activate the browser screen Browser screen Table 5 1 Browser screen description Icon Function Confirm...

Страница 13: ...User s Manual 6 Press or to select an option then press to confirm the setting and exit the current menu Press to exit the menu interface...

Страница 14: ...RD MOVIE RTS FPS GAME and TEXT can be used to optimize settings according to your activity Standard mode is suitable for most activities Standard mode Press to select to switch Gameplus modes Choose t...

Страница 15: ...DCR ON OFF IMAGE H POSITION 0 100 V POSITION 0 100 CLOCK 0 100 PHASE 0 100 ASPECT WIDE AUTO 4 3 COLOR TEMP COLOR TEMP WIDE AUTO 4 3 RED 0 100 BLUE 0 100 GREEN 0 100 OSD SETTING LANGUAGE ENGLISH T RK E...

Страница 16: ...fting base Without base 495 8 286 3 36 7 mm 542 4 323 1 38 5mm 616 3 364 3 38 7 mm With base 495 8 376 3 160 9 mm 542 4 402 8 160 9 mm 616 3 442 8 161mm Speaker N A N A N A Height range N A N A N A Ro...

Страница 17: ...eck if the PC power is on Check if the PC display card is inserted properly Check if the signal cable of the monitor iscorrectly connected with the PC Check the signal cable plug of the monitor and ma...

Страница 18: ...User s Manual...

Отзывы: