Dahua Active Deterrence Eyeball Скачать руководство пользователя страница 8

Quick Start Guide 

Table 1-2


Alarm information 

Port 

Port Name 

Function 

Alarm I/O 

ALARM_OUT 

Outputs alarm signal to alarm device. 


When connecting to alarm device, only the ALARM_OUT port and 
ALARM_OUT_GND port with the same number can be used 
together. 

ALARM_OUT_GN

ALARM_IN 

Receives the switch signal of external alarm source. 


Connect different alarm input devices to the same 
ALARM_IN_GND port. 

ALARM_IN_GND 


Connecting Alarm Input/output 

1.2


Alarm input/output is available on select models. 


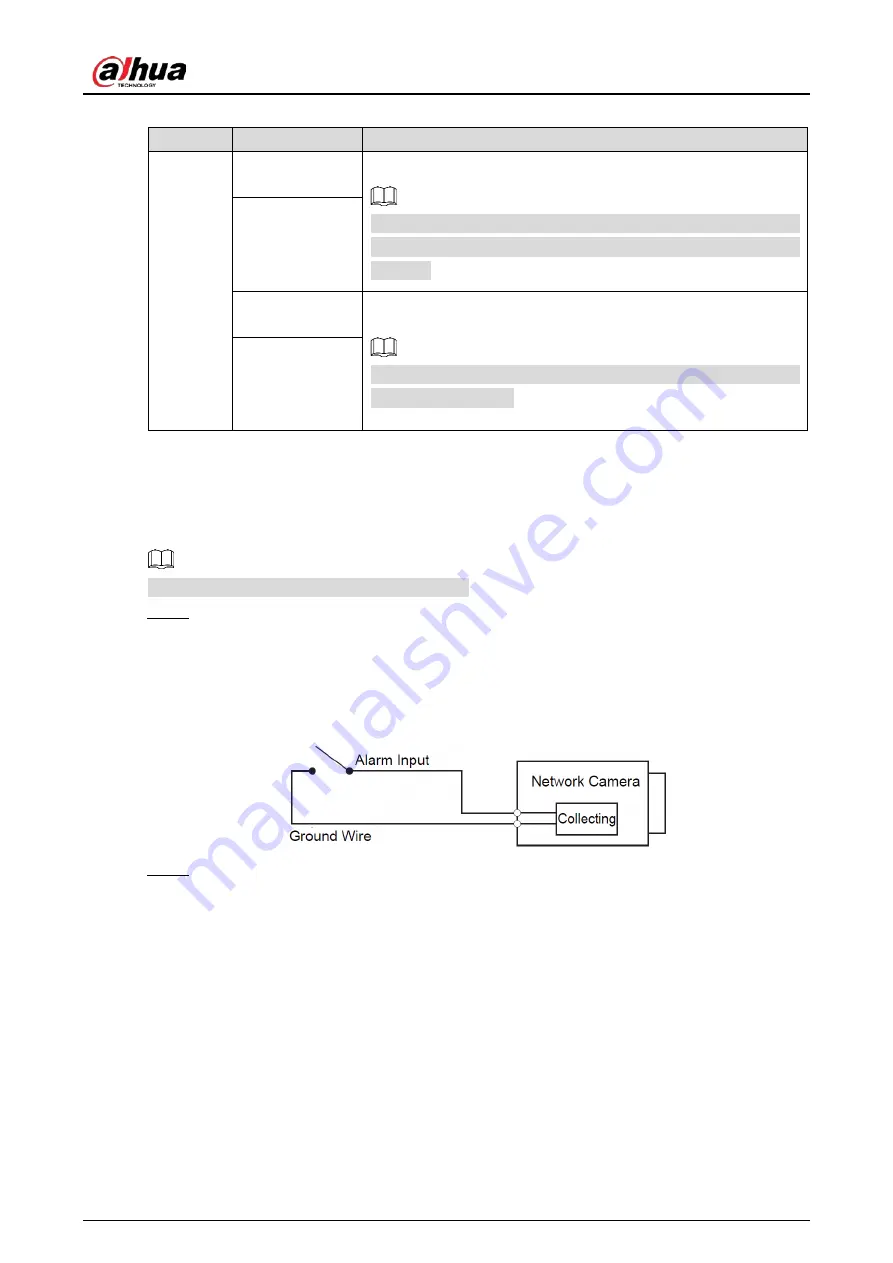
Connect alarm input device to the alarm input end of the I/O port. 

Step 1

Device collects different states of alarm input port when the input signal is idling and being 
grounded. 


Device collects logic "1" when input signal is connecting to +3 V to


+5 V or idling. 


Device collects logic "0" when input signal is grounded. 


Alarm input 

Figure 1-2


Connect alarm output device to the alarm output end of the I/O port. The alarm output is 

Step 2

open-drain output, which works in the following modes. 


Mode A: Level application. Alarm outputs high and low level, and the alarm outlet is OD, 
which requires external pull-up resistance (10K Ohm typical) to work. The maximum 
external pull-up level is 12 V, maximum port current is 300 mA and the default output 
signal is high level (external pull-up voltage). The default output signal switches to low 
level when there is alarm output (As long as the operating current below 300mA, the 
output low level voltage is lower than 0.8 V). 


Mode B: Switch application. Alarm output is used to drive external circuit, the 
maximum voltage is 12 V and the maximum current is 300 mA. If the voltage is higher 
than 12 V, please use an additional electric relay. 

Содержание Active Deterrence Eyeball

Страница 1: ...Active Deterrence Eyeball Network Camera Quick Start Guide V1 0 2 ZHEJIANG DAHUA VISION TECHNOLOGY CO LTD...

Страница 2: ...ler you might collect the personal data of others such as their face fingerprints and license plate number You need to be in compliance with your local privacy protection laws and regulations to prote...

Страница 3: ...tions description or errors in print If there is any doubt or dispute we reserve the right of final explanation Upgrade the reader software or try other mainstream reader software if the manual in PDF...

Страница 4: ...ire or lightning Keep sound ventilation to avoid heat accumulation Transport use and store the device within the range of allowed humidity and temperature Heavy stress violent vibration or water splas...

Страница 5: ...soft cloth You can also remove dust with an air blower Strengthen the protection of network device data and personal information by adopting measures which include but not limited to using strong pass...

Страница 6: ...2 Network Configuration 4 Initializing Device 4 2 1 Changing Device IP Address 6 2 2 Logging in to Web Page 7 2 3 3 Installation 8 Packing List 8 3 1 Dimension 8 3 2 Installing Device 9 3 3 3 3 1 Inst...

Страница 7: ...aker Outputs audio 2 Power input Inputs 12 VDC power Be sure to supply power as instructed in the Guide Device abnormity or damage could occur if power is not supplied correctly 3 Ethernet Connects to...

Страница 8: ...to 3 V to 5 V or idling Device collects logic 0 when input signal is grounded Alarm input Figure 1 2 Connect alarm output device to the alarm output end of the I O port The alarm output is Step 2 open...

Страница 9: ...the alarm input end of the I O port There will be high level and low level alarm signal generated by the alarm input device when alarm occurs set the input mode to NO default if the alarm input signal...

Страница 10: ...nterfaces are for reference only Initializing Device 2 1 Double click ConfigTool exe to open the tool Step 1 Click Step 2 Click Search Setting Step 3 Setting Figure 2 1 Select the searching way Step 4...

Страница 11: ...6 Select the devices to be initialized and then click Initialize Step 7 If you do not provide the linked information for password reset you can reset the password only through XML file When initializ...

Страница 12: ...le devices in one time This section is based on changing IP addresses in batches Changing IP addresses in batches is available only when the corresponding devices have the same login password Follow S...

Страница 13: ...rom DHCP server when you select DHCP Click OK Step 4 Logging in to Web Page 2 3 Open IE browser then enter the IP address of the device in the address bar and then press Step 1 the Enter key If the se...

Страница 14: ...The tool required for the installation such as electric drill is not provided in the packing The operation manual and related tool information are contained in the disk or the QR code Packing list Fi...

Страница 15: ...3 3 1 Installation Type Installation type Figure 3 3 3 3 2 Installing SD Card Optional Pull the power plug off before installing or removing the SD card Press and hold the RESET button for 10 s to re...

Страница 16: ...Start Guide 10 3 3 3 Attaching Device Make sure the mounting surface is strong enough to hold at least three times of the weight of the device and bracket Cable going through the mounting surface Figu...

Страница 17: ...t Guide 11 Cable going through the side cable tray Figure 3 6 3 3 4 Installing Waterproof Connector Optional This part is needed when there is waterproof connector in the package and the device is use...

Страница 18: ...Quick Start Guide 12 Install waterproof connector Figure 3 7 3 3 5 Adjusting Lens Angle Adjust lens angle Figure 3 8...

Страница 19: ...Quick Start Guide...

Отзывы: