


8.Features
© China Daheng Group, Inc. Beijing Image Vision Technology Branch 80
8.4.4. Lookup Table
When the analog signal that is read out by the sensor has been converted via ADC, generally, the raw
data bit depth is larger than 8 bits, there are 12 bits, 10 bits, etc. The feature of lookup table is to replace
some pixel values in the 8 bits, 10 bits, and 12 bits images by values defined by the user.
The lookup table can be a linear lookup table or a non-linear lookup table, created entirely by the user.
You can also use the
LutValueAll
function to create an entire lookup table.
1) How it works
a) LUT is short for "lookup table", which is basically an indexed list of numbers.
b) In the lookup table you can define replacement values for individual pixel values. For example, you
can replace a gray value of 0 (= minimum gray value) by a gray value of 1023 (= maximum gray value
for 10-bit pixel formats). This changes all black pixels in your images to white pixels.
c) Setting a user-defined LUT can optimize the luminance of images. By defining the replacement values
in advance and storing them in the camera to avoid time-consuming calculations. The camera itself
has a factory default lookup table, and the default lookup table does not affect image luminance.
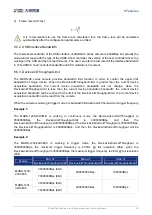
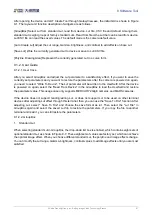
2) Creating the user-defined LUT
To create a lookup table, you need to determine the range of
LUTIndex
and
LUTValue
parameters by the
maximum pixel format supported by the currently used camera.
a) On cameras with a maximum pixel bit depth of 12 bits
The
LUTIndex
selectable item is 0-4095, each
LUTIndex
corresponds to a
LUTValue
, and the
LUTValue
range is [0,4095].
b) On cameras with a maximum pixel bit depth of 10 bits
The
LUTIndex
selectable item is 0-1023, each
LUTIndex
corresponds to a
LUTValue
, and the
LUTValue
range is [0,1023].
Create a user-defined lookup table with the following steps:
1. Select the lookup table to use. Since there is only one user-defined lookup table in the camera, there
is no need to select it by default.
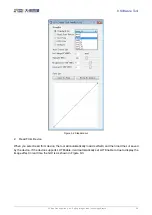
2. Set the
LUTIndex
parameter to the pixel value that you want to replace with a new value.
3. Set the
LUTValue
parameter to the new pixel value.
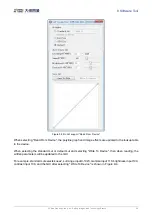
4. Repeat steps 1 and 2 for all pixel values that need to be changed to set the parameters to the target
pixel values in turn.
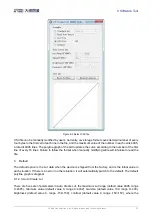
5. Set the
LutEnable
parameter to
true
means that the lookup table feature is enabled. The default is
disabled.


