background image

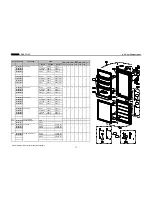
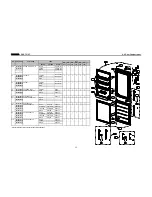
6. PART LIST

D1

D1-1

D1-2

D1-3

D1-4

D2

D2-1

D2-2

D2-3

D2-4

D2-5

D2-6

D2-7

D2-8

D2-9

D4

D6

* Please check the color, some parts code color dependent.

D3

CASE F A

1

D5

CASE F A

2

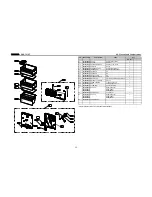
GPPS(GRYSTAL)

2

EVA AS

RFP-301(230V 130W)

NO

PART-CODE

PART NAME

SPEC.

Q'ty

301119V100

301119V120

GPPS(BLUE)

3011187310

CASE ICING AS

301119V110

GPPS(GRAY)

301119V220

GPPS(BLUE)

3017861500

SHELF GLAS F

T3.2 RFP-301

301119V200

GPPS(GRYSTAL)

301119V210

GPPS(GRAY)

3011835900

FAN

OD100,SHAFT OD3.17

1

3011200510

CLAMP FAN

SUS 304 (SPRING)

1

3010664700

BRACKET FAN MOTR

PP, T2.0

1

7112401211

SCREW TAPPING

T1 TRS 4*12 MFZN

4

3010107100

ABSORBER F MOTR

NBR

2

3015922200

MOTOR F AS

AC220V/50HZ,2500RPM(S6111BDF04)

1

3018932400

LOUVER F B

PP

1

3013415800

KNOB F CONTL

PP

1

3018932500

LOUVER F AS

RFP-301(AC 230V 50HZ)

1

3018932300

LOUVER F A

PP

1

4856813100

CABLE TIE

DA-140

1

3012764100

HARNESS D SENS

RFP-340(NBC-K43-24)

1

3017070100

EVA SAS

RFP-301

1

3012831200

HEATER SHEATH AS

RFP-301, 230V, 130W

1

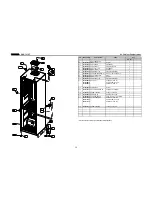
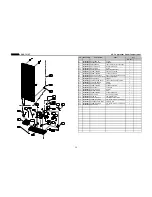
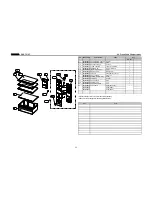
6-3. Frozen Food Compartment

1

RN-34*

3017070000

33

Содержание RN-341N

Страница 1: ...Service Manual RN 341N RN 342N RN 343N RN 344N RN 345N RN 346 ...

Страница 2: ... 5 Prevention of Compressor Restart 13 2 6 Buzzer Sound 13 2 7 Control of R Sensor OFF Point 14 2 8 Error Display 15 3 DISASSEMBLY 3 1 Door Switch 16 3 2 Cover Multi Flow Duct As in Fresh food Compartment 17 3 3 Louver F As in Frozen Food Compartment 18 3 4 Door F R 19 3 5 FRONT CONTL PANEL PCB 21 4 How to Change Door Position 22 5 How to Charge R 600a Refrigerant 23 6 Part List 6 1 Cabinet Compar...

Страница 3: ...x L2290 Condenser Type Diemension unit mm Net Width Packing Net Depth Packing Net Height Packing 595 634 650 685 Refrigerant Type Heater Defrost Type Automatic Start Stop Defrost Heater AC230V 130W Cooling Cycle 0 044kg Evaporator Type Fin Type Dryer Net Weight Packing Blowing Agent C Pentane Defrost Shape Sheath Type Electric Part Freezer Fan Motor AC 220V 50Hz 2500RPM Refrigerator Lighting Bulb ...

Страница 4: ...Lamp Window 3 Multi Duct 4 Knob R Control 5 Cover Vegetable Case 6 Vegetable Case 7 Refrigerator Pocket R 8 Refrigerator Pocket J 9 Freezer Shelves 10 Freezer Case A 11 Freezer Case B 12 Adjusting Leg Left 13 Adjusting Leg Right 9 2 3 4 7 5 6 1 10 10 11 12 13 8 3 ...

Страница 5: ...s Capacitor Run 2 Power Cord 3 Switch P Relay As 4 Earth Comp Wire 5 Fixture Compressor Washer 6 Drain Hose 7 Compressor Absorber 8 Suction Pipe As 9 Dryer As 10 Case vaporization As 11 Pipe connector A 12 Pipe Wire Condensor As 13 Pipe Hot 1 2 4 3 5 8 9 10 11 12 13 6 7 4 ...

Страница 6: ...1 4 Refrigerant Cycle Welding Point 1 SPECIFICATIONS Copper Welding Ag 5 5 Point Silver Welding Ag 30 3 Point Suction Pipe Capillary Tube Evaporator Compressor Pipe connector A Dryer 5 ...

Страница 7: ...a target temperature not actual temperature within refrigerator Refrigeration function is weak in the initial time Please adjust temperature as above after using refrigerator for minimum 1 2 days 1 SPECIFICATIONS Refrigerator Step Mode MIN 5 8 MID 2 5 MAX 1 2 Vegetable compartment 1 5 Freezer Mode LOW 17 19 MID 19 22 HIGH 22 25 6 ...

Страница 8: ...1 6 Wiring Diagram 1 SPECIFICATIONS 7 ...

Страница 9: ...1 7 Main PCB Circuit Diagram 1 SPECIFICATIONS 8 ...

Страница 10: ...OST F3 ERROR CYCLE C1 ERROR DOOR S W DR ERROR D SENSOR D1 ERROR RT SENSOR RT TEMP STEP MIN NOR TEMP STEP MIN TEMP STEP MAX TEMP STEP MAX NOR Forced Defrost Mode in Progress ERROR R SENSOR R1 TEMP S COOL TEMP STEP NOR S COOL continuously TEMP 5 times The Priorities of Error Display R1 RT D1 C1 F3 3 2 1 2 3 1 3 1 2 How to start the mode TEMP continuously S COOL 5 times All LED ON for initial 3 secon...

Страница 11: ... of Refrigerator each step C Temperature of Refrigerator at NOR OFF point 3 7 D S Cool Quick REfrigeration Mode Press S Cool Button of the Panel and make S Cool LED on Comp Fan are on until R sensor reaches to Over Refrigeration OFF Point 9 5 After the reach of 9 5 Step 5 MAX mode continues When S Cool mode lasts for about 40 minutes it returns to general operation mode E Temperature of Freezer Co...

Страница 12: ... Forces Defrost Mode don t start Process same as Normal Defrost Mode except PRE COOL Heater is supposed to be on Initial 30sec even though the temp at D SENSOR is over 13 for TEST How to confirm 1 buzzer sound 3times and all LED on for 3 sec when Forced Defrost Mode start 2 LED 3 S COOL on and 4 5 flickering by pushing S COOL button for continuously and TEMP button 5 times after Forced Defrost Mod...

Страница 13: ... R R O C Running Rate of Compressor RT Ambient temperature T C O T Total Compressor ON OFF Times Start Yes No A C R T 6 8 10 12hours No Yes Any Error No Yes R R O C per 2hrs of A C R T 90 No Yes Accumulated Door Open Time 2min No Yes RT 38 No Yes A C R T 14hours Defrost Mode Start End No Yes T C O T 60hours 12 ...

Страница 14: ...4 Function of Low Ambient Temperature RT COMP It takes several minutes to protect Compressor 1 6 minutes after Comp off 2 30 minutes at operation of Low RT but 6 minutes when the doors open more than 20 seconds CONTROL OBJECT INPUT 2 5 Prevention of Compressor Restart Buzzer A When Forced Defrost Mode start the buzzer rings 3times B After 2 minutes power s on the buzzer rings 3 times C At Short Ci...

Страница 15: ... service 1 Resistance R25 Default resistance 31 4Kohms 2 Resistance R26 Cut the J1 off to reduce basic resistance by 1 5 C 2Kohms up 3 Resistance R27 Cut the J2 off additionally to reduce basic resistance by 1 5 C total 4Kohms up R25 R SENSOR OFF point R25 R26 R SENSOR OFF point 1 5 C R25 R26 R27 R SENSOR OFF point 3 C CONTROL OBJECT INPUT J1 J2 On Main PCB 2 7 Control of R sensor OFF Point 14 ...

Страница 16: ...happens when RT Sensor is OPEN or SHORT 1 LED DISPLAY LED 2 on 4 5 flickering 2 REACTION Delete the conditions of RT sensor Control and operate normally 3 RELEASE When RT Sensor is working normally C d1 ERROR It happens when D Sensor is OPEN or SHORT 1 LED DISPLAY LED 1 on 4 5 flickering 2 REACTION Return to next limit Defrost Time 40 min 3 RELEASE When D Sensor is working normally D DR ERROR It h...

Страница 17: ... Inuput a thin driver in the upper part as above picture And lift up Door Switch carefully Inuput a thin driver in the lower part as above picture And lift up Door Switch carefully Disconnect the wire housing Procedure Procedure 1 3 2 16 ...

Страница 18: ...position on Cover 2 Lever two window lock with flat driver Number of the marks are model dependent 2 Push the cover inside and Unlock Open window turning on the axis A Remove two screw cap with flat driver Unscrew 2 points Disconnect the Lamp Sensor wire housing Procedure Procedure 4 2 5 3 1 Push 2 Lever 2 Lever A axis unscrew unscrew screw cap Push Push the Mark of Locking Position 17 ...

Страница 19: ... the Louver F As from Freezer Unscrew to disassemble as each component part Remove the Louver F As pulling the top side Unlock carefully especially inside 3 locks Disconnect Fan motor wire housing Default position of KNOB F is MID Procedure Procedure 1 4 2 5 3 A axis inside 3 KNOB F 18 ...

Страница 20: ...mpartment Tilt down the appliance to the rear And unscrew middle hinge Don t forget the washer for middle hinge Unscrew and lift up top cover hinge to remove Unscrew and remove top hinge Lift up middle cover hinge to remove Procedure Procedure 1 4 2 3 5 washer 19 ...

Страница 21: ...crew and remove under hinge Turn the Adjusting Leg Left CCW and Remove Don t forget the washer for under hinge The washer for under hinge s bigger than middle one Remove door in frozen food compart ment Procedure Procedure 6 7 8 washer 20 ...

Страница 22: ...ISASSEMBLY No No Inuput a cutter sleeve between Panel and Door Be careful not to scratch the Door surface Lift up the Panel and disconnect the wire housing Unscrew and separate the panel and PCB Procedure Procedure 2 1 3 PCB Panel 21 ...

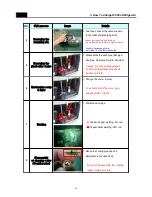
Страница 23: ...opper Refrigerator Freezer Door 1 1 Tilt down the appliance to the rear Watch out for damage of Pipe Wire Condensor assembled in the rear of refrigerator P1 P2 P3 P4 P5 P6 P7 P8 P9 P10 P1 P12 P13 P1 1 3 Move following parts in the opposite position P9 P12 P13 1 4 Change the position of following parts each other and assemble them P6 P7 P3 P4 P1 P8 1 5 Assemble following parts P5 P2 P10 P11 Disasse...

Страница 24: ...ed avoid any naked flames or potential sources of ignition and air the room in which appliance is standing for several minutes In order to avoid the creation of a flammable gas air mixture if a leak in the refrigerating circuit occurs the size of the room in which the appiance may be sited depends on the amount of refrigerant used The room must be 1m3 in size for every 8g of R600a refrigerant insi...

Страница 25: ...N Time 10min Coupling cap and gas charging cap should be seperated before welding NO SVC process Image Details 1 Connect the discharging hose to the pinch plier 2 The outlet of discharging hose should be placed to the outdoor window 1 Fix the pinch plier to the compressor charging pipe 2 Pinch plier should not be moving freely If that is moving freely it would cause fire explosion as leakage gas i...

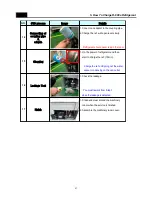
Страница 26: ...arging pipe OUT DOOR fire explosion as leakage gas in the room 1 Discharge the R 600a ref to outdoor Befor connecting the vacuum pump It should have enough time more than 7 minutes to discharge 1 And then connect the vacuum pump to the outlet of discharging hose 1 Disassembe the each pipe Del pipe Suc pipe Capi pipe Dryer Hot pipe Vacum pump should be placed at the outdoor where is able to clear a...

Страница 27: ...he pinch plier charging pipe OUT DOOR NO SVC process Image Details 1 Reassemble the valve ass y with coupling pipe to clockwise 2 Connect the blue hose of the guage to the coupling pipe and the yellow hose to the vacuum pump 3 Open the blue guage lever and start the vacuum pump 1 Be vacuumed the cycle with pump Time 60 80min If the vacuum time is less than 60min ref COP air coolong would be weak 1...

Страница 28: ...wer of refrigerator and then start to charge the ref 10min Charge the ref until going out the water vapour condensing on the can outlet 1 Check the leakage You must rework from Step 1 when the leakage is detected 1 Clean and clear around the machinery room when the service is finished 2 Assemble the machinery room cover 17 Finish 14 Connecting of coupling pipe adapta 15 Charging 16 Leakage Test 27...

Страница 29: ... MAIN AS RFP 311 1 3001416640 COVER M PCB BOX AS PCM BACK COATING 1 301149DX20 PP BLACK RPF 311 301149DX00 COVER HI T PP WHITE RFP 311 1 301149DX10 PP T SILVER RFP 311 3012938900 HINGE T AS RFP 311 1 3016001250 SPECIAL BOLT M 6X15 SWCH22A WH 3 3016044410 SPECIAL WASHER M HI SGCC T1 0XI D9 0XO D15 1 3 3010937720 CAP DV HI HOLE M HIPS 1 3012106500 FOOT ADJ L AS PP INSERT 1 PP INSERT 3016001250 SPECI...

Страница 30: ...11 SCREW TAPPING T1 TRS 4 12 MFZN 1 3016003300 SPECIAL BOLT T2 M6 5 20 4 4019H09031 SPECIAL WASHER SWRH 2 301119VJ00 CASE VAPORI AS RFP 301 1 3811402600 COVER RELAY LZ88CY 1 3015103800 SPRING COVER RELAY LZ88CY COVER RELAY FIXING 1 3018134600 SWITCH P RELAY AS B60 120 QP2 15C RSCR DONPER 1 3015103900 SPRING OVERLOAD PROTECTOR LZ88CY OLP FIXING 1 7122401011 SCREW TAPPING T2S TRS 4 10 MFZN 1 7112401...

Страница 31: ... 30100B9X50 T SILVER TSH1P RFP 301 BLACK BLH1C RFP 301 6 3 Door Compartment NO PART CODE PART NAME Q ty RN 341 RN 342 RN 334 RN 335 RN 336 30100B9X00 ASSY F DR 30100B9X30 AL SILVER x x x x x x 1 1 1 1 1 1 1 1 1 1 x x x x 1 x x 1 1 x 1 x 1 ABS RFP 340 x x x x 1 1 x x x ASG4P RFP 301 SPEC 1 x x x x RN 343 COLOR COLOR the others WHITE DWG1C RFP 301 BLACK DWG1C RFP 302 303 AL SILVER ASG4P RFP 302 303 ...

Страница 32: ...RFP 312 313 30100C3G30 RFP 312 313 1 1 3011450510 SILVER PP RFP 340 30100C4700 ASSY R DR WHITE DWG1C RFP 314 x 30100C4710 AL SILVER ASG4P RFP 314 x x 1 x x 30100C4720 T SILVER TSH1P RFP 314 30100C4730 BLACK BLH1C RFP 314 1 1 BLACK PP RFP 340 30100C4800 ASSY R DR WHITE DWG1C RFP 315 BLACK x x x x 1 x 30100C4810 AL SILVER ASG4P RFP 315 30100C4820 T SILVER TSH1P RFP 315 30100C4830 BLH1C RFP 315 1 1 3...

Страница 33: ... AS WHITE WH1802B RFP 302 BLACK BK103B RFP 302 C3 3019068700 POCKET R CRISTAL GPPS RFP 301 3011450710 SILVER PP RFP 340 BLACK PP RFP 340 1 1 1 1 1 1 C2 5 3011450700 COVER HI HRNS T R WHITE PP RFP 340 3019068710 GRAY 3 3 3 3 3 3 GPPS RFP 301 3019068720 BLUE C4 3019068800 POCKET J CRISTAL GPPS RFP 301 1 1 1 1 1 1 3019068810 GRAY GPPS RFP 301 3019068820 BLUE GPPS C6 3014257200 PANEL F CONTL AS GRAY 3...

Страница 34: ...STAL 301119V210 GPPS GRAY 3011835900 FAN OD100 SHAFT OD3 17 1 3011200510 CLAMP FAN SUS 304 SPRING 1 3010664700 BRACKET FAN MOTR PP T2 0 1 7112401211 SCREW TAPPING T1 TRS 4 12 MFZN 4 3010107100 ABSORBER F MOTR NBR 2 3015922200 MOTOR F AS AC220V 50HZ 2500RPM S6111BDF04 1 3018932400 LOUVER F B PP 1 3013415800 KNOB F CONTL PP 1 3018932500 LOUVER F AS RFP 301 AC 230V 50HZ 1 3018932300 LOUVER F A PP 1 4...

Страница 35: ...E GLAS VEGTB T3 2 1 3 3011664700 DECO SHELF F HIPS 1 3017861200 SHELF GLAS R T3 2 1 3015523800 WINDOW M FLOW DUCT GPPS 1 3017861100 SHELF R AS RFP 301 1 3013416300 KNOB R CONTL HIPS RFP 311 1 3013600020 LAMP AS 240V 15W E14 CC7A 2 3014811310 SENSOR R AS RFP 311 PBN 43 1 3013387900 INSU M FLOW DUCT F PS 1 3017903900 SOCKET LAMP AS AC250V 1 7121300811 SCREW TAPPING T2S PAN 3X8 MFZN RN 34 301149C430 ...

Отзывы: