and provides a 125 Kbps guarantee for everything else. For web browsing the normal rules of
first-come, first-forwarded will apply when competing for the 125 Kbps bandwidth. This may
mean 125 Kbps, but it may also mean much slower speed if the connection is flooded.
Setting up pipes in this way only puts limits on the maximum values for certain traffic types. It
does not give priorities to different types of competing traffic.
10.1.6. Precedences
The Default Precedence is Zero
All packets that pass through NetDefendOS traffic shaping pipes have a
Precedence
. In the
examples so far, precedences have not been explicitly set and so all packets have had the same
default precedence which is 0.
There are 8 Possible Precedence Levels
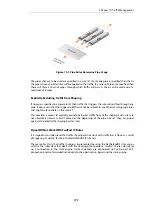
Eight precedences exist which are numbered from 0 to 7. Precedence 0 is the least important
(lowest priority) precedence and 7 is the most important (highest priority) precedence. A
precedence can be viewed as a separate traffic queue; traffic in precedence 2 will be forwarded
before traffic in precedence 0, precedence 4 forwarded before 2.
Figure 10.4. The Eight Pipe Precedences
Precedence Priority is Relative
The priority of a precedence comes from the fact that it is either higher or lower than another
precedence and not from the number itself. For example, if two precedences are used in a traffic
shaping scenario, choosing precedences 4 and 6 instead of 0 and 3 will makes no difference to
the end result.
Allocating Precedence to Traffic
The way precedence is assigned to traffic is specified in the triggering pipe rule and can be done
in one of three ways:
•
Use the precedence of the first pipe
Each pipe has a
Default Precedence
and packets take the default precedence of the first pipe
they pass through.
Chapter 10: Traffic Management
784
Содержание NetDefendOS
Страница 30: ...Figure 1 3 Packet Flow Schematic Part III Chapter 1 NetDefendOS Overview 30 ...
Страница 32: ...Chapter 1 NetDefendOS Overview 32 ...
Страница 144: ...Chapter 2 Management and Maintenance 144 ...
Страница 220: ... Enable DHCP passthrough Enable L2 passthrough for non IP protocols 4 Click OK Chapter 3 Fundamentals 220 ...
Страница 267: ... SourceNetwork lannet DestinationInterface any DestinationNetwork all nets 4 Click OK Chapter 3 Fundamentals 267 ...
Страница 284: ...Chapter 3 Fundamentals 284 ...
Страница 360: ...The ospf command options are fully described in the separate NetDefendOS CLI Reference Guide Chapter 4 Routing 360 ...
Страница 392: ...Chapter 4 Routing 392 ...
Страница 396: ...Web Interface 1 Go to Network Ethernet If1 2 Select Enable DHCP 3 Click OK Chapter 5 DHCP Services 396 ...
Страница 419: ... Host 2001 DB8 1 MAC 00 90 12 13 14 15 5 Click OK Chapter 5 DHCP Services 419 ...
Страница 420: ...Chapter 5 DHCP Services 420 ...
Страница 424: ...2 Now enter Name lan_Access Action Expect Interface lan Network lannet 3 Click OK Chapter 6 Security Mechanisms 424 ...
Страница 573: ...Chapter 6 Security Mechanisms 573 ...
Страница 575: ...This section describes and provides examples of configuring NAT and SAT rules Chapter 7 Address Translation 575 ...
Страница 607: ...Chapter 7 Address Translation 607 ...
Страница 666: ...Chapter 8 User Authentication 666 ...
Страница 775: ...Chapter 9 VPN 775 ...
Страница 819: ...Chapter 10 Traffic Management 819 ...
Страница 842: ...Chapter 11 High Availability 842 ...
Страница 866: ...Default Enabled Chapter 13 Advanced Settings 866 ...
Страница 879: ...Chapter 13 Advanced Settings 879 ...

