background image

SNMP-based Management

The   switch   can   be   managed   with   an   SNMP-compatible   console   program.  The   switch
supports SNMP v1, SNMPv2c and SNMPv3.

Connecting to the Console Port

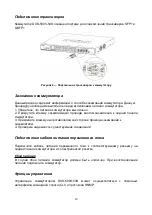
The   front   panel   of   the   switch   provides   a   mini-USB   console   port   to   connect   a   remote
system for monitoring and configuring the switch.

Note: to use the mini-USB console port, you may be required to install a mini-USB driver.

To use the mini-USB console port, the following equipment is needed:

A terminal or a computer with both an RS-232 serial port and terminal emulation 
software

A console cable with a male DB9 connector on one end and a mini-USB connection
on the other

To connect the mini-USB console port on the switch to the computer:

Connect the male DB9 connector on the console cable (shipped with the switch) to
the RS-232 serial port on the computer running terminal emulation software, then
insert the mini-USB connector into the console port on the front of the switch.

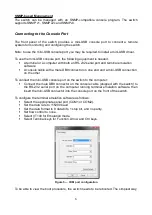
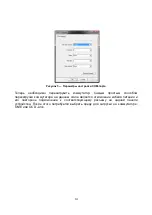
To configure the terminal emulation software as follows:

Select the appropriate serial port (COM1 or COM2).

Set the data rate to 115200 baud.

Set the data format to 8 data bits, 1 stop bit, and no parity.

Set flow control to none.

Select VT100 for Emulation mode.

Select Terminal keys for Function, Arrow and Ctrl keys.

Figure 5 — COM port configuration

To be able to view the boot procedure, the switch needs to be rebooted. The simplest way,

6

Содержание DXS-5000-54S

Страница 1: ...nk DXS 5000 54S 48 port 10G SFP 6 port 40G QSFP interfaces data center switch with 2 front to back AC PSUs 4 front to back fan modules L3 48 10GBase X SFP 6 40GBase X QSFP 2 AC 4 Quick Installation Gu...

Страница 2: ...t USB 2 0 Type A port for connecting a USB storage device Mini USB console port Mini USB console port for connecting to a PC with a mini USB console cable included in the package The Command Line Inte...

Страница 3: ...hardware installation guidelines that the user must follow in order to properly and safely install this switch into the appropriate environment Visually inspect the power cord and see that it is fully...

Страница 4: ...he switch using the screws provided Figure 2 Attaching rack mount brackets to the switch Fasten the mounting brackets in any available open space in the rack using the rack mounting screws Figure 3 In...

Страница 5: ...re the switch is installed 4 Verify that the ground connections on the switch and the rack are securely attached Plugging in the AC Power Cord Plug one end of the AC power cord into the power socket o...

Страница 6: ...on one end and a mini USB connection on the other To connect the mini USB console port on the switch to the computer Connect the male DB9 connector on the console cable shipped with the switch to the...

Страница 7: ...age to reboot the switch is to unplug and re insert the power cable from and into the power receptacle on the back of the switch Then select an operating system to boot the switch in either D Link OS...

Страница 8: ...0 45 5 c 2 6 7 2012 D 2013 E 2014 F 2015 G 2016 H 2017 I 2018 J 2019 0 2020 1 2021 2 2022 1 2 9 A B D Link 8...

Страница 9: ...54S 2 RJ 45 mini USB 4 2 19 DXS 5000 54S 10GBase X SFP 48 SFP 10 40GBase X QSFP 6 QSFP 40 USB 2 0 USB 2 0 Type A USB mini USB mini USB mini USB CLI 10 100 1000Base T RJ 45 Out of band 10 100 1000 PSU...

Страница 10: ...FAN STAT Link Activity Speed 10 40 1000 Link Activity RJ 45 1000 10 100 10...

Страница 11: ...1 10 19 2 3 11...

Страница 12: ...DXS 5000 54S SFP QSFP 4 1 2 3 4 DXS 5000 54S CLI SNMP 12...

Страница 13: ...CLI CLI SNMP SNMP DXS 5000 54S SNMP 1 2c 3 mini USB mini USB mini USB mini USB RS 232 RS 232 mini USB 1 RS 232 2 mini USB COM1 COM2 115200 8 1 VT100 Terminal keys 13...

Страница 14: ...5 COM ONIE D Link 14...

Страница 15: ...band PSU 1 PSU 2 FAN STAT Link Activity Speed Link Activity RJ 45 Reset IEEE 802 3z 1000Base X IEEE 802 3ae 10GBase X IEEE 802 3ba 40GBase X IEEE 802 3 10Base T IEEE 802 3u 100Base TX IEEE 802 3ab 10...

Страница 16: ...294 83 1 006 58 MTBF 205 000 74 62 4 0 45 C 40 70 C 5 95 5 95 cULus CCC BSMI CB CE EMI EMC FCC IC CCC CB CE BSMI 16...

Страница 17: ...C Negruzzi 8 Tel 373 22 80 81 07 E mail info dlink md 169 375 17 218 13 65 E mail support dlink by c 143 7 727 378 55 90 E mail almaty dlink ru 3 23 5 374 10 39 86 67 info dlink am Lietuva Vilnius irm...

Отзывы: