1) Make sure the padlock is in a locked state and that the
cap spins freely.
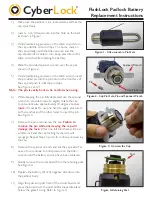
2) Insert a 1/16” Allen wrench into the hole on the back
as shown in Figure 1.
3) While maintaining pressure on the Allen wrench, turn
the cap until the wrench drops. The home mark on
the cap will align with the Allen wrench and the
cap should not be able to turn. Keep pressure on the
Allen wrench while replacing the battery.
4) Slide the provided spanner wrench over the cap as
shown in Figure 2.
5) While maintaining pressure on the Allen wrench, insert
the provided pin into the pin hole on the front face of
the cap and push it until the pin stops.
See Figure 2 and 3.
Note: The pin is easily bent so be careful when using.
6) While keeping the pin fully depressed, use the spanner
wrench to provide torque to slightly rotate the cap
counter-clockwise approximately 10 degrees but
no
more
. It is easiest to use one hand to apply pressure to
both wrenches and the other hand to insert the pin.
See Figure 3.
7) Remove the pin and unscrew the cap.
Failure to
remove the pin while unscrewing the cap will
damage the lock.
After one full turn there will be an
audible click and the cap locking mechanism will
reengage. Repeat Steps 5 and 6 to continue unscrewing
the cap.
8) Remove the spanner wrench and set the cap aside. For
ease of use continue to hold pressure on the Allen
wrench until the battery and cap have been replaced.
9) Gently remove the circuit board from the retaining post.
See Figure 4.
10) Replace the battery (EL123), negative side down into
the padlock body.
11) Align the post and post hole of the circuit board and
press the board over the post until it snaps into place
below the gasket o-ring. Refer to Figure 4.
Cyber
Lock
®
FlashLock Padlock Battery
Replacement Instructions
Figure 1:
Allen wrench in Pin Hole
Figure 2:
Cap Pin Hole, Pin and Spanner Wrench
Figure 3:
Unscrew the Cap
Figure 4:
Retaining Post
Spanner Wrench
Post
Cap Pin Hole
Pin


