background image

INSTRUCTION MANUAL
BUILT-IN FRIDGE 
FREEZER

CIFF7012

Содержание CIFF7012

Страница 1: ...INSTRUCTION MANUAL BUILT IN FRIDGE FREEZER CIFF7012 ...

Страница 2: ...verview 13 Operation 14 Switching On Your Unit 14 Adjusting the Temperature 14 Noises Inside the Unit 14 Tips for Keeping Food in the Unit 15 Preparations for Freezing 15 Defrosting Frozen Food 16 Cleaning 17 Defrosting 17 Cleaning the Interior and the Exterior of the Unit 17 Maintenance 18 Changing the Internal Light 18 Servicing 18 Switching Off for Long Periods of Time 18 Condensation 18 Dispos...

Страница 3: ...not use mechanical devices or other means to accelerate the defrosting process other than those recommended by the manufacturer Do not use electrical appliances inside the food storage compartments of the unit unless they are of the type recommended by the manufacturer If the mains cable is damaged it must be replaced by the manufacturer its service agent or a qualified technician in order to avoi...

Страница 4: ...they do not play with the unit If your unit is fitted with a lock to prevent children being trapped inside keep the key out of reach and not in the vicinity of the unit Do not store volatile or flammable substances such as aerosol cans with a flammable propellant in the unit Do not store bottles or glass containers in the freezer compartment Contents can expand when frozen fizzy drinks which may b...

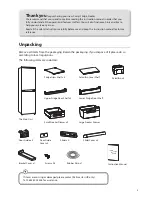
Страница 5: ...reezer Drawer Upper Fridge Door Shelf x 3 Instruction Manual If items are missing or damaged please contact Partmaster UK only Tel 0844 800 3456 for assistance Lower Fridge Door Shelf Thank youfor purchasing your new Currys Fridge Freezer We recommend that you spend some time reading this instruction manual in order that you fully understand all the operational features it offers You will also fin...

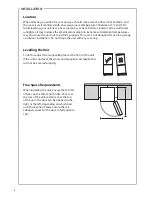
Страница 6: ...it is not designed for use in a garage or outdoor installation Do not drape the unit with any covering Levelling the Unit To do this adjust the two levelling feet at the front of the unit If the unit is not level the doors and magnetic seal alignments will not be covered properly Free Space Requirements When installing the unit ensure that 30 mm of free space is left at both sides 50 mm at the rea...

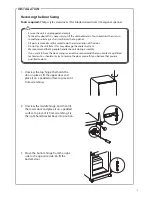
Страница 7: ...yle screwdriver Flat bladed screwdriver Hexagonal spanner Ensure the unit is unplugged and empty To take the door off it is necessary to tilt the unit backwards You should rest the unit on something solid e g a chair just below the top panel All parts removed must be saved to do the reinstallation of the door Do not lay the unit flat as this may damage the coolant system We recommend that 2 people...

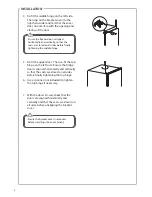
Страница 8: ... 5 Re fit the upper door Then re fit the top hinge on the left side Ensure the fridge door is aligned horizontally and vertically so that the seals are closed on all sides before finally tightening the top hinge 6 Use a spanner not included to tighten the top hinge if necessary 7 With the doors closed check that the doors are aligned horizontally and vertically and that the seals are closed on all...

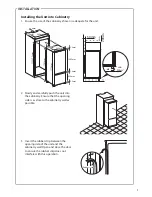
Страница 9: ...e opening side is as close to the cabinetry wall as possible 540mm 540mm 1045mm 628mm 1772mm 1745mm 30mm 14mm 55mm 1772 1776mm 560mm 38mm 550mm 3 Insert the rubber strip between the opening side of the unit and the cabinetry wall Open and close the door to ensure the rubber strip does not interfere with this operation 50mm min 200cm min 200cm2 Rubber strip INSTALLATION 9 ...

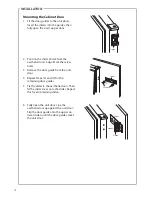
Страница 10: ...he slider cover onto the slider Repeat this for all remaining sliders 6 Fully open the unit door Line the aesthetic door up against the unit door Slip the door guide onto the upper an lower sliders until the door guides meet the unit door Mounting the Cabinet Door 1 Fit the door guides to the unit doors Insert the sliders into the guides then fully open the unit s upper door Guide Slider Screws Gu...

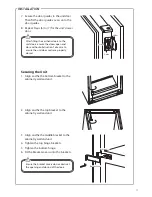
Страница 11: ...to the cabinetry wall and unit 3 Align and fix the middle bracket to the cabinetry wall and unit 4 Tighten the top hinge brackets 5 Tighten the bottom hinge 6 Fit the bracket covers onto the brackets Bracket Cover Bracket After fitting the aesthetic doors to the unit doors ensure the doors open and close without obstruction Take care to ensure the unit door seals are properly closed Ensure the bra...

Страница 12: ...mation refer to the Cleaning section Before Plugging in YOU MUST Check that you have a socket which is compatible with the plug supplied with the unit Before Turning On Do not turn on until two hours after moving the unit The coolant fluid needs time to settle Before Using Your Unit Before placing any food in your unit turn it on and wait for 24 hours to make sure it is working properly and to all...

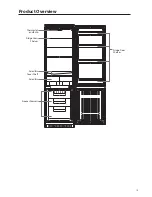
Страница 13: ...Product Overview Freezer Drawers Thermostat and Bulb Fridge Glass Shelves Salad Bin Salad Bin Cover Shelf Fridge Door Shelves 13 ...

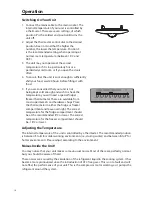
Страница 14: ... thermometer These are available from most supermarkets and hardware shops Place the thermometer in either the fridge or freezer compartment and leave overnight The correct temperature for the fridge compartment should be at the recommended 8 C or lower The correct temperature for the freezer compartment should be 18 C or lower Adjusting the Temperature The internal temperature of the unit is cont...

Страница 15: ... may want to microwave it straight from the freezer Use special freezer bags freezer film polythene bags plastic containers and aluminium foil heavy duty grade only If in doubt double wrap your food Don t use aluminium foil for acidic foods e g citrus fruits Don t use thin cling film glass or used food containers without cleaning Exclude as much air from the container as possible You could buy a s...

Страница 16: ...defrost at room temperature Don t forget that defrosting in a warm area encourages the growth of bacteria and low temperature cooking may not destroy dangerous bacteria 2 Drain off and throw away any liquid lost during defrosting 3 Always make sure there are no ice crystals in the food before cooking particularly with meat These crystals indicate that the food has not fully defrosted 4 Cook food a...

Страница 17: ... up by placing a bowl of hot water inside the freezer compartment and closing the door As the solid frost loosens scrape it away with the plastic scraper 3 When defrosting is complete clean your unit s interior and exterior Cleaning the Interior and the Exterior of the Unit Remove all the shelves drawers and salad bin before cleaning Wipe the inside of the unit with a weak solution of bicarbonate ...

Страница 18: ...t unpleasant smells Condensation Condensation may appear on the outside of the unit This may be due to a change in room temperature Wipe off any moisture residue If the problem continues please contact a qualified technician for assistance Disposal Old units still have some residual value An environmentally friendly method of disposal will ensure that valuable raw materials can be recovered and us...

Страница 19: ...re between 16 C and 38 C Storage Temperature Freezer 18 C Fridge 0 8 C average 4 C Energy Consumption 0 722 kWh 24 hours Energy consumption 263 kWh per year based on standard test results for 24 hours Actual energy consumption will depend on how the appliance is used and where it is located Airborne Acoustical Noise 42dB Energy Grading A Temperature Rise 12 hours Freezing Capacity 3kg 24 hours Rat...

Страница 20: ...ll help conserve natural resources and ensure that it is recycled in a manner that protects human health and the environment For more information about where you can drop off your waste for recycling please contact your local authority or where you purchased your product Visit Partmaster co uk today for the easiest way to buy electrical spares and accessories With over 1 million spares and accesso...

Отзывы: