background image

17

14.

DECK LIFT SHAFT REPLACEMENT

14.1. The following section of this manual need to be 

accomplished:

DECK REMOVAL 

SEAT REMOVAL

CONSOLE REMOVAL, RIGHT AND LEFT SIDE

BATTERY REMOVAL

NOTE: 

THE DECK LIFT SHAFT ALSO DOU-

BLES AS THE FULCRUM POINT FOR THE 
PARKING BRAKE ROD AND HANDLE. 

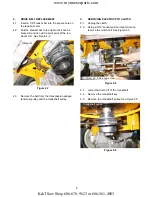
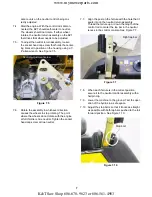
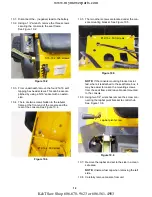
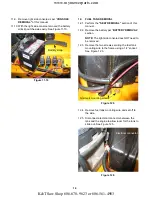
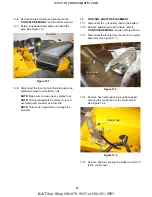
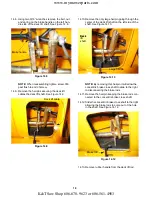
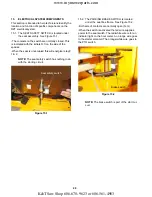
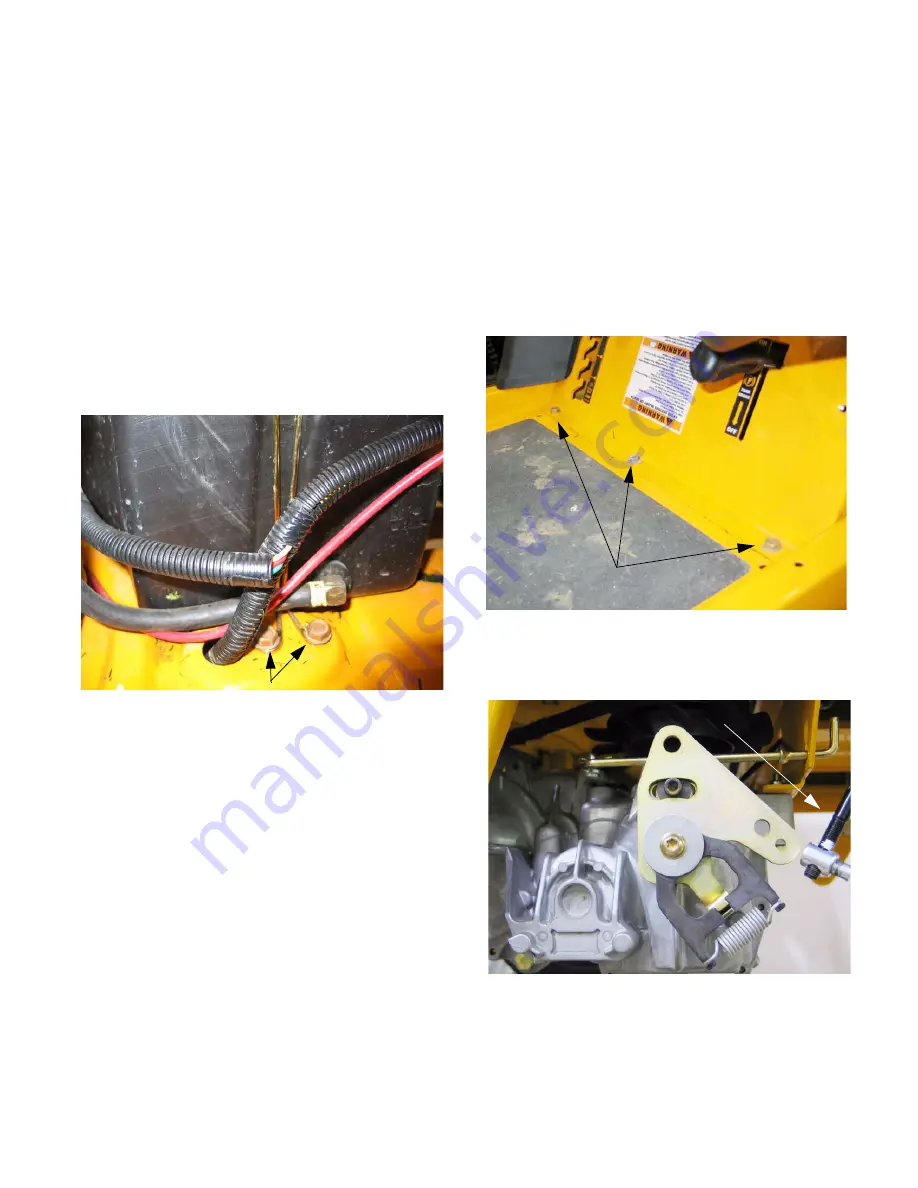
14.2. Remove the two screws securing the fuel tank 

mounting wire to the frame using a 1/2” socket. 
See Figure 14.2.

14.3. Remove fuel tank mounting wire and set off to 

the side.

14.4. Disconnect the electrical connection between 

the fuel tank and the engine. This will allow room 
for the fuel tank to be moved to get a wrench 
underneath.

Figure 14.2

Fuel tank mounting screws

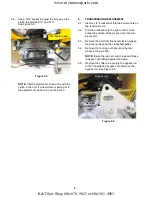
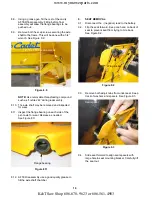
14.5. Carefully lift the fuel tank and remove the hex 

head cap screw under the rear of the fuel tank 
securing the seat box frame to the frame. Using 
a 1/2 “wrench will help immensely 

NOTE: 

The fuel tank does NOT need to be 

taken out.

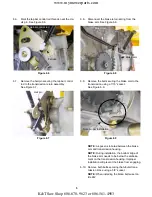
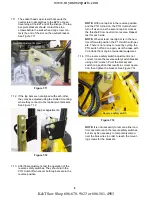
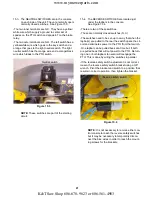
14.6. Using the same 1/2” wrench remove the other 

eight screws hold down the seat box frame. 
There area total two in the rear, two on each 
side and three in the front for a tally of nine.    
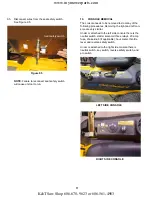
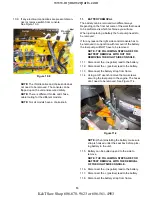
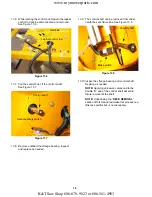
See Figure 14.6.

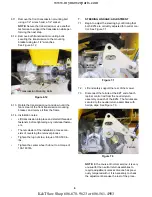
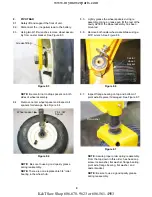
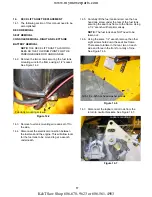
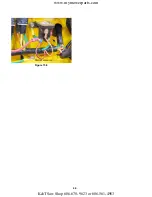
14.7. Disconnect the lapbar control rods from the 

return to neutral brackets. See Figure 14.7.

Figure 14.6

5/16-18 x .625 hex head washer screws

Figure 14.7

Lapbar control rod

www.mymowerparts.com

K&T Saw Shop 606-678-9623 or 606-561-4983

Содержание RZT 17

Страница 1: ...includes the contents of the Operators Manual which came with your equipment No liability can be accepted for any inac curacies or omission in this publication although every care has been take to make it as complete and accurate as possible The right is reserved to make changes at any time to this document without prior notice and without incurring an obligation to make such changes to previously...

Страница 2: ...www mymowerparts com K T Saw Shop 606 678 9623 or 606 561 4983 ...

Страница 3: ...lutch 3 Transmission Replacement 4 Steering Linkage Adustment 6 Pivot Bar 9 Seat Removal 10 Console Removal 11 Battery Removal 13 Fuel Tank Removal 14 Control Shaft Replacement 15 Deck Lift Shaft Replacement 17 Electrical System Components 20 TABLE OF CONTENTS www mymowerparts com K T Saw Shop 606 678 9623 or 606 561 4983 ...

Страница 4: ...www mymowerparts com K T Saw Shop 606 678 9623 or 606 561 4983 ...

Страница 5: ...un and relaxing mow ing The RZT 22 is very similar to the RZT 17 except for the twin cylinder 22 HP Briggs Stratton Intek There are also 4 wheels instead of 2 on the 50 triple blade stamped deck All versions of the Cub Cadet RZT and White ZT are bagger capable 1 DECK LEVELING 1 1 To adjust the deck pitch front to back loosen or tighten the jam nuts located on the front stabi lizer bracket using a ...

Страница 6: ...eys NOTE The spindle covers do not need to be removed 2 4 Remove the belt from the clutch 3 DECK REMOVAL 3 1 Release the deck J pins from the rear hanger arms See Figure 3 1 3 2 Slide the deck forward until the front stabilizer bar can be lifted away from the front mounting bracket 3 3 Slide the deck out from underneath the unit Figure 2 1 1 2 Breaker bar Idler arm Figure 3 1 Deck adjustment gear ...

Страница 7: ...on pulleys tensioner pulley and the crankshaft pulley Figure 4 2 Idler arm 5 SERVICING ELECTRIC PTO CLUTCH 5 1 Unplug the clutch 5 2 Using a 9 16 socket and an impact wrench remove the clutch bolt See Figure 5 2 5 3 Lower the clutch off of the crankshaft 5 4 Remove the crankshaft key 5 5 Remove the crankshaft pulley See Figure 5 5 Figure 5 2 7 16 20 x 4 0 Hex cap screw Figure 5 5 Key Crankshaft pu...

Страница 8: ...l it can be braced in position at the pivot point of the ten sioner arm 6 3 Remove the belt from the transmission pulleys tensioner pulley and the crankshaft pulley 6 4 Remove the four lug nuts securing the rear wheel to the axle hub NOTE Insure the lap bar control rods and brake rods are not rubbing against the frame 6 5 Remove the cotter pin securing the bypass rod to the transmission bypass arm...

Страница 9: ...e transmission using a 7 16 socket See Figure 6 9 NOTE A spacer is located between the brake arm and transmission housing NOTE During installation the bottom ridge of the brake arm needs to be below the emboss ment on the transmission housing Improper installation will prevent the brake from engaging 6 10 Remove both bolts securing the tubular trans mission brace using a 5 8 socket NOTE When insta...

Страница 10: ...ug nuts to a torque of 350 500 in lbs Tighten the center wheel hub nut to a torque of 100 160 ftlb 7 STEERING LINKAGE ADJUSTMENT 7 1 Begin to adjust the steering by confirming that both EZTs are correctly adjusted for neutral con trol See Figure 7 1 7 2 Lift and safely support the rear of the mower 7 3 Disconnect the ferrule at the EZT end of each lap bar control rod from the neutral return assemb...

Страница 11: ...ne at full throttle is true neutral Tighten the socket head cap screw at true neutral Figure 7 5 Neutral adjustment screw 7 7 Align the post on the ferrule with the hole that it seats into on the neutral return assembly Thread the ferrule up or down the length of the control rod to center the lap bar in the neutral recess in the control console See Figure 7 7 7 8 When each ferrule is in the correc...

Страница 12: ...cond lap bar crosses the threshold from neutral into reverse Repeat test for each side NOTE When at least one lap bar is in the neu tral or forward position the PTO clutch will oper ate There is not a relay to re set by cycling the PTO switch off and on again as is the case with Cub Cadet front engine residential equipment 7 14 If the reverse safety switch adjustment is not correct loosen the reve...

Страница 13: ...Wheel spacer 79 x 347 Spacer 8 5 Lightly grease the wheel spacers during re assembly Using a grease gun fill the rest of the cavity AFTER the wheel assembly has been mounted 8 6 Remove both caster wheel assemblies using a 9 16 wrench See Figure 8 6 8 7 Inspect flange bearing on top and bottom of pivot axle Replace if damaged See Figure 8 7 NOTE Assure proper order during reassembly From the top do...

Страница 14: ...or wear Replace as needed See Figure 8 11 8 12 AFTER reassembly use a good quality grease to fill the axle shaft chamber 9 SEAT REMOVAL 9 1 Disconnect the negative lead to the battery 9 2 Flip the seat forward Keep one hand on back of seat to prevent seat from trying to bite back See Figure 9 2 9 3 Remove both wing knobs from under seat Keep track of washers and spacers See Figure 9 3 9 4 Slide se...

Страница 15: ... Removing the right and left con sole are very similar Under or attached to the left side console there is the neutral switch starter solenoid three relays 20 amp fuse choke knob if applicable hour meter throttle lever and reverse safety switch Under or attached to the right side console there is neutral switch key switch reverse safety switch and pto switch LEFT SIDE CONSOLE RIGHT SIDE CONSOLE ww...

Страница 16: ...unting bracket See Figure 10 5 NOTE If the console mounting bracket is slot ted where it is attached to the seat frame box it may be easier to loosen the mounting screws from the seat frame and leave bracket mounted to the console 10 6 Using two 1 2 wrenches remove the screw con necting the lapbar pivot bracket to control hub See Figure 10 6 10 7 Remove the lapbar and set to the side in a clean sa...

Страница 17: ...n with removal of the battery the fuel pump will NOT have to be removed NOTE THE FOLLOWING STEPS ARE FOR BATTERY REMOVAL WITH OUT THE REMOVING THE RIGHT SIDE CONSOLE 11 1 Disconnect the negative lead to the battery 11 2 Disconnect the positive lead to the battery 11 3 Disconnect the battery strap from frame 11 4 Using a 3 8 wrench remove the two screws securing the fuel pump to the engine The hose...

Страница 18: ...he right side console does NOT need to be removed 12 3 Remove the two screws securing the fuel tank mounting wire to the frame using a 1 2 socket See Figure 12 3 12 4 Remove fuel tank mounting wire and set off to the side 12 5 Disconnect electrical connector between the tank and the engine to allow room for the tank to slide out See Figure 12 5 Figure 11 10 Battery strap Figure 12 3 Fuel tank moun...

Страница 19: ... a good time to change the fuel filter Figure 12 7 Fuel tank 13 CONTROL SHAFT REPLACEMENT 13 1 Disconnect the negative lead to the battery 13 2 Remove appropriate side console refer to CONSOLE REMOVAL section of this manual 13 3 Disconnect the ferrule from the return to neutral assembly See Figure 13 3 13 4 Remove hex head cap screw and flat washer securing the control hub to the control shaft See...

Страница 20: ...e box See Figure 13 9 13 10 Inspect hex flange bearing and control shaft Replace as needed NOTE Applying anti seize compound to the double D end of the control shaft will aid in future removal of the shaft NOTE Undertaking the DECK REMOVAL section of this manual will make this procedure a little less painful but is not necessary Figure 13 6 Lap bar control rod Hair pins Figure 13 7 Control shaft R...

Страница 21: ...the fuel tank to be moved to get a wrench underneath Figure 14 2 Fuel tank mounting screws 14 5 Carefully lift the fuel tank and remove the hex head cap screw under the rear of the fuel tank securing the seat box frame to the frame Using a 1 2 wrench will help immensely NOTE The fuel tank does NOT need to be taken out 14 6 Using the same 1 2 wrench remove the other eight screws hold down the seat ...

Страница 22: ...ft See Figure 14 10 NOTE By removing this hairpin it will allow the concentric brake cross shaft to slide to the right to disconnecting the brake rods 14 11 Remove the hairpin keeping the brake rods con nected to the concentric brake cross shaft 14 12 Slide the concentric brake cross shaft to the right allowing the brake rods to come out of the hole in the shaft See Figure 14 12 14 13 Remove rubbe...

Страница 23: ... allow enough clearance for deck lift assembly to slip out the back easily See Figure 14 17 14 18 Shuffle the deck lift assembly to the left till the right side falls out of the seat box 14 19 From this point the deck lift shaft and deck lift handle will slip of the rear of the unit where the battery was See Figure 14 19 NOTE The outer hex flange bearing on the deck lift shaft can be replaced with...

Страница 24: ... relay 1 2 NOTE The seat safety switch has nothing to do with the starting circuit 15 2 The PARKING BRAKE SWITCH is located under the seat box frame See Figure 15 2 Both sets of contacts are normally open N O When the switch is activated the red wire supplies power to the seat switch The red white wire is for an indicator light on the hour meter An orange wire goes to the starter solenoid The oran...

Страница 25: ...es These are normally closed switches N C The switches need to be set up in a way that when the lapbar s are pulled to the rear the switch opens the cir cuit and eliminates power to the PTO from that switch One lapbar can be pulled back at a time but if both are pulled back that will cut power to the PTO Return ing one or both lapbars to neural will reengage the PTO This is done by wiring the swit...

Страница 26: ...r change to the key switch Units with serial number before 1F014G20062 should have key switch 725 04019 Delta switch number 6900 31P and Harness 725 04170 When the old key switch is turned to the start position it doesn t energize the fuel shut off solenoid This will not allow fuel to flow to the carburetor while the engine is cranking To correct this there is a new key switch 725 04228 and a harn...

Страница 27: ...ceive power terminal 85 when the seat switch is activated The PTO RELAY should have a consistent ground terminal 86 and will also receive power terminal 85 when the seat switch is activated The BRAKE RELAY should have a consistent ground terminal 86 and will receive power terminal 85 when the brake switch is activated 15 8 The STARTER SOLENOID is located under the right console just to the right o...

Страница 28: ...24 Figure 15 8 Starter solenoid www mymowerparts com K T Saw Shop 606 678 9623 or 606 561 4983 ...

Страница 29: ...25 www mymowerparts com K T Saw Shop 606 678 9623 or 606 561 4983 ...

Страница 30: ...26 www mymowerparts com K T Saw Shop 606 678 9623 or 606 561 4983 ...

Отзывы: