background image

Downloaded 

from CruisersOwnersForum 

http://www.CruisersOwnersForum.com

Содержание 3580 Flybridge Series

Страница 1: ...General Layout 2 1 3 Controls and Indicators 3 1 4 Principles of Operation 4 1 5 Getting Underway 5 1 6 Periodic Checks and Services 6 1 7 Storage for Extended Lay Up 7 1 8 General Maintenance 8 1 9 A...

Страница 2: ...Crujsers yachts Downloaded from CruisersOwnersForum http www CruisersOwnersForum com...

Страница 3: ...nual 3 Ring Binder 1 3 Owner s Manuals Envelopes 1 4 WARRANTY INFORMATION 1 5 Dealership Responsibilities 5 Your Responsibilities 1 5 Warranty Service 1 5 c risers yacht s 35801SS A ytlrldge Series 1...

Страница 4: ...exceeding existing safety and quality stan dards established by the U S Coast Guard and the Boating Industry of America Cruiser has been manufacturing boats for over 40 years We take pride in our cra...

Страница 5: ...ari ous systems Section I contains a description of the skipper s kit and infonnation about the warranty Section 2 contains boat specifications such as dimensions and capacities There are also layout...

Страница 6: ...l Halon Fireboy Pamphlet AC DC Panel Information Packet RefrigeratOr Freezer User Guide Microwave User Manual Electric StOve Manual Trim Planes Manual Hydraulic Steering Manual AC Powered Battery Char...

Страница 7: ...ies Fill in the Cruisers limited warranty registration card which is located in an envelope inside the skipper s kit Keep a record of the hull number for future reference 2 Inspect the boat at the tim...

Страница 8: ...Cruisers yachts Downloaded from CruisersOwnersForum http www CruisersOwnersForum com...

Страница 9: ...1CATIONS 2 2 Dimensions 2 2 GENERAL LAYOUT 2 3 Belowdecks 3580 85 2 3 Aftcabin 2 4 Engine Compartment and Bilge Layout 2 5 Exterior Lighting 2 6 3560J85 Flybridge Seri85 2 1 Downloaded from CruisersOw...

Страница 10: ...04 cm Bridge Clearance w Arch 13 7 4 1 m Bridge Clearance w o Arch 1 3 5 m Waste System Capacity U S Gallons 70 Gal 265 Litre Waste Holding Capacity U S Gallons 40 Gal IS2 Litre Engine Options MerCrui...

Страница 11: ...Belowdecks HEAD DINETfE 3S80J85 FlybfOClge Se es MIDSIDP BELOW 2 3 FORWARD STATEROOM GALLEY OPTIONAL LOWER STATION HELM SALON CSR161 Cruisers yachl s Downloaded from CruisersOwnersForum http www Crui...

Страница 12: ...2 4 STAINLESS ANCHOR ROLLER COMMAND BRIDGE FIRE EXITINGUISHER SHORE POWER BRIDGE STAIRWAY CSR161 2 Cruisers yachts 3580185 Flybridgo Sefles Downloaded from CruisersOwnersForum http www CruisersOwners...

Страница 13: ...GENERAL lAYOUT 3585 BeJowdecks Cruisers yachl s 3580185 Flybndgo Senes 2 5 Downloaded from CruisersOwnersForum http www CruisersOwnersForum com...

Страница 14: ...MAST liGHT COURTESY liGHT BOARDING liGHTS NAV liGHTS 2 6 SPOT liGHT CSRIS 1 3 Cruisers yachrs 3580 85 Flybridge Serie5 Downloaded from CruisersOwnersForum http www CruisersOwnersForum com...

Страница 15: ...7 8 12 Halon 13 Batt Charger 14 Gen Strainer 15 Gen Seacock 16 Eng Cooling Seacock POrt 17 Eng Cooling Seacock Stbd lB Eng Cooling StI ainers 19 Fresh Water Pump 20 Forward Bilge Pump 21 Air Cond Sea...

Страница 16: ...acock 16 Eng Cooling Seacock Port 17 Eng Cooling Seacock Stbd lB Eng Cooling Strainers 19 Fresh Water Pump 20 Forward Bilge Pump 21 Air Cond Pump Relay 22 Air Cond Strainer 2 8 14 18 11 10 CSR161 JA 2...

Страница 17: ...urmeter 3 3 Trim Tab Control 3 6 Eng ne Temperature Gauge 3 4 Engine Start Stop Pushbutton 3 6 Transmission Control 3 4 Spotlight Control 3 7 Voltmeter 3 4 Transmission Control 3 7 Accessory 3 4 Throt...

Страница 18: ...tailed information 2 SYNCHRONIZER GAUGE The synchronizer gauge compares engine speeds When lhe needle is althe lOp cenler line on the gauge the port and starboard engines are running in sync with each...

Страница 19: ...es indicate the pressure of the lubricating oil inside the engine Make a note of the oil pressure reading when the boat is new this can be considered your engine s normal oil pressure Fluctuations wil...

Страница 20: ...e port engine cranking bat tery and item 16 is a voltmeter for the starboard engine cranking battery Normal operating voltage when engine is a 1000 plus RPM is between 12 0 and 15 5 volts Higher or lo...

Страница 21: ...the top half to turn the blower on and on the bottom to turn the blower off Blower circuit pro tection is provided by a resettable circuit breaker located below the switch 22 and 23 IGNITION SWITCH It...

Страница 22: ...by a resettable circuit breaker located below the rocker switch 29 and 30 TRIM TAB CONTROL IMPORTANT Push the trim tab rocker switches in half second bursts Holding the rockers down too long will oven...

Страница 23: ...TOR Option for Gas Power Only When the alarm sounds gas fumes have been detected You musllurn the bilge blower on to evacuate the fumes Shut engines off if alarm persists See owner s information pamph...

Страница 24: ...Cruisers yachts Downloaded from CruisersOwnersForum http www CruisersOwnersForum com...

Страница 25: ...Water Hookup 4 31 Hot Water Heater 4 32 STEERING SySTEM 4 6 Helm 4 6 HEAD AND WASTE Rudder 4 6 CONTAMINANT SYSTEM 4 32 TRIM TABS 4 7 Waste Holding Tank 4 32 Waste Disposal 4 33 ELECTRICAL SYSTEM 4 7...

Страница 26: ...ure which is standard on diesel engines and an option on gas engines is the freshwater cooling system This system uses the incoming seawater to cool a secondary closed cooling system The seawater flow...

Страница 27: ...from forward to reverse while maint ajning a watertight seal on the shaft log and the shaft seal SHAIT SEAL A CAUTION The packing the rubber tubing and the gland nut adjustment should be impected mon...

Страница 28: ...oadings baltom COn dition and or engine condition could call for a propeller change to achieve the performance desired The propellers furnished by the factory are replaceable at COSL SELECTING A PROPE...

Страница 29: ...VALVE PORT VALVE CSAt61 The manual valves can control the fuel supply to the engines in three ways 1 Each engine can receive fuel from its respective tank pon tank to port engine and starboard tank t...

Страница 30: ...w the operating techniques in Section 5 Rudder The win rudders are offset from the shaft centerline to allow shaft re moval without having to remove the rudders Each rudder is also canted inboard slig...

Страница 31: ...I II I 0 evOlTS GIlQUI oro 2 o_gg 1 CCI IClI IQIMI II 0 1 ATOll UN VOLTAGE AC VO T ETER SELlCT J c JIOOtilDI J U UD 4TUIUoT1 tQl a J c i J un J c J c UlI OOClSlOI J CIII lR4TOIt t J t J t J tJ DC POWE...

Страница 32: ...unning all batteries are charged by the two engine alternatOrs and the rate of charge is controlled by voltage regula tors The system is grounded by grounding the cranking baueries to the engines and...

Страница 33: ...or off and they protect the system receiving the DC current power by automatically opening the circuit should a short or overload condition occur The reseltable circuit breaker protect the system rece...

Страница 34: ...ect the ignition system for the port engine on a twin engine boat There are two CABIN UGHTS Circuit breakers to control power to the cabin light switch es In the on position power is sent to the cabin...

Страница 35: ...rotect you from hazardous shock Your AC systems are rated for 25 volts at 60 cycles Source current can be provided from a 110 volt 60 cycle shore power station or from the onboard generator The AC sys...

Страница 36: ...they also pro tect the system receiving the AC load by automatically breaking the cir cuit in cases of shorlS or overloads IMPORTANT Read the generator owner s manual contained in the skipper s kit b...

Страница 37: ...oJ position 4 Disconnect shore power cablefrom the shore receptacle and then from the boat receptacle A CAUTION Do not turn on the breakerfor shore power ifthe reverse polarity indicator lights up Di...

Страница 38: ...l before operating generator AT RIfATIi OJ OJ OJ EEl SLIDE ______ PROTECTOR DOClSlDO G HEIl TOII CSR 159 6 Make sure DOCKSIDE 2 circuit weaker is of befure connecting shore power to boat When you are...

Страница 39: ...el from shore power and the other one from the generator Use the following table as an example of how to operate both AC panels simultaneously AC Switch DOCKSIDE I and DOCKSIDE 2 AC Power No 1 and No...

Страница 40: ...e are the master AC power switches for the AC Power No 1 panel Put the switches in the on position to send current to all circuit breakers on this panel When these switches are off the flow of current...

Страница 41: ...the outlets Push the circuit breaker to the on position to turn the water heater on The water healer is cono olled by a thermostat to keep the water at a constant temperature Move the switch to the of...

Страница 42: ......

Страница 43: ...ORT 58 P4 PP4 GND 19 E4 EE4 GEAR OIL PORT 59 4 PP5 TRIM 20 L5 EE5 TEMP PORT 60 PP5 P5 TRIM 21 EE5 E5 TEMP PORT 61 4 P6 TRIM 22 L6 E6 OIL PORT 62 P6 PP6 TRIM 23 E6 EE6 OIL PORT 63 P7 PP7 FUELSTBD 24 L7...

Страница 44: ...GND 82 I 4 12 V FEED STBD 83 I 4 12 V FEED STBD 84 I 4 12 V FEED PORT 85 1 4 12 V FEED PORT 86 MI 5 GND 87 K4 3 WIPER 88 K7 3 WIPER PARK 89 3 5 WIPER GND 90 1 4 LT NAV 4 20 Cruiser yachrs 358018S Fly...

Страница 45: ......

Страница 46: ...BULLET LT GND 50 3 3 HD IND GND 16 LI 2 FSRRSPKR 51 3 3 FWSNDR 17 L2 I FSRLSPKR 52 3 3 FWSNDRGND 18 L5 2 FSRRSPKR 53 3 3 FWGAUGEGND 19 L6 I FSRLSPKR 54 L4 4 BPFWD 20 01 2 SPTLT 55 4 3 BPFWD GND 21 02...

Страница 47: ......

Страница 48: ...8 F4 GEAROILS 58 9 3 CTSYLT 19 7 6 GEN STOP 59 9 5 CT5YLTGND 20 7 6 GEN SWFEED 60 5 6 CT5YLTGND 21 7 6 GENSTART 61 6 G4 CTSYLT 22 5 C2 GENBLOWER 62 N5 5 DC PANELGND 23 J4 8 STERNLT 63 N6 6 BILGE LT 24...

Страница 49: ...GNDHALON 87 G5 5 BLOWER 105 5 5 GNDAFrBP 88 5 5 BLOWER 106 6 5 GND WASH DN PMP 89 5 5 BLOWER 107 6 9 WASH DN SW 90 5 5 BLOWERGND 108 C6 9 WASHDNFEED 91 5 5 BLOWERGND 109 C4 3 LT SW FEED 92 5 5 BLOWER...

Страница 50: ......

Страница 51: ...SPKR 32 D7 2 LTSPT 10 Z7 3 LSPKR 33 J2 2 HORN II H6 Z4 LSPKR 34 J3 2 ALARMP 12 Z8 3 LSPKR 35 J4 2 LTSTERN IS H7 4 LTCTSY 36 J6 2 GNDHORN 14 H7 2 LTcrSY 37 J7 2 ALARMS 15 J8 4 GNDLTcrSY 38 PI 2 sw TRIM...

Страница 52: ...re noble metals A shaft zinc is installed at the factory Your dealer will install additional zincs to areas such as the rud ders Check these zincs periodically and have them replaced as needed See you...

Страница 53: ......

Страница 54: ...ll the tank only with potable water Using and refilling the tank often will help keep it a source of clean drinking water FlLTER PUMP AND PRESSURE ACCUMULATOR Water is drawn from the tank by a self pr...

Страница 55: ...l6n feature In this mode the boat is amnected to an unlimited DIlT e ofwater NEVER eave boat unattended whik using the city wal6 n feature Any major eaJ or break in the syrtem wiIJ aJ10w almormal bilg...

Страница 56: ...so equipped Waste Holding Tank The waste holding tank for the 3580 85 is located below the salon floor It can be accessed through the salon floor hatch Waste is pumped from head through a 1 5 sanitar...

Страница 57: ...IONAL A Y valve is installed in this version between the marine toilet and the waste holding tank The Y valve can direct the flow of waste to the hold ing tank or direct to an outlet seacock for overb...

Страница 58: ...st be in the over board position and the waste water outlet seacock must be open Close the outlet water seacock when not in use MACERATOR PUMP OPTIONAL CSA16H 5 4 34 3560185 Flybridge Series Downloade...

Страница 59: ...TOILET l CORRECT HOOKUP FOR SECOND TOILET DOCKSIDE PUMPour SEALAND 1 TORg rr NTWTER DIVERTER VALVE HOLDING TANK T SERIES DISCHARGE PUMP CSRtM 2 n g i Downloaded from CruisersOwnersForum http www Cruis...

Страница 60: ...pump dry Rumring the pump when there is no waste to pump out ofthe holding tLJnk will shorten the life ofthe pump Third activate the macerator pump by turning the breaker on the AC DC control panel t...

Страница 61: ...r sheen upon or discoloration of the surface of the water or causes an emulsion or sludge beneath the surface of the water the violators are subject to a penalty of 5 000 Notify the Coast Guard immedi...

Страница 62: ...in the bilge reaches a certain level a uigger ing device turns the pump on When the water drains the pump will automatically shut off A separate circuit breaker on the AC DC control panel protects th...

Страница 63: ...eing made to the tank system An opened pipeline will release a heavy surge of the gas right at the workman involved An 87 concentration of the gas produced unconsciousness and 90 causes death There is...

Страница 64: ...Cruisers yachrs Downloaded from CruisersOwnersForum http www CruisersOwnersForum com...

Страница 65: ...fety Precautions for Engme Exhaust 5 6 OPERATING INSTRUCTIONS 5 8 Pre Start Checklist 5 8 Starting Gas Engmes 9 Starting Diesel Engmes IO Stopping Gas Engmes 12 Stopping Diesel Engines 12 Fueling 12 S...

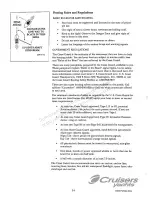
Страница 66: ...d Make a practice of letting someone know your travel plans and route leave a float plan with someone Check local weather reports before casting off Watch the weath er Be on the lookout for strong win...

Страница 67: ...FueICapacitje______________________________ Survival Equipment PFD s Flares ______________ Mirror _________________ Smoke Signals __________ Flashlight _____________ Food __________ Paddle __________...

Страница 68: ...es available to the public Call toll free Courseline 1 800 336 2628 to find out what courses are offered in your area The minimum standards of safety as required by the U S Coast Guard for your boat a...

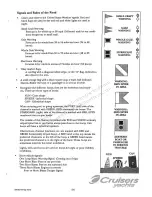
Страница 69: ...rked with GREEN ODD numbered can buoys The STARBOARD right side of the channel is marked with RED EVEN numbered nun or spar buoys The middle of the channel is marked with RED and WHITE vertically stri...

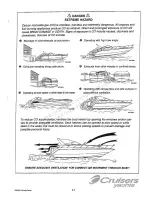
Страница 70: ...ure to carbon monoxide If you think exhaust fumes are entering your boat correct the problem immediately Observe the following safety precautions Be alert for the odor of exhaust fumes A natural vacuu...

Страница 71: ...erating with high bow angle zp __ KC 0486 Exhausts from other vessels in confined areas CD Operating wijh canvas tops and side curtains in place wijhout ventilation To reduce CO accumulation ventilate...

Страница 72: ...Check engine and transmission oil levels If equipped check fresh water coolant level Check gas fuel valves to make sure fuel can flow to engines Check diesel fuel valves to make sure fuel can flow to...

Страница 73: ...ift control levers in neutral position Step 2 Move each throttle lever forward to full throttle position and back to idle poSition Throttle linkage and cable must move smoothly TRANSMISSION INNEUI RAL...

Страница 74: ...ins within the specified range If temperature gauge reads abnormally high STOP ENGINE IMMEDIATELY and determine the cause Step 7 Check engine exhausts to see that they are discharging water Water circ...

Страница 75: ...ep 5 Repeat starting procedure for the second engine IMPORTANT The second engine may be difficult to hear when it starts due to the noise of the first engine Observe the tachometer of the second engin...

Страница 76: ...Fueling Refer to your engine owner s manual for the fuel type and octane rating recommended for your particular engine Your dealer may have fuel sug gestions relative to climate conditions and the us...

Страница 77: ...ng Wheel The rudders are basically useless at slow speeds Put your hands on the control levers and leave the steering wheel alone Recognize the Outside Forces Check the wind direction and velocity as...

Страница 78: ...ower train could result Momentmily pause in neutral and aHow tmgine to return to idle speed before engaging tnJnsmimon Using throttle and shift control levers to compensate for wind and water currents...

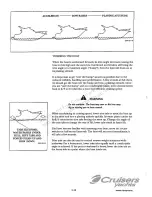
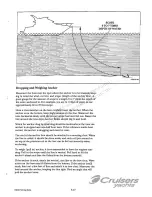
Страница 79: ...m increase the speed on the forward prop To move back from your posi tion and quicken the turn increase the speed on the reverse prop PROPELLER BURSTS AND STOPPING Propeller burst is a maneuvering tec...

Страница 80: ...ing speed A WARNING Do not overtrim The boat may veer or the bow may dig in rousing you to loose control When accelerating to cruising speed lower trim tabs to assist the boat up at the stern and into...

Страница 81: ...anchor is dropped and one half hour later If the reference marks have moved the anchor is dragging and must be reseL The end of the anchor line should be attached to a mooring cleaL When the line is...

Страница 82: ...e synthetic fiber ropes stretch too much Make a bridle for each craft towing and towed by putting a rope completely around the hull A WARNING Always stay cleaT ofany tight OT sIrr tched lines Ifyou ru...

Страница 83: ...c Checks and Services PERIODIC CHECKS AND SERVICES 6 2 Before Every Use 6 3 Every 50 Hours 6 7 Every 100 Hours 6 8 Monthly 6 9 Quarterly 6 10 Annually 6 11 Cruise yachts 6 1 Downloaded from CruisersOw...

Страница 84: ...very 100 Hours Monthly Quarterly Annually 6 2 TASK I Check seawater strainers for leaks and accumulation of debris 2 Check exhaust system for leaks 3 Check seacocks for leaks 4 Check propeller stuffin...

Страница 85: ...vent any further entry of water and then replace the dam aged hose and clamps See your authorized Cruisers dealer for parts and service 4 Inspect container for build up of debris which can clog the st...

Страница 86: ...seacocks Port and starboard engine cooling water seacocks located in the engine comparunent Generator cooling water seacock located in the engine cc mpan ment Air conditioning seacock located in the...

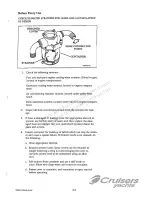
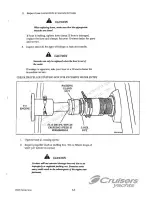
Страница 87: ...is apparent take your boat to a Cruisers dealer for immediate service CHECK PROPELLER STUFFING BOX FOR EXCESSIVE WATER ENTRY TO ENGINE 10 15 DROPS MIN AT CRUISING SPEED IS PERMISSIBLE LOCK NUT 1 Oper...

Страница 88: ...NG DO NOT operate the engine whenfuel1eaks have been detected Allfaels are cambustible andgasoline vapors are explosive Repair any leak before starting the engines or the generator 2 Tighten any conne...

Страница 89: ...TIE BAR I I I lr CHECK FOR LOOSENESS 0 CSR161 2S COITER PIN I a CONNECflNG lCON G SET SCREW Oy CHECKFOR LOOSENESS t r 4r ARM 0 CHECK FOR LOOSENESS FOR LOOSENESS I CYLINDER I Check tie bar at each end...

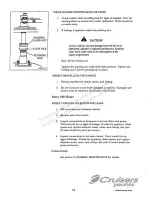
Страница 90: ...r bends cracks and pitting 2 Do not continue to use badly damaged propellers Damaged pro pellers must be replaced See Section 8 for details Every 100 Hours INSPECT FRESHWATER SYSTEM FOR LEAKS I Fill a...

Страница 91: ...uld be inter rupted to all outlets onboard Press the reset button to restore power 5 If power is not interrupted do not use any of the outlets Have a qualified electrician make the necessary repairs C...

Страница 92: ...Downloaded from CruisersOwnersForum http www CruisersOwnersForum com...

Страница 93: ...er screw a 3DE PLUG I Fll L TUBE CSR161 29 Remove plug from fill tube and use a funnel with a tube to add lubricating oil Fill only until oil reaches the full line indicated on the reservoir CHECK ENG...

Страница 94: ...or hatch Head outlet water seacocks located in the galley floor hatch Deck washdown seacock located in the engine comparunent 2 Use lubricating oil and lubricate the wing screw threads and the valve h...

Страница 95: ...ge for Extended Lay Up STORAGE FOR EXTENDED LAY UP 7 2 Lifting and Storing Your Boat 7 2 Transporting 7 3 Winterization 7 4 Fitting Om Mter Storage 7 8 CrUiS rS yachf s 7 1 Downloaded from CruisersOwn...

Страница 96: ...ity rating high enough to support the boat Spreader bars reduce the side pressure at the boat s sheer line and prevent distortion or damage to the deck or gunwale molding Put slings around the hull at...

Страница 97: ...c Transporting The boat must be supported on a trailer with the same care and concern as on the ground Cover the boat to prevent additional load being added from rain or snow Contact your dealer for a...

Страница 98: ...made before covering the crafL d Fuel System IMPORTANT Do not fill the tanks so fuel flows from the vents Allow room in the tanks for expansion I Fuel tanks should be filled with treated fuel to preve...

Страница 99: ...ock while seacock is closed Allow line to drain Replace drain plug i Air Conditioning System 1 Open intake seacock Loosen screws on the seawater pump head to allow water to drain from pump 2 Disconnec...

Страница 100: ...eshwater pump Pour approximately 1 1 2 ounce of potable alcohol into the pump inleL Rotate pump pulley two turns by hand and COnnect inlet hose 1 Ice Maker and Refrigerator Freezers 1 Allow the ice ma...

Страница 101: ...w such as life jackets towels blankets cushions mattresses clothing curtains canvas etc 2 Scrub the inside of the boat Clean the cabinets drawers and cupboards Try to allow one day for drying and airi...

Страница 102: ...rain plugs in strainers and seacocks e Check all hoses and fittings for cracking splitting or deteriora tion Replace defective parts immediately Batteries I Make sure batteries are fully charged and t...

Страница 103: ...ice L Put miscellaneous equipment such as mattresses cushions cur tains life jackets etc onboard m Make sure all seacocks are closed and launch boat A CAUIION Rem4in with the boatfor a minimum of8 hou...

Страница 104: ...Cruise S yachts Downloaded from CruisersOwnersForum http www CruisersOwnersForum com...

Страница 105: ...ENERAL MAINTENANCE 8 2 Power Train 8 2 DC Elecuical System 8 5 Freshwater System 8 5 Bilge 8 6 Hull 8 6 General Care and Cleaning So7 3580185 Flybrldge Series 8 1 Downloaded from CruisersOwnersForum h...

Страница 106: ...t See your Cruisers dealer 4 Leave coupling half on transmission stationary and rotate the propeller shaft J turn in 90 intervals At each 90 intervaJ check the clearance between the coupling halves If...

Страница 107: ...taper of the shafL Install the prop and rotate it on the shaft clockwise and counterclockwise about 100 times 6 Remove the prop and clean the grinding compound from the shaft and prop Repeat steps 2 t...

Страница 108: ...ve rudder arm from the rudder shaft Lower the rudder from the boat The packing nut may have to be loosened to remove the rudder 6 Remove the packing nut ring and old packing 7 Install a new rudder and...

Страница 109: ...ur new freshwater system or the system after a long period of storage use the following procedure 1 Make a solution of 2 1 2 cups 20 oz of household bleach and 10 gallons of water 2 Pour the solution...

Страница 110: ...buffing with DuPont 7 Rub bing Compound or power buffing with Mirror Glaze 1 may be necessary GELCOAT REPAIR Scratches or blemishes in the gelcoat may detract from the appearance of your boat but the...

Страница 111: ...FITTINGS AND HARDWARE Stainless steel has been used wherever possible on your boat It is not totally resistant to corrosion Regular cleaning and polishing with a chrome or stainless steel polish will...

Страница 112: ...h clean water to remove all soap Allow canvas to drip dry If canvas is heavily soiled and stained soak the canvas for approximately 20 minutes in a solution of 1 2 cup 4 oz bleach 1 4 cup 2 oz househo...

Страница 113: ...Gas Fume Detector 9 5 Halon Automatic Fire Extinguisher 9 6 Microwave 9 6 Refrigerator Freezer Galley 9 6 Salon Color Television and VCR VHS 9 7 Spotlight 9 7 Stove Top 9 8 Telephone Jack and Docksid...

Страница 114: ...e 16 000 BTU unit is installed in the salon The air conditioner located behind the refrigerator cools the galley and the forward stateroom The controls for the forward stateroom and galley unit is loc...

Страница 115: ...cuit breaker located near the horn button The DC MAIN and FLYBRIDGE SUPPLY or optional LOWER STA SUP PLY circuit breakers must be on to operate the horn The compressor is mounted under the dash to sta...

Страница 116: ...tateroom salon and forward staterOOm Refer to your skipper s kit for operating instructions in the carbon monoxide handbook Cockpit Shower The shower head hose hot and cold valves are located on the s...

Страница 117: ...s not in use To install the cover start at the bottom of the venturi windshield and work back along the sides and then across the back Refer to General Maintenance in this manual for care and cleaning...

Страница 118: ...nel marked MICROWAVE Refer to the booklet in your skipper s kit for complete operating and care instructions Refrigerator Freezer Galley The dual voltage refrigerator is designed for the marine indust...

Страница 119: ...to operate these components See the information contained in the skipper s kit for operation and care of the stereo and CD player OptionallY with Remote Control The forward staterooms may have color...

Страница 120: ...de of the steering wheel and the resettable circuit breaker is above the switches Push rocker switches in only half second intervals to avoid over correction The trlm tab pump is located aft of the st...

Страница 121: ...the power is tuTned OFF at the Breaker lsolDtor Panel by pulling the button out Firm pressure is required to push in or pull out the button FUNCrION OF CLUTCH 1 The cone clutch engages and disengages...

Страница 122: ...he last metre few feet carefully seating the anchor home in the bow fit ting A GAur ON ENSURE THAT THE HANDLE IS REMOVED FROM THE CLUTCH NUI BEFORE OPERATING UNDER POWElL See your skipper s kit more f...

Страница 123: ...NTS POSITIVE FOR ALL INSTRUMENTS SPEAKER WlRE ON STARBOARD SIDE ONLY MARKED 6 8 WHITE BLACK TRACER GROUND 4 GAUGE GREEN BONDING WlRE WITH OR WlTHOUT ARCH ARCH PLUG HARNESS NAVIGATION LIGHTWlRE GRAY WH...

Страница 124: ...canvas 3 Install1V antenna Optional 4 Secure flybridge to bridge floor seal each screw and apply a bead of sealer around base If you have any question contact Cruisers Customer Service Department at...

Страница 125: ...10 Troubleshooting lJ BlJESII 10 2 Engine and Power Train 10 2 Electrical 10 4 Plumbing 10 5 V Cruisers yacht s 3580 85 Flytridge Series 10 Downloaded from CruisersOwnersForum http www CruisersOwnersF...

Страница 126: ...riazI components Perscmal injury or damage w the boat may occur POSSIBLE CAUSE Fuel valves are closed or fuel tank is empty Contaminated fuel Loose wiring or bad key switch DC main and or ignition cir...

Страница 127: ...el and replace fuel fil ters See Cruisers Dealer for service Replace line or remove obsrruction See Cruisers Dealer for service Drain fuel tank and lines flush with clean fuel and replace fuel filters...

Страница 128: ...kit A CAUTION Never reset a cirruit breaker which has been autot1Ulti cally tripped without first locating and correcting the problem POSSmLE CAUSE SOLUTION Circuit breaker in the tripped or If breake...

Страница 129: ...sink water line Shower sump overflows SUMP PUMP circuit breaker in the tripped or OFF position Discharge lines blocked or pinched Pump or automatic switch is defective 3580 85 Ftyoridge Series 10 5 SO...

Страница 130: ...cuit breaker OFF position ON Low battery charge Charge the batteries Flush water seacock not open Open seacock Inlet pedal valve not working Have head serviced by authorized dealer Head will not empty...

Отзывы: