Crivit Outdoor 34232 Скачать руководство пользователя страница 12

12 ES

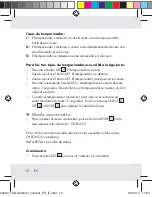
Tipos de temporizador:
r:  

El temporizador comienza la cuenta atrás con el tiempo ajustado 
hasta llegar a cero.

U: 

 El temporizador comienza a contar ascendentemente desde cero una 
vez alcanzado el valor cero.

S: 

 El temporizador se detiene una vez alcanzado el valor cero.

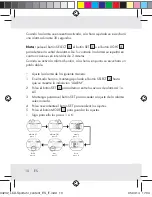
Para los tres tipos de temporizadores es válido lo siguiente:

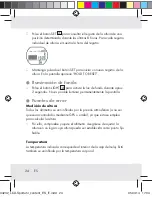
   Presione el botón SET  3 . El temporizador se inicia.
   Vuelva a pulsar el botón SET. El temporizador se detiene.
   Vuelva a pulsar el botón SET. El temporizador prosigue con el conteo.
   Presione nuevamente la tecla SET y manténgala presionada durante 

aprox. 3 segundos. De esta forma, el temporizador se resetea al valor 
original ajustado.

   Cuando el temporizador alcanza el valor cero se escuchará una 

señal de alarma durante 15 segundos. Pulse los botones SELECT  2 , 
SET  3  o MODE  1  para detener la señal de alarma.
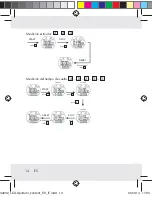
  

Modo cronómetro

   Para acceder al modo cronómetro, pulse el botón MODE  1  hasta 

que aparezca la indicación “CHRONO”.

En el modo cronómetro puede seleccionar las siguientes subfunciones:
CHRONO (cronómetro)
DATA RECALL (consulta de datos)
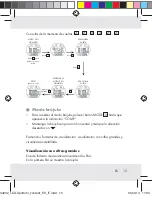
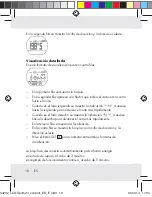
Cronómetro

   Pulse el botón SET  3  para iniciar / detener el cronómetro.

34232_LCD-Sportuhr_content_ES_IT.indd   12

05.03.14   17:04

Содержание 34232

Страница 1: ...d OROLOGIO DA POLSO MULTIFUNZIONE Indicazioni per l uso e per la sicurezza LCD SPORTUHR Bedienungs und Sicherheitshinweise LCD SPORTS WATCH Operation and Safety Notes RELOJ DEPORTIVO LCD OROLOGIO DA P...

Страница 2: ...n y de seguridad P gina 4 IT MT Indicazioni per l uso e per la sicurezza Pagina 28 GB MT Operation and Safety Notes Page 52 DE AT CH Bedienungs und Sicherheitshinweise Seite 75 34232_LCD Sportuhr_cove...

Страница 3: ...3 4 3 1 2 34232_LCD Sportuhr_content_ES_IT indd 3 05 03 14 17 03...

Страница 4: ...P gina 6 Puesta en servicio Cambiar la pila P gina 7 Manejo Modo horario P gina 7 Alarma P gina 9 Modo cron metro P gina 12 Modo br jula P gina 15 Modo alt metro P gina 19 Iluminaci n de fondo P gina...

Страница 5: ...ST SP ajuste 4 Bot n LIGHT luz Indicaciones generales de seguridad CONSERVE TODAS LAS INDICACIONES DE SEGURIDAD Y ADVERTENCIAS PARA FUTURAS CONSULTAS Indicaciones de seguridad sobre las pilas PELIGRO...

Страница 6: ...las tire al fuego ni las cortocircuite ni intente desmontarlas Si no presta atenci n a estas indicaciones la pila podr a descargarse m s all de su tensi n nal En este caso existe riesgo de sulfataci n...

Страница 7: ...Pulsando el bot n SELECT en el m dulo horario puede alternar entre las siguientes funciones hora TIME alarma ALARM cuenta atr s TIMER Hora TIME En el modo horario mantenga pulsado el bot n SELECT 2 ha...

Страница 8: ...do el bot n SELECT para cambiar los ajustes m s r pidamente Pulse el bot n SELECT para ajustar el minutero Con rme la entrada pulsando el bot n SET Ajuste las horas el a o el mes y el d a de forma an...

Страница 9: ...arma individuales los cuales se pueden activar o desactivar individualmente Cada alarma se puede ajustar para cinco nalidades diferentes a alarma en una fecha concreta alarma a las 10 00 h del d a 19...

Страница 10: ...Ajuste la alarma de la siguiente manera 1 En el modo horario mantenga pulsado el bot n SELECT 2 hasta que se muestre la indicaci n ALARM 2 Pulse el bot n SET 3 para alternar entre los avisos de alarm...

Страница 11: ...re la indicaci n TIMER Pulse el bot n SET 3 hasta que aparezca la indicaci n HOLD TO SET y se pueda ajustar la cuenta atr s Pulse el bot n SELECT para ajustar los minutos Pulse el bot n SET para acced...

Страница 12: ...gue con el conteo Presione nuevamente la tecla SET y mant ngala presionada durante aprox 3 segundos De esta forma el temporizador se resetea al valor original ajustado Cuando el temporizador alcanza e...

Страница 13: ...cron me tro tiempo total memoria de vuel tas llena memoria de vueltas tiempo de vuelta Visualizar la memoria del cron metro Pulse el bot n SET 3 para detener el cron metro Pulse el bot n SELECT 2 par...

Страница 14: ...TOP RESET pulse 3 pulse 3 Mantenga pul sado 3 Medici n del tiempo de vuelta 3 2 2 3 3 START STOP RESET pulse 3 pulse 3 mantenga pul sado 3 pulse 2 pulse 2 vuelta 1 vuelta 2 vuelta 3 34232_LCD Sportuhr...

Страница 15: ...jula Para acceder al modo br jula pulse el bot n MODE 1 hasta que aparezca la indicaci n COMP Mantenga la br jula en posici n horizontal y marque la direcci n deseada con Existen dos formatos de visu...

Страница 16: ...zar el norte m s r pidamente Cuando en el lado derecho se muestra la indicaci n N mu vase hacia la derecha para alcanzar el norte m s r pidamente En la tercera la se muestra la localizaci n En la cuar...

Страница 17: ...los datos de direcci n se desv an m s de 10 grados 3 utiliza el aparato por primera vez en el interior de un veh culo Calibraci n del aparato Pulse el bot n MODE 1 para acceder al modo br jula Pulse...

Страница 18: ...gn tico y el norte geom trico en su localidad La declinaci n local se indica en el borde del mapa bien como decli naci n este positiva E o declinaci n oeste negativa W Durante la orientaci n la direcc...

Страница 19: ...nte ejemplo la direcci n actual es N 10 grados Cuando se ajusta el ngulo de declinaci n a 30 grados la direcci n de nitiva cambia a NW 340 grados Nota encontrar informaci n sobre los datos de declinac...

Страница 20: ...iente cifra Pulse a continuaci n el bot n MODE 1 para con rmar el ajuste Nota pulse el bot n SELECT 2 para seleccionar la indicaci n deseada en el modo alt metro Al pulsar a continuaci n el bot n SET...

Страница 21: ...xima HIGH En el modo alt metro pulse el bot n SELECT 2 hasta que se muestre la indicaci n HIGH En la parte inferior de la pantalla se muestra la memoria de la altura m xima en el centro la altura actu...

Страница 22: ...sta que se muestre la indicaci n UP En la parte inferior de la pantalla se muestra la altura total ganada en el centro la altura actual pulse 3 Mantenga pulsado el bot n SET 3 para poner a cero la alt...

Страница 23: ...la altura actual pulse 3 Mantenga pulsado el bot n SET 3 para poner a cero el recuento de monta as En la pantalla aparece HOLD TO RESET Registro En el modo alt metro pulse el bot n SELECT 2 hasta que...

Страница 24: ...x 2 segundos No es posible iluminar permanentemente la pantalla Fuentes de error Medici n de altura Todos los alt metros se ven in uidos por la presi n atmosf rica a no ser que sean controlados median...

Страница 25: ...e no deseche el producto junto con la basura dom stica al nal de su vida til Des chelo adecuadamente Las pilas defectuosas o usadas deben ser recicladas seg n lo indicado en la directiva 2006 66 EC Pb...

Страница 26: ...o prueba de que se realiz la compra Si en el plazo de 3 a os a partir de la fecha de compra se produce un fallo de material o fabricaci n en este producto repararemos el producto o lo sustituiremos gr...

Страница 27: ...resistencia al agua no es una propiedad duradera por lo que debe revisarse regularmente Tenga en cuenta que si permite la apertura y repa raci n del reloj por personas no autorizadas perder los derec...

Страница 28: ...ilit all acqua Pagina 30 Messa in funzione Sostituzione delle batterie Pagina 31 Uso Modalit orario Pagina 31 Allarme Pagina 33 Modalit cronometro Pagina 36 Modalit bussola Pagina 39 Modalit altimetro...

Страница 29: ...CT SPLIT selezione 3 Tasto SET ST SP impostazione 4 Tasto LIGHT luce Avvertenze generali di sicurezza CONSERVARE TUTTE LE AVVERTENZE DI SICUREZZA E TUTTI GLI AVVISI PER IL FUTURO Avvertenze di sicurez...

Страница 30: ...tterie nel fuoco non cortocircuitarle e non aprirle In caso di mancata osservanza delle indicazioni fornite le batterie possono scaricarsi raggiungendo la loro tensione nale Persiste il pericolo di pe...

Страница 31: ...a TIME Premendo il tasto SELECT nella modalit orario possibile selezionare le seguenti funzioni Orario TIME Allarme ALARM Timer conto alla rovescia TIMER Orario TIME Nella modalit orario premere il ta...

Страница 32: ...care rapidamente le impostazioni tenere premuto il tasto SELECT Premere il tasto SELECT per impostare la visualizzazione dei minuti Confermare l immissione premendo il tasto SET Seguire la stessa pro...

Страница 33: ...e attivati o disatti vati singolarmente Ogni allarme pu essere impostato per 5 diversi scopi a Allarme in una determinata data allarme alle ore 10 00 del 19 giugno A1 b Allarme giornaliero in un deter...

Страница 34: ...are l allarme come segue 1 Nella modalit orario premere il tasto SELECT 2 no a quando sul display compare la scritta ALARM 2 Premere il tasto SET 3 per selezionare gli allarmi da A1 a A5 3 Mantenere p...

Страница 35: ...tta TIMER Premere il tasto SET 3 no a che sul display compare la scritta HOLD TO SET e pu essere impostato il Countdown Timer Premere il tasto SELECT per impostare i minuti Premere il tasto SET per pa...

Страница 36: ...di Il timer torna all ora originariamente impostata Quando il timer arriva a zero un segnale acustico si attiva per 15 secondi Premere il tasto SELECT 2 il tasto SET 3 o il tasto MODE 1 per fermare il...

Страница 37: ...piena Memoria giri Tempo di giro Richiamo della memoria del cronometro Premere il tasto SET 3 per fermare il cronometro Premere il tasto SELECT 2 per accedere alla modalit di richiamo della memoria Su...

Страница 38: ...STOP RESET Premere 3 Premere 3 Tenere premuto 3 Misurazione del tempo di un giro 3 2 2 3 3 START STOP RESET Premere 3 Premere 3 Tenere premuto 3 Premere 2 Premere 2 Giro 1 Giro 2 Giro 3 34232_LCD Spor...

Страница 39: ...a Per accedere alla modalit bussola premere il tasto MODE 1 no a quando sul display compare la scritta COMP Mantenere la bussola in posizione orizzontale e contrassegnare la direzione desiderata con S...

Страница 40: ...sinistra per raggiungere rapidamente il nord Se sul lato destro del display compare N procedere verso destra per raggiungere rapidamente il nord La terza riga riporta la posizione in gradi La quarta r...

Страница 41: ...coordinate sono sbagliate di oltre 10 gradi 3 Il dispositivo viene utilizzato per la prima volta su una vettura Calibrazione del dispositivo Premere il tasto MODE 1 per accedere alla modalit bussola...

Страница 42: ...la posizione dell utente La declinazione locale indicata a margine della carta geogra ca come est pi declinazione E o come ovest meno declinazione W Durante l orientamento la direzione sulla carta geo...

Страница 43: ...ezione e ettiva 10 gradi N Se l angolo di declinazione impostato a 30 gradi la direzione nale diventa 340 gradi NW Nota informazioni sui dati di declinazione per le varie localit sono disponibili in I...

Страница 44: ...n ne il tasto MODE 1 per confermare l impostazione Nota per selezionare la visualizzazione desiderata nella modalit alti metro premere il tasto SELECT 2 Premendo in ne il tasto SET 3 nella parte inter...

Страница 45: ...lice Visualizzazione dettagliata Altitudine massima memorizzata HIGH Nella modalit altimetro premere il tasto SELECT 2 no a quando sul display compare la scritta HIGH Nella parte inferiore del display...

Страница 46: ...udine totale UP Nella modalit altimetro premere il tasto SELECT 2 no a quando sul display compare la scritta UP Nella parte inferiore del display viene visualizzato il guadagno di altitudine totale ne...

Страница 47: ...y compare la scritta HILL Nella parte inferiore del display viene visualizzato il numero di rilievi nella parte centrale l altitudine corrente Premere 3 Tenere premuto il tasto SET 3 per azzerare il n...

Страница 48: ...ivare la retroilluminazione per circa 2 secondi Un illuminazione costante del quadrante non possibile Cause di errore Misurazione dell altitudine Tutti gli altimetri sono soggetti agli in ussi della p...

Страница 49: ...domestici ma per motivi di tutela dell ambiente provvedere al suo corretto smaltimento Batterie difettose o usate devono essere riciclate ai sensi della Direttiva 2006 66 EC Pb Pericolo di danni ambi...

Страница 50: ...dalla data di acquisto Conservare lo scontrino di acquisto origi nale in buone condizioni Questo documento servir a documentare l avvenuto acquisto L apparecchio da Lei acquistato d diritto ad una gar...

Страница 51: ...ti non una una propriet permanente e deve essere regolarmente sottoposta a manutenzione Prestare attenzione per evitare che l apertura e la riparazione del vostro orologio eseguita da personale non au...

Страница 52: ...ess Page 54 Preparations for use Changing the battery Page 55 Operation Time Mode Page 55 Alarm Page 57 Stopwatch Mode Page 60 Compass Mode Page 63 Altimeter Mode Page 67 Background contrast lighting...

Страница 53: ...SP setting 4 LIGHT button light General Safety Instructions PLEASE RETAIN ALL SAFETY INFORMATION AND INSTRUCTIONS FOR FUTURE REFERENCE Safety Instructions for Batteries DANGER TO LIFE Batteries recha...

Страница 54: ...ver short circuit them or take them apart If you do not observe these instructions the battery could be discharged beyond the cut o voltage There is then a danger of leaking If the battery has leaked...

Страница 55: ...e time mode By pressing the SELECT button in time mode you can switch between the following functions Time TIME Alarm ALARM Countdown Timer TIMER Time TIME Press the SELECT button 2 in time mode until...

Страница 56: ...the second value to 0 Press the SET button 3 to con rm your entry Note You can hold the SELECT button pressed down to change the settings faster Press the SELECT button to set the minute display Pres...

Страница 57: ...n for about 3 seconds The time display switches back to normal time T1 Alarm There are ve individual alarm signals that can be individually activated or deactivated according to your wishes Each alarm...

Страница 58: ...urly alarm is switched on there will be a beep tone every full hour Set the alarm as shown below 1 Press the SELECT button 2 in time mode until the display ALARM appears 2 Press the SET button 3 to se...

Страница 59: ...pped with a countdown timer and a countup timer Basic setting 0 01 00 1 minute Press the SELECT button 2 in time mode until the display TIMER appears Press the SET button 3 until the display HOLD TO S...

Страница 60: ...ed The following applies to all three timer types Press the SET button 3 The timer starts Press the SET button again The timer stops Press the SET button again The timer continues to count Press the S...

Страница 61: ...has been recorded stopped Press and hold down the SET button 3 to reset the stopwatch display and the lap counter to 0 Stopwatch mode Total time Lap memory full Lap memory Lap time Stopwatch memory re...

Страница 62: ...SET Press 3 Press 3 Hold 3 pressed down Measurement of lap time 3 2 2 3 3 START STOP RESET Press 3 Press 3 Hold 3 pressed down Press 2 Press 2 Lap 1 Lap 2 Lap 3 Recall of lap memory 3 2 3 3 2 3 34232_...

Страница 63: ...lay COMP appears to proceed to the compass mode Hold the compass in a horizontal position and mark the required direction with There are two display formats display with large digit and detailed displ...

Страница 64: ...ars on the right side of the display go right to reach north faster The bearing appears in the third line The compass with the direction and the cardinal point appear in the fourth line Press the SET...

Страница 65: ...le for the rst time Calibration of the device Press the MODE button 1 to proceed to compass mode Press and hold down the SELECT button 2 to proceed to calibration mode CAL appears in the display Press...

Страница 66: ...corrected by subtraction of the plus declination or addition of the minus declination Press and hold down the SET button 3 to proceed to the setting mode for the declination The letter E appears in t...

Страница 67: ...e You will nd information on the declination data for your location positioning in the Internet Altimeter Mode Press the MODE button 1 to proceed to altimeter mode ALTI appears in the display Press th...

Страница 68: ...altime ter mode If you then press the SET button 3 the following data appears in the middle area of the display temperature time and graphic altitude display Time Note You can have your current locati...

Страница 69: ...imum altitude appears in the bottom area of the display the current altitude appears in the middle Press the SET button 3 and hold for about 3 seconds HOLD TO RESET appears in the bottom area of the d...

Страница 70: ...display the current altitude appears in the middle Press 3 Hold the SET button 3 pressed down to reset the minimum altitude to 0 HOLD TO RESET appears in the display Total height loss DOWN Press the S...

Страница 71: ...er mode until the display RECORD appears The current altitude appears in the bottom area of the display the graphic altitude display appears in the middle The altitude variation and graphic display re...

Страница 72: ...t the altimeter in a place the altitude of which you can enter as a reliable reference point Temperature The temperature of the inside of the housing is displayed This is also in u enced by the body t...

Страница 73: ...are Cd cadmium Hg mercury Pb lead Therefore dispose of used batteries through your local collec tion site Warranty The device has been manufactured to strict quality guidelines and meticu lously exam...

Страница 74: ...ure This warranty does not cover product parts subject to normal wear thus possibly consid ered consumables e g batteries or for damage to fragile parts e g switches rechargeable batteries or glass pa...

Страница 75: ...htigkeit Seite 77 Inbetriebnahme Batterie wechseln Seite 78 Bedienung Zeit Modus Seite 78 Alarm Seite 80 Stoppuhr Modus Seite 84 Kompass Modus Seite 87 H henmesser Modus Seite 91 Hintergrund Kontrastb...

Страница 76: ...Taste ST SP Einstellung 4 LIGHT Taste Licht Allgemeine Sicherheitshinweise BEWAHREN SIE ALLE SICHERHEITSHINWEISE UND ANWEISUNGEN F R DIE ZUKUNFT AUF Sicherheitshinweise zu Batterien LEBENSGEFAHR Batte...

Страница 77: ...Sie Batterien nicht kurz und nehmen Sie sie nicht ausein ander Bei Nichtbeachtung der Hinweise kann die Batterie ber ihre Endspan nung hinaus entladen werden Es besteht dann die Gefahr des Auslau fen...

Страница 78: ...rscheint Durch Dr cken der SELECT Taste im Zeit Modus k nnen Sie zwischen den folgenden Funktionen wechseln Zeit TIME Alarm ALARM Countdown Timer TIMER Zeit TIME Dr cken Sie im Zeit Modus so lange die...

Страница 79: ...t tigen Sie Ihre Eingabe durch Dr cken der SET Taste 3 Hinweis Sie k nnen die SELECT Taste gedr ckt halten um die Ein stellungen schneller zu ver ndern Dr cken Sie die SELECT Taste um die Minutenanzei...

Страница 80: ...lang gedr ckt Die Zeitanzeige wechselt wieder in die normale Zeit T1 Alarm Es gibt f nf individuelle Alarmmeldungen die nach Wunsch einzeln aktiviert oder deaktiviert werden k nnen Jeder Alarm kann f...

Страница 81: ...ert nt zur vollen Stunde ein doppelter Piepton Stellen Sie den Alarm wie folgt ein 1 Dr cken Sie im Zeit Modus die SELECT Taste 2 bis in der Anzeige ALARM erscheint 2 Dr cken Sie die SET Taste 3 um z...

Страница 82: ...ler und einem Countup Timer Vorw rtsz hler ausgestattet Grundeinstellung 0 01 00 1 Minute Dr cken Sie im Zeit Modus solange die SELECT Taste 2 bis in der Anzeige TIMER erscheint Dr cken Sie die SET Ta...

Страница 83: ...Null erreicht ist S Der Timer bleibt stehen sobald die Null erreicht ist F r alle drei Timer Typen gilt Dr cken Sie die SET Taste 3 Der Timer startet Dr cken Sie die SET Taste erneut Der Timer stoppt...

Страница 84: ...t im Rundenspeicher aufzuzeichnen w hrend die Stoppuhr l uft Hinweis 99 Runden k nnen gespeichert werden In der Anzeige erscheint MEMORY FULL Speicher voll wenn der Rundenspeicher voll ist Hinweis Zwi...

Страница 85: ...nungen der BESTEN RUNDEN Dr cken Sie die SET Taste um verschiedene Rundenspeicher abzulesen Dr cken Sie die SELECT Taste um den Speicherabruf Modus zu verlassen Zum Durchf hren einer Standardmessung e...

Страница 86: ...2 Runde 1 Runde 2 Runde 3 Abruf des Rundenspeichers 3 2 3 3 2 3 Dr cken Sie 3 zum Anhalten der Stoppuhr Dr cken Sie 2 Dr cken Sie 2 Halten Sie 3 gedr ckt Dr cken Sie 3 Dr cken Sie 3 RESET auf Null ste...

Страница 87: ...iffern In diesem Anzeigeformat gibt zwei Zeilen In der ersten Zeile erscheint der Kompass In der zweiten Zeile erscheinen Richtungszahl und Himmelsrichtung Detailanzeige In diesem Anzeigeformat gibt e...

Страница 88: ...mpasse arbeiten mit dem Magnetfeld der Erde Daher reagieren diese Ger te sehr emp ndlich auf verschiedene Umgebungs ein sse die das Magnetfeld der Erde verzerren beispielsweise bei Ann herung an schwe...

Страница 89: ...rn Starkstromkabeln usw F hren Sie die Kreisbewegungen jeweils in der gleichen Richtung aus Achten Sie darauf Sie f r jeden Kreis mindestens 20 Sekunden aber nicht l nger als eine Minute ben tigen Dr...

Страница 90: ...nken Dr cken Sie die SELECT Taste 2 um die Richtung Ost E oder West W auszuw hlen Dr cken Sie zur Best tigung Ihrer Eingabe erneut die SET Taste Die Zi er f r den Deklinationswinkel beginnt zu blinken...

Страница 91: ...H he HIGH Speicher der minimalen H he LOW H hengewinn gesamt UP H henverlust gesamt DOWN Anzahl der Berge HILL Aufzeichnung RECORD H henmesser einstellen Dr cken Sie im H henmesser Modus die SELECT Ta...

Страница 92: ...erschiedene Weise anzeigen lassen 1 einfacher Anzeige Modus aktuelle H he und Uhrzeit 2 detaillierter Anzeige Modus Temperatur Uhrzeit aktuelle H he und graphische H hendarstellung Dr cken Sie die SET...

Страница 93: ...reich der Anzeige erscheint kurzzeitig HOLD TO RESET Anschlie end erscheint im unteren Bereich der Anzeige die zuletzt gespeicherte maximale H he Speicher der minimalen H he LOW Dr cken Sie im H henme...

Страница 94: ...n Sie im H henmesser Modus die SELECT Taste 2 bis in der Anzeige DOWN erscheint Im unteren Bereich der Anzeige erscheint der gesamte H henverlust in der Mitte die aktuelle H he Dr cken Sie 3 Halten Si...

Страница 95: ...der Mitte erscheint die graphische H hendarstellung H henverlauf und graphische Darstellung zeichnen die H henwechsel der letzten 8 Stunden auf Dr cken Sie die SET Taste 3 um die H henaufzeichnung f...

Страница 96: ...Sie den H henmesser an einem Ort justieren dessen H he Sie als verl sslichen Fixpunkt eingeben k nnen Temperatur Anzeigt wird die Temperatur des Ger tegeh use Inneren Diese wird auch von der K rperte...

Страница 97: ...Cadmium Hg Quecksilber Pb Blei Geben Sie deshalb verbrauchte Batterien bei einer kommunalen Sammelstelle ab Garantie Das Produkt wurde nach strengen Qualit tsrichtlinien sorgf ltig produziert und vor...

Страница 98: ...le die normaler Abnutzung ausgesetzt sind z B Batterien und daher als Verschlei teile angesehen werden k nnen oder f r Besch digungen an zerbrechlichen Teilen z B Schalter Akkus oder die aus Glas gefe...

Страница 99: ...7 Neckarsulm Model No Z32130A Z32130B Version 05 2014 Estado de las informaciones Versione delle informazioni Last Information Update Stand der Informationen 03 2014 Ident No Z32130A B032014 ES IT 5 3...

Отзывы: