background image

Crestron 

QM-MD5x1


QuickMedia™ Matrix Switcher/Mixer


Rack Mounting 

WARNING:

  To prevent bodily injury when mounting or servicing this unit in a 

rack, take special precautions to ensure that the system remains stable.  The 
following guidelines are provided to ensure your safety:  


When mounting this unit in a partially filled rack, load the rack from the 
bottom to the top with the heaviest component at the bottom of the rack. 


If the rack is provided with stabilizing devices, install the stabilizers before 
mounting or servicing the unit in the rack. 

NOTE:

  If rack mounting is not required, rubber feet are provided for tabletop 

mounting or stacking. Apply the feet near the corner edges on the underside of the 
unit. Refer to “Stacking” on page 22 for details. 

NOTE:

  Reliable earthing of rack-mounted equipment should be maintained.  

Particular attention should be given to supply connections other than direct 
connections to the branch circuit. (e.g., use of power strips). 

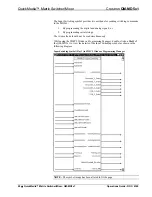
Two “ears” are provided with the MD5x1 so that the unit can be rack mounted. 
These ears must be installed prior to mounting. Complete the following procedure to 
attach the ears to the unit. The only tool required is a #1 Phillips screwdriver.  

1.  There are screws (#4-40 x 0.3125" LG) that secure each side of the MD5x1 

top cover. Using a #1 Phillips screwdriver, remove the three screws closest 
to the front panel from one side of the unit. Refer to the diagram following 
step 3 for a detailed view. 

2.  Position a rack ear so that its mounting holes align with the holes vacated 

by the screws in step 1.  

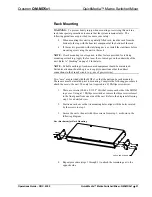
3.  Secure the ear to the unit with three screws from step 1, as shown in the 

following diagram.  

Ear Attachment for Rack Mounting 

USE COVER SCREWS


4.  Repeat procedure (steps 1 through 3) to attach the remaining ear to the 

opposite side. 

Operations Guide - DOC. 6300 

QuickMedia™ Matrix Switcher/Mixer: QM-MD5x1  

  21 

Содержание QuickMedia QM-MD5x1

Страница 1: ...Crestron QM MD5x1 QuickMedia MatrixSwitcher Mixer Operations Guide ...

Страница 2: ...n by the Technical Documentation department at Crestron Electronics Inc 15 Volvo Drive Rockleigh NJ 07647 1 888 CRESTRON All brand names product names and trademarks are the property of their respective owners 2005 Crestron Electronics Inc ...

Страница 3: ...Tools Pro e 53 Creating Labels with Crestron Engraver 53 Uploading and Upgrading 53 Communication Settings 54 Uploading a SIMPL Windows Program 56 Firmware Upgrade 57 Operation 58 Operating Modes 58 Viewing Signal Routes in the System Mode 59 Switching Signals in the Local Mode 59 Adjusting Speech and Program Audio Levels 60 Problem Solving 62 Troubleshooting 62 Further Inquiries 62 Future Updates...

Страница 4: ......
Страница 5: ...op Wall Plate transmitters One QuickMedia output port for connection to QM receivers or other QM switchers Four unbalanced stereo audio inputs Two channel MIC mixer mixes QM microphone signals with electronically adjustable 4 band graphic equalization for output to respective audio mixers and QM outputs One line level balanced unbalanced local audio output consisting of a stereo program channel an...

Страница 6: ...e connected to another MD5x1 or other QM switcher such as the QM MD8x8 QM MD7x2 or QM MD4x2 to provide additional switching capabilities Switching Audio and video input signals are independently switched to the output port Any of the five video input signals can be switched to the QM output The five audio inputs can be switched to the QM output and mixed into the program audio or speech channels o...

Страница 7: ...UT QM IN 5 Program Mic Splitter QM Audio Output Combiner 5 X 1 Video Crosspoint RGB 3 RGB 4 Video Sense EQ Local Stereo Audio Inputs 5 X 1 Stereo Switcher A D A D A D A D 1 2 3 4 Mute Program L Program R Mute Speech AUDIO OUT D A D A D A Delay Vol EQ Vol EQ Mix Mix L L R R Mic Mic Mic Mix L R QM L R QM L R QM Mic 1 2 1 2 Video Inputs QM MD5X1 ALL QM MICROPHONE MIX SIGNALS FROM THE QM MD5X1 ARE SEN...

Страница 8: ...following diagram when configuring a QM network QM Network Topology Applications The MD5x1 is part of the Crestron MediaManager line of integrated presentation solutions It is ideally suited to work with Crestron s MediaManager distribution systems wall plate media centers FlipTop media centers receivers and control processors to allow quick switching of multiple A V sources in a presentation syst...

Страница 9: ...using QM MD5x1 For more information on this and other QM applications refer to the latest revision of the Crestron MediaManager Control Switching and Management Applications Guide Doc 6244 which can be downloaded from the Crestron website http www crestron com manuals Operations Guide DOC 6300 QuickMedia Matrix Switcher Mixer QM MD5x1 5 ...

Страница 10: ...Input Details BNC Gain Maximum Input Input Impedance Signal Sense Signal Sync Resolution Bandwidth Composite S video YPBPR RGB 0 dB Unity gain 75 Ohm termination S video 0 dB Unity gain 75 Ohm termination Composite 0 dB Unity gain 75 Ohm termination PBPR RB 0 7 VPP Y G 1 0 VPP S video 1 0 VPP Composite 1 0 VPP YPBPR RGB 75 Ohm S video 75 Ohm Composite 75 Ohm YPBPR On Y RGB On G S video On Luma Com...

Страница 11: ...ed However the cumulative skew must be 15 ns for the entire length of cable used between all QM devices Longer lengths of cable may experience eventual loss of bandwidth when viewing higher resolution sources For more information refer to QuickMedia Wiring on page 16 NOTE Crestron software and any files on the website are for Authorized Crestron dealers and Crestron Authorized Independent Programm...

Страница 12: ...M MD5x1 QM MD5x1 Physical View Front QM MD5x1 Physical View Rear QM MD5x1 Physical Views 17 03 in 43 24 cm 7 15 in 18 17 cm 16 92 in 42 98 cm 1 70 in 4 32 cm 6 44 in 16 35 cm 8 QuickMedia Matrix Switcher Mixer QM MD5x1 Operations Guide DOC 6300 ...

Страница 13: ...ected Luma Chroma N A Luma Composite Composite Not Connected Not Connected N A Composite AUD The MD5x1 contains four audio inputs that correspond to the two video inputs and two RGBHV inputs These inputs receive unbalanced stereo audio signals through a 3 position mini terminal block connector Inputs 1 and 2 correspond to video inputs 1 and 2 while audio inputs 3 and 4 correspond to RGB inputs 3 a...

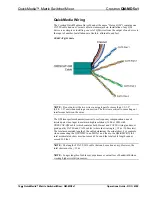
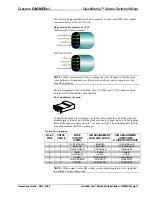
Страница 14: ... Pin Assignments PIN WIRE COLORS 568B QM ASSIGNMENT RGB QM ASSIGNMENT COMPOSITE S VIDEO AND AUDIO 1 WHITE ORANGE RGB Red CHROMINANCE 2 ORANGE RGB Red CHROMINANCE 3 WHITE GREEN RGB Green LUMINANCE 4 BLUE Digital Audio AUDIO 5 WHITE BLUE Digital Audio AUDIO 6 GREEN RGB Green LUMINANCE 7 WHITE BROWN RGB Blue COMPOSITE 8 BROWN RGB Blue COMPOSITE NOTE When transmitting S video luminance uses the green ...

Страница 15: ... or any other device with a QM input The QM port has an RJ 45 connector for QM signals and a corresponding 4 position mini terminal block connector for Cresnet control signals The QM pin assignments for the OUT port are the same as the IN 5 port described previously For wiring information refer to QuickMedia Wiring on page 16 and Network Wiring on page 14 For additional information refer to Hardwa...

Страница 16: ...ng Modes on page 58 V Press this button to switch the video portion of an input signal when in the local mode When the accompanying LED is illuminated only the video portion of a QM signal will be switched Video can be switched separately from audio only when the AUDIO BREAK LED is illuminated While in the system mode pressing V will indicate where the video portion of a signal is routed For more ...

Страница 17: ... indicated by the A or V LED will be switched or viewed depending on the selected mode For information on operating modes and selecting output destinations refer to Operation on page 58 AUDIO OUT Use these buttons to adjust the speech and program audio volume levels for the audio output Press SELECT to toggle between speech audio program audio speech and program audio or none Adjust the selected v...

Страница 18: ...se harmful interference to radio or television reception which can be determined by turning the equipment off and on the user is encouraged to try to correct the interference by one or more of the following measures Reorient or relocate the receiving antenna Increase the separation between the equipment and receiver Connect the equipment into an outlet on a circuit different from that to which the...

Страница 19: ...re run or chain R L x P 40 000 Where The required wire gauge should be chosen such that the resistance value is less than the value calculated in the resistance equation Refer to the table after this paragraph Wire Gauge Values RESISTANCE R WIRE GAUGE 4 16 6 18 10 20 15 22 13 Doubled CAT5 8 7 Tripled CAT5 NOTE All network wiring must consist of two twisted pairs One twisted pair is the 24V conduct...

Страница 20: ...mechanism receiver uses frequency compensation on each twisted pair video input to maintain high resolutions 1600 x 1200 with CRESCAT QM cable which contains both Cresnet and CAT5E wiring and most good quality CAT5E and CAT6 cables where skew rating is 15 ns 100 meters The total accumulated length of the cable determines the actual skew For example when connecting the QM WMC to an MD5x1 and then t...

Страница 21: ... of the eight pin modular jack is facing you with the clip down and the copper side up When looking down at the copper connections pin 1 is on the far right The following table lists the pin assignments on the RJ 45 connector Pin and Pair Assignment RJ 45 PIN CAT5E PAIR WIRE COLORS 568B QM ASSIGNMENT RGB AND AUDIO QM ASSIGNMENT COMPOSITE S VIDEO AND AUDIO 1 2 WHITE ORANGE RGB RED CHROMINANCE 2 2 O...

Страница 22: ...od B Touch Settable ID or TSID which begins on page 19 applies to all TSID ready devices in a Cresnet system with 2 Series control system upgrade file CUZ version 3 029 or later TSID functionality makes it possible for the control system to recognize a network device via its serial number which is stored in the device s memory This method does not require that any devices be disconnected from the ...

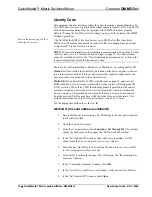
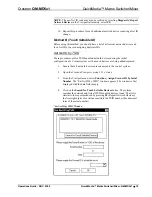
Страница 23: ...em or when such devices are being added replaced 1 Ensure that all network devices are connected to the control system 2 Open the Crestron Viewport version 3 35 or later 3 From the Viewport menu select Functions Assign Cresnet ID by Serial Number The Set Net ID by TSID window appears The window is first displayed with the data fields empty 4 Click on the Search for Touch Settable Devices button Th...

Страница 24: ...ltiple devices of the same type on a network you need to locate a particular one you know the TSID but not the serial number and your site installation list is based on device serial numbers In this or the reverse situation do the following 1 Open the Crestron Viewport 2 From the Viewport menu select Functions Serial Number TSID Conversion Tool The Serial Number TSID Conversion Tool window is disp...

Страница 25: ...rticular attention should be given to supply connections other than direct connections to the branch circuit e g use of power strips Two ears are provided with the MD5x1 so that the unit can be rack mounted These ears must be installed prior to mounting Complete the following procedure to attach the ears to the unit The only tool required is a 1 Phillips screwdriver 1 There are screws 4 40 x 0 312...

Страница 26: ... be avoided on all sides of the unit NOTE The maximum continuous current from equipment under any external load conditions shall not exceed a current limit that is suitable for the minimum wire gauge used in interconnecting cables The ratings on the connecting unit s supply input should be considered to prevent overloading the wiring Hardware Connections for the QM MD5x1 Back of the Unit is Shown ...

Страница 27: ...ing for a base system including all touchpanel screens and the control system program The program output of SystemBuilder is a SIMPL Windows program with much of the functionality encapsulated in macros and templates Once SystemBuilder creates the project the system interfaces and program logic can be customized in SystemBuilder or can be easily modified with Crestron development tools i e SIMPL W...

Страница 28: ... or later with Library Update 320 or later Requires SIMPL Cross Compiler version 1 1 Crestron Database version 16 4 1 or later Required by SIMPL Windows and Crestron Engraver Crestron Engraver 2 3 0 0 or later Programming with SIMPL Windows NOTE While SIMPL Windows can be used to program the MD5x1 it is recommended to use SystemBuilder and Digital Media Tools software for configuring and tuning a ...

Страница 29: ...RMCRX system tree displays the QM MD5x1 in Slot 5 with a default Net ID of 1D as shown in the following illustration Auto Compensation is a feature that is used to recall the stored source compensation settings on a QM transmitter If Auto Compensation is to be used all QM transmitters midpoints and endpoints in a program must use QM devices with Auto Compensation Devices with Auto Compensation cap...

Страница 30: ... NOTE This procedure sets the Net ID for the MD5x1 in the program only It does not automatically set the Net ID for the MD5x1 itself SIMPL Windows automatically changes Net ID values of a device added to a program if a duplicate device or a device with the same Net ID already exists in the program Always ensure that the hardware and software settings of the Net ID match For Net ID hardware setting...

Страница 31: ... labeled AUD 1 through AUD 4 In addition to the local AV inputs the unit provides a QM input labeled IN 5 that can receive video stereo program audio and two channels of microphone audio MIC 1 and MIC 2 from QM transmitters via CAT5 The QM input is a QM audio receiver circuit that supports up to 254 QM Link presets for peaking and boost The peaking and boost settings improve the transmission of th...

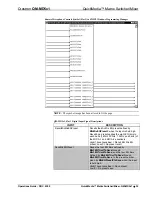
Страница 32: ...rings The two methods should not be used simultaneously While using the SIMPL Windows Programming Manager double click on Slot 1 of the QM MD5x1 to view the details of the Input Switching symbol as shown in the following diagram Input Switching Symbol Slot 1 in SIMPL Windows Programming Manager NOTE The symbol image has been altered to fit the page 28 QuickMedia Matrix Switcher Mixer QM MD5x1 Oper...

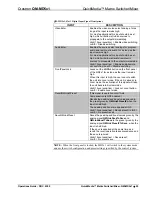
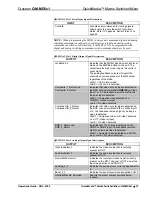
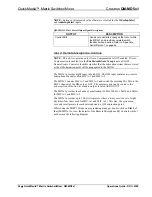
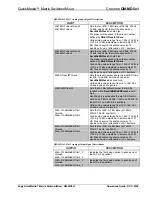
Страница 33: ...nit into Local mode If the unit is already in Local mode the activation of this signal will take the unit back into System mode High 1 level sensitive Lock out Local button Low 0 Enable Local mode RecallQMLink5Preset This signal is operative only if Auto Compensation is NOT enabled Recalls the peaking and boost values saved in the preset given by QMLink5Preset when the input is held high The peaki...

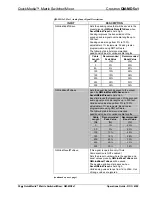
Страница 34: ...e preset given by QMLinkPreset ToSave when SaveQMLinkPreset is held high Boost improves the transmission of the encoded audio signal over cable lengths up to 300 feet Valid boost values range from 0 to 100 adjustable in 1 increments Boost is also programmable using DMT software The following table lists recommended peak boost values for various cable lengths Cable Length ft Recommended Peak Value ...

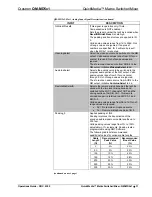
Страница 35: ...om 0 for no source through 5 Out of range values are ignored Thus to route an audio source from AUD 4 to the QM output initialize AudioInpSelect to 4d RemoteMicSelectA Selects the remote microphone pair that will be mixed with the two local microphones and switched to the MIC 1 channel of OUT and the mixing section of AUDIO OUT This remote microphone pair is referred to as MIC A 1 and MIC A 2 Vali...

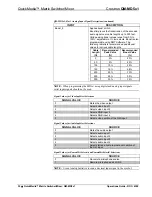
Страница 36: ...and analog input signals serial input signals should not be used Signal Values for VideoInpSelect Selections SIGNAL VALUE SOURCE 0 Mutes the video output 1 Selects video input 1 2 Selects video input 2 3 Selects RGB input 3 4 Selects RGB input 4 5 Selects video portion of the QM input Signal Values for AudioInpSelect Selections SIGNAL VALUE SOURCE 0 Mutes the audio output 1 Selects audio input 1 2...

Страница 37: ... 2 The feedback remains high for as long as video is detected High 1 Composite video detected on a COMP Pb Video In input Low 0 No video detected Component S_1_Detect Component S_2_Detect Indicates that video sync levels are detected on the BNC connector marked Y Y on Video Input 1 or 2 The feedback remains high for as long as video is detected High 1 Component video or S video detected on a Y Y V...

Страница 38: ...e MD5x1 provides a QM input labeled IN 5 The QM input contains two remote microphone channels called MIC A 1 and MIC A 2 The MD5x1 can mix MIC A 1 and MIC A 2 and switch the resulting Mic Mix to the MIC 1 channel of the QM output OUT The same mic mix can be routed to the mixer section of the line level audio output labeled AUDIO OUT The MD5x1 provides four bands of equalization 160Hz 500Hz 1 2kHz ...

Страница 39: ...ing a preset applies the eight EQ trims to each band 160Hz 500Hz 1 2kHz and 3kHz of the MIC A 1 and MIC A 2 equalizers High 1 level sensitive Recall Mic Mix EQ preset Low 0 No preset recall SaveMicEQPreset Saves the four EQ trims defined by Mic1EQTrim1ToSave through Mic1EQTrim4ToSave and the four EQ trims defined by Mic2EQTrim1ToSave through Mic2EQTrim4ToSave to the preset number given by MicEQPre...

Страница 40: ...f range values are ignored MicMixEQPreset Sets the Mic Mix preset number that will be recalled when RecallMicMixEQPreset is held high Recalling a preset applies the eight EQ trims to each band 160Hz 500Hz 1 2kHz and 3kHz of the MIC A 1 and MIC A 2 equalizers Valid analog values range from 1d to 16d Out of range values are ignored MicA 1ToMicMixEQTrim1 through MicA 1ToMicMixEQTrim4 Sets the four MI...

Страница 41: ...rogram audio from one of the stereo program sources and the Mic Mix mix described above are inputs to this mixer The mixer mixes the program and the microphone into the three AUDIO OUT channels PRG L PRG R and SP Up to 40 ms delay can be applied to the SP channel The Mixer module provides up to five mixer presets where a mixer preset consists of nine mixing values for AUDIO OUT three mixing levels...

Страница 42: ... mixing levels for remote MIC A 1 and MIC A 2 as defined by the MicA 1ToMicMix and MicA 2ToMicMix analogs The mixing levels are saved to the preset given by MicMixerPreset when the input is held high If the save is asserted at the same time as a recall the recall takes precedence and the save is ignored High 1 level sensitive Save mic mixer preset Low 0 No preset save continued on next page 38 Qui...

Страница 43: ...ive Recall mixer preset Low 0 No preset recall QM MD5x1 Slot 3 Analog Input Signal Descriptions INPUT DESCRIPTION MicMixerPreset Sets the mic mixer preset number that will save or recall the four mixing levels for remote MIC A 1 and MIC A 2 Valid analog values range from 1d to 16d Out of range values are ignored AudioOutMixerPreset Sets the mixer preset number that will save or recall the nine mix...

Страница 44: ... channel of AUDIO OUT Valid analog values range from 800d 80 dB to 0d 0 dB adjustable in increments of 0 1 dB Changing the analog value by 1d signifies a boost or attenuation of 0 1 decibels A value of 800d 80 dB signifies the minimum mixing level and will cut the mixing level to a complete mute A mixing level of 0d 0 dB means that the signal will pass unaffected LeftToAudioOutSp Sets the mixing l...

Страница 45: ...d routed to the PRG L channel of AUDIO OUT Valid analog values range from 800d 80 dB to 0d 0 dB adjustable in increments of 0 1 dB Changing the analog value by 1d signifies a boost or attenuation of 0 1 decibels A value of 800d 80 dB signifies the minimum mixing level and will cut the mixing level to a complete mute A mixing level of 0d 0 dB means that the signal will pass unaffected LeftToAudioOu...

Страница 46: ...nd routed to the PRG R channel of AUDIO OUT Valid analog values range from 800d 80 dB to 0d 0 dB adjustable in increments of 0 1 dB Changing the analog value by 1d signifies a boost or attenuation of 0 1 decibels A value of 800d 80 dB signifies the minimum mixing level and will cut the mixing level to a complete mute A mixing level of 0d 0 dB means that the signal will pass unaffected LeftToAudioO...

Страница 47: ...everal ways to use this input 1 Use an Analog Initialize symbol speedkey INIT to set the value to the expected maximum number of open microphones 2 For systems in which manual muting of microphones is acceptable the microphone feedback signals can be used to calculate the number of open microphones Invert the microphone mute feedback signals and connect them to the inputs of a Digital Sum symbol s...

Страница 48: ... SP The MD5x1 provides graphic and parametric EQ for each of the three AUDIO OUT channels The graphic EQ portion can be programmed using either SIMPL Windows or Crestron Digital Media Tools DMT software The parametric equalizer and fixed frequencies of the graphic equalizer can only be programmed using DMT Software The MD5x1 provides 12 filters for each output channel with a maximum of 10 filters ...

Страница 49: ...ow the change The MD5x1 provides 10 trim presets where a trim preset consists of 30 EQ trims 10 EQ trims each for PRG L PRG R and SP In addition to the 10 trim presets the MD5x1 provides five filter presets settable using DMT Software While using the SIMPL Windows programming manager double click on Slot 4 of the QM MD5x1 to view the details of the Graphic EQ symbol as shown in the following diagr...

Страница 50: ...ot 4 Analog Input Signal Descriptions INPUT DESCRIPTION AudioOutTrimPreset Sets the trim preset number that will be saved or recalled Valid analog values range from 1d to 10d Out of range values are ignored AudioOutFilterPreset Sets the filter preset number that will be recalled when RecallAudioOutFilterPreset is held high Valid analog values range from 1d to 5d Out of range values are ignored Aud...

Страница 51: ...values are still stored in the receiver In large networks that do not use Auto Compensation presets for peak boost input compensation and microphone equalization will need to be manually created stored and recalled on each receiver for each transmitter on the network When Auto Compensation is enabled each transmitter automatically transmits an ID input compensation and microphone equalization pres...

Страница 52: ... MD7x2 and QM MD5x1 can also act as a midpoint between a QM origination point and a QM endpoint When acting as a midpoint these devices pass on the audio parameters stored by the QM origination point If Auto Compensation is NOT enabled the MD5x1 supports up to 192 source gain compensation presets which allow for normalization of audio levels between different sources Each compensation preset appli...

Страница 53: ...edia Matrix Switcher Mixer General Audio Controls Symbol Slot 5 in SIMPL Windows Programming Manager NOTE The symbol image has been altered to fit the page Operations Guide DOC 6300 QuickMedia Matrix Switcher Mixer QM MD5x1 49 ...

Страница 54: ...l is operative only if Auto Compensation is enabled Recalls the source gain compensation preset given by the analog signal AudioOutPrgCompPreset when the input is held high The source gain compensation is added to program volume and is applied equally to both the PRG L and PRG R channels of AUDIO OUT High 1 level sensitive Recall AUDIO OUT compensation preset Low 0 No preset recall SaveCompPreset ...

Страница 55: ...ange from 0 80 dB to 100 20 dB AudioOutSpBass and AudioOutSpTreble Adjusts the treble and bass levels of the SP channel of AUDIO OUT Valid values range from 0 15 dB to 100 15 dB A value of 50 signifies a flat level corresponding to 0 dB AudioOutSpDelay Sets the speech delay in milliseconds on the SP channel of AUDIO OUT Valid analog values range from 0d 0ms to 40d 40ms AudioOutLVolume Adjusts the ...

Страница 56: ...B QM MD5x1 Slot 5 Digital Output Signal Descriptions OUTPUT DESCRIPTION MuteAudioOutSp_F Indicates the mute status of the SP channel of AUDIO OUT The feedback will remain high for as long as the output is muted High 1 Audio is muted Low 0 Audio is un muted MuteAudioOutL_F Indicates the mute status of the L channel of AUDIO OUT The feedback will remain high for as long as the output is muted High 1...

Страница 57: ...eating Labels with Crestron Engraver Use Crestron Engraver software to print custom labels for each input and output button Using the templates in Engraver print labels on 100 pound paper Paper weighing less than 100 pounds will be harder to slide in while paper weighing more than 100 pounds will not fit Uploading and Upgrading NOTE Crestron recommends that you use the latest software and that eac...

Страница 58: ... to establish communications Communication Settings NOTE For laptops and other PCs without a built in RS 232 port Crestron recommends the use of PCMCIA cards rather than USB to serial adapters If a USB to serial adapter must be used Crestron has tested the following devices with good results Belkin large model F5U103 I O Gear GUC232A Keyspan USA 19QW Discontinued Results may vary depending on the ...

Страница 59: ...tings window Setup Communications Settings Command 3 Select RS 232 as the connection type Verify that an available COM port COM 1 is shown after this step is selected and that all communication parameters and necessary options from the Port Settings window are selected as shown after this step Click the OK button to save the settings and close the window Port Settings Window NOTE The parameters sh...

Страница 60: ...indow file smw and click Open 3 Select Project Transfer Program Upload via Crestron Viewport 1 Verify that the procedure for Communication Settings that begins on page 54 has been performed 2 As shown after this step select File Transfer Send Program alternatively press Alt P from the Viewport menu File Transfer Send Program Command 3 The Send Program window appears as shown after this step Click ...

Страница 61: ...ns the latest firmware available Therefore please check the Crestron website for the latest version of firmware Not every product has a firmware upgrade but as Crestron improves functions adds new features and extends the capabilities of its products firmware upgrades are posted To upgrade the firmware complete the following steps 1 Verify that the procedure for Communication Settings that begins ...

Страница 62: ...iewed using the front panel controls of the MD5x1 When operating in the local mode all switching functions are controlled by the buttons on the front panel Press the SYS button located on the front panel to select the system mode or press the LOCAL button to select the local mode The SYS LED will illuminate when the MD5x1 is operating in the system mode The LOCAL LED will flash when the MD5x1 is i...

Страница 63: ...utput Switching Audio Video Simultaneously 1 Make sure that the MD5x1 is in the local mode the LOCAL LED is flashing slowly 2 If not already disabled disable the audio break function by pressing the AUDIO BREAK button Audio break is disabled when the AUDIO BREAK LED is off and the V LED is on NOTE When disabling the audio break function routes will switch if needed so that the audio output will ha...

Страница 64: ...e levels of the Speech and Program Audio signals at the line level outputs can be adjusted on the MD5x1 s front panel The volume levels of the Speech and Audio Program can be adjusted individually or simultaneously for each output channel Before making any volume adjustments the volume controls must be set to adjust the desired parameter Repeatedly press the SELECT button to toggle between the fou...

Страница 65: ... until the PGM LED is illuminated The SELECT LED will flash When the PGM LED is illuminated any changes in the volume level will be made to the Program Audio portion of the audio signal 2 Press J or K to raise or lower the volume of the Program Audio portion of the audio signal When raising the volume the K LED will flash When the upper limit is reached the K LED will stop flashing When lowering t...

Страница 66: ...quality Incorrect skew settings in the QM RMCRX device Use Digital Media Tools software to set correct skew settings for each QM RMCRX in the system Remote microphone produces harsh distorted sound Input gain at remote device is set too high Lower microphone input gain at remote QM device Hum in microphone audio QM device is improperly grounded Ensure that all devices in the system are properly gr...

Страница 67: ...tends the capabilities of the QM MD5x1 additional information may be made available as manual updates These updates are solely electronic and serve as intermediary supplements prior to the release of a complete technical documentation revision Check the Crestron website periodically for manual update availability and its relevance Updates are identified as an Addendum in the Download column ...

Страница 68: ...control system If the MD5x1 is already in the system mode the operating mode will not change When set via serial command the front panel lock setting is not retained when power to the MD5x1 is recycled To retain the panel lock setting a digital signal must be used When the verbose mode is on and the lock state changes or if the MD5x1 is polled for the status of the front panel lock the MD5x1 repli...

Страница 69: ...eo input routed to the QM output and M1 is the remote microphone input QM5 routed to the QM output Each audio and video input value is 2 digits and thus can range from 00 for no source to 05 corresponding to inputs 1 through 5 Acceptable microphone switching values are 00 for no microphone or 01 for QM5 microphone The XX or xx specifier should be used to denote a don t care condition in which case...

Страница 70: ... is the input routed to the QM output audio channel v1 is the input routed to the QM output video channel and m1 is the microphone input routed to the QM output microphone channel Each number will be two digits If a switch command is sent and an output is already at the new setting serial feedback will not be provided for that output NOTE There is no serial feedback for any switches made while the...

Страница 71: ... and overlay components are covered for 90 days batteries and incandescent lamps are not covered This warranty extends to products purchased directly from CRESTRON or an authorized CRESTRON dealer Purchasers should inquire of the dealer regarding the nature and extent of the dealer s warranty if any CRESTRON shall not be liable to honor the terms of this warranty if the product has been used in an...

Страница 72: ...Crestron Electronics Inc Operations Guide DOC 6300 15 Volvo Drive Rockleigh NJ 07647 01 05 Tel 888 CRESTRON Fax 201 767 7576 Specifications subject to www crestron com change without notice ...

Отзывы: