

CHVI-RTS-1G-N/CHVI-RTS-1G-SM
Remote Temperature Sensor
Installation Guide
Description
The CHVI-RTS-1G-N and CHVI-RTS-1G-SM are wall-mounted remote temperature
sensors designed for use with Crestron thermostats. Using CAT5 or similar
low-capacitance wire, the remote sensor may be mounted up to 500 feet (152 meters)
from the thermostat.
Additional Resources
Visit the product page on the Crestron website (
)
for additional information and the latest firmware updates. Use a QR
reader application on your mobile device to scan the QR image.
Installation
The CHVI-RTS-1G-N mounts to a round or square electrical box; the CHVI-RTS-1G-SM
mounts to a round or square electrical box or any flat surface.
NOTE:
Ensure the installation location is not close to a heat or humidity source and is
away from direct sunlight, skylights, and windows. Do not place in direct sunlight. The
sensors are suitable for mounting in dry or damp locations as defined by the National
Electrical Code.
NOTE:
Installation next to controls (keypads, touchscreens, etc.) or in shared gang
boxes may affect accuracy.
NOTE:
When mounting to an electrical box, insulate the box to prevent the
temperature of the wall cavity from affecting the temperature reading.
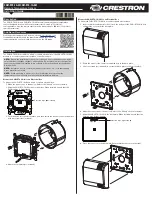
Mount the CHVI-RTS-1G-N to an Electrical Box
To mount the CHVI-RTS-1G-N to a round or square electrical box.
1. Make the connections to the device. Refer to the “Wiring” section for details.
2. Align the CHVI-RTS-1G-N to the electrical box. When installed, ensure that the
Crestron logo is right-side up.
Crestron logo right-side up
3. Push the wires into the electrical box, and then fasten the device to the electrical box
with four screws (not included).
4. Attach the faceplate (not included).
Mount the CHVI-RTS-1G-SM to an Electrical Box
To mount the CHVI-RTS-1G-SM to a round or square electrical box.
1. Insert a small screwdriver into the slots on the bottom of the CHVI-RTS-1G-SM to
separate the cover from the back plate.
2. Route the wires for the sensor through the hole in the back plate.
3. Use four screws (not included) to secure the back plate to the electrical box.
4. Make the connections to the device. Refer to the “Wiring” section for details.
5. Align the CHVI-RTS-1G-SM to the back plate. When installed, ensure that the
Crestron logo is right-side up.
Crestron logo right-side up
6. Press the sensor onto the back plate. Ensure that the vents are on the right.