background image

2-Series Integrated Dual Bus Control System 


Crestron 

AV2 & PRO2


occur. These objects are initiated by pressing the function button that is associated 
with it.  

Default Front Panel Page 


Creating a Page with Front Panel Editor 

NOTE:

  The creation of a front panel page is discussed in this section. For more 

details, consult the SIMPL Windows help file. Search for Front Panel Editor.  

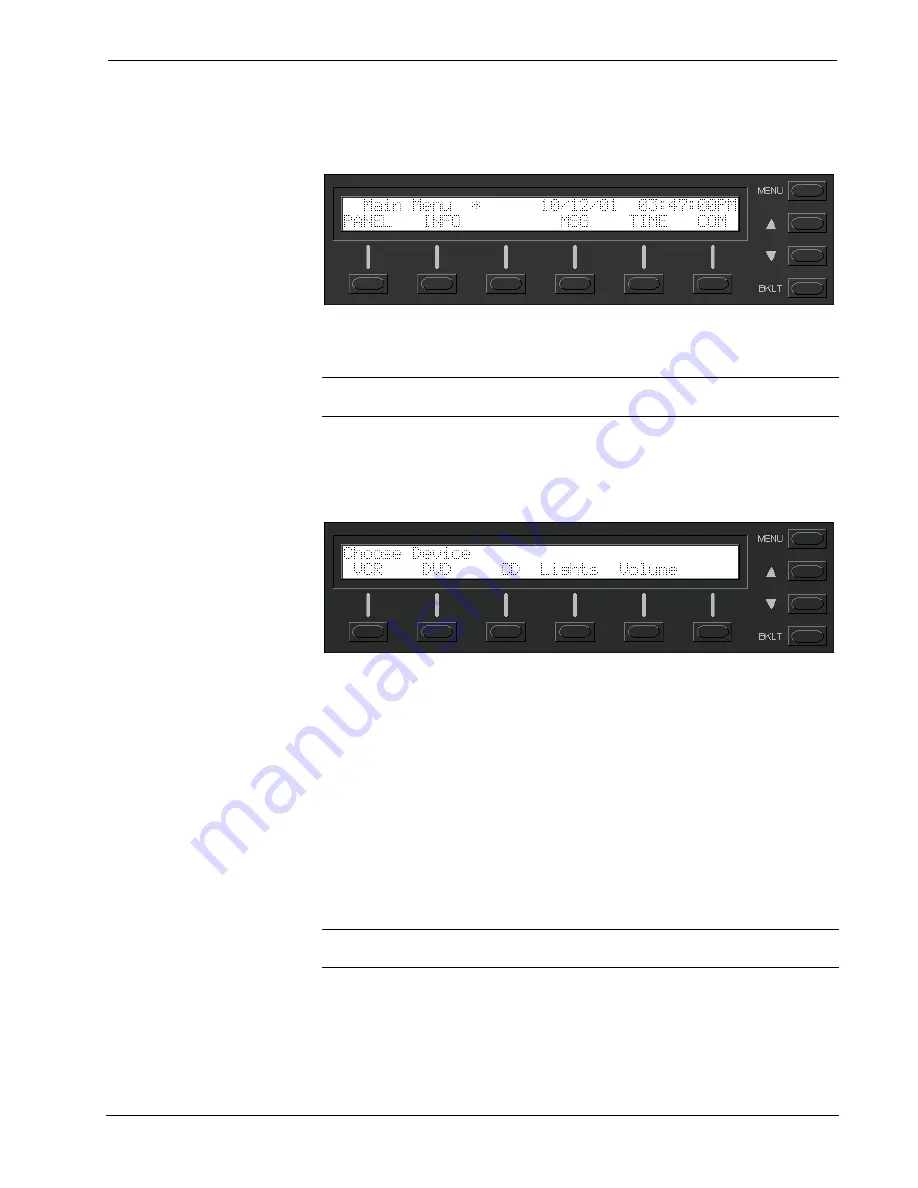
Assume that a page, as shown after this paragraph, is required. The concept of such 
an application is that the user can then choose a given device and then, from a lower-
level page, control one or more transport functions of the device.  

Example of a Front Panel Page 


Adding Top-Level Pages and Objects 

Use SIMPL Windows and access the Front Panel Editor by selecting 

Project | Edit 

Front Panel

. Click on the 

Add

 button and enter a new name for the new page. For 

this example, use “Menu1 – Choose Device” as the name.  

Double click on the front panel (green display area) to open the “Edit Panel Object” 
window. This example requires that headings be added to the page, so choose 

Text 

Object

 from the 

Object Type 

area. In the 

Inactive Text 

field, enter “Choose device” 

and click 

OK

. The object is displayed on the panel. Click on and drag the object to 

its desired location on the panel, top row.  

Add additional objects (VCR, DVD, CD, Lights, and Volume) to the page by double 
clicking in the display area where the object is to appear. Repeat the procedure in the 
previous paragraph; place objects over the appropriate menu function button.  

NOTE:

  Objects on a screen can be copied and pasted to facilitate ease of design 

(using SIMPL Windows v2.00 or later).  

Adding Lower-Level Pages and Objects 

Lower-level pages can be added for each of the objects on the bottom row of the 
page just created. For the purpose of this example, one lower-level page is added for 

18  

  Integrated Dual Bus Control System: PRO2 & AV2 

Operations Guide - DOC. 5957 

Содержание 2 Series

Страница 1: ......

Страница 2: ...This document was prepared and written by the Technical Documentation department at Crestron Electronics Inc 15 Volvo Drive Rockleigh NJ 07647 1 888 CRESTRON ...

Страница 3: ...Creating a Page with Front Panel Editor 18 Adding Top Level Pages and Objects 18 Adding Lower Level Pages and Objects 18 Front Panel Symbol 20 Object Types 21 Loading Crestron Control Software 21 Installing Crestron Development Tools 21 Memory 22 Non volatile 22 Volatile 23 Initial Setup 23 Obtaining Communications 25 Troubleshooting Communications 27 Creating the System Program 30 Converting an E...

Страница 4: ...d to the Control System 41 Passthrough Mode 41 COM Analyzer 41 Further Inquiries 43 Future Updates 43 Software License Agreement 44 Return and Warranty Policies 46 Merchandise Returns Repair Service 46 CRESTRON Limited Warranty 46 Appendix A Command Details 47 Appendix B File System 57 ii Contents Operations Guide DOC 5957 ...

Страница 5: ...upgrades databases and schedules Crestron s unique dual bus system with its high speed I O bus architecture provides blazing fast throughput system wide This dual bus architecture also permits upgrade to new second generation higher performance expansion cards while still using existing cards and software programs The 40Mb s Y BUS supports existing CNX control cards and serves as the pipeline for ...

Страница 6: ...rocessor Processing Speed 257 MIPS Dhrystone 2 1 Benchmark Onboard Memory 36MB Compact Flash Slot up to 4GB Expandable Memory accepts standard Type II Compact Flash or IBM Microdrive High Speed Y BUS 3 Expansion Optional Dual Card Slots 3 Expansion Card Slots Bus Z BUS 1 Expansion Card Slot Architecture 300 Mb s Parallel Communications Dynamic Static IP Addressing Ethernet Full Duplex TCP IP and U...

Страница 7: ...17 025 in 43 244 cm WITHOUT OPTIONAL MOUNTING EARS 19 000 in 48 260 cm WITH OPTIONAL MOUNTING EARS An asterisk indicates that the feature is not standard though may be optional on the AV2 configuration A number of slots reside on the rear panel of the 2 Series three open Y BUS slots a Z BUS slot and a compact flash slot Furthermore as shown after this paragraph there is a single RS 232 computer po...

Страница 8: ... COM D COM F On the rear panel there are six software programmable bidirectional serial ports for RS 232 RS 422 or RS 485 communication with hardware and software handshaking Speeds are rated up to 115 200 bps Ports C D E and F are Cresnet Accelerator ready The Cresnet Accelerator effectively increases the network speed fan out and device addresses by a factor of 8 for each Poll Accelerator added ...

Страница 9: ...t to RS 485 Bus COM DB9 CONNECTOR RS 485 BUS Tie Pins 1 9 Tie Pins 4 6 Pin 5 G INFRARED SERIAL OUTPUT Infrared Serial Output Connectors S5 INFRARED SERIAL OUTPUT A B C D E F G H S G S G S G S G S G S G S G S G On the rear panel there are eight serial outputs for IR or serial interface Each output is labeled S signal and G ground Infrared output is rated up to 1 2 MHz Serial protocols include one w...

Страница 10: ... unit is connected to and receives power from an AC outlet NET This LED illuminates when the central processing unit is processing or communicating with Cresnet devices i e button pressed at Cresnet panel or data received from Cresnet panel ERR This LED illuminates when an error condition is detected This may be the result of hardware or software failure missing wrong card placed in a slot or a pr...

Страница 11: ...s that the CTS line is high When CTS flow control is enabled CTS indicates the serial devices on the respective COM ports are ready to accept data from the unit IR SERIAL A H These LEDs illuminate during activity on the respective IR SERIAL lines INPUT OUTPUT 1 8 These LEDs illuminate when the input voltage thresholds for the respective I O ports are exceeded or when the output is active RELAY 1 8...

Страница 12: ...T This button adjusts the brightness of the LCD backlight and the front panel LEDs Menu Function Buttons PANEL NOTE If the unit does not have a loaded program with front panel screens defined the PANEL menu function does not appear on the Main Menu This menu function button displays a programmable interface offering command text indirect text and hierarchical screen structure The menu contents are...

Страница 13: ...e LCD display Use and to scroll left and right respectively The CLEAR button can to used to empty the error log and extinguish the ERR front panel LED A security message prompts the user to confirm the command NOTE The up and down menu selection buttons to the right of the LCD display may be used in lieu of the NEXT and PREV menu function buttons MSG Submenu with Sample Message TIME This menu can ...

Страница 14: ...s button allows the user to monitor the transmission and reception traffic on every COM type device and card that is active in the SIMPL Windows program which is loaded into the 2 Series control system This includes all devices connected via Cresnet eg ST COM and Ethernet eg CEN COM as well as the built in card slot 4 and cards inserted into the expansion slots eg CNXCOM 2 and C2COM 3 Serial trans...

Страница 15: ...PAC2M PRO2 and RACK2 3 Filenames for 2 Series control system update files have a CUZ extension and can be obtained from the What s New page Control Systems Update Files section or Downloads page OPSYS Library of the Crestron website 4 The LCD display is not available on the AV2 Leading Specifications of the 2 Series Connectors CONNECTOR DETAILS NET 1 4 pin male connector for expansion to Cresnet o...

Страница 16: ...Mounting WARNING To prevent bodily injury when mounting or servicing this unit in a rack take special precautions to ensure that the system remains stable The following guidelines are provided to ensure your safety The unit should be mounted at the bottom of the rack if it is the only unit in the rack When mounting this unit in a partially filled rack load the rack from the bottom to the top with ...

Страница 17: ... procedure steps 1 through 3 to attach remaining ear to opposite side Expandable Memory The onboard 36MB memory of the 2 Series integrated dual bus control system is enhanced with a 4GB expansion slot that supports off the shelf Type II compact flash memory and the IBM Microdrive hard drive The slot is accessible on the rear panel of the unit Complete the procedures in the following subsections to...

Страница 18: ... the bussing strip into the first common position on the terminal block The strip engages the other common positions automatically 3 Remove approximately 1 8 of the jacket from the common wire and insert the conductor into one of the terminal block common positions Tighten the terminal block screws to lock the wire and bussing strip into place Insulate the strip by folding a piece of wide vinyl el...

Страница 19: ...per pair The jacket is teal color and labeled CRESNET every two feet Liberty Wire carries the cable reference CRESNET and it is available in plenum or non plenum versions NOTE Each 2 Series integrated dual bus control system has one 4 pin network connector Use the following Crestron products to interconnect to other devices within a network some permit network testing CNTBLOCK Network Terminal Blo...

Страница 20: ...ector and tighten the retaining screw Repeat the procedure for the other three network conductors Hardware Hookup Refer to the hookup diagram on the next page and aside from attaching power last complete the connections in any order Refer to Network Wiring on page 14 when making network connections NOTE To prevent overheating do not operate this product in an area that exceeds the environmental te...

Страница 21: ... control system The PRO2 LCD display is preprogrammed with a certain level of diagnostic testing and network device information Assuming the PRO2 is connected to a PC running SIMPL Windows a LCD display programming utility Front Panel Editor can be accessed This editor enables a programmer to program multi level pages under the PANEL left most function button on the LCD display Front Panel Editor ...

Страница 22: ...example use Menu1 Choose Device as the name Double click on the front panel green display area to open the Edit Panel Object window This example requires that headings be added to the page so choose Text Object from the Object Type area In the Inactive Text field enter Choose device and click OK The object is displayed on the panel Click on and drag the object to its desired location on the panel ...

Страница 23: ...re shown in the inactive state none of the buttons are being pressed Example VCR Control Page Use the Edit Panel Object window to add objects to this page Double click on the first object play From the Digital Channel field in the Edit Panel Object window scroll down to or enter 1 In the Active Text field enter PLAY as the button s active text Therefore when the menu function button associated wit...

Страница 24: ...for as long as the system is on that page press on the SIMPL Windows symbol In this note is used to denote a wildcard CNMSX Pro CNRACKX Front Panel Editor Window Front Panel Symbol A powerful tool to assist programmers in naming and routing signals for the LCD display is the Synchronize Signals command While the panel appears on the PC screen select Panel Synchronize Signal Names to automatically ...

Страница 25: ... straight through RS 232 cable that has a DB9 male connector on one end and a DB9 female connector on the other Straight through means that pin 1 on the male end goes to pin 1 on the female end etc The male end plugs into the port labeled COMPUTER on the 2 Series integrated dual bus control system The female end plugs into a serial port on the PC If the PC has a DB25 male connector obtain a DB9 to...

Страница 26: ...ns for installing the various development tools When initiating a custom install from the CD the user is presented with a list of the software programs documentation and other resources available on the CD ROM For each item set or clear a checkbox to the left of the item to direct the installation program whether to install that component onto the hard drive The size of the items installed determi...

Страница 27: ... create a new folder called PROJECTS underneath the CRESTRON directory Create another folder called MYJOB under PROJECTS for the current job The resulting pathname is C CRESTRON PROJECTS MYJOB 3 Copy the supplied files into the folder created in the last step The source of the file determines the procedure From an EXE file If a job is downloaded from the Crestron website or is received via email a...

Страница 28: ...hived to the example file C CRESTRON SIMPL PROGRAMS EXAMPLE ZIP For this ZIP file to be used by SIMPL Windows select File Import Archived Program The Import an Archived Program Window similar to the one one after this paragraph appears Import an Archived Program Window 24 Integrated Dual Bus Control System PRO2 AV2 Operations Guide DOC 5957 ...

Страница 29: ...ng to upload the program files into the 2 Series integrated dual bus control system it is necessary to first establish communication between the unit and a PC There are two ways of communicating with the control system either via the COMPUTER port RS 232 serial communications or via Ethernet if the optional Z BUS expansion card is installed Prior to completing the following steps be sure the commu...

Страница 30: ...cessing the Port Settings Window 7 Select the appropriate connection type RS 232 for a PC connection through the COMPUTER port of the 2 Series integrated dual bus control system or TCP IP through the Ethernet via optional Z BUS Verify that the proper COM port is selected and set the parity to None the data bits to Eight and the stop bits to One Refer to the window shown after this step for the rem...

Страница 31: ...tion covers troubleshooting communications of the 2 Series integrated dual bus control system via RS 232 to the COMPUTER port For troubleshooting Ethernet communications of the unit with the optional Z BUS expansion card refer to the C2ENET 1 C2ENET 2 Operations Installation Guide latest revision of Doc 5962 respectively for further information If communications with the 2 Series integrated dual b...

Страница 32: ...gain call Crestron customer service Refer to Further Inquiries on page 43 5 If steps 1 through 4 have failed to result in communications the last series of steps to perform is a reset on the control processor Complete the following steps to do so 5a While the Viewport is displayed select Setup Communications Settings alternatively depress Alt D to open the Port Settings window 5b Set the baud rate...

Страница 33: ...ogram loaded in the system is not running However it is stored and will execute during the next reset Release the SW R button 5e To confirm communication from the PC to the 2 Series integrated dual bus control system select Diagnostics Check Operating System Version alternatively depress the F5 key from the Viewport After a few seconds the Viewport responds by displaying the operating system versi...

Страница 34: ...grammer can select configure program test and monitor a Crestron control system NOTE Crestron 2 Series control systems require SIMPL Windows version 2 00 or later The latest software versions can be obtained from the What s New page SIMPL Windows section or Downloads page SIMPLWIN Library of the Crestron website www crestron com New users are required to register in order to obtain access to the F...

Страница 35: ...evices are dropped onto slot 4 they are assigned to port A through port F in sequence by default COMMUNICATION PARAMETERS In the System Tree scroll down to Slot 4 C2I COM6 within the control system and expand to display the individual ports Single click on the desired port then right mouse click and select Configure Select the SERIAL SETTINGS tab to display a window that allows for the assignment ...

Страница 36: ... they are assigned to port A through port H in sequence by default If more than 8 drivers are needed in the system the sequence is repeated again as needed COMMUNICATION PARAMETERS In the System Tree scroll down to Slot 5 C2I IR8 within the control system and expand to display the individual ports Single click on the desired port then right mouse click and select Configure Select the SERIAL SETTIN...

Страница 37: ...ing Manager Converting an Existing System Program To convert an existing system program that is configured with a control system other than the AV2 or PRO2 one must verify that SIMPL Windows v2 0 or later is running and the Crestron database v15 6 2 or later is available Complete the following steps to execute the conversion 1 Use the correct version of SIMPL Windows and open the existing program ...

Страница 38: ...nal ambiguity exists SIMPL Windows prompts the programmer to open each Crestron module select Project User Modules umc as the file type and recompile 7 Return to SIMPL Windows and select Project Convert Compile alternatively depress F12 to recompile the SIMPL Windows program NOTE SIMPL Windows v2 00 and later is sensitive to analog versus serial signal definition in a program During the compilatio...

Страница 39: ...Permanent button is not required for a 2 Series integrated dual bus control system since all transfers are permanently stored To extract the existing program confirm that the Retrieve Program from the Control System before overwriting check box is checked before sending the new program 6 After transferring the program file click on the Check Program button to ensure that the file loaded properly T...

Страница 40: ... network cable Also verify that the touchpanel is set to the proper network ID This info should be available in the system connection sheets or directly from the programmer 2 Select Tools Viewport to open the Crestron Viewport if it is not already opened 3 Select Diagnostics Report Network Devices alternatively depress F4 and verify that the touchpanel to be loaded reports back and is at the expec...

Страница 41: ... Window 3 The Open window offers the option to enter or browse to the path name of a new update package Only choose update packages with a CUZ extension 4 After locating the CUZ package click OK in the Open window to initiate firmware download Observe the Transfer In progress window on the PC 5 When the transfer is 100 complete the Waiting for Control System to Reboot message appears 6 Upload the ...

Страница 42: ...IMPL Windows Preferences window In the Symbol Set area of the General tab select Special as shown in the illustration that follows this note SIMPL Windows Preferences Window Commands can be categorized It is possible to find the same command in more than one category Categories include Device pertains to the unit itself Ethernet govern parameters that involve the installed Z BUS card File influenc...

Страница 43: ... available heap space HELP Display help screens INFO Print software capabilities INITIALIZE Clear file system IPADDRESS Set IP address IPMASK Set IP subnet mask IPTABLE Display IP table MESSAGE Display a message on front panel screen PASSWORD Set console password PING Perform IP ping test on remote node RAMFREE Show available file space in the ram file system REBOOT Perform system reboot REMMASTER...

Страница 44: ...es software configuration i e card is in proper slot as defined by program If using PRO2 depress MSG button on front panel for specific error If using AV poll the network F4 from the Viewport Compilation error RLCMCVT166 RLCMCVT177 Poor analog versus serial signal definition in the SIMPL Windows program Confirm properly signal definition in the program System locks up Various Hold down SW R button...

Страница 45: ...de Window Passthrough mode allows data to pass from the COMPUTER port to the selected COM port on a Cresnet or Ethernet device such as ST COM or CEN COM While passthrough mode is running the program currently in memory is suspended and will not execute When passthrough mode is exited the program resumes operation The TX and RX LEDs for the given port illuminate when in passthrough mode Entering pa...

Страница 46: ...e screen shown below Select the BIN ASCII or HEX menu function button to determine the appropriate format Select Format Type Screen Once the BIN ASCII or HEX menu function button is selected the display provides the T R Screen The Data Menu in the CNX Series control system contained a RESET and REFRESH menu function button These buttons are not necessary for the PRO2 because the data is always liv...

Страница 47: ...ia at 852 2341 2016 In Latin America call Crestron Latin America at 5255 5093 2160 In Australia call Crestron Pacific at 613 9480 2999 For local support from exclusive Crestron factory trained personnel in New Zealand call Amber Technologies at 649 410 8382 Future Updates As Crestron improves functions adds new features and extends the capabilities of the 2 Series integrated dual bus control syste...

Страница 48: ... commands data or instructions from or to another computer b for local campus or wide area network internet or web hosting services or c pursuant to any rental sharing or service bureau arrangement The Software is designed as a software development and customization tool As such Crestron cannot and does not guarantee any results of use of the Software or that the Software will operate error free a...

Страница 49: ... of ninety 90 days from the date of receipt and b that any hardware accompanying the Software will be subject to its own limited warranty as stated in its accompanying written material Crestron shall at its option repair or replace or refund the license fee for any Software found defective by Crestron if notified by you within the warranty period The foregoing remedy shall be your exclusive remedy...

Страница 50: ...ot covered This warranty extends to products purchased directly from CRESTRON or an authorized CRESTRON dealer Purchasers should inquire of the dealer regarding the nature and extent of the dealer s warranty if any CRESTRON shall not be liable to honor the terms of this warranty if the product has been used in any application other than that for which it was intended or if it has been subjected to...

Страница 51: ...node is completely specified by its CIP ID number and the IP addresses of each end The new IP table is stored in permanent memory for retrieval The panel should be rebooted to recognize the new node Entering the command without a parameter displays the current setting Help Menu s Ethernet Main Syntax ADDMaster cip_id ip_address device_id Parameters cip_id the ID of the node in hexadecimal notation...

Страница 52: ...sible Source RS 232 CTP Telnet User Program CIPPORT Description This command specifies the port number to be used for the CIP interface It should only be used in the few cases where there is a conflict Help Menu s Ethernet Syntax CIPPORT portnumber Parameters portnumber port number for CIP activity Possible Source RS 232 CTP Telnet CLEARERR Description This command clears the error log for diagnos...

Страница 53: ...otocol IP address of the router node in dot decimal format eg 255 255 255 255 Possible Source RS 232 CTP Telnet User Program DELETE Description This command deletes file s from the file system Wildcards are accepted and can be in the form of file file and file Help Menu s File Syntax DELete filespec Parameters filespec ASCII string contains the file name and or wildcards Possible Source RS 232 CTP...

Страница 54: ...and is effective Help Menu s Ethernet System Syntax ETHERNET ON OFF Parameters ON enables the Ethernet card OFF disables the Ethernet card Possible Source RS 232 CTP Telnet ETHERTEST Description This command runs the various diagnostic tests for the Ethernet card Help Menu s Ethernet System Syntax ETHERTEST RESET REGTEST MEMTEST LOOPBACK MMUTEST INTTEST EETEST FULL EXTLOOP REGMAP SHOWTX SHOWRX EED...

Страница 55: ...s the commands for the console grouped by function Help Menu s Main Syntax HELP ALL DEVice ETHERnet FILE SYStem Parameters ALL shows all the commands for the touchpanel DEVice displays commands specific to a touchpanel device ETHERnet shows the commands for Ethernet control FILE displays the commands for the file system SYStem list of general system commands Possible Source RS 232 CTP Telnet INFO ...

Страница 56: ...tax IPTable Parameters none Possible Source RS 232 CTP Telnet MESSAGE Description This command displays a message on the front panel screen It will be used to display informational messages during downloads Help Menu s Device Syntax MESSAGE message_string Parameters message_string ASCII string to display on panel screen No parameter clears message from screen and restores display page Possible Sou...

Страница 57: ...y its CIP ID number and the IP addresses of each end The new IP table is then stored in permanent memory for retrieval The panel should be rebooted so that the old node will not be recognized Help Menu s Ethernet Main Syntax REMMaster cip_id ip_address Parameters cip_id the ID of the node in hexadecimal notation ip_address the Internet Protocol IP address of the remote node in dot decimal format e...

Страница 58: ...ication parameters for the COMPUTER port New settings are effective immediately Help Menu s System Syntax SERial baud parity databits stopbits Parameters baud desired baud rate for the RS 232 port 110 through 115200 parity desired parity for the port N E O databits desired number of data bits 7 8 stopbits desired number of stop bits 1 2 Possible Source RS 232 CTP Telnet SHOWHW Description This com...

Страница 59: ...OAD DISPLAY FIRMWARE net_id Parameters DISPLAY indicates that the file is a display list for a touchpanel FIRMWARE indicates that the file is a firmware upgrade net_id Cresnet ID of the touchpanel device in hexadecimal Possible Source RS 232 CTP Telnet VERSION Description This command displays firmware version information Help Menu s Main System Syntax VERsion Parameters none Possible Source RS 23...

Страница 60: ...elp Menu s File Main Syntax XGETfile filespec Parameters filespec ASCII string contains the file name and or wildcards Possible Source RS 232 CTP XONXOFF Description This command enables disables the software handshaking on the RS 232 port If no parameter is entered the current state is displayed Help Menu s System Syntax XONxoff ON OFF Parameters ON enables the XON XOFF handshaking OFF disables t...

Страница 61: ...S Contains various system configuration files SETUP Legacy directory used in ISYS panels to hold setup files HTML Web pages SIMPL Control system program files SPLUS Simpl module files USER Used for user defined files MAILBOX Directory contains the user mailbox file CFx The mounting point for the compact flash files where x is the number of the compact flash slot 0 on board slot i e CF0 refers to t...

Страница 62: ...2 Series Integrated Dual Bus Control System Crestron AV2 PRO2 This page intentionally left blank 58 Integrated Dual Bus Control System PRO2 AV2 Operations Guide DOC 5957 ...

Страница 63: ...Crestron AV2 PRO2 2 Series Integrated Dual Bus Control System This page intentionally left blank Operations Guide DOC 5957 Integrated Dual Bus Control System PRO2 AV2 59 ...

Страница 64: ...Crestron Electronics Inc Operations Guide DOC 5957 15 Volvo Drive Rockleigh NJ 07647 12 01 Tel 888 CRESTRON Fax 201 767 7576 Specifications subject to www crestron com change without notice ...

Отзывы: