background image

Installing Hardware  2-4

Step 4: Connect to 

telephone line and 

telephone set

1.

Locate the most convenient telephone wall outlet.
If a telephone set is already connected to it, unplug the telephone cable from the wall outlet.

2.

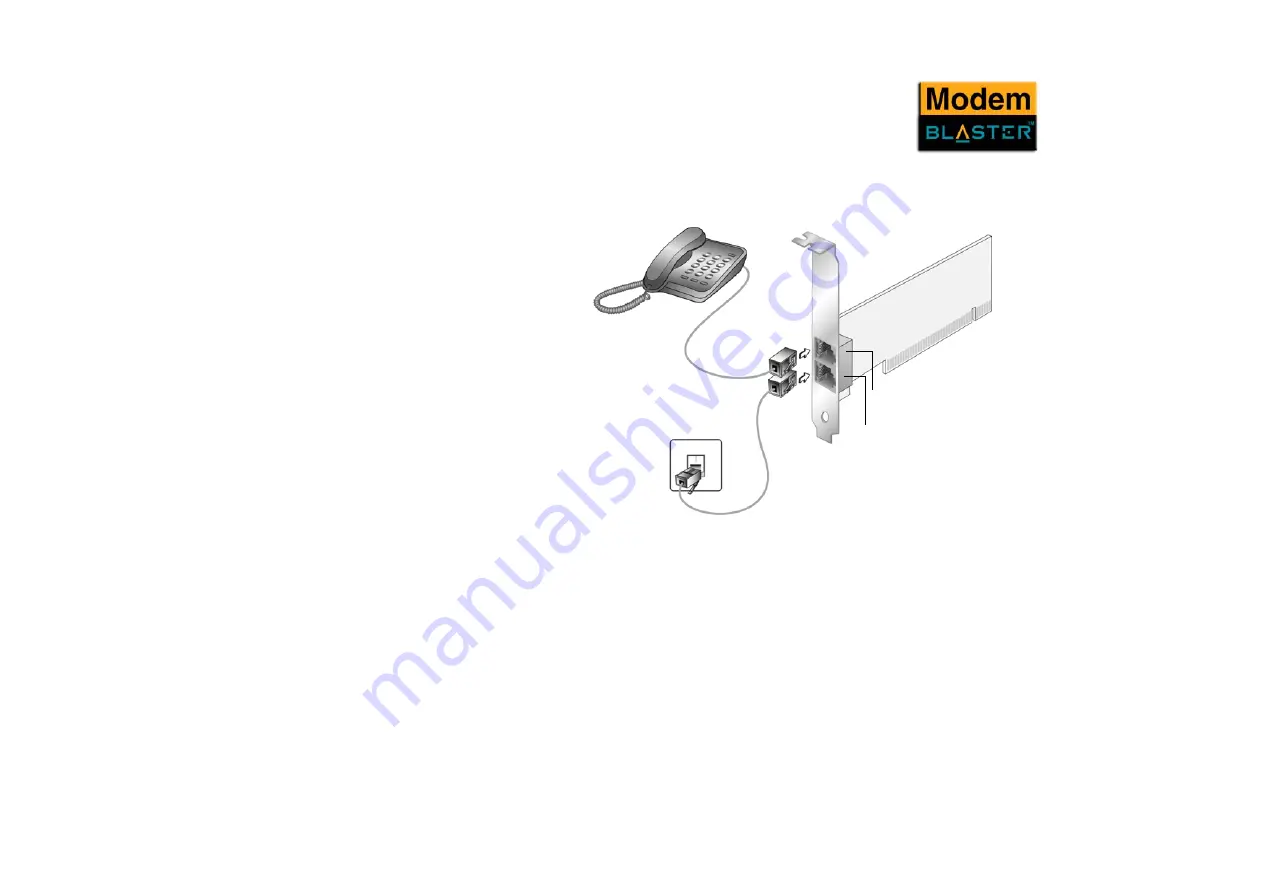
Connect the telephone cable from a telephone set to the Phone jack of the modem.

3.

Connect one end of the telephone cable provided to the wall outlet and the other end to the 
Telephone Line jack of the modem.

Figure 2-3: Connecting the telephone line and telephone to your modem.

Phone jack

Telephone Line jack

To telephone line wall outlet

Telephone cable 
(provided)

Telephone set

Modem card

Содержание DI5732

Страница 1: ...a license agreement and may be used or copied only in accordance with the terms of the license agreement It is against the law to copy the software on any other medium except as specifically allowed i...

Страница 2: ...ossibility that the Software will be used on more than one computer at a time 3 Stand Alone Basis You may use the Software only on a stand alone basis such that the Software and the functions it provi...

Страница 3: ...ou will use CDDB Data the CDDB Client and CDDB Servers for your own personal non commercial use only You agree not to assign copy transfer or transmit the CDDB Client or any CDDB Data to any third par...

Страница 4: ...the Software Should the Software prove defective you and not Creative or its distributors or dealers assume the entire cost of all necessary servicing repair or correction This warranty gives you spe...

Страница 5: ...reative as advocating or authorising the infringement of local and or international laws applicable to your jurisdiction SPECIAL PROVISIONS APPLICABLE TO THE EUROPEAN UNION IF YOU ACQUIRED THE SOFTWAR...

Страница 6: ...eiver is connected Consult the dealer or an experienced radio TV technician CAUTION To comply with the limits for the Class B digital device pursuant to Part 15 of the FCC Rules this device must be in...

Страница 7: ...mputer 2 2 Step 2 Insert the modem card 2 3 Step 3 Connect to power supply 2 3 Step 4 Connect to telephone line and telephone set 2 4 Notes on connecting the telephone line and telephone set 2 5 3 Ins...

Страница 8: ...3 PCM Upstream 5 3 Modem on Hold 5 3 Using Modem on Hold 5 4 A Technical Specifications B Troubleshooting Problems Installing Software B 2 Resolving Hardware Conflicts B 3 Resolving Conflicts in Wind...

Страница 9: ...If You Have a Problem C 3 Returning a product for repair C 4 Operating Hours C 4 Limited Warranty C 5 Creative European Contact Centre...

Страница 10: ...Introduction...

Страница 11: ...and PDF User Manual Recording Model and Serial Numbers Your modem card has a model number and a serial number After removing the modem card from its packaging write down its model and serial numbers...

Страница 12: ...t this document Note This highlights additional or important information about a feature Caution This highlights proper usage of your product Use this information to avoid risky situations Warning Thi...

Страница 13: ...1 About Your Modem...

Страница 14: ...in Figure 1 1 Place the modem card in front of you as you go through this chapter This will help you identify the various components found on your modem card Figure 1 1 The jacks on your modem card Te...

Страница 15: ...2 Installing Hardware...

Страница 16: ...cord from the wall outlet 3 Remove your computer casing 4 Remove the metal bracket from an unused PCI slot as shown in Figure 2 1 Put the screw aside for use later Turn off the main power supply and...

Страница 17: ...o the wall outlet and then turn on the computer To install drivers and applications refer to Installing and Testing the Modem Drivers on page 3 2 Do not force the modem card into the slot Make sure th...

Страница 18: ...the wall outlet 2 Connect the telephone cable from a telephone set to the Phone jack of the modem 3 Connect one end of the telephone cable provided to the wall outlet and the other end to the Telephon...

Страница 19: ...n it be used on toll or coin operated lines Contact your local telephone company for help if you are not sure about the suitability of your telephone line This modem is intended for use on an analog t...

Страница 20: ...3 Installing and Testing the Modem Drivers...

Страница 21: ...M drive s auto insert notification feature For more details see Problems Installing Software on page B 2 i Windows 98SE users may be prompted to locate the ACRCST9 CAT file Click the Browse button and...

Страница 22: ...appears 3 Click the Diagnostics tab 4 Click the COM port that has been assigned to your modem 5 Click the More Info button to display the response status of your modem If your modem is not responding...

Страница 23: ...a conflict between the modem and another peripheral device To resolve the conflict you must change the settings on your modem see Resolving Conflicts in Windows 2000 XP on page B 4 In Windows Me 1 Cli...

Страница 24: ...The Creative Modem Blaster V 92 DI5732 Properties dialog box similar to Figure 3 4 appears 5 Click the Diagnostics tab and then click the Query Modem button to display the response status of your mod...

Страница 25: ...4 Uninstalling the Modem...

Страница 26: ...nstructions tell you how to uninstall the modem In Windows 98SE 1 Click Start Settings Control Panel 2 Double click the Add Remove Programs icon The Add Remove Programs Properties dialog box similar t...

Страница 27: ...then click the Change Remove button 5 Click the Close button 6 Turn off your computer and remove the modem card In Windows Me 1 Click Start Settings Control Panel 2 Double click the Add Remove Program...

Страница 28: ...k the Add or Remove Programs icon The Add or Remove Programs dialog box similar to Figure 4 4 appears 3 Click the Change or Remove Programs button 4 Click Creative Modem Blaster V 92 DI5732 and then c...

Страница 29: ...5 Modem Features...

Страница 30: ...modem to serve as a fax on demand system by using the software provided Internet Access Your modem allows you to access computer bulletin boards and to browse the Internet at speeds of up to 56 Kbps...

Страница 31: ...eed from 33 6 Kbps to a maximum of 48 Kbps Modem on Hold This feature allows you to answer an incoming call even when you are surfing the Internet Check with your local Internet Service Provider to as...

Страница 32: ...g you call click the Disconnect Call button 3 A dialog box similar to Figure 5 3 appears The modem will reconnect to the Internet During the software installation when selecting the drivers and applic...

Страница 33: ...A Technical Specifications...

Страница 34: ...ces Table A 1 Plug and Play Resource Information DEPENDENT FUNCTIONS RESOURCE INFORMATION Choice 1 COM 3 I O Port 3E8 to 3EF IRQ 3 4 5 7 9 10 or 11 Choice 2 COM 4 I O Port 2E8 to 2EF IRQ 3 4 5 7 9 10...

Страница 35: ...re implemented in the hardware Therefore no special drivers or libraries are needed to take advantage of higher speeds and data reliability Automatic dial and answer capabilities Fax Features Supports...

Страница 36: ...B Troubleshooting...

Страница 37: ...tion program through the My Computer shortcut menu 1 Double click the My Computer icon on your Windows desktop 2 In the My Computer window right click the CD ROM drive icon 3 On the shortcut menu clic...

Страница 38: ...ct your modem and click the Properties button The Properties dialog box of the modem appears 6 Click the Resources tab 7 Click the Use Automatic Settings check box to select it If this check box is al...

Страница 39: ...to the Properties dialog box of the conflicting peripheral device and select the same check box there 10 Restart your system to allow Windows 2000 XP to reassign resources to your modem and or the co...

Страница 40: ...r communications software to detect that the remote user has hung up is not long enough The modem or communications software cannot detect a different dial or busy tone For example if you are connecti...

Страница 41: ...upport and our self service knowledgebase The European support area on our website at www europe creative com contains the following options Knowledgebase Creative s Self service knowledgebase empower...

Страница 42: ...d solution document to escalate your query via eMail If you do not have access to our website then you can mail us directly at support europe creative com Telephone You have the option to contact our...

Страница 43: ...OS manufacturer version and chipset manufacturer Type and version of your operating system e g Windows 95 98 or Windows NT Windows 2000 or Windows Me If after using the Creative support services you b...

Страница 44: ...kaging in which you return the hardware item After receiving the hardware Creative will process the return Creative may replace or repair the product with new or re conditioned parts and the faulty pa...

Страница 45: ...cular purpose with respect to the use of this product Creative also disclaims any obligation to support products for all operating environments for example by ensuring interoperability with future ver...

Страница 46: ...353 1 4380060 Belgium Tel 353 1 4333291 Denmark Tel 353 1 4333230 Finland Tel 353 1 4333270 Norway Tel 353 1 4333240 Sweden Tel 353 1 4380030 Holland Tel 353 1 4333272 Switzerland Tel 353 1 4380070 Po...

Отзывы: