


T10 Torx bit
T15 Torx bit
Dusting gas
Time Required:
7-8 minutes
About this task
Different size and speed grade DIMMs cannot be mixed on a blade. Identical DIMMs must be installed in all of the
slots that are common to a node.
Procedure
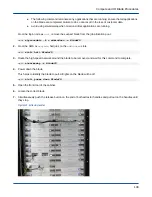
1. Remove the blade from the cabinet.
2. Remove the T15 Torx screws that attach the shroud to the blade and remove the shroud.
3. Remove the T10 Torx screws that attach the air diffuser bracket to the blade and remove the bracket.
4. Disconnect the power cable connectors (press the release tab and pull cable straight out) and remove the
power cable assembly.
5. Locate the defective DIMM.
6. Simultaneously push out on both DIMM cams with both thumbs to eject the DIMM from the socket.
7. Remove the memory DIMM and place it on an ESD-safe surface.
5.5.2
Install a Blade Memory DIMM
Prerequisites
Different size and speed grade DIMMs cannot be mixed on a blade. Identical DIMMs must be installed in all of the
slots that are common to a node.
Tools Required:
Adjustable torque driver, 5–40 in-lbs
T10 Torx bit
T15 Torx bit
Dusting gas
Time Required:
7-8 minutes
Procedure
1. Spray the DIMM contacts and the DIMM socket with dusting gas to remove any debris.
Compute and IO Blade Procedures
136