


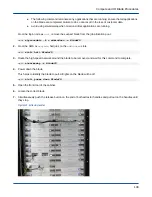


8. Slide the blade approximately 3/4 of the way out of the cage.
9. Grasp the front of the blade with one hand and the bottom of the blade near the center with the other hand
and pull the blade completely out of the cage.
10. Set the blade on an ESD-safe surface.
11.
CAUTION:
●
Equipment overheating
●
If unable to reinstall a blade in the empty slot within 2 minutes, install a filler blade assembly in
the empty slot. Failure to do so can cause other blades in the system to overheat.
If returning a blade to Logistics, remove all of the daughter cards, voltage modules, and DIMMs.
5.2
Install a Blade Using xtwarmswap
Prerequisites
Tools Required:
T15 Torx driver
Time Required:
5 minutes
Procedure
1. If installing an unpopulated spare blade, acclimatize the blade to the computer room before removing it from
the shipping case; reinstall the daughter cards, voltage modules, and DIMMs.
2. If a filler blade assembly is installed in the empty slot, remove the filler blade assembly.
3. Grasp the front of the blade with one hand and the bottom of the blade near the center with the other hand.
4. Align the left and right guide rails on the blade with the guide slots in the sides of the chassis.
5. Slide the blade straight into the cage until it stops; push the center of the face plate to avoid pinching fingers
under the extractor handles.
6. Push the tabs on the extractor handles with the extractor flanges on the sides of the cage.
Compute and IO Blade Procedures
131