


SERVICE
AND ADJUSTMENTS
~~
3/16"- "
Figure 23
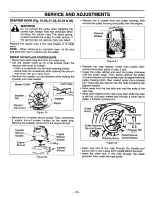
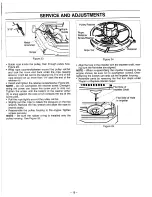
• Guide rope inside the pulley, then through pulley hole.
Figure 23.
• Wrap rope counterclockwise
around the pulley ratchet
and tuck the loose end back under the rope, leaving
about a 1 inch tail next to the retainer rib. The end of the
rope should not go more than 1/4" past the end of the
retainer rib.
• Install and tighten the retainer screw/washer. Figure 24.
NOTE -
Do not overtighten the retainer screw. Overtight-
ening the screw can cause the screw post to strip out.
Tighten the screw until the bottom of the washer either
(1) is snug against the rope or (2) contacts the top of the
screw post.
• Pull the rope tightly around the pulley ratchet.
• Slightly pull the rope to relieve the pressure on the hex
wrench. Remove the hex wrench and allow the rope to
rewind slowly.
• Reassemble the pulley housing to the engine. Tighten
screws securely.
NOTE -
Be sure the rubber o-ring is installed onto the
pulley housing. See Figure 20.
Rope Tai
Figure 24
• Align the hole in the impeller with the impeller shaft, mak-
ing sure the flat sides are aligned.
NOTE -
When re-assembling the impeller housing to the
engine shroud, be sure not to overtighten screws. Over-
tightening the screws can strip out the impeller housing.
• Assemble parts by reversing the first four steps under
"Repair or Replace Starter Rope".
u.........
I
W:
Flat Side of
:
Impeller Shaft
r:=:=::::>J
Flat Side of Hole
in Impeller
Figure 25
- 19-