


14
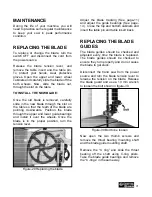
Remove the blade guard and use a screw
driver to loosen the screws located on each
of the two guide bearings as shown in
figure-16.
Figure-16 Set screws
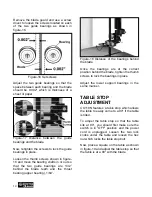
Adjust the two guide bearings so that the
space between each bearing and the blade
should be 0.002” which is thickness of a
sheet of paper.
Figure-17 Distance between the guide
bearings and the blade
Now, retighten the screws to lock the guide
bearings in place.
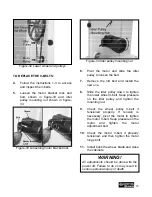
Loosen the thumb screws shown in figure-
18 and move the bearing shafts in or out so
that the two guide bearings are 1/32”
behind the blade teeth and the thrust
bearing (upper bearing), 1/64”.
Figure-18 Distance of the bearings behind
the blade
Once the bearings are at the correct
position behind the blade, tighten the thumb
screws to lock the bearings in place.
Adjust the lower support bearings in the
same manner
.
TABLE STOP
ADJUSTMENT
CX119N features a table stop which allows
the table to easily come to a 90° if the table
is tilted.
To adjust the table stop so that the table
sits at 90°, you should first make sure the
switch is in “OFF” position and the power
cord is unplugged. Loosen the two lock
knobs under the table and loosen the hex
nut which locks the table stop bolt.
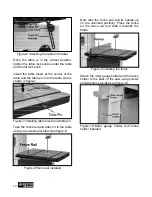
Now, place a square on the table as shown
in figure-19 and adjust the table stop so that
the table is at a 90° with the blade.
Содержание CX119N
Страница 1: ...CX119N 14 WOOD BAND SAW USER MANUAL Version 0 1 ...
Страница 24: ...24 CX119N BODY PARTS BREAKDOWN ...
Страница 25: ...25 CX119N BODY PARTS LIST ...
Страница 26: ...26 CX119N TABLE PARTS BREAKDOWN ...
Страница 27: ...27 CX119N TABLE PARTS LIST ...
Страница 28: ...28 CX119N BODY PARTS BREAKDOWN LIST ...