Costway EP24041 Скачать руководство пользователя страница 13


12 


Important notes: 

The  exhaust  hose  is  280mm-1500mm  long  and  which  is  determined  by  the  specification  of  the 

air-conditioner (s). Do not use prolonged the hose or replace it with other different hoses as this may affect the 

functions of the air-conditioner. The exhaust hose must be smooth or it may lead air-conditioner overheat and 

trip because exhaust hose is obstructed. 
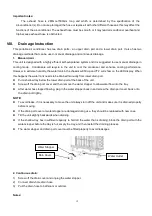
 

VIII. 

Drainage Instruction 

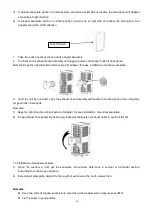
This  portable  air  conditioner  has  two  drain  ports  -  an  upper  drain  port  and  a  lower  drain  port.  It  also  has  two 

drainage methods that can be used - manual drainage and continuous drainage. 

1.  Manual drain:   

This unit is designed with a highly efficient self-evaporative system and it is suggested to use manual drainage in 

cooling  mode.    Condensate  will  recycle  in  the  unit  to  cool  the  condenser  and  enhance  cooling  performance. 

However in extreme humidity, the water tank in the chassis will fill up and “FL” will show on the LED display. When 

this happens the water tank needs to be drained manually from lower drain port. 


Put a shallow tray below the lower drain port at the back of the unit.   


Screw off the drain port cover and then remove the water stopper to allow water flow into the tray. 


After water has stopped flowing, plug in the water stopper back in and screw the drain port cover back onto 

the drain port tightly. 
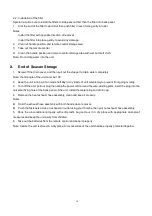
NOTE: 


To avoid leaks, if it is necessary to move the unit always turn off the unit and make sure it is drained properly 

before moving.   


If the drain port cover or water stopper are damaged during use, they should be replaced with new ones. 


Tilt the unit slightly backwards when draining. 


If the shallow tray has insufficient capacity to hold all the water that is draining, block the drain port with the 

water stopper before the tray is full, empty the tray, and then restart the draining process. 


The water stopper and drain port cover must be fitted properly to avoid leakages. 


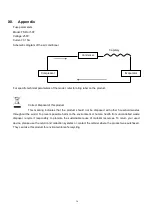
2. Continuous drain: 

1) 

Screw off the drain cover and unplug the water stopper. 

2) 

Connect drain-hole drain hose 

3) 

Pull the drain hose to bathroom or outdoor. 


Notes:     

Dain Cover 

Water Outlet 

Water Stopper 

Содержание EP24041

Страница 1: ......

Страница 2: ...atures and Identification of Parts 3 IV Operation and Settings 4 V Multiple Protection Functions 8 VI Handling and Transportation 9 VII Installation Adjustment 9 VIII Drainage Instruction 12 IX Maintenance and Service 13 X End of Season Storage 14 XI Troubleshooting 15 XII Appendix 16 ...

Страница 3: ...n using your air conditioner follow up these basic precautions Indoor use only it is prohibited to use this unit outdoors or in humid environment such as bathroom etc Do not remove ground prong Do not use an adapter Do not use an extension code Never share the power outlet with other appliances Never connect or disconnect the power plug with wet hands to avoid electric shocks Never turn off the un...

Страница 4: ...erature for the use of this machine is 17 C 35 C 62 95 This machine s fuse specifications φ3 6x10mm 3 15A 250V II Functions and Technical Specification This unit offers cooling dry fan and sleep modes This unit is with two fan speed level accessible by panel control and remote control Temperature setting range of this unit is 17 30 62 86 This unit is designed with various protection functions such...

Страница 5: ...s 4 Universal wheel 5 Chassis 6 Back shell 7 Back filter 8 Universal plug fixing holes 9 Protective net 10 Drain hole 11 Side filter 12 Remote control 13 Exhaust hose 14 Exhaust hose adapter 15 Drain cover connector 16 Drainage pipe IV Operation and Settings 1 Control Panel ...

Страница 6: ...operate in Cool Mode automatically temperature set at 24 75 and fan runs at high speed B Select operating mode Press the Mode button to toggle among the operating options Cool Dehum Fan The corresponding indicator will illuminate C To Set the Temperature The temperature can be set between 17º C 62 and 30ºC 86 when the air conditioner is in Cool mode D Fan speed button The fan speed can be adjusted...

Страница 7: ...ase 1 2 again in another 2 hour working then keep set temperature unchanged further Room temperature will automatically show in LED display with range 10 35 50 95 On Off time can be set E1 E2 E4 protection see Troubleshooting Water full warning protection 5 Timer Operation Press Timer button to set automatic OFF time while unit is running Timer will light up The unit will be off automatically when...

Страница 8: ...is button to set unit automatic on and off time Button press this button to select high speed of fan running except dry and sleep modes Button press this button to select low speed of fan running Button press this button to increase temperature or timer setting Button press this button decrease temperature or timer setting Button press this button to make Celsius degrees and Fahrenheit degrees int...

Страница 9: ...unction Compressor water spraying motor will turn off when compressors running over 10 minutes and tube temperature Tp is continuously 2 35 for 20 seconds under cooling mode E4 will show on LED display window the unit initiates the anti frost protection and all buttons on control panel except for power button are inactive Once the tube temperature 8 46 the protection is relieved to recover into or...

Страница 10: ...on at least 2 hours before first installation This air conditioner may be moved indoors conveniently keep the unit in upright position while moving it The air conditioner shall be placed on flat surface Do not install or operate this air conditioner in bathroom or other wet environments 1 1 Installation of exhaust hose assembly and its adapter 1 Take out the exhaust hose assembly and its adapter f...

Страница 11: ...te 3 Hold the unit by one hand carry the exhaust hose assembly with another hand and push it into unit gently for good lock of two parts Remarks 1 Keep the right direction of slant side A of adapter for ease installation of window seal plate 2 Keep exhaust hose assembly be strongly locked by fasteners in exhaust outlet to avoid its fall off 1 3 Installation of window seal plate 1 Open the window i...

Страница 12: ...ew and close the window as Photo A Align the 4 openings on window seal plate with corresponding 4 openings on exhaust hose adapter and set them together then slide adapter downwards to make 2 set of openings locked for 2 parts good connection B Lock self tapping screw φ4mm into adapter hole Remarks Slide the adapter downwards and assure the adapter installed in good position Lock the screw tightly...

Страница 13: ...pens the water tank needs to be drained manually from lower drain port Put a shallow tray below the lower drain port at the back of the unit Screw off the drain port cover and then remove the water stopper to allow water flow into the tray After water has stopped flowing plug in the water stopper back in and screw the drain port cover back onto the drain port tightly NOTE To avoid leaks if it is n...

Страница 14: ...in or send the unit to service center 1 Surface cleaning Clean the unit surface with wet and soft cloth but do not use chemical solvents such as alcohol and gasoline to avoid any damage to unit 2 Filter cleaning Clean the filter every two weeks otherwise it would influence the unit performance if filter clogged with dust 2 1 How to clean filter Grip the filter handle and take it out gently in corr...

Страница 15: ...ust be 30 2 Keep the unit running in fan mode half day to dry inside of unit completely to prevent from going mouldy 3 Turn off the unit pull out plug then wrap the power cord around the wire winding pillar insert the plug into the universal fixing hole at the back panel of the unit install the water plug and drain cap 4 Remove the heat exhaust hose assembly clean and keep it properly Notes Hold t...

Страница 16: ...or replace the filter Air inlet or air outlet clogged Remove the obstruction High noise level The unit is being placed at uneven surface Put the unit at a flat and firm place may reduce noise The compressor does not work Initiation of overheat protection Wait until the temperature decrease the unit will re start automatically The remote control does not work Too long distance Bring the remote cont...

Страница 17: ...t should not be disposed with other household wastes throughout the world To prevent possible harm to the environment or human health from uncontrolled waste disposal recycle it responsibly to promote the sustainable reuse of material resources To return your used device please use the return and collection systems or contact the retailer where the product was purchased They can take this product ...

Страница 18: ...ant to us We sincerely solicit you to go back to our shop and leave a good rating in just a simple click It would be quite encouraging if you could kindly do so like below February 24 2019 Great products so far Fast delivery easy setup and working without any issues Great products so far With your inspiring rating COSTWAY will be more consistent to offer you EASY SHOPPING EXPERIENCE GOOD PRODUCTS ...

Страница 19: ...18 ...

Отзывы: