background image

12

4. Bioprinting with the Corning® Matribot® Bioprinter

4.1 Installing Corning DNA Studio

Install the latest version of Corning DNA Studio. The latest version of Corning DNA Studio is available at  
www.corning.com/matribotguidelines.

4.2 Connecting the Corning Matribot Bioprinter

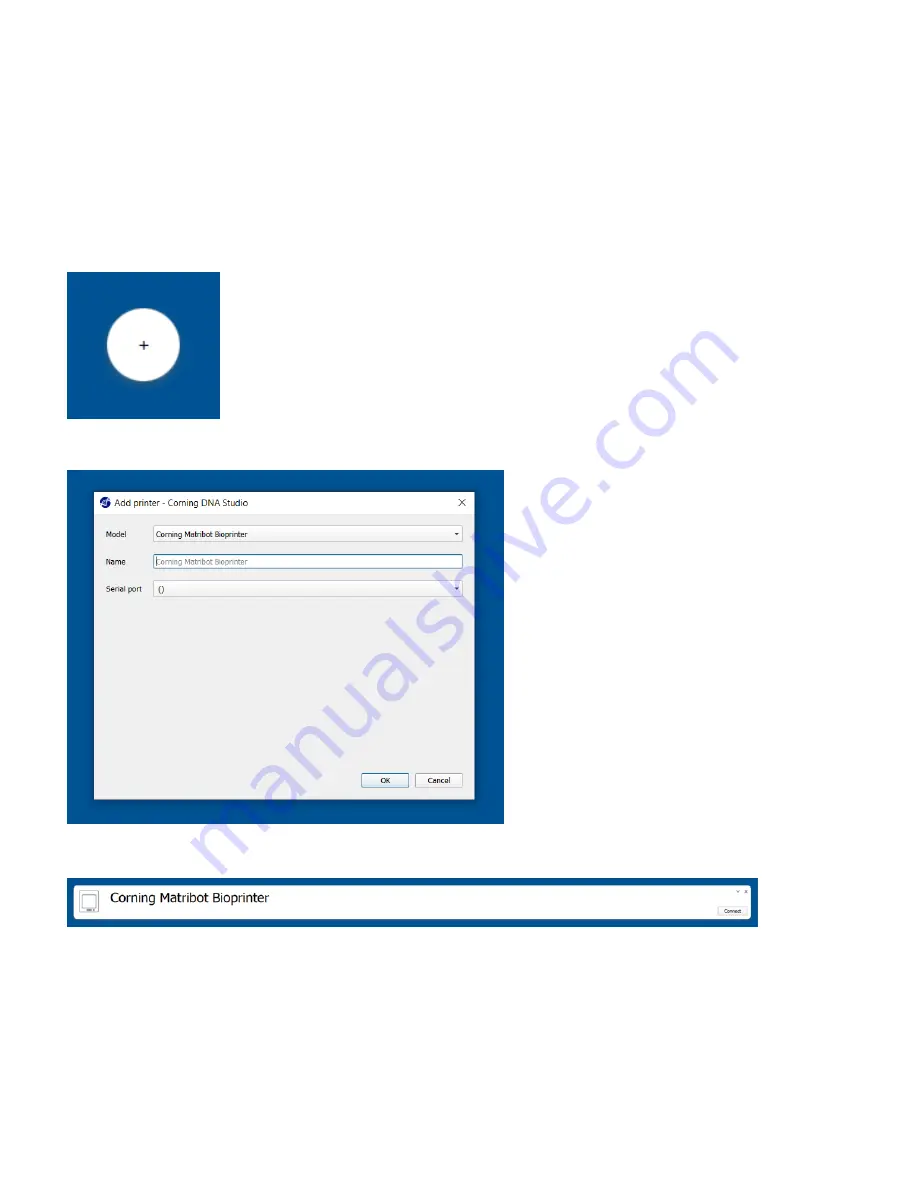
To establish connection between the Corning Matribot Bioprinter and Corning DNA Studio follow the steps below.

1.  Connect the Corning Matribot Bioprinter to your computer using the included USB cable.
2.  If there are no devices listed on the home screen, press the plus (+) button in the bottom right corner.

3.  Select the correct serial port and press OK. 

4.  Press the connect button to connect to the device.  

Содержание Matribot 6150

Страница 1: ...Corning Matribot Bioprinter Instruction Manual Catalog Number 6150 ...

Страница 2: ...nting from a 3D model 13 4 3 1 Start a Bioprint project 13 4 3 2 Generate the geometry 14 4 3 3 Print surface 15 4 3 4 Printer settings 15 4 3 5 Printhead settings 16 4 3 6 Models settings 17 4 3 7 Layers settings 18 4 3 8 Calibration and Automatic bed leveling ABL 19 4 3 9 Print model 20 4 4 Biodispensing droplets 21 4 4 1 Start a Droplet project 21 4 4 2 Print surface 22 4 4 3 Printer settings 2...

Страница 3: ...ts can cause injury Be careful when loading and unloading the print sample Use caution when working near the needle Piercing the operator s skin can occur Remove the syringe needle or nozzle before working on the printbed Never clean or service the Corning Matribot Bioprinter while it is on Always turn off the power and disconnect any external sources of power before cleaning or servicing the Corn...

Страница 4: ...spensing materials with a flash point of 150 C or lower If you are unsure of a material s compatibility contact Corning After using ethanol to clean the Corning Matribot Bioprinter wait at least 60 seconds before bioprinting to ensure that all flammable vapors are removed 1 6 Electrostatic discharge ESD protection The Corning Matribot Bioprinter printbed and printhead are ESD sensitive Use the fol...

Страница 5: ...h the use of included software Corning DNA Studio translates your three dimensional CAD models into coordinates and instructions for the Corning Matribot Bioprinter to precisely deposit your materials onto a Petri dish well plate or other vessel The bioprinting and biodispensing processes work through the extrusion of a hydrogel biomaterial such as Corning Matrigel matrix Collagen or any basement ...

Страница 6: ... Temperature Printbed temperature range Room temperature to 65 C Printhead temperature range 0 C to room temperature Operating temperature range 15 C to 30 C Storage temperature range 10 C to 60 C Software Software bundle Corning DNA Studio Supported file formats G code STL OBJ AMF Supports Windows XP 32 bit 7 and macOS X 10 6 64 bit 10 7 Communication USB SD card Electrical Power supply adapter i...

Страница 7: ...s Do not force or tear anything during the unpacking or setup process as this may irreversibly damage your Corning Matribot Bioprinter Position the system to ensure the user has fast access to the power cable or that the system is run through an emergency disconnect when an emergency stop may be required The device must be connected to a power outlet with protective grounding 1 Clear a sturdy tabl...

Страница 8: ...any movable parts or loose components It is recommended to have 2 people lift from the sides of the frame at the indicated locations Remove the device out of the box and place it on the table or benchtop 7 Remove the protective plastic bag from the unit 8 Remove the top inner foam insert as shown DO NOT pull on the printhead cable ...

Страница 9: ...r to remove as shown below 11 Take the surface probe out of the electrical supply box and place it inside the device 12 Refer to the following sections of this manual for start up instructions and support 13 Keep all of the original packaging materials such as foams plastic envelopes and boxes in a safe place You might need them for packing the instrument in case any transportation is required ...

Страница 10: ... connecting the Corning Matribot Bioprinter to a wall socket ensure that the socket is grounded Next connect the Corning Matribot Bioprinter power outlet see Section 2 1 Product map to the grounded wall socket with the included 24V power supply and the power cord Turn on the Corning Matribot Bioprinter by using the power switch on the front see Section 2 1 Product map Always connect the Corning Ma...

Страница 11: ...printhead Ensure you have correctly mounted print surfaces and bioink syringes before biodispensing Syringe plunger holder Syringe plunger Surface probe Temperature controlled syringe based extrusion printhead Nozzle needle ...

Страница 12: ...lockwise looking from the top of the printhead so that the tabs sit under the top of the block 3 Adjust the position of the syringe plunger holder by navigating to the Prepare Bioprint menu on the LCD interface and selecting the Raise Plunger function Using the Extrude Volume Function on the LCD interface move the syringe plunger holder to match the position of the syringe plunger 4 Rotate the syr...

Страница 13: ...thermal insulator should be used when dispensing in 384 well microplates The standard nozzle thermal insulator should be used when dispensing and bioprinting in 6 to 96 well plates and Petri dishes 1 Slide the thermal insulator into the cooling block 2 Rotate the thermal insulator counterclockwise looking from the top of the printhead until the insulator is securely attached 2 1 1 2 3 8 Detaching ...

Страница 14: ...nnecting the Corning Matribot Bioprinter To establish connection between the Corning Matribot Bioprinter and Corning DNA Studio follow the steps below 1 Connect the Corning Matribot Bioprinter to your computer using the included USB cable 2 If there are no devices listed on the home screen press the plus button in the bottom right corner 3 Select the correct serial port and press OK 4 Press the co...

Страница 15: ...a new bioprinting process using a 3D model Corning DNA Studio will guide you through the process of setting up your Bioprint Select the desired supported file types by navigating to the appropriate folder and select the appropriate file The included SD card contains a set of files with basic geometries ...

Страница 16: ...try can be generated within Corning DNA Studio To generate the geometry choose the Generate option to start a new bioprinting process using a generated geometry Corning DNA Studio will guide you through the process of setting up your Bioprint Select the desired geometry and its dimensions ...

Страница 17: ...LED Photocrosslinking module Enable and adjust the Printbed temperature in the Printer settings Use Temperature control to keep the Printbed at a certain temperature or turn temperature control off to print at room temperature Enable and adjust the Photocrosslinking parameters in the Printer settings It is recommended to crosslink at the end of each layer 2 1 3 4 5 6 1 Printbed temperature Activat...

Страница 18: ...ume if the bioink is not extruding at the starting point of each new filament Decrease if there is instead an accumulation of bioink at the starting point 7 Extrusion rate The rate the bioink flows out from the nozzle Increasing the extrusion rate will increase the flow of the bioink from the nozzle Decrease if the filament is too thick 8 Retract volume The volume of bioink which is pulled back up...

Страница 19: ... Increase the z lift if the nozzle is dragging in a previously printed filament during a non print move For more detailed information on how parameter selection impacts a print please refer to the Corning Matribot Bioprinter Parameters CLS AN 648 4 3 6 Models settings Press on the Models icon on the bottom of the window to move to the next step of the process This screen enables many of the option...

Страница 20: ...tructs with porosity to allow diffusion of nutrients or filling with other bioinks or materials Honeycomb pattern Suitable for constructs with isotropic mechanical characteristics This infill pattern is consistent across adjacent layers resulting in solid walls between the neighboring pores with good compressive strength This pattern is most applicable for tissues such as bone and cartilage This p...

Страница 21: ... at three points to enable bed leveling compensation It uses a matrix to compensate for tilt in the bed or print surface Corning recommends using Automatic bed leveling if the layer height is visually different on one side of the bed than on the other side when inspecting a 3D printed construct Automatic bed leveling will initially appear disabled and is only enabled after automatic or manual cali...

Страница 22: ...ster the calibration settings 4 1 2 3 5 6 4 3 9 Print model This screen which appears on the right side of the software window summarizes the bioprinting process You can monitor the activity of the device while printing In addition you can change the parameters such as printbed temperature and printhead temperature 2 1 4 3 1 Printbed temperature Allows you to activate deactivate change and monitor...

Страница 23: ...ing 1 Progress indicator Displays progress of the bioprinting process as a percentage This is calculated by considering the total number of layers to be printed and the layer which is being currently printed 2 Pause or resume Tap to pause the bioprinting process When the process is paused tap to resume the bioprinting process 3 Stop Tap to stop the bioprinting process You can restart a print over ...

Страница 24: ...e of surface 2 For well plates select the vendor of the well plate 3 For well plates select the number of wells 4 If selecting a well plate individual wells can be selected by left clicking on the desired wells Ctrl clicking allows for multiple individual wells to be selected 5 Activate the droplet array feature 6 Select the pattern for the droplet array feature 7 If the droplet array feature is a...

Страница 25: ...ure or turn temperature control Off to print at room temperature Enable and adjust the photocrosslinking parameters in the Printer settings 2 1 3 4 5 1 Printbed temperature Use this to activate the printbed temperature control function 2 Adjust printbed temperature Adjust the temperature of the printbed When Off the printbed will be kept at room temperature 3 Photocrosslinking Use this to activate...

Страница 26: ...The volume of bioink which is pulled back up in the nozzle during a non print move Increase the retract volume and extrusion volume if droplets do not detach in some wells 7 Droplet volume The volume of the droplet 8 Z offset The height the nozzle tip is above the calibrated point of surface Increase the Z offset if the nozzle is calibrated too close to the surface 9 Enable advanced bioprinting pa...

Страница 27: ...three points to enable bed leveling compensation It uses a matrix to compensate for tilt in the bed or print surface Corning recommends using Automatic bed leveling if the layer height is visually different on one side of the bed than on the other side when inspecting a 3D printed construct Automatic bed leveling will initially appear disabled and is only enabled after automatic or manual calibrat...

Страница 28: ... the nozzle in 3 Z axis command Controls the position of the printbed along the Z axis 4 X Y axis command Controls the position of the printhead along the X and Y axis The central button moves the printhead and printbed to the Home position 5 Step size Select the step size for X Y and Z axis movements 6 Calibrate Register the calibration settings ...

Страница 29: ...ime the nozzle prior to printing This can be done through the Extrusion button on the Printer model screen or through the Extrude Volume Function in the Prepare Bioprint section of the LCD interface on the bioprinter Press Start to start the dispensing process You can pause the process at any point After pausing you can resume or cancel dispensing 1 Progress indicator Displays progress of the disp...

Страница 30: ... pressing and holding the button 3 Retract the syringe plunger holder by pressing the button 4 5 2 Temperature tab Use the Temperature tab to adjust the temperature control settings Those setting will be overwritten by the setting in droplet or bioprint projects 1 3 2 4 1 Activate temperature control of the printhead 2 Printhead temperature Set the temperature of the printhead 3 Activate temperatu...

Страница 31: ...s command Controls the position of the printbed along the Z axis 2 X Y axis command Controls the position of the printhead and the surface probe along the X and Y axis The central button moves the printhead and printbed to the Home position 3 Select the step size for X Y and Z axis movements 1 Turn On Off chamber lights Consider using when working with photosensitive materials ...

Страница 32: ... update onto your computer Firmware updates are available at www corning com matribotguidelines Navigate to the Update tab in the utility s menu Press Browse and select the file from the list Press Start Update to perform the update procedure The update will take a few minutes Do not disconnect the USB cable or power down the printer until the update is complete ...

Страница 33: ...e Plunger function Using the Extrude Volume function move the syringe plunger holder to match the position of the syringe plunger 5 4 Printing using g code file To bioprint directly from an SD card follow the steps below 1 Copy the g code to the SD card You can generate your g code file using Corning DNA Studio to define the printing parameters and exporting the resulting g code to the SD card 2 P...

Страница 34: ...ck Cover Bottom followed by the Back Cover Top Yearly or as needed 6 2 Cleaning or sanitizing the Corning Matribot Bioprinter Before cleaning turn off and unplug the Corning Matribot Bioprinter The Corning Matribot Bioprinter has a chemical resistant coating Clean or sanitize it with 70 v v ethanol Spray the surface and wipe it with a soft cloth while wearing gloves to avoid direct contact with th...

Страница 35: ...bed tightly Unscrew the adjustment screw to the back left A by approx 2 turns 4 Move the printbed and the printhead manually until the tip of the nozzle touches the surface of the printbed in front of the adjustment screw to the back left A 5 Leaving the printbed where it is manually move the printhead until the nozzle is in front of the adjustment screw to the back right B Adjust the butterfly sc...

Страница 36: ...side of the device Pluck the belt and read the frequency from the analyzer You should see a frequency spike and it should drop off slowly as the vibration of the belt decreases over time For the Corning Matribot Bioprinter Y Gantry belts the ideal frequency is 100Hz 10 Both of the Y Gantry belts should be as close as possible in tension with each other 5 If an adjustment needs to be made to the be...

Страница 37: ...er outlet and ensure nothing else is connected to the outlet Check the voltage input on the fuse panel to ensure it matches the required voltage on the power supply No material extruded from the nozzle Syringe plunger is not connected to the holder arm Rotate the syringe plunger holder arm over the plunger and twist the syringe by the tabs counterclockwise to ensure it is locked in place Material ...

Страница 38: ...ibration bioprinting or biodispensing doesn t start Disable printing from SD card mode in utilities tab in the Corning Matribot Bioprinter s LCD interface Other issues with Corning DNA Studio Run Corning DNA Studio as Administrator Nozzle insulator detached Insulator is not attached properly Attach the thermal insulator to the cooling block by inserting it from below and rotating counterclockwise ...

Страница 39: ... the USB cable is connected to the device and the computer Corning Matribot Bioprinter SD card mode is enabled Disable printing from SD card mode in the utilities tab in the Corning Matribot Bioprinter s LCD interface The Bioprint is not showing up in the menu of the LCD interface SD card is not properly inserted Verify that the SD card is properly inserted in the SD card reader Corning Matribot B...

Страница 40: ... at your expense Corning will determine in its sole discretion as whether an issue is covered under the warranty Concerning Unauthorized Returns Returns not pre authorized will not be eligible for repair replacement or refund Do not send a product back to Corning unless you have contacted us first and we have authorized you to send it Limitations and Confirmation By using the product you agree to ...

Страница 41: ... 020 655 79 28 United Kingdom t 0800 376 8660 All Other European Countries t 31 0 206 59 60 51 LATIN AMERICA grupoLA corning com Brazil t 55 11 3089 7400 Mexico t 52 81 8158 8400 Warranty Disclaimer Unless otherwise specified all products are for research use or general laboratory use only Not intended for use in diagnostic or therapeutic procedures Not for use in humans These products are not int...

Отзывы: