background image

15

3.4 Cleaning Schedule

Coredy R550 (R500+ ) has cleaning schedule settings which allow you to customize when Robot cleans your home. These settings are available 

only through the Remote Control.

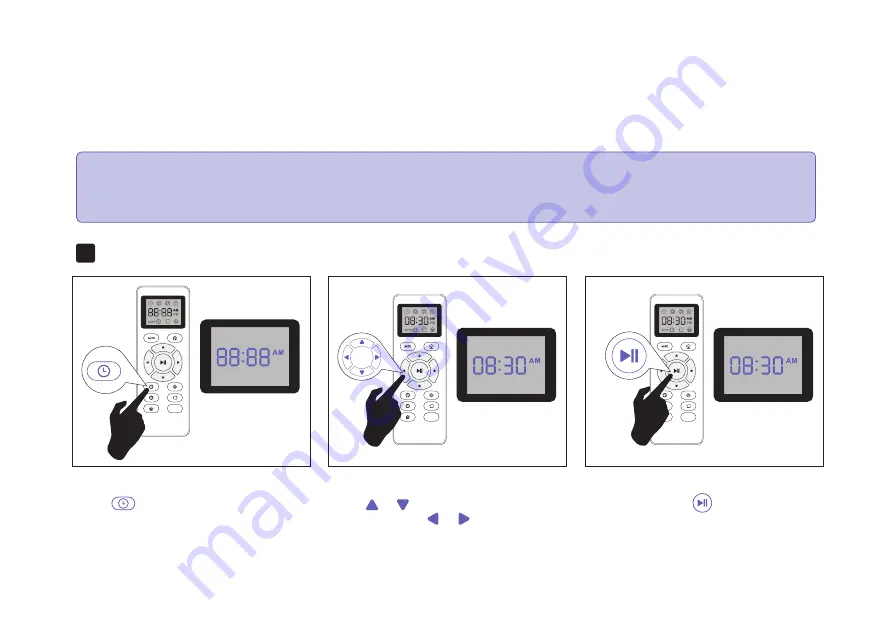
Press           button on Remote Control, and 

then the hour section begins to flash in the 

clock display setting window.

Set the Remote Control’s Clock

1.

Press      or      button to select the desired 

figures. Press the      or      button to select 

the minute or hour section.

And then press the         button, the Robot will 

BEEP

” when the clock setting completed.

MAX

MAX

MAX

1. Make sure the time is set correctly to your local time before setting a cleaning schedule.

2. Make sure AM/PM is set correctly.

3. Schedule accuracy is every 15 minutes.

4. Make sure the remote control near by the robot while setting the clock or schedule.

Note:

Содержание R500+

Страница 1: ...Owner s Manual Coredy R550 R500...

Страница 2: ...ule 4 1 Emptying Robot s Bin 4 2 Cleaning Robot s Filter 4 3 Cleaning Robot s Side Brush 4 4 Cleaning Robot s Cliff Sensors and Charging Contacts 4 5 Cleaning Robot s Floor Tracking Sensor 4 6 Cleanin...

Страница 3: ...ces are disposed of in landfills or dumps hazardous substances can leak into the groundwater and get into the food chain damaging your health and well being Please contact your local or regional waste...

Страница 4: ...rson responsible for their safety Children should be supervised to ensure they do not play with the robot Cleaning and maintenance shall not be performed by children without supervision Do not place a...

Страница 5: ...y sign of damage or leakage Do not charge damaged or leaking battery packs If the battery pack is leaking contact Coredy Customer Service for disposal The battery pack must be removed from the robot b...

Страница 6: ...Start Cleaning To send R550 R500 Robot back to the Charging Dock press on robot or press the on Remote Control Indicator Dock Button Indicator Light Pink Low Power Indicator Blink Pink Charging Indica...

Страница 7: ...Dust Bin Driving Wheels Power Switch Anti Drop Sensors Charging Contacts Universal Wheel Side Brushes Battery Pack Main Brush 05 Dust Collector Release Button Dust Collector Infrared Sensor Bumper...

Страница 8: ...ories 1 x Charging Dock 1 x Adapter 1 x Remote Control with 2 x AAA battery 1 x Dust Bin 4 x Side Brushes 1 x Brush 1 x Main Brush 1 x High Efficiency Filter Water Tank and Cleaning Cloth Sold Separat...

Страница 9: ...2 3 Charging Dock 07 Charging indicator Location for remote control Signal transmission area Butting charging pole piece...

Страница 10: ...e display screen Automatic re charging button Automatic cleaning Direction buttons Clock setup button Scheduling button Start Pause button Spot cleaning button Edge cleaning button Small space button...

Страница 11: ...cords for blinds or curtains power cords and any fragile objects If the Robot passes over a power cord and drags it there is a chance an object could be pulled off a table or shelf If the room to be c...

Страница 12: ...it clicks Plug in the Charging Dock and place the remaining wire into the trunking at the bottom of the Charging Dock 1 3 2 Install Side Brushes 4 Activate the Robot Place Coredy R550 R500 onto the C...

Страница 13: ...a cleaning cycle robot returns to the Charging Dock to recharge 6 Pause To pause the robot during a cleaning cycle press the button on robot or press the button on the Remote Control To resume the cl...

Страница 14: ...it has cleaned an entire level of your home If its battery gets low before finishing a cleaning cycle Coredy R550 R500 returns to the Charging Dock to recharge Once Coredy R550 R500 finishes its clean...

Страница 15: ...by closing the door Press on the remote control to start cleaning in Single Room Mode 6 Spot Cleaning When you select Spot Cleaning robot intensely cleans a localized area by spiraling outward about 3...

Страница 16: ...FLAT on the floor 1 Identify the area or item you do not want Coredy R550 R500 to get close to 2 If necessary use scissors to cut the Boundary Strip to a shorter length Be sure to correctly measure th...

Страница 17: ...window Set the Remote Control s Clock 1 Press or button to select the desired figures Press the or button to select the minute or hour section And then press the button the Robot will BEEP when the c...

Страница 18: ...etting window Press or button to select the desired figures Press the or button to select the minute or hour section And then press the button the Robot will BEEP when the Cleaning Schedule setting co...

Страница 19: ...y 2 3 months or when visibly worn Every 3 6 months Cliff Sensors Charging Contacts Floor Tracking Sensor Front Driving Wheel Unversal Wheel Once per month Filter Once per week twice per week in homes...

Страница 20: ...n Press dust bin release button to remove it 1 4 2 Cleaning Robot s Filter Remove filter by grasping the white tab 1 Shake off debris by tapping the filter against your trash container 2 Open dust bin...

Страница 21: ...liff Sensors and Charging Contacts Remove the brush 1 Wipe Robot s Cliff Sensors with a clean dry cloth 1 Wipe the charging contacts on Robot and the Charging Base with a clean dry cloth 2 Clean the b...

Страница 22: ...the bottom surface Do not spray cleaning solution directly into the sensor entrance Pull on the release tabs to unlock the brush guard as shown 1 Lift the rolling brush to remove 2 Clean the rolling...

Страница 23: ...battery or other accessories for the robot Remove the lithium ion battery from the product Place a piece of tape over the battery s metal charging contacts Reinstall the battery with the tape on it in...

Страница 24: ...oor and the two screws on the battery door then remove 1 Reinstall the battery with the battery label and tabs facing up 2 Reinstall the battery door and the two screws Take care not to pinch the side...

Страница 25: ...or Lighting Red Clean the front driving wheel then press the power button to restart the robot Robot s front driving wheel is stuck One beep Clean the side brush then press the power button to restart...

Страница 26: ...er several times to dislodge any debris that might be trapped underneath Press robot s bumper 5 10 times to ensure bumper contracts freely Two beeps Manually take the robot on the charging dock to cha...

Страница 27: ...ds and then turn it back on You cannot schedule cleanings Make sure the main power switch on the bottom of Coredy R550 R500 is turned on Make sure the time time of day AM PM and the scheduled time hav...

Страница 28: ...s back Clean the charging contact pins The rolling brush does not rotate Clean the rolling brush Check if the rolling brush and brush guard have been installed properly Coredy R550 R500 s movements or...

Страница 29: ...r Service Website http shop coredy com E mail support coredytech com US COST FREE Tech Support 1 800 999 8470 UK COST FREE Tech Support 44 808 134 9909 coredytech CoredyOfficial coredy_robotvacuum Cor...

Страница 30: ...MODEL R550 R500 Website http shop coredy com E mail support coredytech com US COST FREE Tech Support PST Mon Sun 06 00 24 00 GMT Mon Sun 14 00 08 00 1 800 999 8470 UK COST FREE Tech Support 44 808 134...

Отзывы: