Cor IBR200 Скачать руководство пользователя страница 4

11/2/2020

COR IBR200 IoT Router Quick Start Guide

https://customer.cradlepoint.com/s/article/COR-IBR200

4/7


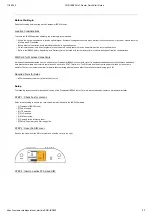
STEP 7: Mount the router.

The IBR200 router may be affixed to a wall or mounted on the ceiling. Refer to the following for best practices:

Hold the router in the desired position and location and then use a pen or marker to mark the placement location for the screws.
Ensure the mounting location is away from objects that cause RF interference, including concrete, reflective and metal surface, microwaves, and so on.
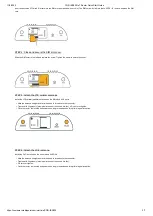
Pre-drill holes for the mounting screws.
Use wall anchors to ensure the endpoint is securely mounted.


STEP 8: Connect the Ethernet cable.

Connect the Ethernet cable to the port marked LAN on the back of the IBR200. Connect the other end to your cable modem.


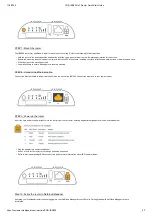
STEP 9: Power up the router.

Insert the 4-pin end of the power source into the four-pin port on the router, ensuring appropriate alignment of pins as illustrated below. 

Plug the adapter into an electrical socket.
Allow 1 minute for the router to run through its bootup sequence.
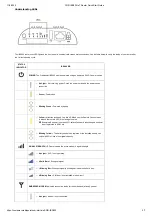
Refer to the Understanding LEDs section of this guide for more information about LED indicator status.


Step 10: Active the router in NetCloud Manager.

Activating your Cradlepoint router requires logging into your NetCloud Manager account. Refer to Getting Started with NetCloud Manager for more
information.


Содержание IBR200

Страница 1: ...Before You Begin Location Considerations SIM Card for Wireless Connectivity Required Tools for Setup Setup STEP 1 Check box for content STEP 2 Open the SIM cover STEP 3 Insert an active 2FF sized SIM...

Страница 2: ...broadband data plan must be added to your Cradlepoint IBR200 series branch router for wireless broadband connectivity Wireless broadband data plans are available from network operators such as Verizo...

Страница 3: ...he LTE cellular paddle antennas on the MAIN and AUX ports Hold the antenna straight and twist the base to thread onto the connector Tighten with fingers only maximum torque not to exceed 4 in lbs o Do...

Страница 4: ...to ensure the endpoint is securely mounted STEP 8 Connect the Ethernet cable Connect the Ethernet cable to the port marked LAN on the back of the IBR200 Connect the other end to your cable modem STEP...

Страница 5: ...en Powered by battery Yellow Attention is needed Log into NCM and use the Remote Connect menu to access the router s NCOS to manage the alert Examples Battery at less than 20 default Password is uncha...

Страница 6: ...5 minutes to connect to the Internet log into the local UI of the device to make configuration changes or to start the troubleshooting process You must be physically co located with the device in orde...

Страница 7: ...to Do Port Forwarding To Multiple Devices on the Same Port s article How to Do Port Forwarding To Multiple Devices on the Same Port IBR600C Series Quick Start Guide s article COR IBR600C Series Quick...

Отзывы: