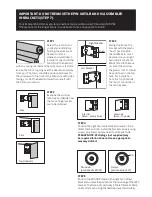
STEP 9
Attach the base rail
arms to the base rail
using the large round
head screws. Apply light
tension to the Exterior
Blind and mark where
the base rail arms are to
be fixed. Leave at least 1/2 turn of fabric around the
headrail, as this will make it easier to retract the blind
after installation.
STEP 10
Drill into wall or frame
and fix the base rail arm
into place using the
screws provided.
(Wall Plugs may be
needed)
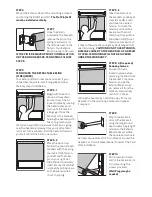
STEP 7
Once the blind is
installed in the brackets,
remove the pin on the
spring mechanism on
the left side next to the
flat pin. Your Exterior
Blind is ready to be used.
IF THE PIN IS REMOVED PRIOR TO INSTALLATION
OR THE BLIND NEEDS RE-TENSIONING FOLLOW
STEP 8.
STEP 8
TENSIONING THE RETRACTABLE BLIND
(IF REQUIRED)
Your Exterior Blind comes pre-tensioned. If your
shade does require re-tensioning please follow
the easy steps listed below.
STEP 6
Mount the Exterior Blind in the mounting brackets,
positioning the RIGHT end first.
The Flat Pin (Left)
must be installed vertically.
STEP 8-1
Begin with the blind
drawn halfway down.
Ensure the ratchet is
locked in place by rocking
the headrail back and
forth until the tension
is engaged. Take the
blind out of the brackets,
holding the headrail, with
the spring mechanism
(flatpin) on your left side, ensure the fabric is going
over the headrail and away from you (so the fabric
is closest to the window). Roll the headrail towards
yourself until all the blind is woundup.
STEP 8-2
Place the wound up
blind in the pre-installed
brackets with the spring
mechanism (flatpin) on
your left and the roller
pin on your right. Let
the blind unroll down by
itself. Ensure the ratchet
is locked by pulling down
on the base rail with a
short, sharp tug.
STEP 8-3
Take the blind out of
the brackets and repeat
steps 8-1 and 8-2 until
you have the desired
tension. To check the
tension pull down the
base rail with a short
sharp tug. Only pull the
blind down fully (to set
tension) a maximum of
3 times otherwise the spring may be damaged from
over tensioning.
CAUTION DO NOT OVER-TENSION.
DAMAGE CAUSED TO THE HEADRAIL AS A RESULT
OF OVER-TENSIONING WILL NOT BE COVERED
UNDER THE WARRANTY.
STEP 8-4 (if required)
Reducing tension
Ensure ratchet is
locked in place before
removing the blind from
the bracket. To reduce
tension, ensure the
Exterior Blind is fully
up, remove it from the
brackets and partially
unroll it 2–3 times
turning the headrail by hand (top away from you).
Replace it in the mounting brackets and repeat
if required.


