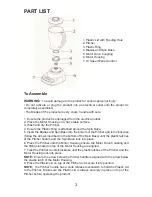
PART LIST
To Assemble
WARNING:
To avoid damage to the product or serious personal injury:
• Do not activate or plug the product into an electrical outlet until the product is
completely assembled.
• The Blades of the product are very sharp; handle with care.
1. Ensure the product is unplugged from the electrical outlet.
2. Place the Motor Housing on a flat, stable surface.
3. Wash and dry the Pitcher.
4. Ensure the Plastic Ring is attached around the Spin Base.
5. Insert the Blades and Spin Base into the bottom of the Pitcher and turn clockwise
(follow the arrows inscribed on the bottom of the Spin Base) until the plastic latches
of the Pitcher bottom and the Spin Base lock into place.
6. Place the Pitcher onto the Motor Housing ensure the Motor Drive Coupling and
the fittings located on top of the Motor Housing are aligned.
7. Twist the Pitcher counterclockwise until the plastic latches of the Pitcher and the
Motor Housing lock into place.
NOTE:
Ensure the arrow below the Pitcher handle is aligned with the arrow below
the plastic latch of the Motor Housing.
8. Place the Plastic Lid on top of the Pitcher and secure it into position.
NOTE:
The Pitcher handle has a slide release mechanism to hold the Plastic Lid
to the Pitcher. Make sure the Plastic Lid is always securely in place on top of the
Pitcher before operating the product.
3
1. Plastic Lid with Feeding Hole
2. Pitcher
3. Plastic Ring
4. Blades and Spin Base
5. Motor Drive Coupling
6. Motor Housing
7. 10 Speed Panel Control
Содержание CE22131
Страница 1: ...Blender UserManual Model CE22131 ...
Страница 7: ...Licuadora ManualdeUso Modelo CE22131 ...


