OPERATING & INSTALLATION INSTRUCTION 2-POST-LIFT
Product description H264/H265/H342/H325
This lift consists basically of the main column and the slave column. In both columns are a chain drive,
connected lifting spindles and lifting carriage complete with lifting apparatus.
The drive turns the lifting spindle. On the spindles are nuts which are attached to the lifting carriage which,
according to the turning direction of the drive, moves up or down and thus performs the raising and lowering
pperation. The lifting carriage is borne on maintenance free roller bearings whithin the column. By shifting
the main drive switch or via a switch wire in the upper and lower positions. The main drive switch reverts
automatically to the stop position when released and stops the movement of the lift in each position of the
lifting apparatus.
The lift is also equipped with a variety of active and passive safety devices. An example of this would be the
safety device for broken load bearing nuts which transfers the load to a reserve safety nut in the event of a
worn thread. At the same time, a mechanical blocking system is engaged which prevents the continued
movement to the lowered position in the event of worn threads.
The swivel arm lock of lift type H264/H265 stops the load arms moving after travelling upward a short
distance from the lowered positon. This is to prevent the lifting apparatus slipping from the jacking points on
the vehicle being raised. Operating safety is paramount!
The swivel arm lock of lift H342 Consul 2.60 stops the load arms moving after travelling upward
approximately 25 mm from the lowered position. This is to prevent the lifting apparatus slipping from the
jacking points on the vehicle being raised. Be aware of the meshing of the gears!
The chain break switch controls the chain drive and switches off the power in the event of a broken chain,
thus preventing the load being raised from falling off due to misalignment. Regular operating checks!
The heat sensor in the drive motors stops the lift in the event of overheating and only allows the lift to restart
after a cooling down period.
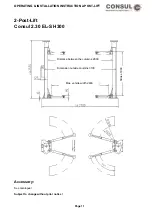
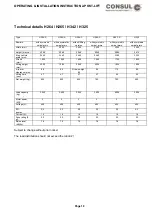
The 2-Post-Lift 265 (capacity: 3500 kg) is made with symmetrical swivel bearing arms as standard. Other
lifting apparatus available on request. All swinging arms for this lift have the same extended length and the
vehicle to be lifted is placed directly between the columns.
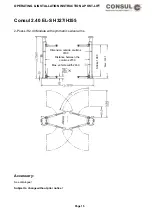
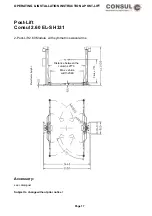
The 2-Post-Lift H342 (capacity: 6000 kg) is made with symmetrical swivel bearing arms as standard. Other
lifting apparatus available on request. All swinging arms for this lift have the same extended length and the
vehicle to be lifted is placed directly between the columns.
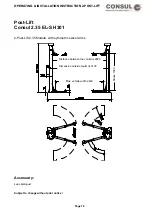
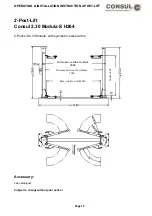
For the 2_post-Lift type: H264 (capacity: 3000 kg) you are offered symmetrical and asymmetrical loading
arms as well as a a quick take up version of the chassis. Where the unit has symmetrical loading arms, the
arms are all the same length and the vehicle to be lifted is placed in the middle of the 2 columns in the drive-
on direction.
With the asymmetrical design the loading arms are of different lengths. The short double swivel arms are in
the drive-on position forward and the long single swivel arms are in the drive-on position at the back.
The vehicle to be lifted is positioned so that the forward-most door hinges are close to the lift columns in
order to facilitate a wide opening of doors. It is desirable that the vehicle’s engine is towards the short swivel
arms (the centre of gravity of the vehicle as close as possible to the centre of lift!). All 4 lifting points are
positioned at the jacking points laid down by the vehicle manufacturer!
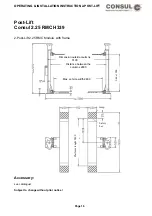
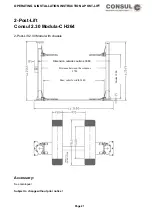
A more advanced design is the 2-Post-Lift with drive-on chassis. This lift has a fixed chassis as its lifting
apparatus. Only one axel of the vehicle to be lifted is to driven onto the chassis. The chassis grips onto the
door thresholds during the lift.
Page 25
Содержание 2.25 EMC
Страница 66: ...OPERATING INSTALLATION INSTRUCTION 2 POST LIFT Electric diagram for chain lifts H264 H265 Page 66 ...
Страница 67: ...OPERATING INSTALLATION INSTRUCTION 2 POST LIFT Electric diagram H342 Page 67 ...
Страница 68: ...OPERATING INSTALLATION INSTRUCTION 2 POST LIFT Electric diagram H325 Page 68 ...
Страница 69: ...OPERATING INSTALLATION INSTRUCTION 2 POST LIFT Electric diagram with rotary reversing switch Page 69 ...
Страница 70: ...OPERATING INSTALLATION INSTRUCTION 2 POST LIFT Electric diagram with push button Page 70 ...
Страница 71: ...OPERATING INSTALLATION INSTRUCTION 2 POST LIFT Page 71 ...
Страница 72: ...OPERATING INSTALLATION INSTRUCTION 2 POST LIFT Page 72 ...
Страница 73: ...OPERATING INSTALLATION INSTRUCTION 2 POST LIFT Page 73 ...
Страница 74: ...OPERATING INSTALLATION INSTRUCTION 2 POST LIFT Page 74 ...
Страница 75: ...OPERATING INSTALLATION INSTRUCTION 2 POST LIFT Page 75 ...
Страница 76: ...OPERATING INSTALLATION INSTRUCTION 2 POST LIFT Page 76 ...
Страница 77: ...OPERATING INSTALLATION INSTRUCTION 2 POST LIFT Page 77 ...
Страница 78: ...OPERATING INSTALLATION INSTRUCTION 2 POST LIFT Page 78 ...
Страница 79: ...OPERATING INSTALLATION INSTRUCTION 2 POST LIFT Page 79 ...
Страница 80: ...OPERATING INSTALLATION INSTRUCTION 2 POST LIFT Page 80 ...

