background image

NEDERLANDS


Conceptronic CLLMEASYWL versie 2.0 

Gebruiksaanwijzing 


Gefeliciteerd met uw nieuwe  

Conceptronic Wireless Mouse met usb-ontvanger 


In deze gebruiksaanwijzing vindt u stap-voor-stap instructies voor de installatie 
van de Conceptronic draadloze muis met usb-ontvanger. 

 
Bij problemen kunt u het beste naar onze 

support-site

 gaan 

(www.conceptronic.net - klik op ‘Support’). Daar vindt u een database met veel 
gestelde vragen (FAQ). 

 
Als u een vraag over dit product heeft die niet op onze website wordt 

beantwoord, kunt u ons gerust e-mailen op [email protected].  

 
Ga voor meer informatie over Conceptronic producten naar de Conceptronic 

website: www.conceptronic.net. 


1. Inhoud verpakking 


U vindt de volgende items in de verpakking van de Conceptronic draadloze muis 
met usb-ontvanger: 


Conceptronic draadloze muis 


USB-ontvanger voor Conceptronic draadloze muis 


2 AAA-batterijen  


Deze gebruiksaanwijzing 
Содержание CLLMEASYWL

Страница 1: ...nic net klik op Support Daar vindt u een database met veel gestelde vragen FAQ Als u een vraag over dit product heeft die niet op onze website wordt beantwoord kunt u ons gerust e mailen op support co...

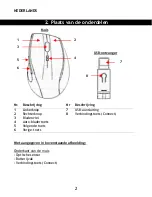
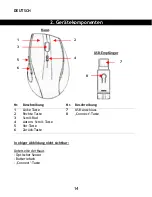
Страница 2: ...knop 7 USB aansluiting 2 Rechterknop 8 Verbindingstoets Connect 3 Bladerwiel 4 Auto bladertoets 5 Volgende toets 6 Vorige toets Niet aangegeven in bovenstaande afbeelding Onderkant van de muis Optisch...

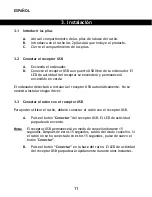
Страница 3: ...en ge nstalleerd Installatie van stuurprogramma s is niet nodig 3 3 Muis met usb ontvanger verbinden Voordat u uw muis kunt gebruiken moet u hem met de usb ontvanger verbinden A Druk op de Connect to...

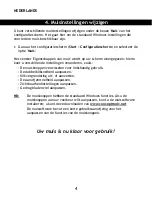
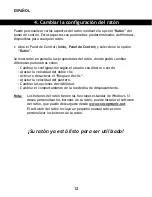
Страница 4: ...verschillende instellingen veranderen zoals De muisknoppen verwisselen voor linkshandig gebruik De dubbelkliksnelheid aanpassen Klikvergrendeling uit of aanzetten De aanwijzersnelheid aanpassen Zicht...

Страница 5: ...t and click Support Here you will find the Frequently Asked Questions Database When you have other questions about your product and you cannot find it at our website then contact us by e mail support...

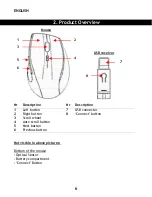
Страница 6: ...eft button 7 USB connector 2 Right button 8 Connect button 3 Scroll wheel 4 Auto scroll button 5 Next button 6 Previous button Not visible in above pictures Bottom of the mouse Optical Sensor Battery...

Страница 7: ...l be recognized and installed automatically No driver installation is required 3 3 Connecting the mouse with the USB receiver In order to use the mouse you need to connect the mouse to the USB receive...

Страница 8: ...can change several settings like Change the configuration for left or right handed use Adjust the double click speed Turn on or off Click lock Adjust the pointer speed Change visibility options Chang...

Страница 9: ...onic net Aqu encontrar la base de datos de las preguntas m s frecuentes o FAQ Si tiene otras preguntas sobre su producto y no las encuentra en nuestro sitio web p ngase en contacto con nosotros por co...

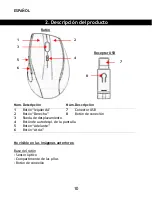
Страница 10: ...Conector USB 2 Bot n Derecha 8 Bot n de conexi n 3 Rueda de desplazamiento 4 Bot n de autodespl de la pantalla 5 Bot n Adelante 6 Bot n Atr s No visible en las im genes anteriores Base del rat n Sens...

Страница 11: ...tectar e instalar el receptor USB autom ticamente No se necesita instalar ning n driver 3 3 Conectar el rat n con el receptor USB Para poder utilizar el rat n deber conectar el rat n con el receptor U...

Страница 12: ...Cambiar la configuraci n seg n el usuario sea diestro o zurdo Ajustar la velocidad del doble clic Activar o desactivar el Bloqueo de clic Ajustar la velocidad del puntero Cambiar las opciones de visib...

Страница 13: ...klicken Sie auf Support Dort steht Ihnen unsere FAQ Datenbank mit den h ufig gestellten Fragen zur Verf gung Wenn Sie weitere Fragen zu Ihrem Produkt haben die Sie auf unserer Webseite nicht beantwor...

Страница 14: ...ung 1 Linke Taste 7 USB Anschluss 2 Rechte Taste 8 Connect Taste 3 Scroll Rad 4 Autom Scroll Taste 5 Vor Taste 6 Zur ck Taste In obiger Abbildung nicht sichtbar Unterseite der Maus Optischer Sensor Ba...

Страница 15: ...kannt und installiert Keine Treiberinstallation erforderlich 3 3 Verbinden der Maus mit dem USB Empf nger Bevor Sie die Maus verwenden k nnen m ssen Sie sie mit dem USB Empf nger verbinden A Dr cken S...

Страница 16: ...edene Einstellungen ndern Dazu geh ren Die Konfiguration f r die links und rechtsh ndige Verwendung Einstellen der Doppelklickgeschwindigkeit KlickEinrasten aktivieren oder deaktivieren Einstellen der...

Страница 17: ...t en cliquant sur Support Vous y trouverez les r ponses aux questions les plus fr quentes FAQ Pour toute autre question au sujet de notre produit ou si vous ne trouvez pas l information dont vous avez...

Страница 18: ...he 7 Connecteur USB 2 Touche de droite 8 Touche Connect 3 Roue de d filement 4 Roue de d filement automatique 5 Touche Suivant 6 Touche Retour Non visible sur les images ci dessus Sous la souris Sense...

Страница 19: ...iver n est installer 3 3 Connexion de la souris au r cepteur USB Pour pouvoir utiliser votre souris vous devrez la connecter au r cepteur USB A Appuyez sur la touche Connect du r cepteur USB Le voyant...

Страница 20: ...main gauche ou droite R glage de la vitesse du double click Activation ou d sactivation du Click lock R glage de la vitesse du curseur Modification des param tres de visualisation Modification du fon...

Страница 21: ...e e i quesiti pi frequenti accompagnati dalle relative risposte In caso di domande e dubbi di altra natura riguardanti il prodotto e che non appariranno nel nostro sito web potete contattarci via e ma...

Страница 22: ...ore USB 2 Tasto destro 8 Pulsante di Connessione 3 Rotella di scorrimento 4 Tasto scorr autom 5 Tasto Avanti 6 Tasto Indietro Non visibile nelle immagini in alto Parte inferiore del mouse Sensore otti...

Страница 23: ...o e installato automaticamente Non necessario nessun driver per l installazione 3 3 Come collegare il mouse con il Ricevitore USB Per poter usare il mouse sar necessario collegarlo al Ricevitore USB A...

Страница 24: ...e diversi parametri come ad esempio Modificare la configurazione per mancini o destri Regolare la velocit del doppio clic Attivare o disattivare il Blocco clic Regolare la velocit del puntatore Modifi...

Страница 25: ...car em Support Suporte A vai encontrar a Base de Dados das Perguntas Mais Frequentes Quando tiver outras quest es sobre o seu produto e n o encontrar resposta para elas na nossa p gina ent o contacte...

Страница 26: ...terior 2 Bot o direito 7 Ficha USB 3 Roda de deslocamento 8 Bot o de ligar 4 Bot o de deslocamento autom tico 5 Pr ximo bot o N o vis vel nas figuras anteriores Parte inferior do rato Sensor ptico Com...

Страница 27: ...hecido e instalado N o necess ria a instala o de qualquer controlador 3 3 Ligar o rato ao receptor USB Para poder usar o rato tem de o ligar ao receptor de USB A Carregue no bot o Connect Ligar do rec...

Страница 28: ...configura es tais como Mudar a configura o para utilizadores canhotos ou destros Ajustar a velocidade do duplo clique Activar ou desactivar o bloqueio do bot o Ajustar a velocidade de ponteiro Mudar a...

Страница 29: ...son a Support hivatkoz sra Itt megtal lhat a gyakran feltett k rd sek adatb zisa Ha m s k rd se lenne a term kkel kapcsolatban s a v laszt nem tal lja meg a webhely nk n akkor keressen meg minket e ma...

Страница 30: ...mLe r s 1 Bal gomb 7 USB csatlakoz 2 Jobb gomb 8 Csatlakoz s gomb 3 G rd t ker k 4 Automatikus g rget s gomb 5 El re gomb 6 Vissza gomb Nem l that a fenti k peken Eg r alja Optikai rz kel Elemtart Csa...

Страница 31: ...i az USB s vev t Nincs sz ks g illeszt program telep t s re 3 3 Az eg r csatlakoztat sa az USB s vev h z Az egeret csak az USB s vev h z val kapcsol d s l trej tte ut n lehet haszn lni A Nyomja meg a...

Страница 32: ...s haszn lat k z tti v laszt s Dupla kattint s sebess g nek m dos t sa ClickLock bekapcsol sa s kikapcsol sa A mutat mozg si sebess g nek m dos t sa A l that s gi lehet s gek m dos t sa A g rd t ker k...

Страница 33: ...pport b l m ne t klay n tavsiye ederiz Burada S k a Sorulan Sorular Veritaban n bulacaks n z r n n zle ilgili ba ka sorular n z varsa ve bunlar n yan tlar n web sitemizde bulam yorsan z bize e posta i...

Страница 34: ...Sol buton 7 USB konnekt r 2 Sa buton 8 Ba lant d mesi 3 Kayd rma tekerle i 4 Otomatik kayd rma d mesi 5 leri butonu 6 Geri butonu Yukar daki resimlerde g r nmeyenler Farenin alt Optik Sens r Pil yuva...

Страница 35: ...olarak alg lanacak ve kurulacakt r S r c kurulumu gerektirmez 3 3 Farenin USB al c ya ba lanmas Fareyi kullanmak i in fareyi USB al c ya ba laman z gerekir A USB al c da bulunan Ba lant d mesine bas...

Страница 36: ...rn Sol ya da sa elle kullan m i in yap land rma ayarlar n de i tirin ift t klama h z n ayarlay n T klama Kilidi ni a n ya da kapat n aret i h z n ayarlay n G r n rl k se eneklerini de i tirin Kayd rm...

Страница 37: ...ensor type Optical Resolution 800 Dpi Sensor tacking speed 35 cm second Sensor report rate 3000 times second USB receiver power 5V DC through USB port Battery type 2x AAA Battery consumption Operating...

Отзывы: