Comunello Automation RAMPART 1000 Скачать руководство пользователя страница 22

22

COMUNELLO

  ®Copyright 2021 - All rights reserved

5.1  SETTINGS AND CONNECTION OF ACCESSORIES

5.1.1  CONTROL AND ADJUSTMENT PANEL REFERENCES
F1: 230V

~

 mains power supply fuse (F3.15A250V).

F2: 24V  operator power supply fuse (F15A250V).
FORCE (TR1):  FORCE control (clockwise for maximum force).
AUTO (TR2): 

Auto closing time (time increase in clockwise direction).

P1: 

Remotes acquisition button.

P2: 

Maximum travel learning button.

S1: 

Auto (open-close) or step-by-step mode (open-stop-close) key selector switch.

S2: 

CONDOMINIUM FUNCTION selector.

POWER LED:  2W LED courtesy light.
LED1: 

Power indicator LED (feedback).

LED2: 

Maximum travel programming indicator LED (feedback).

LED3: 

Remotes save/delete indicator LED (feedback).

5.1.2 ACCESSORIES CONNECTION TERMINALS (CN1)
1:   GND (common).
2:   Open/Close Pushbutton input (NO).
3:  Stop Pushbutton input (NC). 
4:  Photocells Safety Input (NC).
5: 24V  + Power Supply for Photocells Safety (max 300mA).
6: 24V  – Power Supply for Photocells Safety.
7: 24V  + Power Supply for Flashing Light (max 5W).
8: 24V  – Power Supply for Flashing Light.
9:  Antenna Input (signal pole).
10:  GND (common).
11:  8K2 Safety Input.

5.1.3 MAXIMUM TRAVEL LEARNING (OPENING LIMIT SWITCH)

To set the Opening Limit Switch the operator must be coupled to the door via the track and the sliding runner must be attached to the 
drive chain or belt. In addition, at least one pushbutton control must be connected to the system (or a saved remote must be available) 
and activated secutiry devices (photocells and STOP enter) and N.C. (normally closed) 

To acquire the Opening Limit Switch position: 

power the operator, bring the door to a "nearly closed" position (approximately 500 mm from the closing stop)

 by means of the 

pushbutton or button on the remote. Press and hold down button P2 on the control panel until LED2 comes on; release button P2 (LED2 
starts blinking). The door will perform a closing movement until reaching the end stop. Once the door is closed (Zero position acquisition) 
it will start the opening movement at low speed. During the opening phase it is possible to decide the starting point of deceleration during 
opening. To achieve this, press the button of a previously saved radio control, then you can decide the FEA point by pressing the radio 
control button again. Subsequently, the sectional door starts the reclosing phase at an average speed and it is possible to decide the 
deceleration start point in closing by pressing the button of a radio control, then the closing ends automatically by pressing the mechanical 
stop. Alternatively, the entire process can be left to run automatically with the sectional door reaching the limit switches on the mechanical 
stops (if fitted in the guide track) and still acquire the Opening Limit Switch position (FIG. 17). In this case, a slowdown will be inserted 
in the last 20 cm both in opening and closing. LED2 will stop blinking and then switch off, thereby confirming that the maximum travel 
position has been saved. 

The Opening Limit Switch acquisition procedure can be repeated, if necessary, only with the operator powered in the stop 
position.

NOTE:

 At the end of each closing manoeuvre, the motor releases the tension on the belt to preserve the mechanics.

5.1.4 SAVING / DELETING A REMOTE

To save a remote (Comunello radio transmitter) simply press button P1 on the control panel. Management logic is as follows:
Channel 1:  Press button P1 once, LED3 blinks once. Press the remote button to which you wish to assign the OPEN-CLOSE 

function.

Channel 2:  Press button P1 twice, LED3 blinks twice. Press the remote button to which you wish to assign the STOP function.
Reset: 

Press button P1 four times, LED3 will switch on steady. Press and hold down button P1, LED3 blinks rapidly; keep 
button P1 pressed until LED3 stops blinking (confirmation that the saved remotes have been deleted).

5.1.5 AUTOMATIC CLOSING

The operator features a selectable Automatic Closing function. To enable or disable Automatic Closing set the Trimmer TR2 as follows:
AUTO CLOSING TIME SELECTION
0%    

= Auto closing disabled

50%  

= 3"

75%  

= 30"

100%   = 60"
Note= Increase in clockwise direction
Factory setting: Automatic Closing enabled.(30")

5.1.6 AUTOMATIC OR STEP-BY-STEP MODE

There are two movement control modes available: Automatic Mode (each time the Open-Close button or Remote button is pressed 

the operator reverses its direction of run) or Step-by-Step (each time the Open-Close button or Remote button is pressed the operator 

Содержание RAMPART 1000

Страница 1: ...TION ET D INSTALLATION INSTRUCCIONES DE USO Y DE INSTALACION MANUAL DE INSTRU ES DE UTILIZA O Attuatori elettromeccanici per porte sezionali Electromechanical actuators for sectional doors Actionneurs...

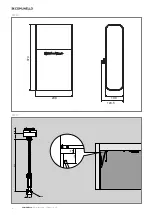
Страница 2: ...2 COMUNELLO Copyright 2021 All rights reserved FIG 1 FIG 2 40 400 0 400 2800 mm 500 mm...

Страница 3: ...3 COMUNELLO Copyright 2021 All rights reserved FIG 3 FIG 5 FIG 6 FIG 4...

Страница 4: ...4 COMUNELLO Copyright 2021 All rights reserved FIG 8 A FIG 7 FIG 9 FIG 11 FIG 10 FIG 10...

Страница 5: ...5 COMUNELLO Copyright 2021 All rights reserved FIG 14 FIG 12 FIG 13 FIG 15...

Страница 6: ...6 COMUNELLO Copyright 2021 All rights reserved FIG 16 FIG 17 FIG 18...

Страница 7: ...OORS CU 24V RT ID Description Cable type Lenght 1m to 20m Lenght 20m to 50m 1 Main power supply HAR EN50575 CPR 305 2011 2x1 5 mm2 2x2 5 mm2 3 Flashing light 2x0 5 mm2 2x1 0 mm2 5A Photocell TX 2x0 5...

Страница 8: ...8 COMUNELLO Copyright 2021 All rights reserved FIG 20 FIG 21 370 208 100 123 5 846 56 20 90 M8 150 50 MIN...

Страница 9: ...DS FOTO FOTO LAM LAM COM LAM ANT GND 8K2 IT EN FR ES PT P P PULSANTE APRI CHIUDO OPEN CLOSE PUSH BUTTON BOUTON OUVERTURE FERMETURE BOT N ABRIR CERRAR BOT O ABRIR FECHAR STOP PULSANTE STOP STOP BUTTON...

Страница 10: ...0 6 2 2005 AC 2005 EN61000 6 3 2007 A1 2011 EN62233 2008 ETSI EN 300 220 1 V3 1 1 ETSI EN 300 220 2 V3 1 1 ETSI EN 301 489 1 V2 1 1 ETSI EN 301 489 3 V2 1 1 Final Draft EN60335 1 2012 AC 2014 A11 2014...

Страница 11: ...tare che le parti dell automatismo possano venir immerse in acqua o in altre sostanze liquide Anche durante l installazione evitare che liquidi possano penetrare all interno della centrale e di altri...

Страница 12: ...parti meccaniche Non utilizzare l automazione se necessario un intervento di riparazione 2 MODELLI E DESCRIZIONE PRODOTTO 2 1 DESCRIZIONE Attuatore elettromeccanico per porte sezionali bilanciate a m...

Страница 13: ...la guida a soffitto come illustrato nelle FIG 13 e 14 Fissare la staffa di fissaggio al portone mediante perno e copiglia in dotazione FIG 15 Legare il cordino di attivazione dello sblocco manuale FIG...

Страница 14: ...o inizier la manovra di apertura a bassa velocit Durante la fase di apertura possibile decidere il punto di inizio rallentamento in apertura Per fare ci si preme il pulsante di un radiocomando precede...

Страница 15: ...amento chiuso se intercettata impedisce l apertura rilevamento ostacolo da chiuso 5 1 11 RILEVAMENTO OSTACOLI Il motore dotato di un sistema di rilevamento ostacoli attivo durante la corsa normale Tra...

Страница 16: ...ne programmata al massimo entro 6 mesi o 10 000 manovre dalla precedente manutenzione Scollegare qualsiasi fonte di alimentazione dal motore Verificare e sotituire tutte le parti di movimento usurate...

Страница 17: ...sei mesi o all impiego di pezzi di ricambio non originali difetti causati da agenti chimici e o fenomeni atmosferici La garanzia non comprende il costo per materiale di consumo in ogni caso COMUNELLO...

Страница 18: ...53 EU RED 2011 65 EU RoHS Directive and that all the rules and or technical specifications shown below have been applied EN61000 6 2 2005 AC 2005 EN61000 6 3 2007 A1 2011 EN62233 2008 ETSI EN 300 220...

Страница 19: ...declines all liability for damage caused by unauthorized modifications The parts of the automation system must never be immersed in water or other liquids During the installation procedures ensure tha...

Страница 20: ...sted to periodically examine the installation in order to verify the presence of possible damages to the cables springs and mechanical parts Automation should not be used if it is necessary a repair i...

Страница 21: ...er FIG 12 Fix the track to the ceiling as shown in FIG 13 and 14 Secure the drive lever to the door using the supplied pin and cotter FIG 15 Tie on the manual release cord FIG 16 4 3 2 LIMIT STOP ADJU...

Страница 22: ...ss the button of a previously saved radio control then you can decide the FEA point by pressing the radio control button again Subsequently the sectional door starts the reclosing phase at an average...

Страница 23: ...rmal travel movements By means of a digital encoder when the normal travel of the door is obstructed the operator is stopped once the impact force prescribed by the applicable standards is exceeded th...

Страница 24: ...00 operating cycles since the last service Disconnect the operator from all power supplies Check all the moving parts and replace any worn parts Check all parts of the automation system for signs of d...

Страница 25: ...every six months or utilisation of non original spare parts defects caused by chemical agents and or atmospheric conditions The warranty does not cover the cost of consumables in any case COMUNELLO ac...

Страница 26: ...ectives suivantes 2014 53 EU RED 2011 65 EU Directive RoHS Et qui ont t soumis toutes les norms et ou sp cifications techniques ci apr s indiqu es EN61000 6 2 2005 AC 2005 EN61000 6 3 2007 A1 2011 EN6...

Страница 27: ...ilit en cas de dommages entra n s par une modification du produit viter toute immersion de composants de l automatisme dans l eau ou dans d autres liquides Durant l installation viter galement toute p...

Страница 28: ...ants jouer avec eux Examiner p riodiquement l installation pour d tecter la presence de d g ts ventuels aux c bles ressorts et parties m caniques Ne pas utilizer l automatisme lorseque on necesite une...

Страница 29: ...lafond comme repr sent aux FIG 13 et 14 Fixer le levier d entra nement au portail au moyen du goujon et de la goupille fournis FIG 15 Attacher la cordelette d activation du d brayage manuel FIG 16 4 3...

Страница 30: ...E Un bouton de commande au moins doit en outre tre connect ou une radiocommande m moris e et les dispositifs de s curit cellule photo lectrique et entr e STOP Pour acqu rir le FEO alimenter le moteur...

Страница 31: ...de bords de s curit r sistifs 8k2 qui une fois activ s inversent le mouvement la fois en ouverture et en fermeture il reste en veille jusqu une commande donn e ATTENTION lors de la programmation l un...

Страница 32: ...e commande ou metteurs radio effectuer des essais d ouverture de fermeture et d arr t du portail et v rifier que le comportement de ce dernier est r gulier V rifier le fonctionnement de tous les dispo...

Страница 33: ...les six mois ou l utilisation de pi ces de rechange non originales d fauts caus s par des agents chimiques et ou des ph nom nes atmosph riques La garantie n inclut pas le co t des consommables dans t...

Страница 34: ...legales que transponen las seguientes directivas 2014 53 EU RED 2011 65 EU Directiva RoHS Y que han sido aplicadas todas las normas y o especificaciones t cnicas en lo sucesivo indicadas EN61000 6 2 2...

Страница 35: ...por productos modificados Evite que las piezas del automatismo puedan quedar sumergidas en agua o en otros l quidos Evite que los l quidos puedan penetrar en el interior del cuadro de control y de otr...

Страница 36: ...mente la instalacci n para verificar la presencia de eventuales aver as a los cables muelles y partes mec nicas No se utilize la automaci n cuando se necesite una reparaci n de la misma 2 MODELOS Y DE...

Страница 37: ...erno y el pasador suministrados FIG 15 Ate el tirador de activaci n del dispositivo de desbloqueo manual FIG 16 4 3 2 REGULACI N DE LOS FINALES DE CARRERA Desenrosque y coloque el final de carrera en...

Страница 38: ...ional comenzar un movimiento de cierre hasta el tope Tras haberse cerrado adquisici n de la posici n de Cero comenzar un movimiento de apertura a velocidad lenta Durante la fase de apertura es posible...

Страница 39: ...lula impide la apertura detecci n de obst culos cuando est cerrada 5 1 11 DETECCI N DE OBST CULOS El motor incorpora un sistema de detecci n de obst culos que se activa durante la carrera normal Utili...

Страница 40: ...mantenimiento anterior Desconecte todas las fuentes de alimentaci n del motor Compruebe y sustituya todas las piezas m viles desgastadas Compruebe el desgaste de todas las piezas del automatismo 8 PI...

Страница 41: ...eis meses o al uso de piezas de repuesto no originales defectos causados por agentes qu micos y o fen menos atmosf ricos La garant a no incluye el costo por material de consumo en todos los casos COMU...

Страница 42: ...005 AC 2005 EN61000 6 3 2007 A1 2011 EN62233 2008 ETSI EN 300 220 1 V3 1 1 ETSI EN 300 220 2 V3 1 1 ETSI EN 301 489 1 V2 1 1 ETSI EN 301 489 3 V2 1 1 Texto final EN60335 1 2012 AC 2014 A11 2014 e alte...

Страница 43: ...as do sistema de automatiza o sejam mergulhadas em gua ou outras subst ncias l quidas Mesmo durante a instala o evite a entrada de l quidos na unidade de controlo ou em outros dispositivos abertos Se...

Страница 44: ...o utilize o sistema de automatiza o se for necess ria uma opera o de reparo 2 MODELOS E DESCRI O DO PRODUTO 2 1 DESCRI O Acionador eletromec nico para portas seccionadas balanceadas por molas Motorre...

Страница 45: ...Prenda o suporte de fixa o no port o usando o pino e a cavilha fornecidos FIG 15 Amarre a corda de ativa o do desbloqueio manual FIG 16 4 3 2 REGULA O DO FIM DE CURSO Desparafuse e posicione o fim de...

Страница 46: ...at o ponto final de fechamento Uma vez fechado aquisi o da posi o de Zero ter in cio a manobra de abertura a baixa velocidade Durante a fase de abertura poss vel decidir o ponto de in cio do abrandame...

Страница 47: ...TEC O DE OBST CULO O motor disp e de um sistema de detec o de obst culos ativo durante o curso normal Com o uso de um encoder digital quando um obst culo interrompe o curso normal do seccionado o moto...

Страница 48: ...conecte todas as fontes de alimenta o do motor Verifique e substitua todas as pe as de movimenta o gastas Verifique o estado de deteriora o de todas as pe as do sistema de automatiza o 8 PE AS DE REPO...

Страница 49: ...manuten o do sistema pelo menos a cada seis meses ou pelo emprego de sobressalentes n o originais defeitos causados por agentes qu micos e ou fen menos atmosf ricos A garantia n o cobre o custo dos ma...

Страница 50: ...NOTES...

Страница 51: ...51 COMUNELLO Copyright 2021 All rights reserved NOTES...

Страница 52: ...FRATELLI COMUNELLO S P A AUTOMATION GATE DIVISION Via Cassola 64 C P 79 36027 Ros Vicenza Italy Tel 39 0424 585111 Fax 39 0424 533417 info comunello it www comunello com...

Отзывы: